Pandora's Box Part I: '64 Frame Repair
 03-08-2008, 03:43 PM
#1
Drifting

Thread Starter
Hey Gang!
It's time to walk very carefully around The Box and ponder what lies within, before cracking loose the seal and peering beneath it's lid...

So, in the aftermath of the discussion about gigantic road-trips with rusty frames, I've completed the journey through denial, anger, bargaining, and depression - and made my way to acceptance...
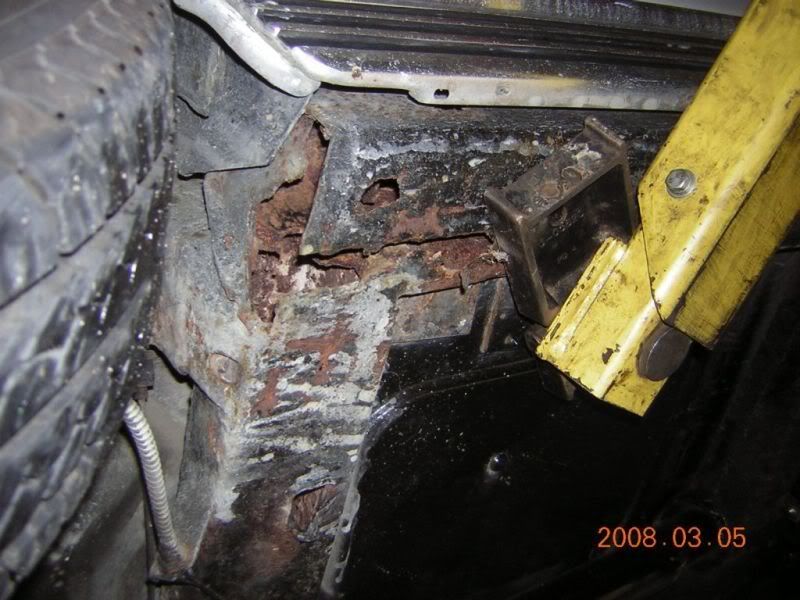
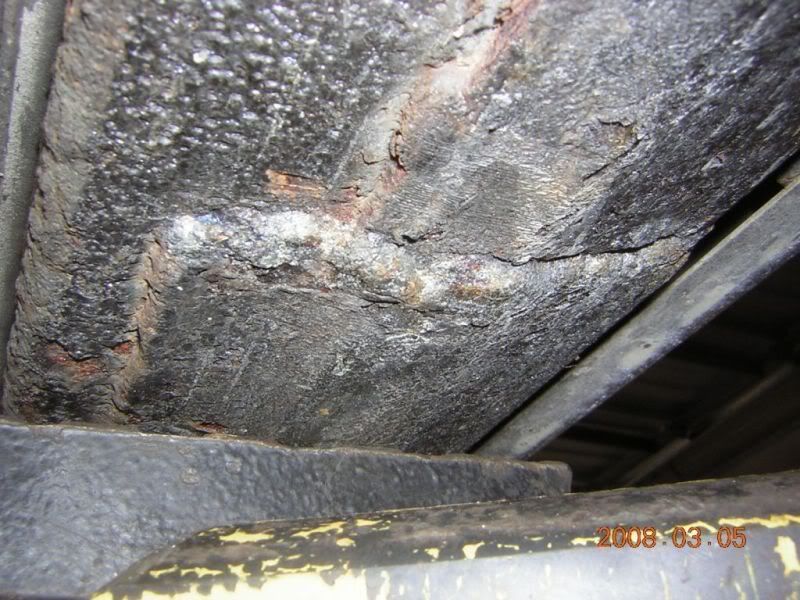
I've had a closer look at my 'problem spots' on the 64's frame. I noticed a couple of interesting things. The problems are essentially contained on the frame rails near the 3rd X-member, which seems intact enough to save. The right side is much worse than the left, and the left side has been patched previously. Kinda puts the final nail in the coffin of any originality awards, eh?
RR Frame Rail:
LR Frame Rail:
The rest of the frame has a tolerable amount of surface rust on it, but otherwise appears intact. So, I could do a repair along the lines of what Lars described on his '64. Or, I could replace the frame. I'm still dealing with a potentially #'s matching frame and so I'm inclined to repair what I've got (and hopefully unearth the #s in the process, assuming I don't have to cut out that part of the frame). So, let's rule out a frame replacement for now, because that would make me contemplate doing a Resto-Mod on a #'s matching car, and that's too deep into The Box for this point in time...
The Primary Mission Objective is to make the car safe to 'drive hard and put away wet', without destroying any future opportunity to do a full-on restoration. The Secondary Objective is to repair the frame 'correctly' enough that any future work would not include un-doing any fixes. The Bonus Objective would be to do a complete chassis restoration and never have to think about it again.
The obvious choice for many would be to do a full body-off chassis resto, but I'm trying to avoid that for the time being for a number of reasons, not least of which is that I want to drive the car this spring/summer. It may come to that, but first I'm exploring the option of repairing it without removing the body.
My good friend, who'se shop I used to put the car in the air, reccomended a local guy who specializes in restorations and customs. I've talked to him and sent off photos of the frame, and some links for reference. I'll be taking the car in next Saturday or so to get him to take a look and make an assesment. His initial suggestion on the phone was that we could cut out and weld in new rails with the body on, which is what I'd like if it's not cost prohibitive. Otherwise, I may risk heresy and suggest welding in patches to make it safe, and worry about a complete repair at a later date...
I've looked at the Paragon, VP of Michigan, and Corvette Central frame repair kits and their prices seem to be pretty close, but I don't know about the quality differences, or differences in the completeness of the kits. Or, other suppliers - or if they are ultimately all coming from one factory.
I've also been thinking about how to ensure that the repair goes well without damaging the body - how far can you separate the body from the frame by un-doing the body mounts without damaging anything? And, how do you keep the frame from moving during the repair - or has it already moved? Is there a set of measurement points that we can use to get it all back together straight, or is there enough latitude in the rear suspension allignment to accommodate some shift?
And of course, what to look for in terms of 'correctness': serial numbers, markings, types of finishes etc. I still haven't decided which way to go yet (Not Correct, or National Corvette), and don't want to make any unnecessary moves, or ones that may need to be undone later.
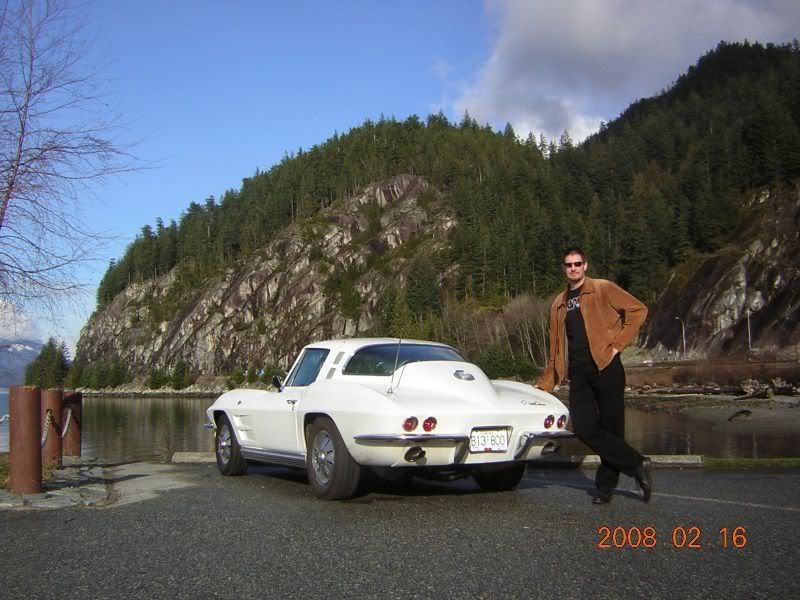
Thanks for listening, I always appreciate the support, advice, and information that comes from this Forum. I'll keep you posted on the progress as I negotiate The Box. And now, a parting shot of The Beast, for good measure and inspiration!

It's time to walk very carefully around The Box and ponder what lies within, before cracking loose the seal and peering beneath it's lid...
So, in the aftermath of the discussion about gigantic road-trips with rusty frames, I've completed the journey through denial, anger, bargaining, and depression - and made my way to acceptance...
I've had a closer look at my 'problem spots' on the 64's frame. I noticed a couple of interesting things. The problems are essentially contained on the frame rails near the 3rd X-member, which seems intact enough to save. The right side is much worse than the left, and the left side has been patched previously. Kinda puts the final nail in the coffin of any originality awards, eh?
RR Frame Rail:
LR Frame Rail:
The rest of the frame has a tolerable amount of surface rust on it, but otherwise appears intact. So, I could do a repair along the lines of what Lars described on his '64. Or, I could replace the frame. I'm still dealing with a potentially #'s matching frame and so I'm inclined to repair what I've got (and hopefully unearth the #s in the process, assuming I don't have to cut out that part of the frame). So, let's rule out a frame replacement for now, because that would make me contemplate doing a Resto-Mod on a #'s matching car, and that's too deep into The Box for this point in time...
The Primary Mission Objective is to make the car safe to 'drive hard and put away wet', without destroying any future opportunity to do a full-on restoration. The Secondary Objective is to repair the frame 'correctly' enough that any future work would not include un-doing any fixes. The Bonus Objective would be to do a complete chassis restoration and never have to think about it again.
The obvious choice for many would be to do a full body-off chassis resto, but I'm trying to avoid that for the time being for a number of reasons, not least of which is that I want to drive the car this spring/summer. It may come to that, but first I'm exploring the option of repairing it without removing the body.
My good friend, who'se shop I used to put the car in the air, reccomended a local guy who specializes in restorations and customs. I've talked to him and sent off photos of the frame, and some links for reference. I'll be taking the car in next Saturday or so to get him to take a look and make an assesment. His initial suggestion on the phone was that we could cut out and weld in new rails with the body on, which is what I'd like if it's not cost prohibitive. Otherwise, I may risk heresy and suggest welding in patches to make it safe, and worry about a complete repair at a later date...
I've looked at the Paragon, VP of Michigan, and Corvette Central frame repair kits and their prices seem to be pretty close, but I don't know about the quality differences, or differences in the completeness of the kits. Or, other suppliers - or if they are ultimately all coming from one factory.
I've also been thinking about how to ensure that the repair goes well without damaging the body - how far can you separate the body from the frame by un-doing the body mounts without damaging anything? And, how do you keep the frame from moving during the repair - or has it already moved? Is there a set of measurement points that we can use to get it all back together straight, or is there enough latitude in the rear suspension allignment to accommodate some shift?
And of course, what to look for in terms of 'correctness': serial numbers, markings, types of finishes etc. I still haven't decided which way to go yet (Not Correct, or National Corvette), and don't want to make any unnecessary moves, or ones that may need to be undone later.
Thanks for listening, I always appreciate the support, advice, and information that comes from this Forum. I'll keep you posted on the progress as I negotiate The Box. And now, a parting shot of The Beast, for good measure and inspiration!
Last edited by darguy; 03-08-2008 at 03:47 PM.
 03-08-2008, 04:46 PM
#2


It appears you have a job ahead of you. I'd wait 'til the assessment's been done before making any decisions.
What the photos show is all too typical of Midyear (any other years) rust problems. Maybe it can be repaired properly with the body on, maybe not, depending on the extent of the rust.IMO, I would/have do/ done it with the body off. That way you'll be able to look at the whole frame in case there's other areas that may need rust or other damage repair. The new frame sections you mentioned are, IMO, fairly reasonably priced, it's the labor/time that is not. Are you able to do some/alot of the work yourself?
Prior to starting any cutting it's recommended that you weld steel braces to the frame in order to maintain the original configuration & remove them when finished.
I believe the replacement sections are available from one source & that's " Vette Products" in Michigan. BTW, they also make complete replacement frames.
A side advantage & suggestion to doing a body off repair such as this is to replace the brake lines & the long fuel line while you have it apart.
A quick note: Several years ago I was in the process of removing a '64 Convertible frame & as I pulled it out it,it broke into 2 pieces, so what you have, unfortunately, is all too common.
Good Luck! Bob L.
03-08-2008, 05:12 PM
#4
Le Mans Master


member "subfixer" sectioned in a number of pieces into his 64 frame. His car is now purrrfect. He may have contemplated the razor blades along the way though (but knowing him, I kinda doubt it).
can't imagine doing it with the body on.
can't imagine doing it with the body on.
03-08-2008, 05:21 PM
#5
Race Director


Member Since: Apr 1999
Location: Beverly Hills/Pine Ridge Florida
Posts: 10,735
Received 565 Likes
on
350 Posts

MANY years ago, I was involved in a similar situation, also with a 64.
The car was, and still is owned by the original owner. It's a Daytona Blue/blue 365 roadster.
Long story short, he left it outside for years at his parents' house. Frame was shot.
Brought it to a friends garage. We disconnected everything. We had about 8 guys and a PILE of 8x8 wood railroad ties.
We placed railroad ties parallel to the frame, on the outside of the frame. We then lifted the body up, and placed 8x8's across the other ties, and laid the body on them.
We then lifted more, and put more ties, etc. When we were done, the entire body was high in the air, and we rolled the frame, engine, trans and all out from under the body.
The intact body sat on the tie system till the frame was repaired, and then, WEEKS later, we dropped it back on.
This minimized total disassembly.
Food for thought.
Chuck
The car was, and still is owned by the original owner.
It's a Daytona Blue/blue 365 roadster. Long story short, he left it outside for years at his parents' house. Frame was shot.
Brought it to a friends garage. We disconnected everything. We had about 8 guys and a PILE of 8x8 wood railroad ties.
We placed railroad ties parallel to the frame, on the outside of the frame. We then lifted the body up, and placed 8x8's across the other ties, and laid the body on them.
We then lifted more, and put more ties, etc. When we were done, the entire body was high in the air, and we rolled the frame, engine, trans and all out from under the body.
The intact body sat on the tie system till the frame was repaired, and then, WEEKS later, we dropped it back on.
This minimized total disassembly.
Food for thought.
Chuck
 03-08-2008, 07:13 PM
#6
Team Owner


Chuck,
It is so sad to see this kind of repair necessary but that is good advice. I remember when the owner bought the car and was zipping around the mountains near Vancouver in absolute delight. And that is beautiful country, particularly Whistler. At one point in snow if I recall correctly. It must be such a disappointment to see that frame rot!
It is so sad to see this kind of repair necessary but that is good advice. I remember when the owner bought the car and was zipping around the mountains near Vancouver in absolute delight. And that is beautiful country, particularly Whistler. At one point in snow if I recall correctly. It must be such a disappointment to see that frame rot!
Last edited by Paul L; 03-08-2008 at 07:17 PM.
03-08-2008, 07:27 PM
#7
I would pull the body. Just be done with it. Limit the project creep (The "While I Am At It") and repair the frame. I would leave the engine-drive train/suspension intact. Cover with plastic and tape and seal it off. Then spot blast / clean the portions to be repaired. I good metal guy and a wire feed can do wonders.
Otherwise, some Frankenstein type braces could be welded, if there was a good place to weld to, for the time being.
Otherwise, some Frankenstein type braces could be welded, if there was a good place to weld to, for the time being.
03-08-2008, 09:02 PM
#8
Supporting Lifetime Member
I have (had) the exact same rust areas on my '64 coupe frame and was able to repair myself without much difficulty at all. As someone mentioned, Vette Products of Michigan sells a frame splice section for just this area. It comes about 2 feet long I think. I cut it to length to just replace the damaged areas, and I also saved the stamped VIN number on top of the frame. After a little welding, grinding, welding... process, you can't hardly tell it had ever been replaced. You do need a good welder capable of making deep penetrating welds at the connection between the side rail and the crossmember/kickup area as this is a critical strength area. I also don't know how it could ever be done without taking the body off of the frame since you have to weld from all sides. But with the frame off, you'll be able to tell if there are other rusted/damaged areas very easily. Then you can decide whether its cheaper to replace it outright. My goal was to keep the original frame if possible, and luckily for me it worked out that I could.
Good luck.
BTW, forgot to mention, you must weld cross bracing and take good accurate measurements before making any cuts to make sure that it goes back together in exactly the same place. Here is my Photobucket site with all sorts of pics, but there are some I took of the frame repair process.
http://s195.photobucket.com/albums/z...upe/?start=all
Last edited by jon68l79; 03-08-2008 at 09:11 PM.
03-08-2008, 09:38 PM
#9
Drifting

I think you should assume that the body mounts look somewhat like the frame. The holes in which the rubber isolators mount have a tendency to enlarge due to rust. I have similar problems and have elected to do a frame replacement on a restorod. Good luck.
03-08-2008, 09:42 PM
#10
Le Mans Master
I would pull the body. Just be done with it. Limit the project creep (The "While I Am At It") and repair the frame. I would leave the engine-drive train/suspension intact. Cover with plastic and tape and seal it off. Then spot blast / clean the portions to be repaired. I good metal guy and a wire feed can do wonders.
Otherwise, some Frankenstein type braces could be welded, if there was a good place to weld to, for the time being.
Otherwise, some Frankenstein type braces could be welded, if there was a good place to weld to, for the time being.

I'm with you Mark. Spending more money now to do it right will very likely save a lot more money down the road.
Darguy, it's still early enough in the year that you can have your frame fixed properly and be back on the road before summer starts. I'd spring for the extra $$$ now and feel confident in my baby. My 2 cents.
- Pat
 03-09-2008, 12:12 AM
#11
Race Director

The first photo looks pretty bad to me. My frame looked a whole bunch better than that until I had it dipped. I found all sorts of small holes in those areas after that. I just went ahead and put a new rear half on my frame. If they had been available then, I might have bought a new frame. Having a frame with the SN# stamped on it is nice but don't be too sure it's even recongnizable under there. After dipping my frame there wasn't any trace of a serial number that I could find. Even if you do find one, as mentioned above you can cut it out and stitch it into a repair section. Typically it's the lower metal that rots away and the upper metal remains solid. A skin patch on the bottom may be a good way of procrastinating a frame off resto until later in those cases. From the looks of the frame rail and what appears to be a big chunk of rust hanging in one of the crossmember openings, I would be starting to worry if there is enough solid frame rail to support the crossmember and deal with the torsional forces the rear kickup frame sections put on it. You do have a coupe which has a much stiffer body than a convertible, but at some point if the frame starts working you are going to have body and safety problems. Have the guy take a look at it but I think I would limit driving and keep a close eye on it until I was ready to pull it apart and make full repairs.
Dan
Last edited by DansYellow66; 03-09-2008 at 12:16 AM.
03-09-2008, 09:02 AM
#12
Le Mans Master
Here are some shots of when we fixed the frame under my coupe. You can't do it with the body on the frame and do it right. You need to be able to weld the top of the frame and the body is in the way. Those yellow stands you see are attached to the floor of the garage with threaded rods into a sockets that are permanently grouted in place. The frame is supported in 10 locations and when we cut that section out of the frame it did not shift position. I purchased the repair sections from ZIP and I believe that all vendors are using the same supplier.Rich
Last edited by BADBIRDCAGE; 03-09-2008 at 09:05 AM.
03-09-2008, 10:08 AM
#13
POSSE ZR-1 Driver
Like the pictures in the first post, both my frame rail ends were almost gone. The kickups were about as thin as paper. (I can't believe I drove it that way for 2 years).
My solution was to replace everything behind the trans crossmember. Vette Products of Michigan (http://www.vetteproducts.net/) supplied the "back-half" frame.
Then it was just a cut and weld operation.
Before:

After:

I do not recommend trying any frame repair with the body on. You just can't get it perfect that way.
03-09-2008, 10:41 AM
#14
Melting Slicks

It's a damn shame that a little design change and some preventitive maintanence would have prevented all this. Larger drain holes in the frame end would have made a big difference.
03-09-2008, 11:04 AM
#15
Le Mans Master
Rich
03-09-2008, 12:36 PM
#16

DO IT RIGHT THE FIRST TIME...I have seen to many guys...go with ..there is never time or money to do it right the first time but there always seems to be time/money to do it right the second time.
God Bless "SOUTHERN CARS"!!!
Cheers
Nic
God Bless "SOUTHERN CARS"!!!
Cheers
Nic
Last edited by Nicola; 03-09-2008 at 12:40 PM. Reason: spelling
03-09-2008, 03:58 PM
#17
Team Owner


Member Since: Oct 2000
Location: Washington Michigan
Posts: 38,899
Received 1,859 Likes
on
1,102 Posts
I was at Vette Products a couple of weeks ago doing an article for CE on how they make reproduction frames, and here's one of their "back 48" assemblies; it was their first product ten years ago, and they still make quite a few of them.
03-09-2008, 04:35 PM
#18
Burning Brakes

Here are some shots of when we fixed the frame under my coupe. You can't do it with the body on the frame and do it right. You need to be able to weld the top of the frame and the body is in the way. Those yellow stands you see are attached to the floor of the garage with threaded rods into a sockets that are permanently grouted in place. The frame is supported in 10 locations and when we cut that section out of the frame it did not shift position. I purchased the repair sections from ZIP and I believe that all vendors are using the same supplier.Rich
Dan
Last edited by Rumblegutz; 03-09-2008 at 05:03 PM.
03-09-2008, 04:47 PM
#19
Melting Slicks
Member Since: Aug 2007
Location: Chicago IL
Posts: 3,494
Likes: 0
Received 0 Likes
on
0 Posts

What about one of those restored rolling frames off of ebay for $15K?
Is that too much money?
Probably if you could do all the work yourself and enjoy the process.
Is that too much money?
Probably if you could do all the work yourself and enjoy the process.
03-09-2008, 07:09 PM
#20
Le Mans Master
No, but a friend of mine did. He made them with the ability to attach to the sockets in the floor via 1/2 inch allthread rod, level through the three outside carriage bolt fixtures and used 1/2 inch althread out the top to attach to the frame.
When we started the repair we leveled the frame from side to side using the two rear body mount attachment points and using a center
point support at the front of the car in the center of the saddle. After that, we used the two mounts for the radiator support and leveled the frame side to side and front to rear.
When tightening up on a mount we set a dial indicator and made sure that we didn't put a stress on the frame when locking the frame down to the mounts.
When we cut that section of frame out we had our knees touching the frame. It didn't even pulse when the cut was made.
My friend made the sockets that we grouted into the garage floor prior to starting the repair. A lot of thought went into that rig.
Rich