1964 Frame Rust Cutting & Rail Welding - Photos
 10-22-2007, 02:30 PM
#1
Tech Contributor

Thread Starter
Member Since: Aug 1999
Location: At my Bar drinking and wrenching in Lafayette Colorado
Posts: 13,680
Received 4,959 Likes
on
1,948 Posts

There have been a few posts here requesting info on the frame rail replacement kit and the installation process - thought I'd post a few photos of the process in a new post so people catch it...
This is the rear frame kit from Paragon. Installation was pretty straight forward with normal metal working tools and some welding ability. Fit was very good, and all parts needed for the job were included. I also ordered and installed the seat belt attach bracket (the triangular pieces).
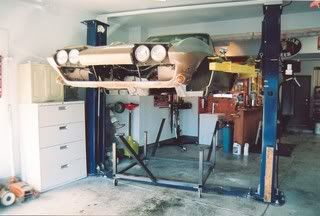
Body has to be off the frame, so here it pops off after about an hour's worth of prep, bolt cutting, and disassembly:
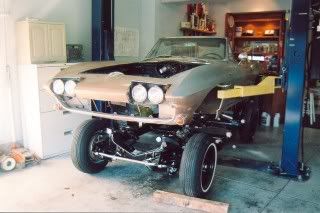
I built a simply dolly for the body - it makes things much easier. Here the body is being lowered onto the dolly for storage and body work:
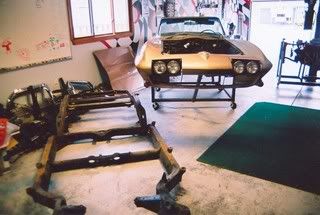
The entire IRS rear end comes out of the frame as a single assembly - just a few bolts and the whole thing comes out. Roll it to the side for later disassembly:

Here is the bare frame after an afternoon of disassembly work - not much to it:
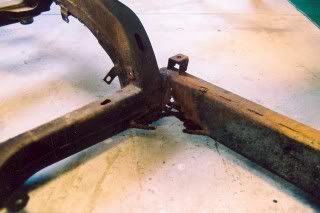
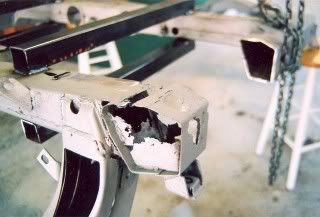
Passenger side rust area - looks pretty nasty:

Driver’s side rust area - you can see daylight through the frame:
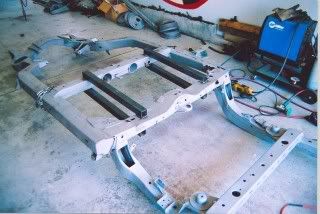
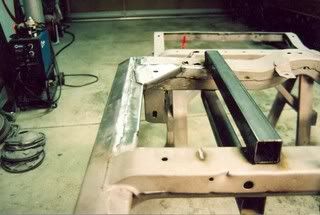
After sandblasting, I welded in 4 stiffening bars to the frame. Bars are 2"x2" mild steel tubing so the frame won't move after cutting:
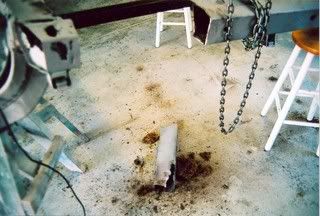
Here is the first frame cut - check out all the rust pieces falling out of the piece that dropped to the floor:
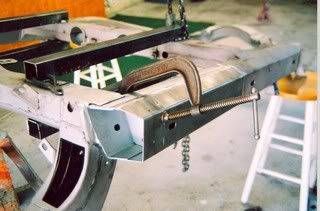
Once the rough cut was made, the final trimming, cutting and prep was done to fit the new repro pieces - here it's ready for triming and fitting:
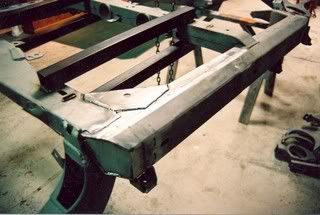
The new pieces clamped and tack welded in position. Fit is very good:
Driver’s side all welded in – the stiffening bars were kept in place until all work was completed, and only one side was cut at a time:
Finished driver’s side:
I used a chainfall to flip and rotate the frame by myself. If you have a helper, 2 people can do the flipping and handling:
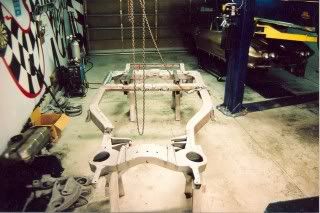
After welding, I shot the frame with DP40LF epoxy primer and used catalyzed Delstar DAR9000 (gloss) for final finish. Complete final assembly to create the rolling chassis took one weekend of beer drinking and wrenching:

I'm too cheap to buy the stencils for the serial numbers, so I made my own stencils and shot all the numbers onto the frame:
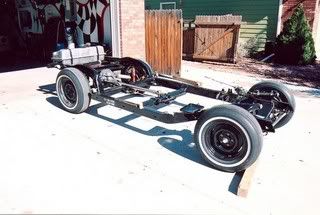
Piece of cake!
This is the rear frame kit from Paragon. Installation was pretty straight forward with normal metal working tools and some welding ability. Fit was very good, and all parts needed for the job were included. I also ordered and installed the seat belt attach bracket (the triangular pieces).
Body has to be off the frame, so here it pops off after about an hour's worth of prep, bolt cutting, and disassembly:
I built a simply dolly for the body - it makes things much easier. Here the body is being lowered onto the dolly for storage and body work:
The entire IRS rear end comes out of the frame as a single assembly - just a few bolts and the whole thing comes out. Roll it to the side for later disassembly:
Here is the bare frame after an afternoon of disassembly work - not much to it:
Passenger side rust area - looks pretty nasty:
Driver’s side rust area - you can see daylight through the frame:
After sandblasting, I welded in 4 stiffening bars to the frame. Bars are 2"x2" mild steel tubing so the frame won't move after cutting:
Here is the first frame cut - check out all the rust pieces falling out of the piece that dropped to the floor:
Once the rough cut was made, the final trimming, cutting and prep was done to fit the new repro pieces - here it's ready for triming and fitting:
The new pieces clamped and tack welded in position. Fit is very good:
Driver’s side all welded in – the stiffening bars were kept in place until all work was completed, and only one side was cut at a time:
Finished driver’s side:
I used a chainfall to flip and rotate the frame by myself. If you have a helper, 2 people can do the flipping and handling:
After welding, I shot the frame with DP40LF epoxy primer and used catalyzed Delstar DAR9000 (gloss) for final finish. Complete final assembly to create the rolling chassis took one weekend of beer drinking and wrenching:
I'm too cheap to buy the stencils for the serial numbers, so I made my own stencils and shot all the numbers onto the frame:
Piece of cake!
Last edited by lars; 10-22-2007 at 03:37 PM.


 10-22-2007, 08:25 PM
#7
Tech Contributor
Looks good Lars, I haven't seen you post you must be busy. There is a vette shop here that does that without removing the body. They jack it hihg enough to work on it. Somewhere in my pile of vette mags from the past 30 years I have an issue showing this process. I think I'd pull the body as you did.

 10-23-2007, 07:17 AM
#9
Drifting

Lars,
You make it look WAY too easy! Please tell us that you run into the same kind of problems we do.......like your welder craps a part right in the middle of the job, the water heater in your house starts leaking the day you finally have time to work on the car
Excellent job as usual, look forward to following your progress on this build. We miss seeing you post on the C2 forum......always good info and fun.
Jeff
10-23-2007, 07:58 AM
#10

There have been a few posts here requesting info on the frame rail replacement kit and the installation process - thought I'd post a few photos of the process in a new post so people catch it...
This is the rear frame kit from Paragon. Installation was pretty straight forward with normal metal working tools and some welding ability. Fit was very good, and all parts needed for the job were included. I also ordered and installed the seat belt attach bracket (the triangular pieces).
Body has to be off the frame, so here it pops off after about an hour's worth of prep, bolt cutting, and disassembly:
I built a simply dolly for the body - it makes things much easier. Here the body is being lowered onto the dolly for storage and body work:
The entire IRS rear end comes out of the frame as a single assembly - just a few bolts and the whole thing comes out. Roll it to the side for later disassembly:
Here is the bare frame after an afternoon of disassembly work - not much to it:
Passenger side rust area - looks pretty nasty:
Driver�s side rust area - you can see daylight through the frame:
After sandblasting, I welded in 4 stiffening bars to the frame. Bars are 2"x2" mild steel tubing so the frame won't move after cutting:
Here is the first frame cut - check out all the rust pieces falling out of the piece that dropped to the floor:
Once the rough cut was made, the final trimming, cutting and prep was done to fit the new repro pieces - here it's ready for triming and fitting:
The new pieces clamped and tack welded in position. Fit is very good:
Driver�s side all welded in � the stiffening bars were kept in place until all work was completed, and only one side was cut at a time:
Finished driver�s side:
I used a chainfall to flip and rotate the frame by myself. If you have a helper, 2 people can do the flipping and handling:
After welding, I shot the frame with DP40LF epoxy primer and used catalyzed Delstar DAR9000 (gloss) for final finish. Complete final assembly to create the rolling chassis took one weekend of beer drinking and wrenching:
I'm too cheap to buy the stencils for the serial numbers, so I made my own stencils and shot all the numbers onto the frame:
Piece of cake!

 10-23-2007, 02:12 PM
#13
Tech Contributor
Thread Starter
Member Since: Aug 1999
Location: At my Bar drinking and wrenching in Lafayette Colorado
Posts: 13,680
Received 4,959 Likes
on
1,948 Posts
I'm assembling parts for a roller-cammed, AFR, 406. I have a 67 BB hood for the car, so I can run a good intake system to make it all work. Should run pretty strong... Car is going black with red interior and red stinger stripe.
Lars
Lars
10-23-2007, 02:25 PM
#14
Drifting

Member Since: Oct 2000
Location: Boerne Texas
Posts: 1,642
Likes: 0
Received 0 Likes
on
0 Posts


