
GRID CAR - next level build
 05-27-2014, 03:43 PM
#1
Burning Brakes

Thread Starter


Hello all,
It is time to run with the next chapter of awesomeness for The Grid Car. This will include the tear down of the engine and suspension entirely.
I bought the car maybe 7 years ago. It had 50k-ish miles on it and behaved accordingly. It started, it drove, It was loud, I was happy.
Now that the concept of the GRID CAR has turned out so well, things like an occasional puff of blue smoke, a slightly grabby caliper, or a mildly wondering alignment seem beneath it now.
So first step... let's get the right equipment.
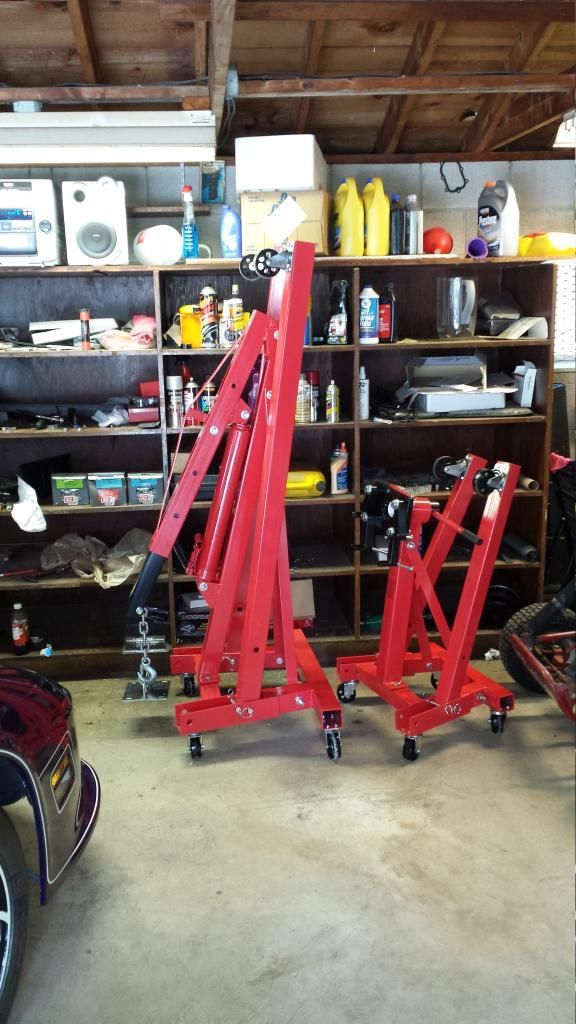
Then up it goes! Off with the wheels straight away.

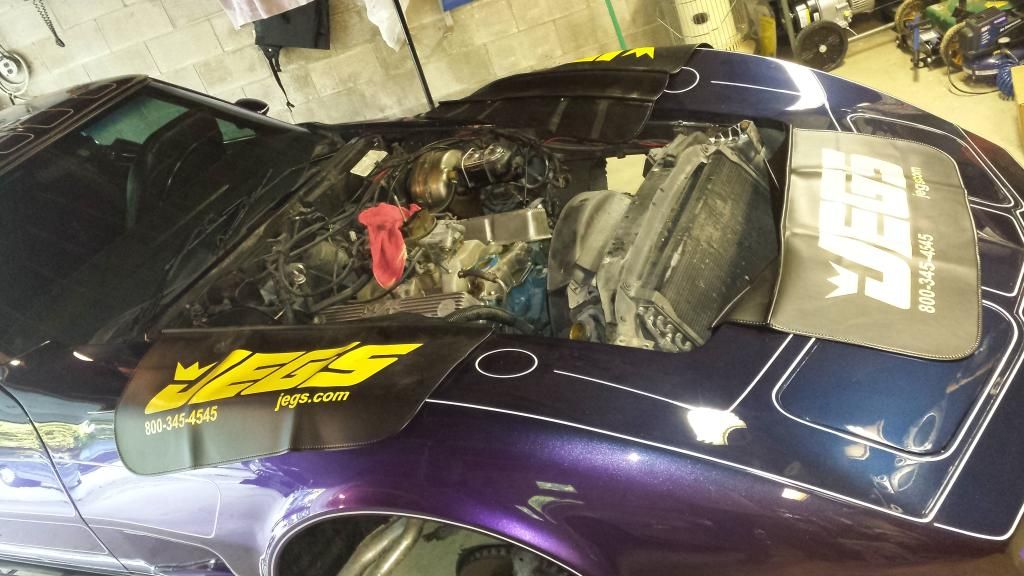
The hood is off and its time to tackle the numerous connections and pull the engine.
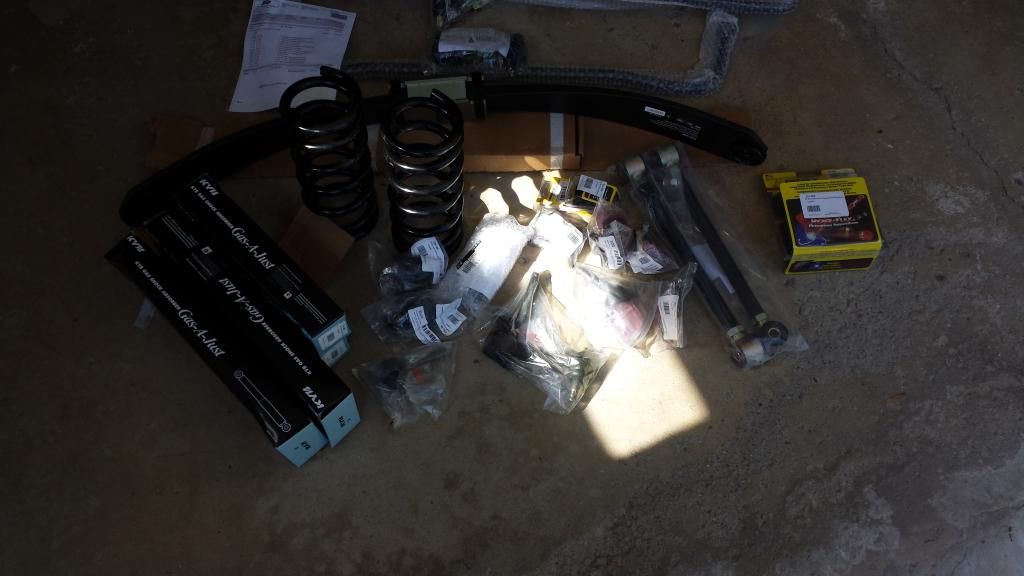
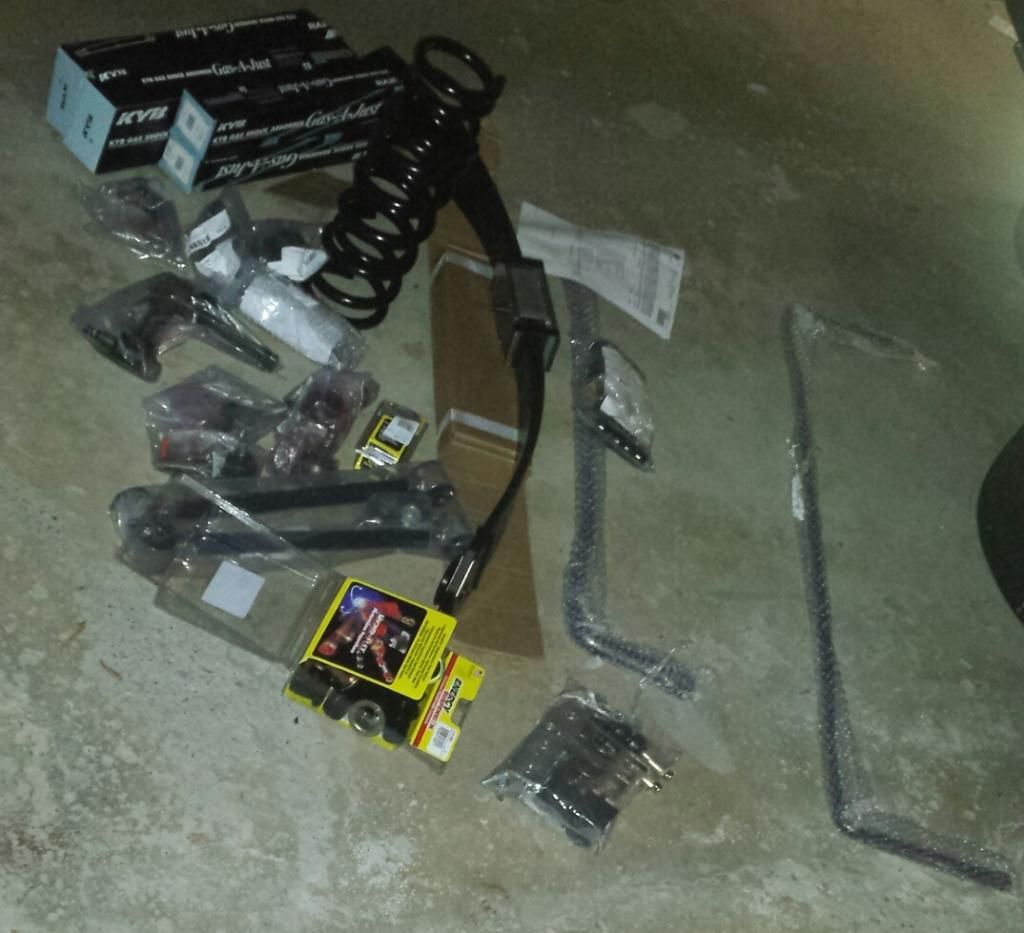
While in the process of pulling the engine, the new suspension kit from Zip-Corvette arrives! It looks like great quality stuff too including ENERGY bushings all around.
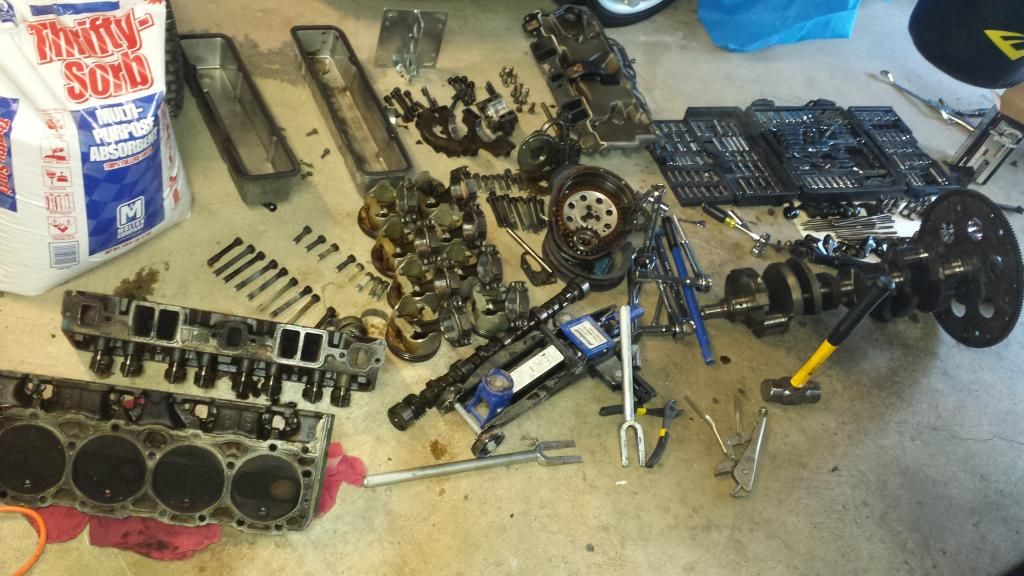
After one more day of unbolting and unhooking stuff, the engine is out and ready to be evaluated. The engine's new family of Edelbrock components sit in the background anxiously awaiting their chance to prove their worth...

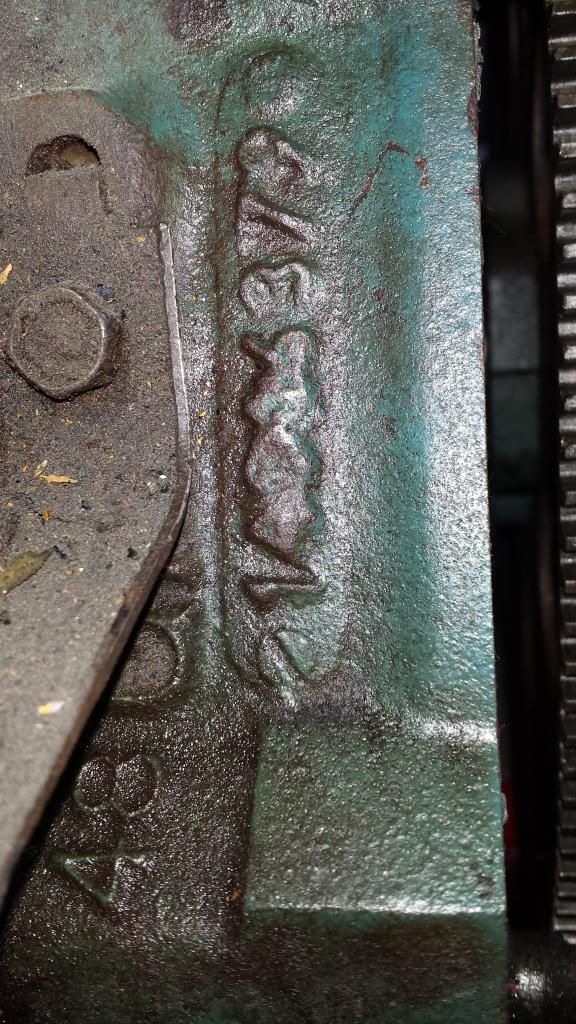
This is a good time to check the casting number and make sure there wasn't an engine replacement in the car's history. The factory blue paint is a good indication we have the original power plant. The numbers check out and we move forward with discovering what exciting adventures await us inside.
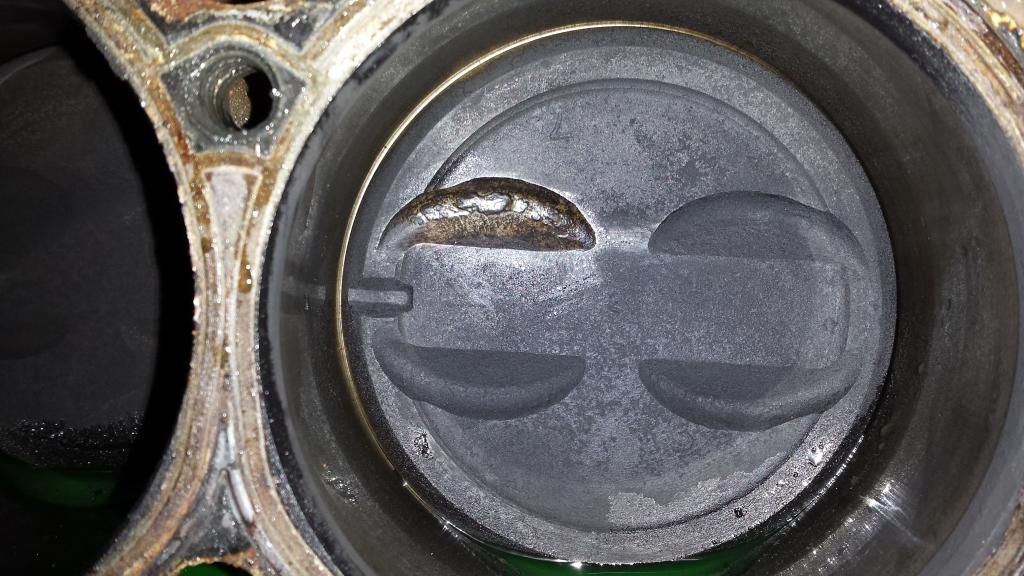
After the heads are off and we get things cleaned up, we can begin to piece together a history of events. We find three different problems on 3 different cylinders, any one of which is a little hard to explain on their own. The first is a damaged piston that looks like its ready to burn threw at any moment. Suddenly, this is is no longer feeling like an "upgrade" event as much as it is a rescue operation.
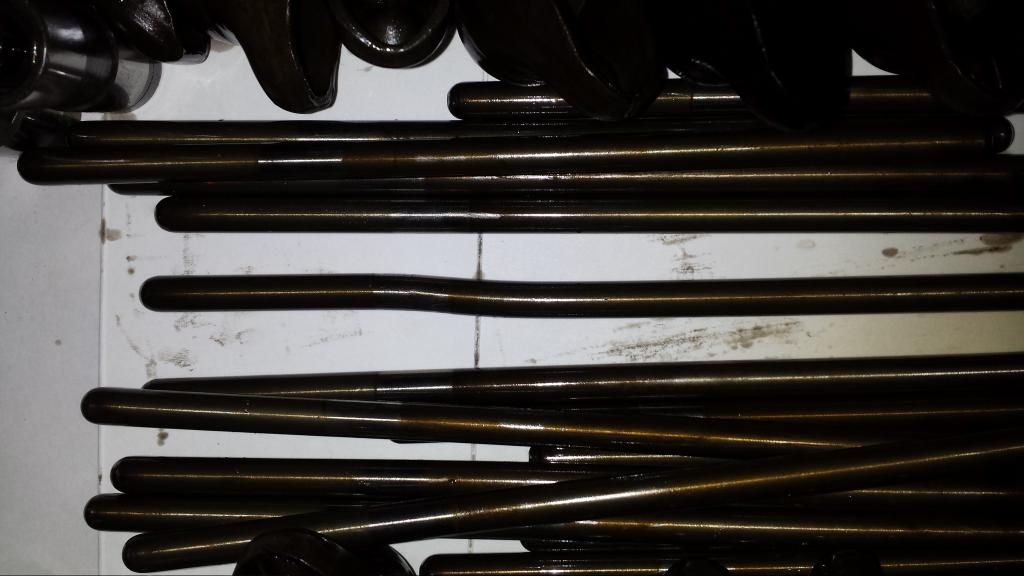
Another unhappy moment... we find a slightly bent pushrod.
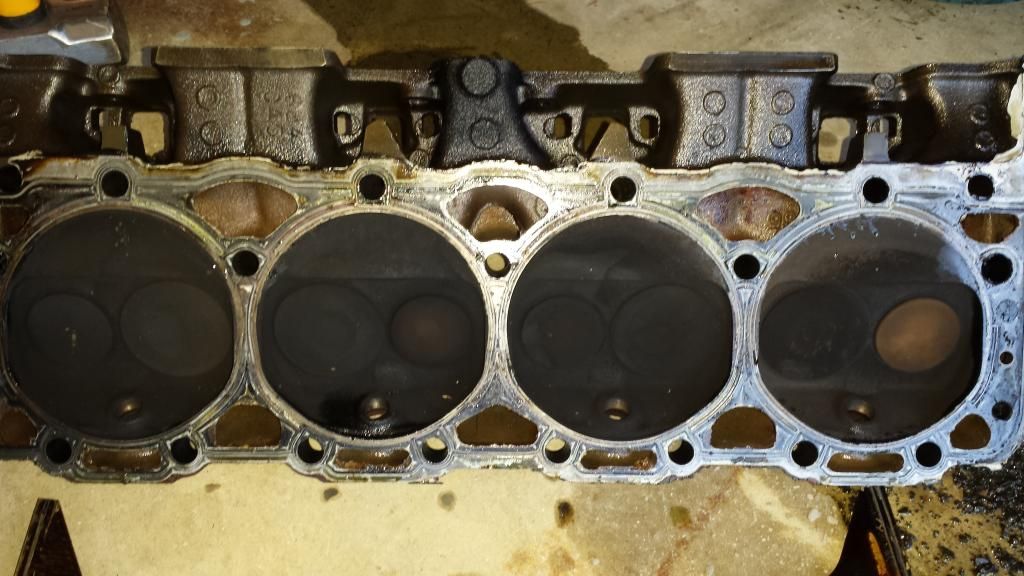
Lastly we have some unusual discoloration on one of the valves. I am unsure what this means. I think it indicates a lean condition but that is just a guess. In any case, something wasn't happy, and I'm feeling more and more like I have avoided a major catastrophe by pulling this engine NOW rather than later.
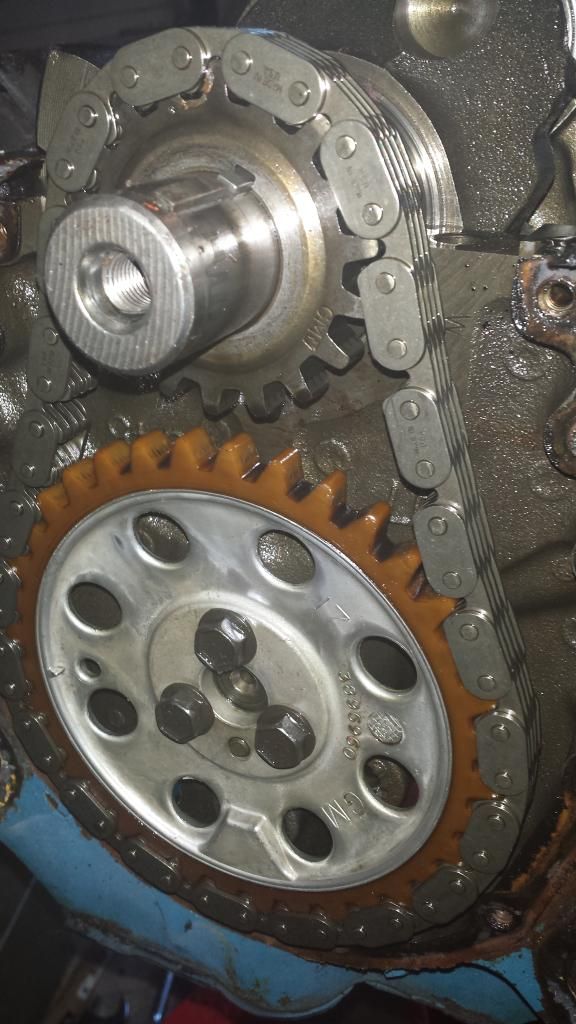
The original nylon timing gear is still on the engine. This makes us think the bottom end is all original since those gears didn't last long and were almost always replaced right away.
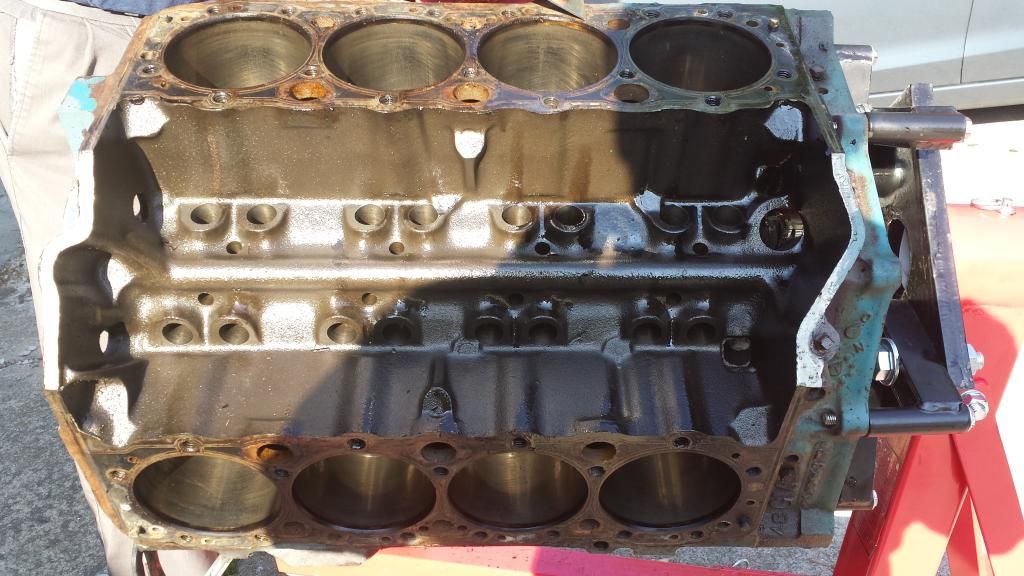
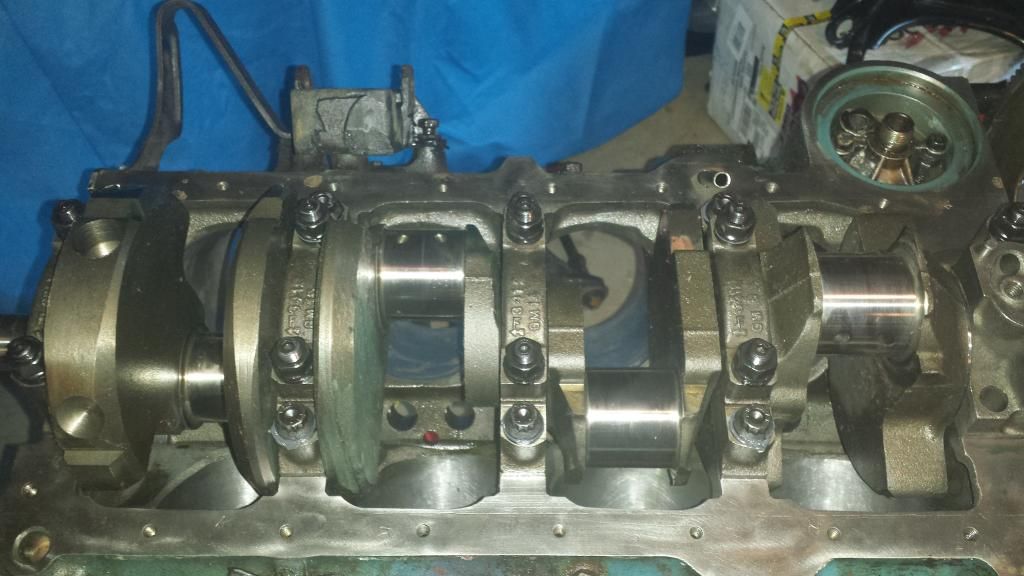
The bottom half of the engine looks great, happy to see 4-bolt mains too. The crank is perfect and the cylinders still show cross-hatches. This is a sweet block. Very pleased with the bottom end.
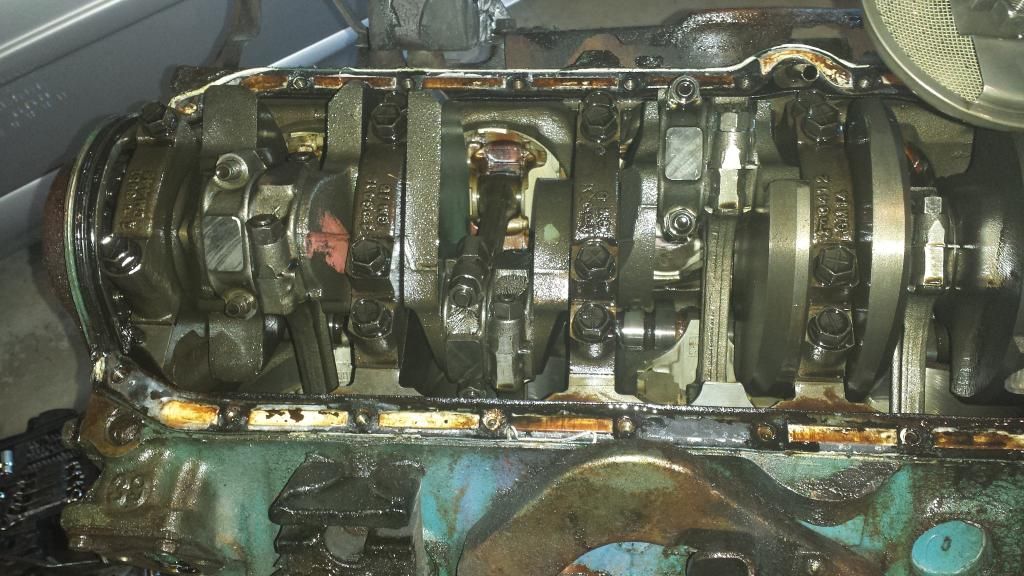
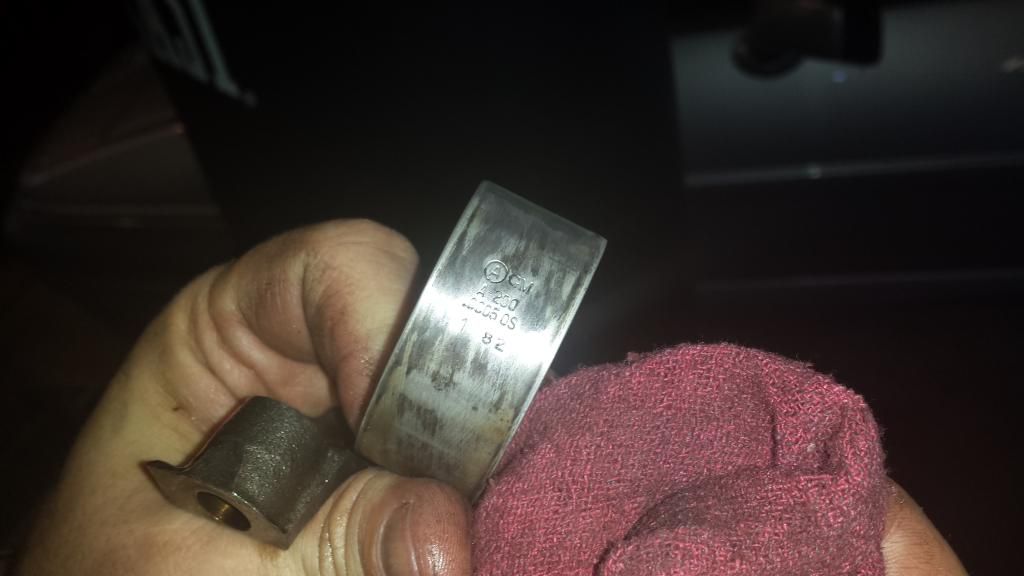
The bearings all look very nice as well. Some wear, but nothing destructive.

Stay tuned, more to come...
It is time to run with the next chapter of awesomeness for The Grid Car. This will include the tear down of the engine and suspension entirely.
I bought the car maybe 7 years ago. It had 50k-ish miles on it and behaved accordingly. It started, it drove, It was loud, I was happy.
Now that the concept of the GRID CAR has turned out so well, things like an occasional puff of blue smoke, a slightly grabby caliper, or a mildly wondering alignment seem beneath it now.
So first step... let's get the right equipment.
Then up it goes! Off with the wheels straight away.
The hood is off and its time to tackle the numerous connections and pull the engine.
While in the process of pulling the engine, the new suspension kit from Zip-Corvette arrives! It looks like great quality stuff too including ENERGY bushings all around.
After one more day of unbolting and unhooking stuff, the engine is out and ready to be evaluated. The engine's new family of Edelbrock components sit in the background anxiously awaiting their chance to prove their worth...
This is a good time to check the casting number and make sure there wasn't an engine replacement in the car's history. The factory blue paint is a good indication we have the original power plant. The numbers check out and we move forward with discovering what exciting adventures await us inside.
After the heads are off and we get things cleaned up, we can begin to piece together a history of events. We find three different problems on 3 different cylinders, any one of which is a little hard to explain on their own. The first is a damaged piston that looks like its ready to burn threw at any moment. Suddenly, this is is no longer feeling like an "upgrade" event as much as it is a rescue operation.
Another unhappy moment... we find a slightly bent pushrod.
Lastly we have some unusual discoloration on one of the valves. I am unsure what this means. I think it indicates a lean condition but that is just a guess. In any case, something wasn't happy, and I'm feeling more and more like I have avoided a major catastrophe by pulling this engine NOW rather than later.
The original nylon timing gear is still on the engine. This makes us think the bottom end is all original since those gears didn't last long and were almost always replaced right away.
The bottom half of the engine looks great, happy to see 4-bolt mains too. The crank is perfect and the cylinders still show cross-hatches. This is a sweet block. Very pleased with the bottom end.
The bearings all look very nice as well. Some wear, but nothing destructive.
Stay tuned, more to come...
 05-27-2014, 04:30 PM
#2
Le Mans Master

looks like a great project. I'm a fan of the Grid Car. 
 05-28-2014, 08:54 AM
#4
Burning Brakes
Thread Starter
Thanks for the kind words guys. Let's get going with part 2...!!!
Soooo, it looks like we need to order some pistons. That wasn't in the original plan so we shall focus on suspension while the parts are shipped. Let's take another look at that wonderful kit that Zip-Corvette put together. This is pretty exciting. Going from well-aged stock components designed 30+ years ago to an all new tuned matched set of coils, shocks, Anti-sway bars, and a composite leaf spring should be about as differently contrasting as Justin Bieber's hair styles. And all for about $1,200 bucks.
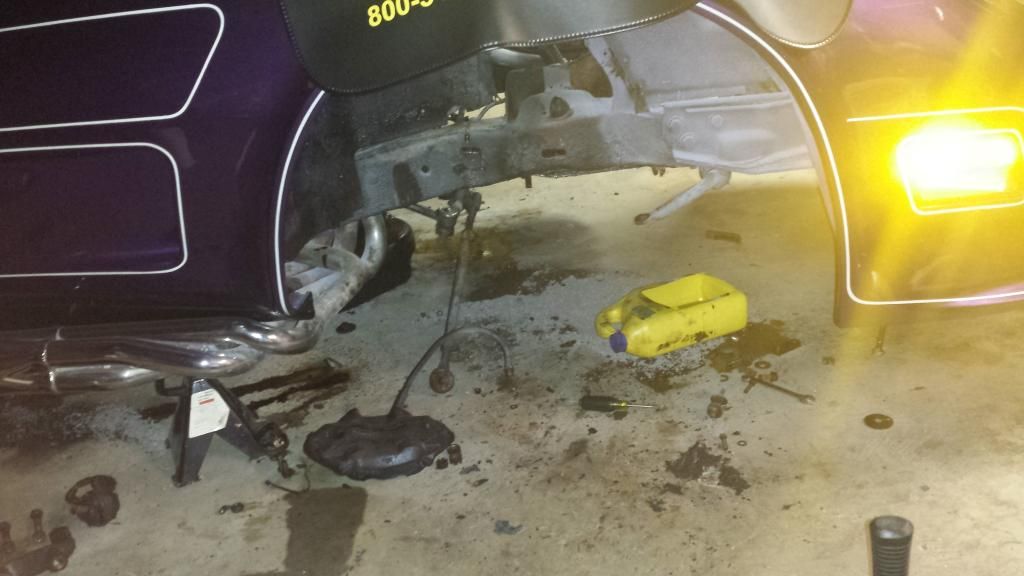
OK, enough time wasted staring at the new shiny stuff. Let's get our hands dirty! The caliper comes right off. We grind threw the rusty link coming off the anti-sway bar. No point even trying to get it off gracefully and it sets a worrisome tone for what may come next. however the caliper did come off without a fight, as does the wheel bearing and the rotor. The wheel bearings are in perfect condition. They must have been replaced just prior to me buying the car. With a few extra strong whacks of the fork the ball joints pop and we have the spindle off. ( In hind site, I think I would use the screw-jack type separator tool vs. the fork since you have to come at the upper from the side to avoid hitting the frame with the ends of the fork. )
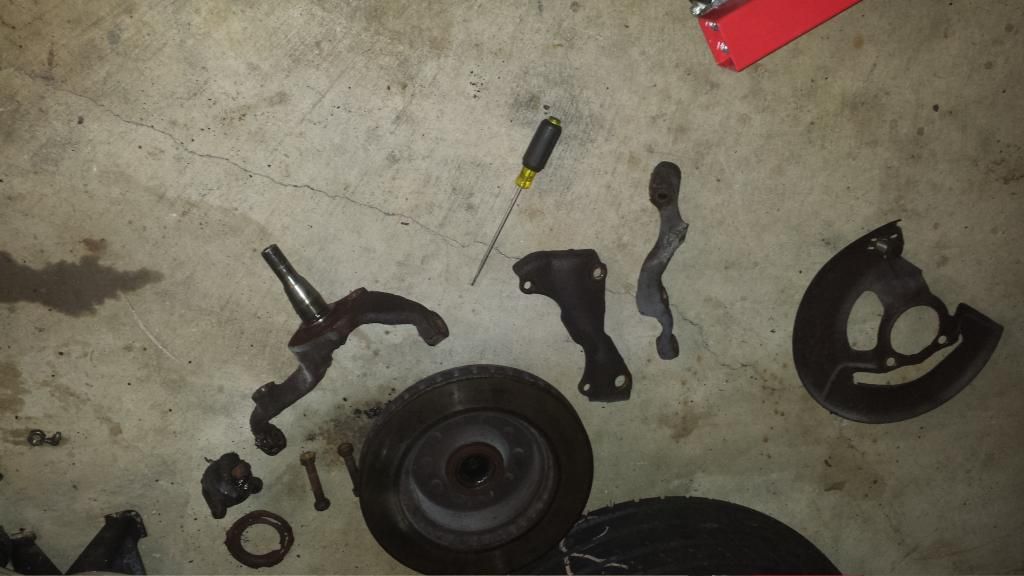
As we continue to move further in to the lion's den we discover that the bushings aren't just old and worn, some are just.. gone. It is only the layers of grease and grime that make it appear like they are still in one piece. Hrm. great. Then that sinking feeling in your stomach happens. On the lower control arm, a bolt broke when attempting to remove it from its shaft. I hate broken bolts. Further analysis reveals portions of the control arms are actually seized. Afflicted by a perfect recipe of 1 part eroded bushings, 2 parts rust & dirt and a whole bucket load of time. With a bit of tenacity we finally finish up the demolition of the passenger's side.
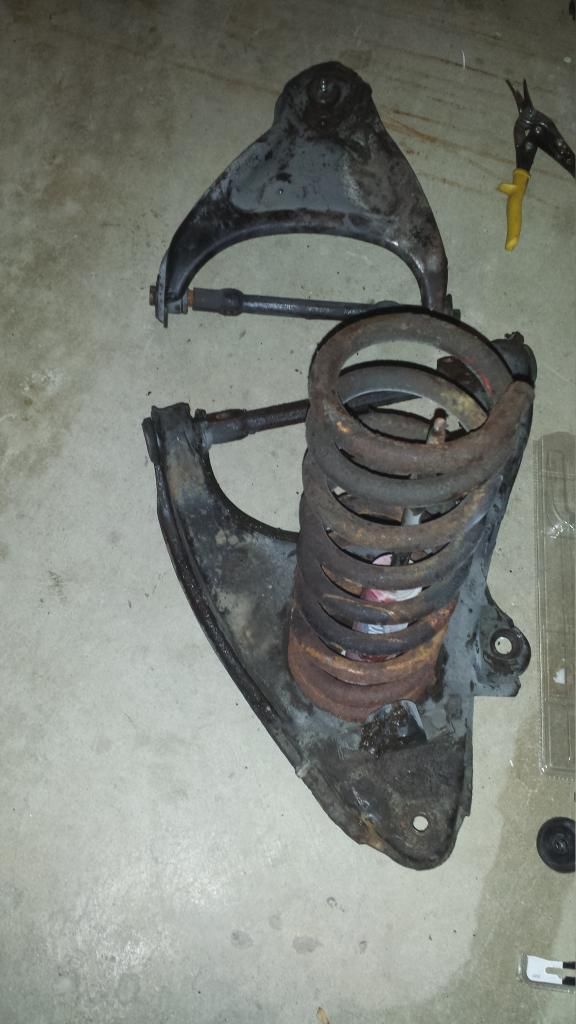
The original springs are rusted and nasty. They are also 6-8 inches taller than the replacements. Things should certainly go back on easier then they came off. The Gabriel shock looks like a replacement, but it wasn't replaced in this century. Victory is mine. The car gave up the battle , if just barely.
Reconditioned control arms will be ordered so we can start fresh with the assembly process. In the meantime there is a lot of cleanup that can be done before the new engine and suspension go back in. Time to get busy in the engine bay. More new parts should arrive soon so stay tuned!
Soooo, it looks like we need to order some pistons. That wasn't in the original plan so we shall focus on suspension while the parts are shipped. Let's take another look at that wonderful kit that Zip-Corvette put together. This is pretty exciting. Going from well-aged stock components designed 30+ years ago to an all new tuned matched set of coils, shocks, Anti-sway bars, and a composite leaf spring should be about as differently contrasting as Justin Bieber's hair styles. And all for about $1,200 bucks.
OK, enough time wasted staring at the new shiny stuff. Let's get our hands dirty! The caliper comes right off. We grind threw the rusty link coming off the anti-sway bar. No point even trying to get it off gracefully and it sets a worrisome tone for what may come next. however the caliper did come off without a fight, as does the wheel bearing and the rotor. The wheel bearings are in perfect condition. They must have been replaced just prior to me buying the car. With a few extra strong whacks of the fork the ball joints pop and we have the spindle off. ( In hind site, I think I would use the screw-jack type separator tool vs. the fork since you have to come at the upper from the side to avoid hitting the frame with the ends of the fork. )
As we continue to move further in to the lion's den we discover that the bushings aren't just old and worn, some are just.. gone. It is only the layers of grease and grime that make it appear like they are still in one piece. Hrm. great. Then that sinking feeling in your stomach happens. On the lower control arm, a bolt broke when attempting to remove it from its shaft. I hate broken bolts. Further analysis reveals portions of the control arms are actually seized. Afflicted by a perfect recipe of 1 part eroded bushings, 2 parts rust & dirt and a whole bucket load of time. With a bit of tenacity we finally finish up the demolition of the passenger's side.
The original springs are rusted and nasty. They are also 6-8 inches taller than the replacements. Things should certainly go back on easier then they came off. The Gabriel shock looks like a replacement, but it wasn't replaced in this century.
Victory is mine. The car gave up the battle , if just barely. Reconditioned control arms will be ordered so we can start fresh with the assembly process. In the meantime there is a lot of cleanup that can be done before the new engine and suspension go back in. Time to get busy in the engine bay. More new parts should arrive soon so stay tuned!
05-29-2014, 07:52 AM
#5
Burning Brakes
Looks like you have a great handle on things and I want to subscribe to this thread! Should you ever need an extra set of hands to help out, shoot me a PM. I would love to see this car go back together.
05-29-2014, 12:48 PM
#6
Burning Brakes
Thread Starter
I appreciate the offer to help as well. New parts are in route, so its just a waiting game for the next few days. I'm motivated to stay on top of this project as the Corvettes of Carlisle car show is just a few months away. That sounds like a long time, but given my full time job programming plus a part time job running a video arcade, I only get 6-7 hours a week to work on the car. If it gets down to the wire, I may have to have a Forum wrench turning party!!
 05-30-2014, 08:08 AM
#7
Burning Brakes
I have been thinking about making the trek out to Corvettes at Carlisle again. Took my older blue '73 automatic out there a few years ago to try and sell. It had a lot of lookers, but in 2009 not many were throwing money out there. It will sneak up very quickly.
I am also familiar with your video arcade. Lots of people around the shop I work at love it!
Let us know when you want to have that Forum Wrenching party. Also, you should check out the Columbus Cars and Coffee that happens every Saturday morning.
Facebook Link
Forum Thread
Good Luck
I am also familiar with your video arcade. Lots of people around the shop I work at love it!
Let us know when you want to have that Forum Wrenching party. Also, you should check out the Columbus Cars and Coffee that happens every Saturday morning.
Facebook Link
Forum Thread
Good Luck
05-30-2014, 09:55 AM
#8
Burning Brakes
Thread Starter
Yes, its true. Time flies with stuff like this. It is coming along bit by bit. I try not to freak out when I see "this" laying all over my garage... *gulp* like.. what have I gotten myself in too!! haha.
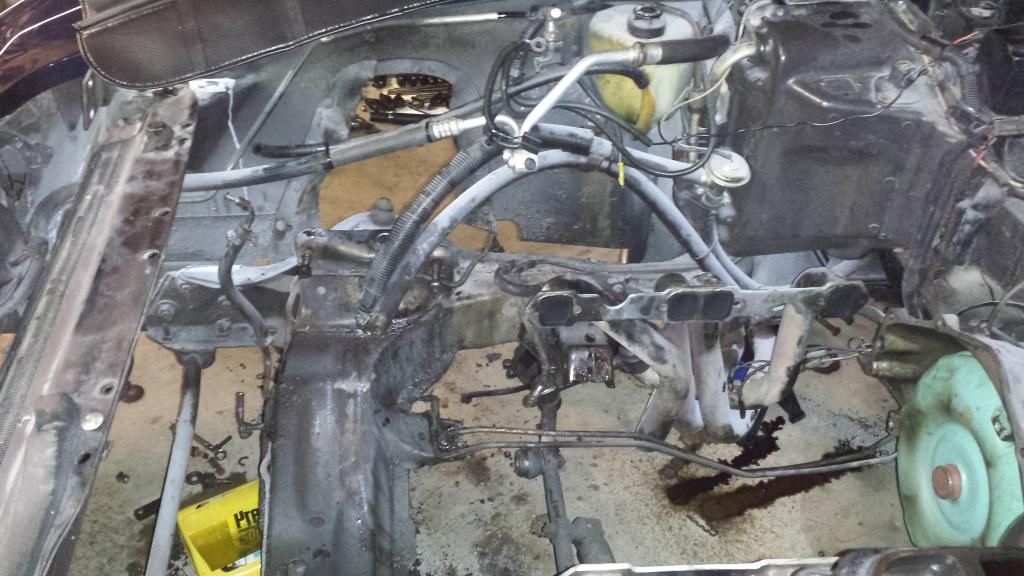
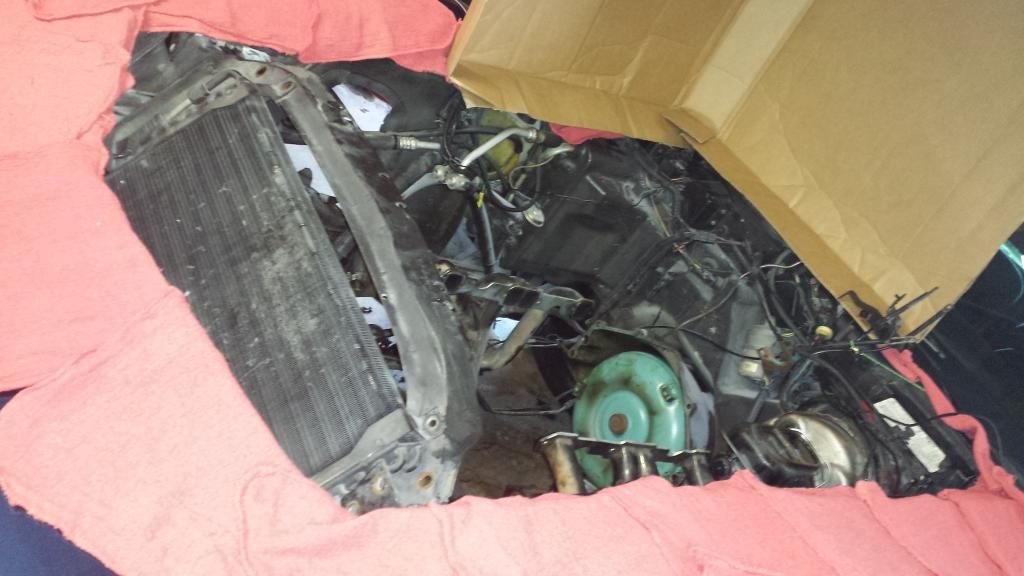
But I just take it step by step and consider each little bit of progress a win. I got the engine bay cleaned out and that makes me feel better. I covered the car with rags and devised a cardboard overspray-shield to protect the paint from the aggressive degreaser. It looks 80% better, which is all I can hope for, as there isn't enough time to strip the whole bay and repaint.
The block has some noticeable OEM casting manufacturing imperfections , but none are in the critical gasket surface areas. The cam bearings are total trash. they feel like gravel and I honestly don't know how this didn't cause more problems. New cam bearings have already arrived.
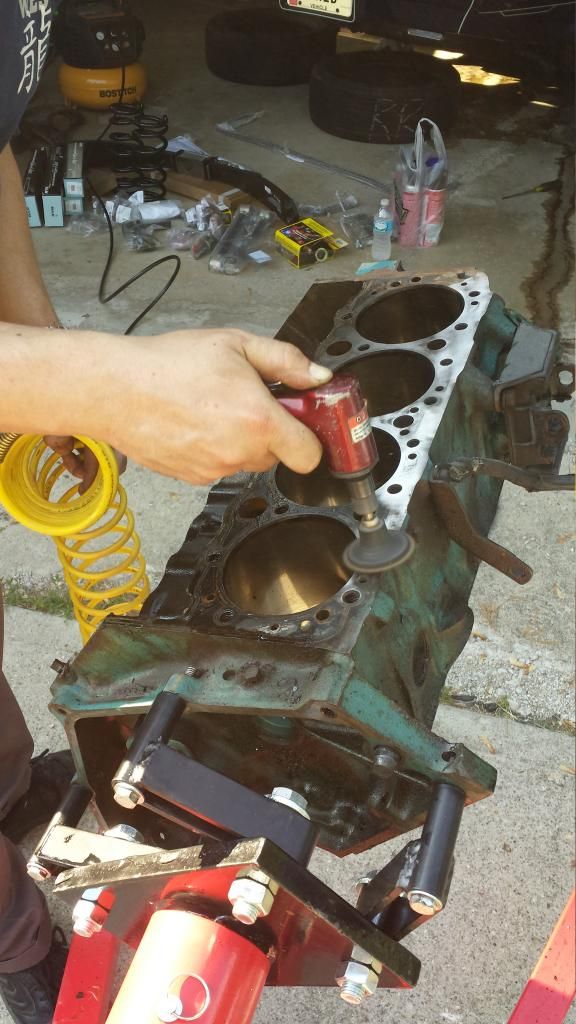
My friend brought over his surface prep tool and we got the block ready to go. If you are still using manual scraping methods to prep your gasket surfaces you might want to find a spoon, twist the handle in to a corkscrew and shove it in your eye because that is just about as much fun. This tool provides amazing results in seconds!!
I hope to get some serious progress done this weekend so look for more updates on Monday. The pistons arrived. The main bearings arrived. The upper control arms arrived. One lower control arm arrived. I will plasti-gauge all the clearances after the cylinder walls are honed. The block is in such good shape it won't be going to the machine shop for decking or a bore-out. It's classic GM goodness.
But I just take it step by step and consider each little bit of progress a win. I got the engine bay cleaned out and that makes me feel better. I covered the car with rags and devised a cardboard overspray-shield to protect the paint from the aggressive degreaser. It looks 80% better, which is all I can hope for, as there isn't enough time to strip the whole bay and repaint.
The block has some noticeable OEM casting manufacturing imperfections , but none are in the critical gasket surface areas. The cam bearings are total trash. they feel like gravel and I honestly don't know how this didn't cause more problems. New cam bearings have already arrived.
My friend brought over his surface prep tool and we got the block ready to go. If you are still using manual scraping methods to prep your gasket surfaces you might want to find a spoon, twist the handle in to a corkscrew and shove it in your eye because that is just about as much fun. This tool provides amazing results in seconds!!
I hope to get some serious progress done this weekend so look for more updates on Monday. The pistons arrived. The main bearings arrived. The upper control arms arrived. One lower control arm arrived. I will plasti-gauge all the clearances after the cylinder walls are honed. The block is in such good shape it won't be going to the machine shop for decking or a bore-out. It's classic GM goodness.
 05-30-2014, 04:27 PM
#10
Burning Brakes
Thread Starter
Fair question... I considered it, despite the block's already great condition. But, the one place in town I found that could do it had a 'drop off and wait a week or two' kind of policy and I don't feel like that fits in my project plan's schedule.
06-02-2014, 01:43 PM
#11
Burning Brakes
Thread Starter
I got a bit more time in on the car project this weekend. There isn't a lot to show in pictures, but I'm quite happy with the results. We got the block prep all done! We were diligent about getting it cleaned , cylinder honed, and then the new cam bearings installed.
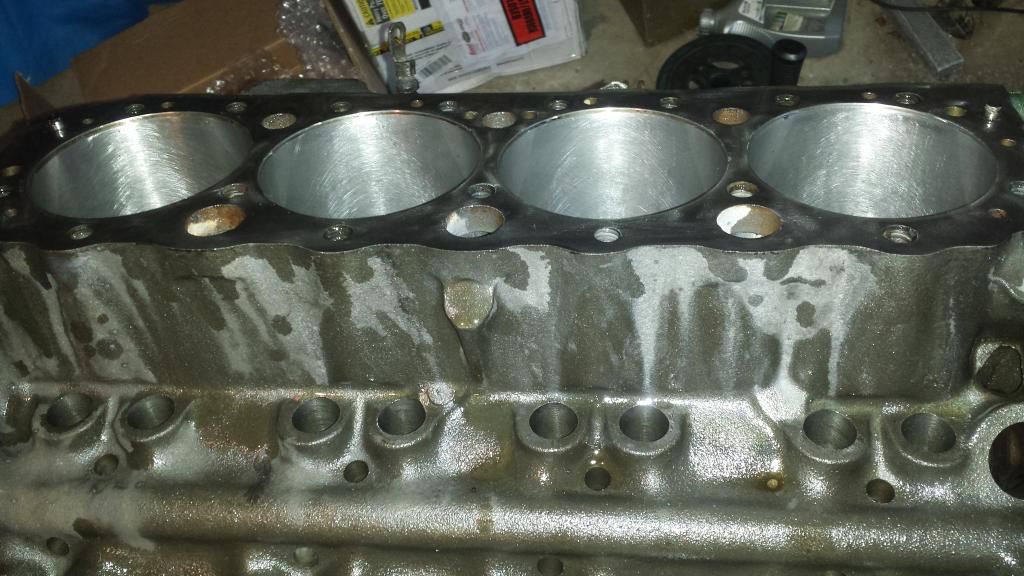
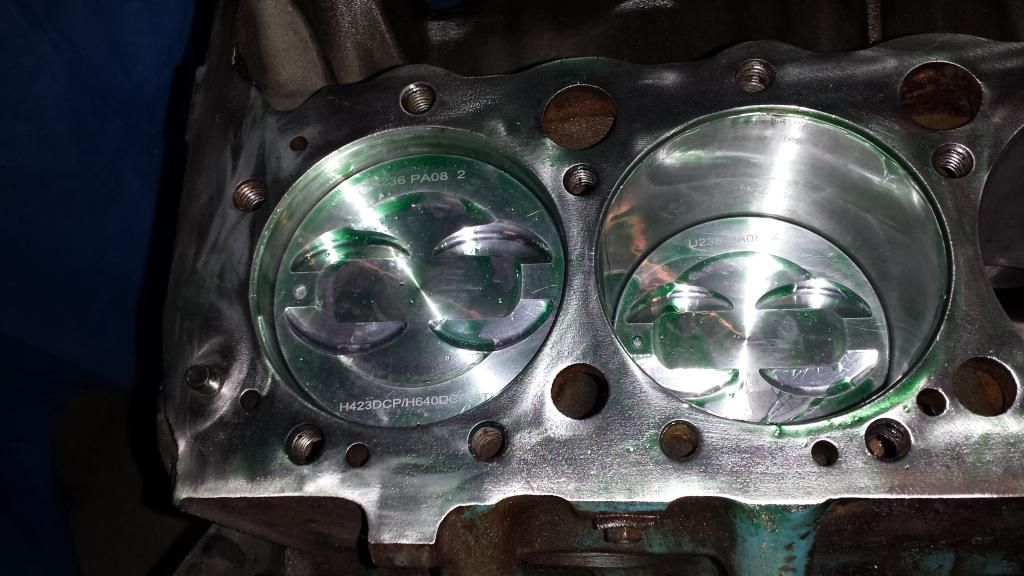
The cross-hatches came out pretty darn good!! A quick check verifies that the bore is still 4.000 and the deck is flat as can be. Like I said before... sweet block!

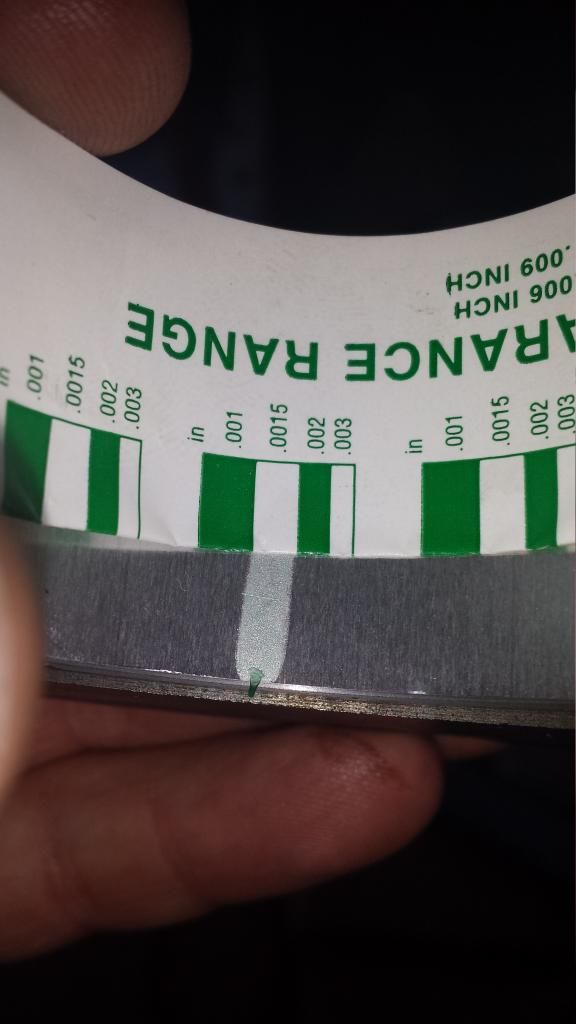
Re-assembly was started and clearances checked. The plasti-gauge shows the new bearings are a little tight. They came in at .0015 and I'm shooting for .0025. So, this is where the update stops until the -.001 bearings arrive.
The cross-hatches came out pretty darn good!! A quick check verifies that the bore is still 4.000 and the deck is flat as can be. Like I said before... sweet block!
Re-assembly was started and clearances checked. The plasti-gauge shows the new bearings are a little tight. They came in at .0015 and I'm shooting for .0025. So, this is where the update stops until the -.001 bearings arrive.
Last edited by hyteck9; 06-02-2014 at 02:04 PM.
06-02-2014, 03:24 PM
#12
Le Mans Master
did you run riffle brushes through the oil galleries? thats where the bad stuff is that many people miss.
06-03-2014, 07:51 AM
#13
Burning Brakes

I know your in a hurry but I think its a huge mistake not to have the blocked "dressed" by a qualified machine shop.
By dressed I mean magna fluxed, boiled, honed if not bored, and the cam, crank line bored or at least measured. Good luck with your build but remember it always cheaper and faster to do things once the right way vs 2 or more times.
By dressed I mean magna fluxed, boiled, honed if not bored, and the cam, crank line bored or at least measured. Good luck with your build but remember it always cheaper and faster to do things once the right way vs 2 or more times.
06-03-2014, 09:43 AM
#15
Burning Brakes
Thread Starter
Hello again,
Thanks for the replies. We did clean the oil galleries , but not with rifle brushes. That is a great tip 7t9l82.
micks69,
You may well be right on that one and only time will tell !! If the block is compromised I would be sad. In fact there is still every possibility that I will fail and have to buy a crate motor before its all said and done. However I would hate to lose out on the experience. The truth is, I actually "wanted" to hone the block myself as I have never done it before. I am very much a hands-on kind of person. There is a world of difference between reading why an engine shop puts cross-hatches in a block and chooses certain angles in which to do it (29', 45',72') and actually doing it yourself. Learning that perfect sound of the stones when they are doing exactly what you want rather than digging or floating. The ability to feel the walls every step of the way as they get smoother and smoother. This is good stuff!
If I was building a racecar this would be treated quite a bit differently and I am not sure I would trust myself with the outcome, but the GRID CAR was an experiment in fun! I insisted on being a part of the paintwork and I want to know everything that happens to the engine too, for better or for worse.
Please keep those tips coming in!!!

 06-05-2014, 11:02 AM
#17
Burning Brakes
Thread Starter
Quick update...
It turned out the rear main bearing clearance was actually a bit too loose. After weighing the options of available adjustment sizes, we decided it best to leave all the mains evenly spaced at the .0015 they were originally measuring and bring the rear main in line with them. It will leave a little 'room to grow' as they say, and the high volume oil pump should keep everything juiced nicely. ARP studs were used, and it spins effortlessly with the flick of a finger.
The rod bearings were also checked. 7 of the 8 measure at .0020 and the last is awaiting an up size that will bring it in to tolerance (to about .0022.)
The project should go fast now. All this checking and rechecking takes forever. I'm gonna baby this thing anyway, you won't be seeing it at the dragstrip so I think it will be fine. But if something does wrong down the road, I will know exactly where everything was at and how it got there.
It turned out the rear main bearing clearance was actually a bit too loose. After weighing the options of available adjustment sizes, we decided it best to leave all the mains evenly spaced at the .0015 they were originally measuring and bring the rear main in line with them. It will leave a little 'room to grow' as they say, and the high volume oil pump should keep everything juiced nicely. ARP studs were used, and it spins effortlessly with the flick of a finger.
The rod bearings were also checked. 7 of the 8 measure at .0020 and the last is awaiting an up size that will bring it in to tolerance (to about .0022.)
The project should go fast now. All this checking and rechecking takes forever.
I'm gonna baby this thing anyway, you won't be seeing it at the dragstrip so I think it will be fine. But if something does wrong down the road, I will know exactly where everything was at and how it got there.
Last edited by hyteck9; 06-05-2014 at 11:05 AM.
06-11-2014, 10:24 AM
#18
Burning Brakes
Thread Starter
Hey all, just a quick update.
That oddball rod that wasn't spec'ing out correctly turned out to be a serious issue. It couldn't be fixed by getting different bearings , even racing bearings... It turns out the rod and/or rod cap where ever so slightly twisted. This is a perfect example of a reason why clearances are checked by the way!
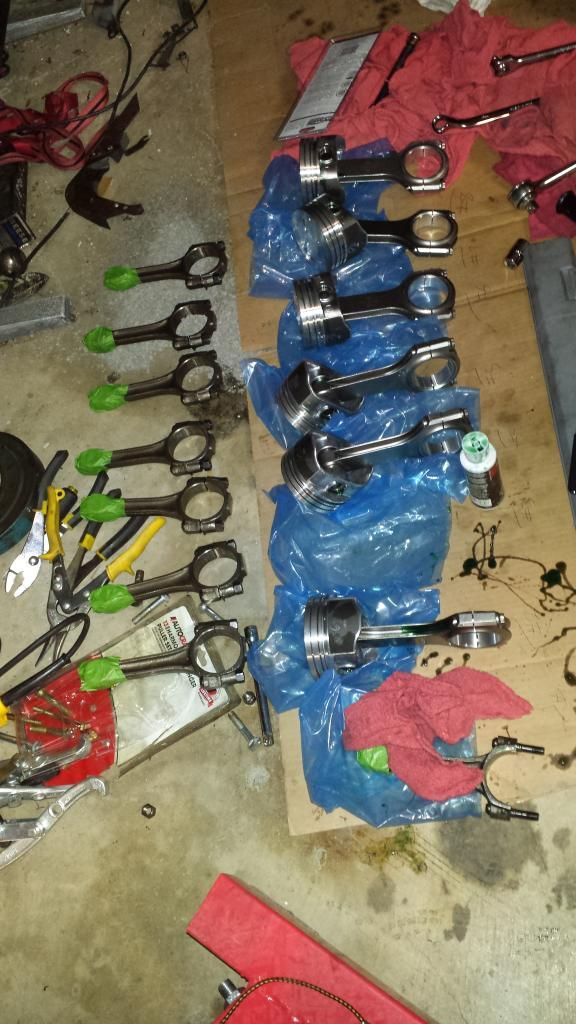
That, combined with a number of other factors like mismatched weight and different casting markings, persuaded me to move forward with the purchase of an all new set of rods. I went with the Eagle ESP H-beams with ARP bolts and brass wrist pin bushings. (Don't judge my mess!! I'm actually very careful about keeping the parts clean.)
The rod bearing clearances all checked out at a perfect .002 and the project is back on track again. The piston ring gaps are all ideally set to .020 (1st ring) and .024 (2nd ring). (Since its not a forced induction application I'm not being too awfully precise about it.) The rings are rotated so the gaps are at 9 and 5 to the inner wall and the pistons installed with generous amounts of assembly lube. The rods are torqued down and the assembly is spun to check for binding after each cylinder is completed. Progress!
That oddball rod that wasn't spec'ing out correctly turned out to be a serious issue. It couldn't be fixed by getting different bearings , even racing bearings... It turns out the rod and/or rod cap where ever so slightly twisted.
This is a perfect example of a reason why clearances are checked by the way!That, combined with a number of other factors like mismatched weight and different casting markings, persuaded me to move forward with the purchase of an all new set of rods. I went with the Eagle ESP H-beams with ARP bolts and brass wrist pin bushings. (Don't judge my mess!! I'm actually very careful about keeping the parts clean.)
The rod bearing clearances all checked out at a perfect .002 and the project is back on track again. The piston ring gaps are all ideally set to .020 (1st ring) and .024 (2nd ring). (Since its not a forced induction application I'm not being too awfully precise about it.) The rings are rotated so the gaps are at 9 and 5 to the inner wall and the pistons installed with generous amounts of assembly lube. The rods are torqued down and the assembly is spun to check for binding after each cylinder is completed. Progress!
06-11-2014, 11:33 AM
#19
Le Mans Master
It's always interesting to see what choices a guy makes in building his engine.
I too chose to hone my own cylinders, but did get the block cleaned and replaced oil plugs and freeze plugs.
When you honed yours did you use the three fingered hone? What grit did you use. What angle of finish did you shoot for?
Why the assembly lube instead of oil on piston install?
Given the bent push rod , the damaged piston and the damaged con rod I would guess that this thing was over reved at some point and had piston to valve contact.
06-11-2014, 11:59 AM
#20
Burning Brakes
Thread Starter
I chose lube rather than oil because my work time is so spread out that the engine sits, often for a couple days, and the lube stays in a little better where the oil drips out. (My garage is not climate controlled either so all finished surfaces need a coating.)
..and this is why I will be replacing the Delco HEI distributor with one that has a rev limiter built in.

Last edited by hyteck9; 06-11-2014 at 02:41 PM.