
Hood Fit, Hood Fitment, Hood Gap, Front End Low
 09-29-2012, 08:07 PM
#1
Racer

Thread Starter

All, I haven't posted in a while. I have been plugging away on the car, but admittedly, I've slowed down a bit. As some may know, I posted a while back regarding a problem with hood fitment. What I learned is that I was not alone and particularly, those of us with '68s have an aggravated problem. I solved my problem and want to share with the forum. Some may like it, some may not, but here goes.
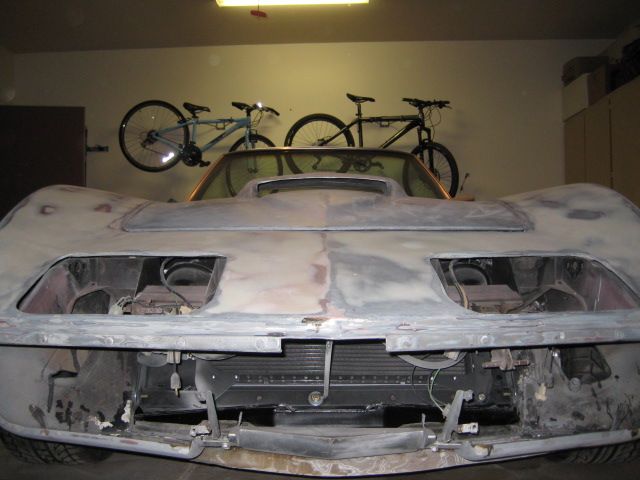
The car is a '68 roadster sitting on an SRIII frame. The core support is from the donor and the body is sitting on poly body mounts. None of this really matters, but I know some will ask. In my previous thread, I did everything possible shims to both the body and the core support. In my first three pics, the front frame extensions were not installed which accounted for a lot of the sag (the hood sat approx 1/4"-1/3" higher than the surround. It followed the fender contours very nicely up to the hood hinges...then from the hinges forward, I had a huge problem.
What did I do. First, I installed the front frame extensions, installed through bolts to simulate the bumper being mounted and using a floor jack, I lifted the extreme front end as much as prudent and tightened the extensions to the frame. This helped a lot, perhaps it accounted for half of my problem. I then tried lifting the nose more with the core support to nose bar support rod, but I found that this did more to adjust the angle of the front end rather than lift it where I needed it. What I needed to do was lift and support the headlight bar below the front surround. What I came up with is something that is cheap, simple and adjustable. It fixed my problem, so others can use if they like.
The fix involved 1"x1/8" steel bar from Ace Hardware ($2), 4 5/16" bolts (3/4" long), 6 5/16" washers and 2 5/16" lock nuts. All total about $4.
1- cut the bar in half
2- drill 5/16" hole 1/2" down and center on bar
3- place tip of bar in vice (1") and bend to about 100 degrees, then bend to a twist of approx 10-15 degrees. This the the trick and you'll see why in the pics.
4- Install drilled end of bar into outer headlamp assy slot using bolt and washer. Properly bent, then oriented, the bar should be perpendicular and parallel to the front frame extension. It should also remain forward of the inner fender and make no unwanted contact with the headlight assy.
5 - Mark the bar approx half way down the frame extension. Mark it for final cut and mark it for a hole (approx mid span of the frame extension when set where you need it.
6 - Remove the bar, cut it, drill a 3/8" hole where you marked it. This 3/8" hole will allow for adjustability.
7- Re-Install the bar, lift light bar to needed height and mark frame extension for hole in center of 3/8" hole in bar.
8- Romove, drill a 5/16" hole where marked on frame extension, clean everything up and re-install.
9- Once re-installed as before, leave the top bolt just loose enough to allow minor tweaks, lift the nose bar to aligned height and install the bolt wasthers and lock nut as shown in the pics.
10- Hope this helps.
My initial problem:
Brackets, hardware, brackets mocked up to headlight assy (both front and rear pics)...note these are all for the drivers side; the tabs need to point outboard to clear the reinforcements on the headlight assy and because of the 'twist' the bottom of the bar will hang forward of vertical. The bars will not be interchangeable because of this.


Pics showing the headlight assy installed with the bracket, also one pic showing the backside of the frame extension ie...the thru-bolt.


The final results:


The car is a '68 roadster sitting on an SRIII frame. The core support is from the donor and the body is sitting on poly body mounts. None of this really matters, but I know some will ask. In my previous thread, I did everything possible shims to both the body and the core support. In my first three pics, the front frame extensions were not installed which accounted for a lot of the sag (the hood sat approx 1/4"-1/3" higher than the surround. It followed the fender contours very nicely up to the hood hinges...then from the hinges forward, I had a huge problem.
What did I do. First, I installed the front frame extensions, installed through bolts to simulate the bumper being mounted and using a floor jack, I lifted the extreme front end as much as prudent and tightened the extensions to the frame. This helped a lot, perhaps it accounted for half of my problem. I then tried lifting the nose more with the core support to nose bar support rod, but I found that this did more to adjust the angle of the front end rather than lift it where I needed it. What I needed to do was lift and support the headlight bar below the front surround. What I came up with is something that is cheap, simple and adjustable. It fixed my problem, so others can use if they like.
The fix involved 1"x1/8" steel bar from Ace Hardware ($2), 4 5/16" bolts (3/4" long), 6 5/16" washers and 2 5/16" lock nuts. All total about $4.
1- cut the bar in half
2- drill 5/16" hole 1/2" down and center on bar
3- place tip of bar in vice (1") and bend to about 100 degrees, then bend to a twist of approx 10-15 degrees. This the the trick and you'll see why in the pics.
4- Install drilled end of bar into outer headlamp assy slot using bolt and washer. Properly bent, then oriented, the bar should be perpendicular and parallel to the front frame extension. It should also remain forward of the inner fender and make no unwanted contact with the headlight assy.
5 - Mark the bar approx half way down the frame extension. Mark it for final cut and mark it for a hole (approx mid span of the frame extension when set where you need it.
6 - Remove the bar, cut it, drill a 3/8" hole where you marked it. This 3/8" hole will allow for adjustability.
7- Re-Install the bar, lift light bar to needed height and mark frame extension for hole in center of 3/8" hole in bar.
8- Romove, drill a 5/16" hole where marked on frame extension, clean everything up and re-install.
9- Once re-installed as before, leave the top bolt just loose enough to allow minor tweaks, lift the nose bar to aligned height and install the bolt wasthers and lock nut as shown in the pics.
10- Hope this helps.
My initial problem:
Brackets, hardware, brackets mocked up to headlight assy (both front and rear pics)...note these are all for the drivers side; the tabs need to point outboard to clear the reinforcements on the headlight assy and because of the 'twist' the bottom of the bar will hang forward of vertical. The bars will not be interchangeable because of this.
Pics showing the headlight assy installed with the bracket, also one pic showing the backside of the frame extension ie...the thru-bolt.
The final results:


 09-30-2012, 12:51 AM
#3
Burning Brakes


Hi Rob,
Looks like your project is coming along nicely. Keep up the pics. Mine has really come to a stand still due to work is so busy (that's a good thing) and my wife's health. Hopefully the docs can help her get better soon and I can start moving forward again. Good luck on finishing yours.
Rob
Looks like your project is coming along nicely. Keep up the pics. Mine has really come to a stand still due to work is so busy (that's a good thing) and my wife's health. Hopefully the docs can help her get better soon and I can start moving forward again. Good luck on finishing yours.
Rob

 09-30-2012, 03:16 PM
#5
Racer
Thread Starter
Doug, thanks! Thought I'd come so far on this project until I started with the body and quickly realized what a challenge it can be to get these things looking the way they should...after having to re-skin both doors, rebuild the fender lips and lower front valance I thought I'd reached the home stretch until this little surprise. Feeling a bit of motivation again...
Rob, thanks for the words and sorry to hear your wife is still struggling a bit. Hopefully I can stay on the timeline and offer some lessons learned once you get back on track. Good luck with everything...
Craig, thanks and I hope this can help folks out. I thought this method looked a little easier and more robust than than using the '69 and on inner fender supports. Plus it can offer some fine adjustments.
r,
Rob