
1971 Journey
 02-18-2013, 01:28 AM
#1
Melting Slicks

Thread Starter


Hi
I am creating a duplicate of my Australian thread here to cover the Journey I have taken on my 1971 Corvette purchased late in 2009.
Hope it is of some interest to others.
The Car as I picked it up......
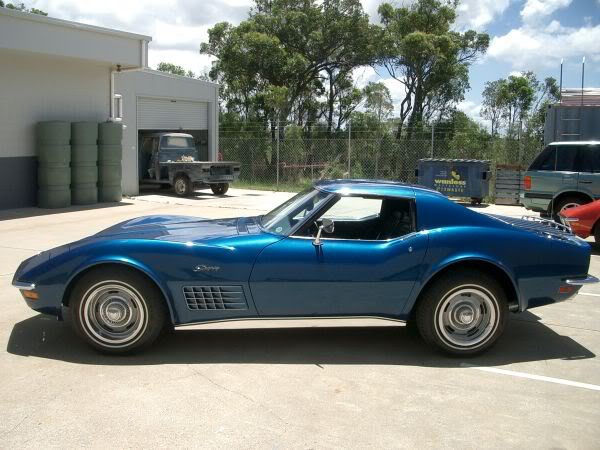
1971 Matching Numbers 350-270hp Bridgehampton Blue Coupe
Page 1 - December 2009
Page 2 - June 2010
Page 3 - September 2010
Page 4 - October 2010
Page 5 - November 2010
Page 6 - November 2010
Page 7 - December 2010
Page 8 - December 2010
Page 9 - January 2011
Page 10 - March 2011
Page 11 - June 2011
Page 12 - July 2011
Page 13 - July 2013
Page 14 - August 2011
Page 15 - September 2011
Page 16 - September 2011
Page 17 - October 2011
Page 18 - October 2011
Page 19 - November 2011
Page 20 - November 2011
Page 21 - November 2011
Page 22 - November 2011
Page 23 - November 2011
Page 24 - January 2012
Page 25 - March 2012
Page 26 - June 2012
Page 27 - July 2012
Page 28 - August 2012
Page 29 - September 2012
Page 30 - December 2012
Page 31 - March 2013
Page 32 - March 2013
Page 33
Page 34
Page 35
Page 36
Page 37
Page 38
Page 39
Page 40
Page 41
Page 42
Page 43
Page 44
Page 45
Page 46
Page 47
Page 48
Page 49
Page 50
Page 51
Page 52
Page 53
Page 54
Page 55
Page 56
Page 57
Page 58
Page 59
Page 60
Page 61
Page 62
Page 63
Page 64
Page 65
Page 66
Page 67
Page 68
Page 69
Page 70
Page 71
Page 72
Page 73
Page 74
Page 75
Page 76
Page 77
Page 78
Page 79
Page 80
Page 81
Page 82
Page 83
Page 84
Page 85
Page 86
Page 87
Page 88
Page 89
Page 90
Page 91
Page 92
Page 93
The Car in 2012.....
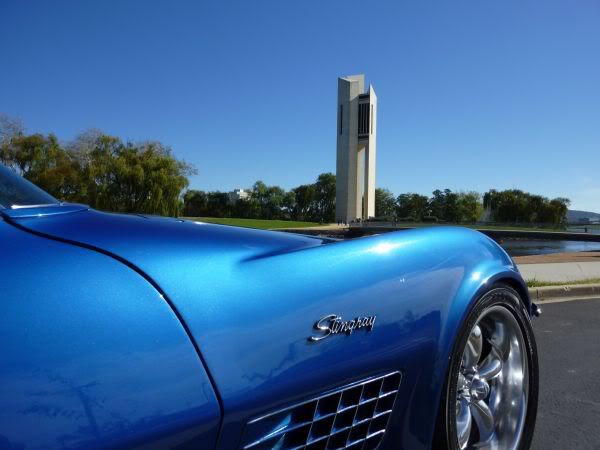
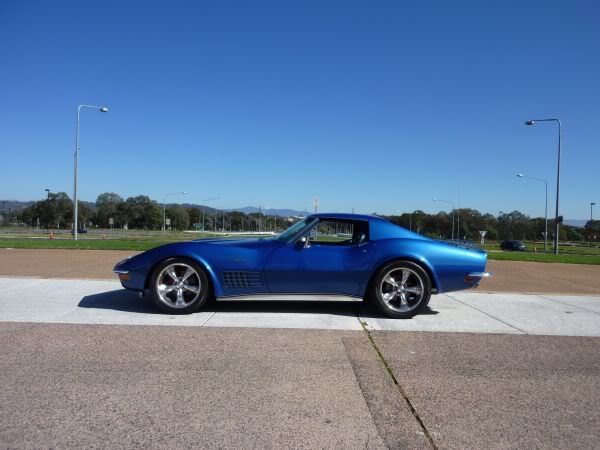
This thread was originally on the Australian Corvettes forum (Now Closed) but I had decided to also post it here given the wider audience and experience.
I am creating a duplicate of my Australian thread here to cover the Journey I have taken on my 1971 Corvette purchased late in 2009.
Hope it is of some interest to others.
The Car as I picked it up......
1971 Matching Numbers 350-270hp Bridgehampton Blue Coupe
Index of Pages
Page 1 - December 2009
- Seats
- Seat Belts
- Seat Tracks
- Under Dash Insulation
- Replace Console
- Dash Air vents
- Air Vent Servo
- Mirrors
- Rear Window Shelf
- A Pillars
- Cowl Water Leaks
- HVAC Duct
- Calipers Clean Refurbish
- Adjust Parking Brake
Page 2 - June 2010
- Calipers Paint
- Brake Rotors
- Brake Rotor Run Out
- Rear Brake Calipers
- Braided Brake Lines
- Body Height Font Back
- Vacuum Tank
- Carb Choke
- Fuel Line Tank
- CEC Solenoid
- Console Gauges
- Temperature Gauge Calibration
- Gauge Bezel
- Dash Pad
- T-Top Stainless Polish
Page 3 - September 2010
- Under Dash Insulation
- Strip Interior
- Auto Shifter Rebuild
- CEC Relays
- Console Trim Plate strip
- HVAC Refurbish
- Dynamat Front Floor
- Dash Pad Speakers
- Lower Dash Pad Cleanup
- Wheel Choices
- Under Dash Wiring
- Oil Gauge Line
- Lower Dash Pad Fit
Page 4 - October 2010
- Stereo Speaker Bass Cut
- Refit Under Console Wiring
- Refit Console
- Door Weatherstrip
- Console HVAC Control
- Dynamat
- Drain Tubes
- A Pillar Cleanup and Paint
- Console Trim Pieces Paint
- A Pillar Stainless CleanUp
- Console Air Vent Trim
- Dynamat Rear
- Drain Tubes
- HVAC Controls
- Stainless Polish
- Finish Console Plate
Page 5 - November 2010
- 18" Coys C5 Wheels Arrive
- Console Trial Fit
- Rear Window Clean Up
- Weatherstrip Removal
- A Pillar Refit
- New Weatherstrip
- A Pillar finish
- Rear Window Weatherstrip Prep
- MP3 Wiring
- Aerial
- Trim Panel Clean Up
- Repair Rear Trim Panels
- Repaint Rear Trim Panels
Page 6 - November 2010
- Repaint Trim Panels .... cont
- T-Top Strip Down
- Repair T-Top Trim Panels
- Rear Window Weatherstip
- Storage Compartment Prep
- Rear Carpet Fitting
- Console Trim Panel Build Up
- Wire Brackets Rebuid
- Trim Panel Fit and Adjustment
Page 7 - December 2010
- Brake Console Rebuild
- Repaint Trim Pieces
- Front Carpet Fit
- T-Top Panel Finish
- Storage Compartment Test Fit
- Surface rust Removal
- T-Top Center Trim Rebuild
- Rear Window Latch Rebuild and Adjustment
- Rear Roof Trim Refit
- Bulkhead Carpet Fit
- A Pillar and Teader Trim
- Sun Visors
- Start T-Top Refinish Inside
Page 8 - December 2010
- T-Top Refinish Inside
- Rebuild and Repaint Mirror
- T-Top Adjustment
- Carpet Seat Bolt Holes
- B Pillar Trim Fit
- Adjust Rear Fit
- Rebuild Storage Lids
- Repaint Seat Backs
- Fire Extinguisher
- Run Wires through Brackets/Clips
- Clean Up Exterior
- Replace Carb Filter
- New Air Cleaner and Decal
- Repair Headlight Trim Rings
- Summernats 2011
Page 9 - January 2011
- Collecting Parts for Under Bonnet
- Temperature Sender Findings
- Wiper Door Actuator
- A-Arm Shims
- Sun Visor Support Pins
- Rear Marker Light
- Paint Chip Repair
- Kick Panel Speaker
- Wiper Door Actuator
- Fender Emblems
Page 10 - March 2011
- New Battery
- Rear Shocks
- Battery Drain
- Vacuum Tank Revisit
- TH400 Speedo cable leak
- Differential Snubber cushion
- Ipod integration part II
- The Brake Squeak in reverse
- Vapor Cannister
- T-Top Adjustment
Page 11 - June 2011
- Vapor Cannister....continued
- T-Top Adjustment....continued
- Rear Window Glass Scratches
- Setting Timing
- Distributor Advance
- Choke Linkage
- Removing A/C Evaporator box
- Clean up engine bay
- Start Stripping down engine
- Suspension Removal Starts
- Steering Removal Starts
- Radiator out
Page 12 - July 2011
- Trial fit Semi Coil Overs
- Drain Power Steering
- Remove Steering Linkages
- New Quadrajet
- Front Brake Lines Removed
- Proportioning Valve removed
- All Out
- Engine Accessories Off
- Disassemble Spindle
Page 13 - July 2013
- Header Test Fit
- Clean Up Front Frame
- Clean Up Front Frame.
- Radiator Support Rust
- Remove Headlight Solenoids and Actuators
- Adjust Front Apron
- Fiberglass repairs
- Front Wiring Harness
- Frame Clean up
- Radiator Repair
- Painting Frame
- Remove Steering Column
- Remove Intake
Page 14 - August 2011
- Remove Wiper Motor
- Remove Firewall Brackets
- Inner Guard Re-Shape
- Firewall Clean Up
- More Firewall Tidy Up
- Painted Firewall
Page 15 - September 2011
- Engine Bay Repair & Paint
- Power Booster & Master Cylinder
- Repaint Block
- Cleaned up fluid lines
- Strip Front Brakes
- Auto Dipstick Tube
- Trans Vacuum Line
- Intake Mock Up
Page 16 - September 2011
- Wiring Harness
- Circuit Breakers
- Radiator Support Trial Fit
- Wiper Motor CleanUp
- Power Steering Pump Disassemble
- Headlight Relays
- Electric Fan Relays
- Refitting Parts to Firewall
- Fitted Borgeson Steering Box
Page 17 - October 2011
- Transmission Cooler
- AC Delete Housing
- New Front Brake Lines
- Compression AN Fittings on Auto Cooler Lines.
- Harness Repair
- Fit AC Delete Housing
- Strip Valve Covers
- Paint Valve Covers
Page 18 - October 2011
- Paint Water Pump
- Rebuild A/C Harness
- Intake Fitted
- Media Blasted
- Suspension Painted
- Front Brake Calipers Painted
- Heater Wiring
- Radiator & Fans
- Fitted Alternator
- Fitted Water Pump
- Fitted heater Hoses and Vacuum Cutt-off
Page 19 - November 2011
- Cleaned up Throttle cable
- New Springs in Distributor
- Fitted Starter and other Accessories
- Engine Wiring Harness
- Throttle Cable
- Cooler Lines
- Radiator Core
- Thermo Fan Mounting Brackets
- Headlight Actuators
- Radiator Mounted
- Fitted Horn
- Picked up A-Arms
Page 20 - November 2011
- Thermatic Fan Controller
- Trans Cooler Lines
- Power Steering Pump
- Speedo Cable
- Valve Covers
- Fuel Lines
- Remote Start Wiring
- Headers Fitted.
- A-Arms and Spindles started
- Wiper Door Actuator Fitted
Page 21 - November 2011
- A-Arms and Spindles continued
- Electric Fans Fitted
- Radiator Back in Again
- Tie Rods etc.
- Spreader Bar
- Rebuilt Front Calipers
- Packed and Fitted Front Bearings
- Set the Rotor RunOut
- Fitted the Calipers
- Bled Front Brakes
- Front Sway Bar
- Sealed Front Apron
Page 22 - November 2011
- Thematic Fan Controller
- Steering Column
- Front Air Sealing
- Exhaust Fitted
- Repaint Underside of Hood !!!!
- Stripped Underside of Hood Again
- Fitted Hood
- Seals for Radiator
- Grills Repainted
- Grills Aligned.
- Bumperettes Fitted
Page 23 - November 2011
- More Grill and Bumper Alignment
- New Tail Lights
- Charcoal Canister Fitted.
- Vacuum Hoses
- Emission Hoses
- Splash Shields
- Plug Wires and Shields
- Motor Close to Done
- Side Grills Fitted
- Side Sills Fitted
- First Wash in 9 Months
- Power Steering Pump Control Valve O-Ring
- Heat Shields
Page 24 - January 2012
- Wiper Switch
- Summernats 2012
- US Trip 2012
- Now What
- Fan Control Panel
- Caster for large Tires
- Tire Clearances
- AMTops
- Cup Holder
- Ipod Wiring
- Power Distribution
Page 25 - March 2012
- 186 Heads Rebuilt
- Some Photo Shots
- Shielding Mod for Dipstick
- Vacuum Tank Repair
- Garage Floor.
- Start Engine Strip
- Testing Temperature Senders
- Fan Brackets for New Radiator
- Motor Removal
- Charcoal Canister Moved Down
Page 26 - June 2012
- Clean up Mounts and Frame
- Underside of Hood Painted
- Transmission Tunnel Crack
- Vacuum Tanks
- Motor at Builders Shop QIM
- Detail Engine Bay
- Tunnel Insulation
- Engine back from QIM
Page 27 - July 2012
- Cam Choice
- Paint Motor Block
- Rebuild Distributor
- Shim Distributor End Play
- Tested Temperature Senders
- Re Assembly of Motor Externals
Page 28 - August 2012
- Thematic Fans Bracket
- DeWitts radiator
- Motor Rebuild Shots
- Power Steering Adjustment Bolts
- Refinish Car Jack
- Radiator Overflow Tank
Page 29 - September 2012
- Stripped Down Door
- Window Removed
- Regulator and Runners
- Locks and Handles
- Run Wires for Central Locking
- Clean Up Door
- Dynamat Inside Door
- Repaint Edge
- Finished Expansion Tank
- Door locks
- Fitting Power Window Regulator
- Door Outer Trim and Seals
- Glass Fittings
- First Attempt to Allign Glass
- TTop Squeaks !!!!!!!!
- American Car Nationals 2012
- Trial Fit new Door Panel
- Adjusted Head lights
- Fixed Loose Headlight Door
- Polished Wheels
Page 30 - December 2012
- New Brake Pads
- Swapped Back to Original Steering Wheel
- Clean & Detail under Hood
- Summernats 2013
- Carb Accelerator Pump
- Temp Guage & Fan Control
- Car shows
Page 31 - March 2013
- TH400 modulator vacuum hose
- Booster Vacuum Leak
- 5.25" Kick Panel Speakers
- New BB/LT1 Hood
- T-Top Squeaks
Page 32 - March 2013
- Run to Tom's Garage
- Aluminium Tie Rod Sleeves
- Outer Tie Rod end kit - Anti Bump Steer
- Replaced Accelerator Pump Again
- T-Top trim plugs
- Big Block/LT1 Hood
Page 33
- Install Nose Support Bracket
- Prepare Egg Crate Vents for paint
- Engine Bay Glass Repairs
- Replace Rear View Mirror Bracket
- Antique Automobile Radio
- Repainted Egg Crate Side Vents.
- Repainted LT1 Hood
Page 34
- Cleaned up Vette for Summernats
- Summernats 2014 Pictures
- US Trip January 2014
Page 35
- Missfire Issues
- Quadrajet Strip
- Larger Jets and Rods
- Setting the Front Toe
Page 36
- Alligning Trailing Arms to Chasis Rail
- Setting Rear Toe
- Waterless Wash
- Window Regulator Locking Bolt
- Rear Halo Drip Trim Sealing
Page 37
- Power Door Actuators
- Hidden SubWoofer in Storage Box
- Removing Window Glass Scratches
- Passenger Door Mechanism Refurbish
- Strip Old Seats
Page 38
- Restore Seat Frames
- New Seat Covers To Foams
- Covers to Seat Bottoms
Page 39
- Fitted Seat Back Trims
- Final Seat Assembly
- Colour Match Door Pulls
- Fitted Rebuilt Seats to car
Page 40
- Cleaned Garage Floor
- Patched Concrete
- Power Washed Garage Floor
- Etched Concrete
- Painted Garage Floor with 3 Coats
- Wait 3 Days to Dry
- New Clean Garage Ready for Use
- QuickJack 5000 Arrives
Page 41
- Checking Borgeson box is Centred
- Box Now Centred Properly
- Column Now Correctly Centred
- However Steering is Offset !
- Borgeson Advise Box Clocked Incorrectly - Supplied New Free Replacement :-)
Page 42
- Strip Down Headers etc
- Remove Old Borgeson Box
- Fit New Borgeson Box
- Order Cup Head bolts to Replace Borgeson Bolts
Page 43
- New Bolts Arrive
- Finish Fitting New Borgeson Box
- Replace Valve Cover Gaskets
- Alignment Done
- Add Drain Holes to Radiator Support
- Spray inside of Radiator Support with Rust Protector
Page 44
- Original Ralley Wheels with New Trim Rings
- Global West Upper and Lower Control Arms Arrived
- Removing Original Lower Control Arms
- Removed Original Upper Control Arms
Page 45
- Started Fitted Global West Upper Arms
- Started Fitted Global West Lower Arms
- Dents in Front Crossmember
Page 46
- Fitted NOS window buttons
- Repaired Dents in Front Crossmember
- Finished front A-Arms
- Updated Kick Panel Speakers
- QuickTrick Alignment of Front End
Page 47
- Front Swaybar Angle
- Clean Polish & Wax
- Some Door Adjustments
Page 48
- Vette Hit by Beer Bottles Tossed by Oncoming Car
- Started Repair of Door and Hood Damage
- Scope Creep Took Over
- Repairs on Drivers Side Guard Front Corners, Apron and Spoiler Started
Page 49
- Repairs Continued
- Door Handle Area Repair
Page 50
- Test Fitting New Front Bumper
Page 51
- Front Bumper Continues
- Repair Passenger Guard Front Corner
- Front Apron Surgery to Get Grills to sit Level and Bumperettes Straight
Page 52
- More Work on Front Apron and Bumperettes
Page 53
- Repair Headlight Surround
- Repair Spider Cracks in Drivers Door
- Repair Top of Guard near Wipers
- Egg Crate Areas needed Some Work
- Wiper Gearbox out
- Cleaned, Resealed and Painted Wiper area
Page 54
- Repair Front Hood Surrounds
- More front Apron Surgery
Page 55
- Front Apron Success
- Vette to painter Take 1
- Primer on repairs
- Restore Wiper Mechanism
Page 56
- Some Test Shoots of Colour
Page 57
- Progress at the Paint Shop
- Back Home for Rear Guard Repair Resin
Page 58
- Rear Guard Repair take 1 Polyester
- Vette Back to Painter Take 2
Page 59
- Decision to Respray Entire Vette
- Vette Back home again
Page 60
- Testing Lowered Luggage Rack
- Start Repairs of Roof Hoop.
Page 61
- Roof Hoop Continues
- Repair Rear Apron
Page 62
- Change to Epoxy Resin for Panels Rearward of Doors (71 is mix of Polyester and Epoxy)
- Grind out and Repair Again in Epoxy
Page 63
- Lots of rear Apron Work
- Glass to Roof Hoop
- The Joys of VPA
Page 64
- Finish Sanding Roof Hoop
- Shaping Rear Apron Cut Outs
- Rear Guard Repair Done Again in Epoxy
- Copy Guard Shape with Template
Page 65
- Rear Deck repairs
- Restore Tail Light Housings
- Prepare rear Shock Mounts for VanSteal Coilovers
Page 66
- Welding in Shock Mounts
- Disassemble T-Tops
- Wet Sanding Starts
Page 67
- More Sanding
- More Filling
- Rebuild Water Diverters for Door Arch
- Vette Back to Painter Take 3
Page 68
- Repainted Garage Floor
- Vette in Booth for Some Primer
- Jams Shot with Colour
Page 69
- Finish Wiper Mechanism Restoration
- Paint Progress
Page 70
- Vette Coming Home
Page 71
- Fiited New Stainless Door Strikers
- Polishing front Apron
Page 72
- Paint Inside Front Apron
- Restore Headlight Actuator Parts
- Powder Coat Steel Wheels
- Reseal Inner Guards
- Spray Bedliner on Inner Guards
Page 73
- Bed Liner for Front Inner Guards
- Reassemble Headlight Mechanisms
- Headlight Doors back on
- Hood Back on
Page 74
- TailLight Assemblies Fitted
- Rear Wiring in Place
Page 75
- Fitting Headlight Mechanism
- Fitted Bumper Support Brackets
- Fitted Fuel Tank Overflow Assembly
- Rear Logo Fitted
Page 76
- Test Fitting Rear Bumpers
- Bed Liner in Wiper Tray and Rear Vents
- Started Removing Rear Suspension
- Pulled Diff Crossmember
- Stripped Down all Parts and Painted
- Fitted Front Bars
Page 77
- Cleaned up Rear Frame
- Cleaned up Rear Inner Guards
- Cleaned up Rear Underside of Body
- Repaired Battery Box Fiberglass
- Diff Back for Rebuild
- Painted Diff
Page 78
- Painted Rear Frame
- Painted Storage Boxes and Inner Guards with Bed Liner
- Stock Type Diff Crossmember Bushed Fitted
- Diff and Crossmember Fitted then Removed for Better Bushes
- Fitted Up Door Hardware and Weatherstip
Page 79
- Fitted Delrin Diff Crossmember Bushes
- Diff Crossmember Fitted
- Assembled Trailing Arms
- Fitted Half Shafts
Page 80
- Rear Suspension Fitted
- Callipers Back On
- New Rear Seal in TH400
- Speedo Gear in TH400 Changed
- CV's on Tail Shaft
- Fitted Parking Brake Cables
Page 81
- Repaired Inner Guard Holes
- Fitted Vacuum Tank
- Disassemble Cluster
- Restored Hood Release Bracket
- Restored Gas Pedal Assembly
- Dash Steering Column Support Refurbished
- Pedal Box Refurbished
- New Brake Booster Fitted
- Ridetech Bracket for Borgeson Box Fitted
- Bench Bleed Master Cylinder
- Repairs on Dash Pad
Page 82
- Fitted Master Cylinder
- Rebuilt Speedo
- Repaired Dash Pad
- Fitted Gas Pedal Assembly
- Playing with Rear Spring Length
- Assembled Dash Cluster
Page 83
- Repaired Wiper Solenoid
- Wires and Hoses Behind Dash
- More Clock Repairs
- Gauge Cluster Assembly
Page 84
- Replaced Clock Assembly
- Fitted Rear Bumpers
- Fitted Halo Stainless & Chrome
- New Weatherstip for T-Tops
- Fitted rear Inspection Plates
- Fitted Headlights
Page 85
- Restored Wiper Blade Assemblies
- Fitted Rear Tow Hook
- Fitted Wipers
- New 2.5" Exhaust Fitted
- Cleaned up Side Frames and Painted
- Re-Fit Door Weatherstrip
Page 86
- Tested Rear Suspension Maximum Body Drop
- Modified Clearances and Bump Stops
Page 87
- Windscreen Washer Tubes
- Made a Headlight Vacuum Relay Mounting Plate
- Fitted Wiper Door Trim
- Refurbish Wiper Door Mechanism and Fitted and Adjusted
Page 88
- Rear CoilOver Testing - Shorter Shock Bodies Needed
- Fitted new VanSteel Coil-Over with Spherical Bearings
Page 89
- Built Modules to fix ShutDown Pop in AAR Radio with AMP
- New Kick Panel Speakers and Mounting Plates
- Amp Mounted Under Seat
Page 90
- Johnny Joints to Replace Heims on Strut Rods
- Serviced Transmission
Page 91
- Fitted Cut-off for Extra Circuits
- Removed Jack Hold Downs
- Built Mount for Powered Sub in Storage
- Made Bracket for PWM Modules
Page 92
- Mounted PWM Controllers
- Mounted Under Seat Stereo Amp
- Adjusted Gains on Stereo
- Started Fitting Carpets
Page 93
- Heat Blanket Under Front Carpets
- Front Carpets Installed
- Seats back in
- ....
The Car in 2012.....
This thread was originally on the Australian Corvettes forum (Now Closed) but I had decided to also post it here given the wider audience and experience.
Last edited by CraigH; 04-09-2023 at 05:48 AM.

The following 5 users liked this post by CraigH:
72greg (11-27-2019),
Fred Catcott (12-20-2023),
hanig1one (12-14-2019),
SciVette (01-28-2022),
sjstub (12-08-2020)

Popular Reply
04-15-2020, 11:08 AM
Tech Contributor

Member Since: Aug 1999
Location: At my Bar drinking and wrenching in Lafayette Colorado
Posts: 13,652
Received 4,919 Likes
on
1,929 Posts

Hey Craig -
This is the first time I've looked through your incredible post and your admirable process. One note for you: 7 years ago, you posted up some photos of your carb and the way you cleaned it up and re-assembled it. If it's still in that configuration, you have a problem - it is not right. Might be a good idea to fix it when you get a chance.
Here is the photo you posted to show how you have the carb choke pulloff:

First, your carb is not a 1971 carb, or you do not have a 1971 choke system. The 1971 carb and system looks like this:


Your carb is a 1972 - 1974 vintage carb. It uses a spring wrapped around the choke pulloff arm to assist in correct choke operation. It also uses a unique secondary airvalve rod. Your carb is missing the pulloff arm spring and the second (short) pulloff connect rod. It should look like this:


Lars
02-18-2013, 01:29 AM
#2
Melting Slicks
Thread Starter
December 2009
I ordered a number of interior trim parts in December and they arrived prior to Xmas.
The only one I have fitted so far is the new console. The original was torn and needed replacement.
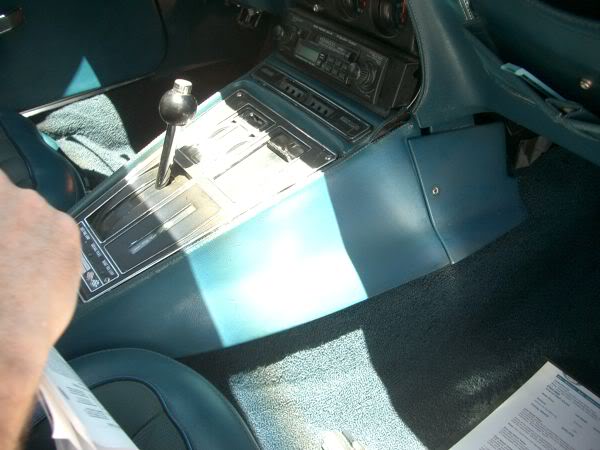
After straightening all the brackets etc etc I trial fitted the new one

Tossed the old radio and ordered a replica one with new electronics and ipod input
I also found out why the fiber optics for the front lights were not working - They were not connected under the console.
When I pull it out again to do the carpets I will refurbish the console top and repaint it etc.
I also
- removed all rust from the brake power booster and sprayed it.
- tidied up a number of wires under the bonnet that went no where
- re wrapped the loom where it goes down to the starter
- pulled all plug wires and cleaned and tidied up including fixing a few cracks - new set ordered
- added an inline fuel filter
- connected all the vacuum hoses to the correct points on engine and re-connected the charcoal canister correctly.
- made a temporary cover for the empty radio spot.
Took the Vette to the Summernats, where it sat most of the time on the oval - got lots of great comments.
I ordered a number of interior trim parts in December and they arrived prior to Xmas.
The only one I have fitted so far is the new console. The original was torn and needed replacement.
After straightening all the brackets etc etc I trial fitted the new one
Tossed the old radio and ordered a replica one with new electronics and ipod input
I also found out why the fiber optics for the front lights were not working - They were not connected under the console.
When I pull it out again to do the carpets I will refurbish the console top and repaint it etc.
I also
- removed all rust from the brake power booster and sprayed it.
- tidied up a number of wires under the bonnet that went no where
- re wrapped the loom where it goes down to the starter
- pulled all plug wires and cleaned and tidied up including fixing a few cracks - new set ordered
- added an inline fuel filter
- connected all the vacuum hoses to the correct points on engine and re-connected the charcoal canister correctly.
- made a temporary cover for the empty radio spot.
Took the Vette to the Summernats, where it sat most of the time on the oval - got lots of great comments.
Last edited by CraigH; 04-09-2023 at 05:49 AM.
02-18-2013, 01:30 AM
#3
Melting Slicks
Thread Starter
January 2010
Late January I decided to kill any rust that i Icould find in the base of the birdcage and repaint it - not a lot there from what I could see but it was caused by a leak from the wiper cowl area that was wide open. Filled it up and put the water hose back onto it to test and it now seems to be ok.
Possibly had front passenger side panel work done that caused the problem.
I also found out that when they fitted my seat belts in QLD they did not enlarge the trim opening enough so they had rubbed and were damaged.
Sent them back to the Supplier who is repairing them for me.
Took the opportunity to get them re made in blue.
Got samples from both Hemco and SeatBelt Solutions
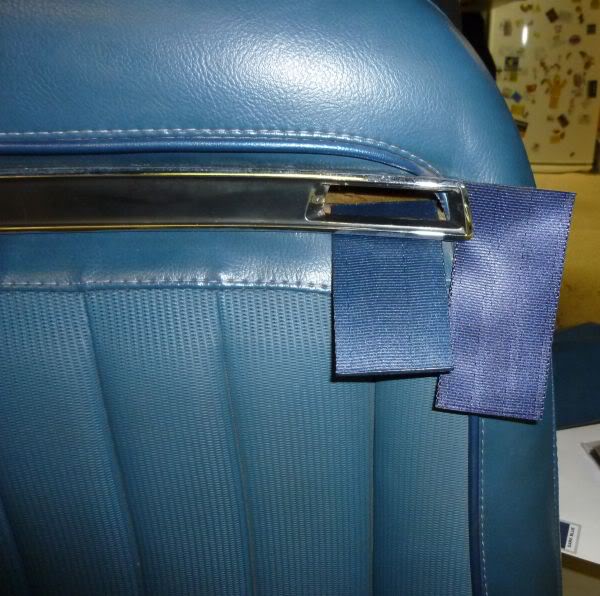
Luckily SeatBelt Solutions color was the closest and they were the original supplier so new set on way in blue.
However one thing leads to another......
To get the seat belts out I had to remove the the seats and the rear trim then take the webbing out of the belts etc....a bit involved but not too bad
So I decided the seats needed some work.
If only I could get back to the trim bits i got in December or the ones I purchased while in the US in January.
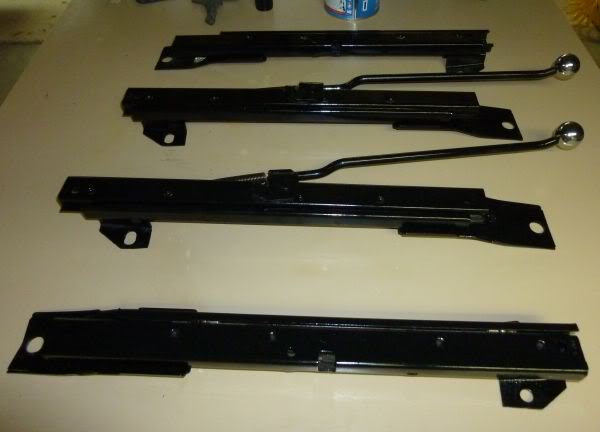
Removed all the tracks and cleaned them up.
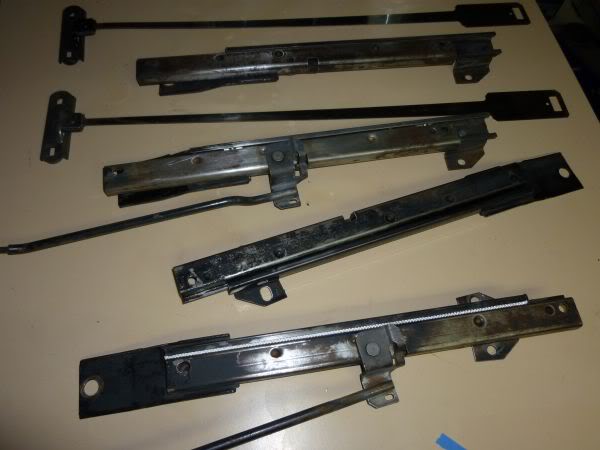
Repainted and lubricated them
Then i decided to pull the seats apart to repaint the trims, better clean them and swap the base between driver an passenger side.
Final outcome was not bad compared to how dirty they looked when i got them
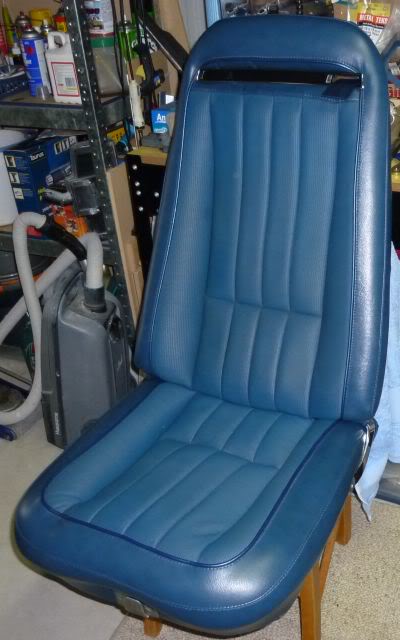
They are out of the car still waiting for the belts to come back
Late January I decided to kill any rust that i Icould find in the base of the birdcage and repaint it - not a lot there from what I could see but it was caused by a leak from the wiper cowl area that was wide open. Filled it up and put the water hose back onto it to test and it now seems to be ok.
Possibly had front passenger side panel work done that caused the problem.
I also found out that when they fitted my seat belts in QLD they did not enlarge the trim opening enough so they had rubbed and were damaged.
Sent them back to the Supplier who is repairing them for me.
Took the opportunity to get them re made in blue.
Got samples from both Hemco and SeatBelt Solutions
Luckily SeatBelt Solutions color was the closest and they were the original supplier so new set on way in blue.
However one thing leads to another......
To get the seat belts out I had to remove the the seats and the rear trim then take the webbing out of the belts etc....a bit involved but not too bad
So I decided the seats needed some work.
If only I could get back to the trim bits i got in December or the ones I purchased while in the US in January.
Removed all the tracks and cleaned them up.
Repainted and lubricated them
Then i decided to pull the seats apart to repaint the trims, better clean them and swap the base between driver an passenger side.
Final outcome was not bad compared to how dirty they looked when i got them
They are out of the car still waiting for the belts to come back
Last edited by CraigH; 04-09-2023 at 05:50 AM.
The following users liked this post:
Bigben (09-18-2021)
02-18-2013, 01:31 AM
#4
Melting Slicks
Thread Starter
While the seats were out I thought why not take the carpets out and have a look....that led to cleaning up a number of under dash brackets and repainting them all.
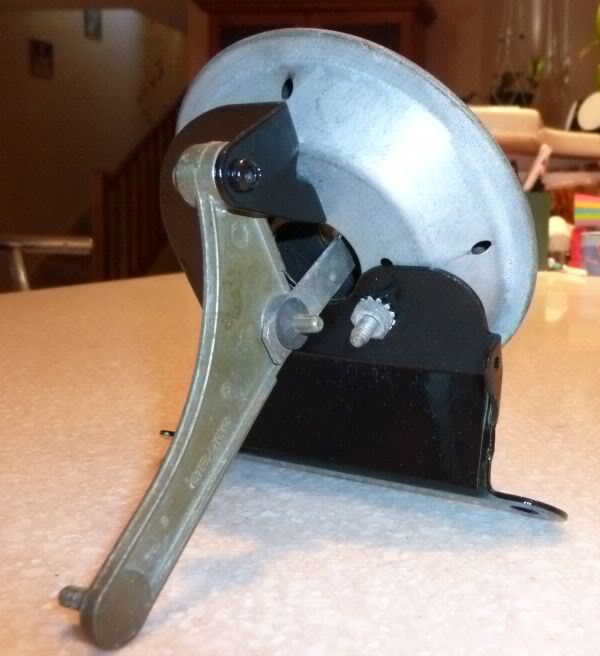
I started to get tired of cleaning bolts and nuts so I purchased one of these
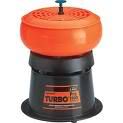
chemically kill any rust on the parts then drop them in here for a few hours and they come up great.
Will look for some more abrasive media as it can take a while.
So while the carpets were out i decided to work out how they had re wired my blinkers etc as there was no extra wire running from the brake switch to the back.
That led to re doing all the connections with heat shrink etc etc.
Found out how it was done - fairly clever.
Take the wire previously used for back up and use that to run the new brake light signal.
Then feed the backup signal from the transmission selector into the turn signal unit (where the brake light switch had previously gone) and all works fine.
While I was looking at this I wanted to find out why some of the rear fiber optics did not work and I found a couple of breaks in the fiber.
Thought I could fix it then decided to just replace the run.
Jaycar sell 4m run of 2ml fiber that is exactly the correct size for $25.
45 minutes later I have all the lights working in the console.
While looking around the taillights I notice the vapor return line is a bit old so i decide to replace it.....wow that was a pain as it is just a bit more than my arm could stretch.
I started to get tired of cleaning bolts and nuts so I purchased one of these
chemically kill any rust on the parts then drop them in here for a few hours and they come up great.
Will look for some more abrasive media as it can take a while.
So while the carpets were out i decided to work out how they had re wired my blinkers etc as there was no extra wire running from the brake switch to the back.
That led to re doing all the connections with heat shrink etc etc.
Found out how it was done - fairly clever.
Take the wire previously used for back up and use that to run the new brake light signal.
Then feed the backup signal from the transmission selector into the turn signal unit (where the brake light switch had previously gone) and all works fine.
While I was looking at this I wanted to find out why some of the rear fiber optics did not work and I found a couple of breaks in the fiber.
Thought I could fix it then decided to just replace the run.
Jaycar sell 4m run of 2ml fiber that is exactly the correct size for $25.
45 minutes later I have all the lights working in the console.
While looking around the taillights I notice the vapor return line is a bit old so i decide to replace it.....wow that was a pain as it is just a bit more than my arm could stretch.
Last edited by CraigH; 04-09-2023 at 05:50 AM.
02-18-2013, 01:31 AM
#5
Melting Slicks
Thread Starter
The wiper motor had been replaced before i got the car but none of the washer tubes were there so i found the plastic bag washer water holder under the fender and ran tubes to the pump and then into the windscreen wiper area.
However cant seem to find any tubes on my wipers to take the water : :
:
May have been replaced at some time with other wipers.
Will need to see how I can get water on windscreen another way possibly.
However cant seem to find any tubes on my wipers to take the water :
: May have been replaced at some time with other wipers.
Will need to see how I can get water on windscreen another way possibly.
02-18-2013, 01:32 AM
#6
Melting Slicks
Thread Starter
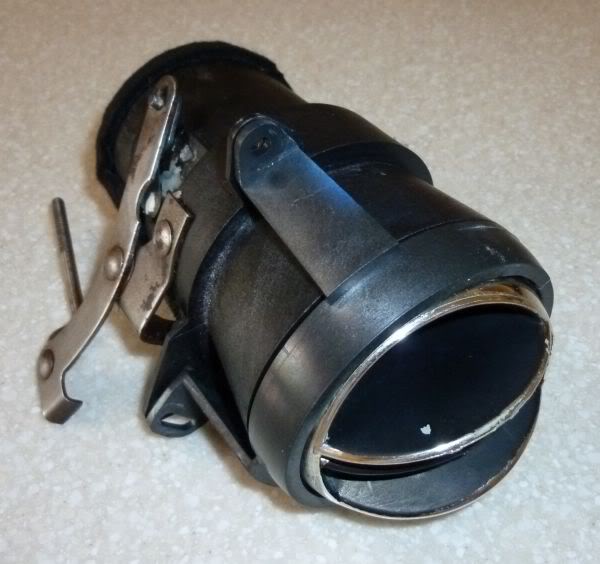
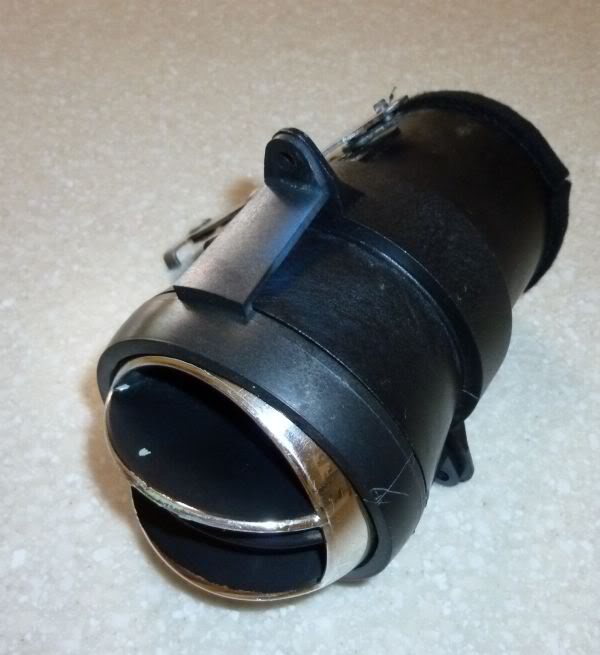
The Aircon was not working when i got it and the fan motor is dead.
Was thinking of getting a classic air unit but then decided why not try and get some air flow with the standard setup first, so I have checked out most of the vacuum operations and the heater box doors all seem to open close etc.
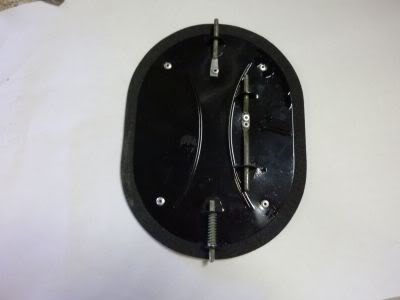
Removed the recirculate air vent flap and will need to replace the seal on it (remove rivets etc)
Will need to get a new motor for the system to see how much flow I get.
Found this site that makes panels to allow the removal of the air con under bonnet.
http://acdelete.com/pages/68-82_Y-Body.htm
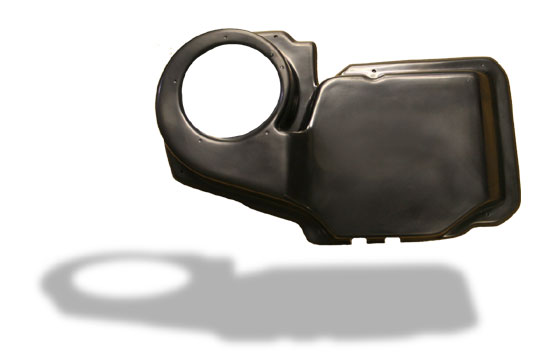
Will give this some more thought.
Was thinking of getting a classic air unit but then decided why not try and get some air flow with the standard setup first, so I have checked out most of the vacuum operations and the heater box doors all seem to open close etc.
Removed the recirculate air vent flap and will need to replace the seal on it (remove rivets etc)
Will need to get a new motor for the system to see how much flow I get.
Found this site that makes panels to allow the removal of the air con under bonnet.
http://acdelete.com/pages/68-82_Y-Body.htm
Will give this some more thought.
02-18-2013, 01:33 AM
#7
Melting Slicks
Thread Starter
I started to clean up under the drivers side dash.
Took off some of the brackets and repainted them.
Took out all the old under felt and created new patterns for as much as I could get to.

Then glued them in place.
Then I started to Dynamat the floor below that.
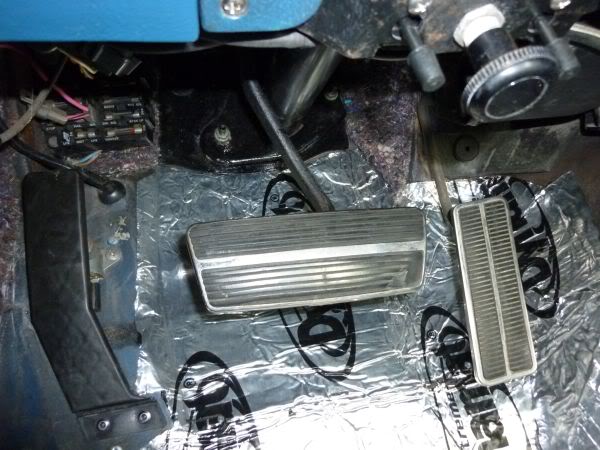
A lot more patterns to make, Dynamat to cut and roll into place .....but my son wanted to repaint his bedroom this weekend so time was very short. Dont let your kids use thumb tacks on plaster walls - one wall must have had 50 that needed to be filled sanded etc.
Took off some of the brackets and repainted them.
Took out all the old under felt and created new patterns for as much as I could get to.
Then glued them in place.
Then I started to Dynamat the floor below that.
A lot more patterns to make, Dynamat to cut and roll into place .....but my son wanted to repaint his bedroom this weekend so time was very short. Dont let your kids use thumb tacks on plaster walls - one wall must have had 50 that needed to be filled sanded etc.
Last edited by CraigH; 04-09-2023 at 05:51 AM.
The following users liked this post:
c1nicole (09-14-2022)
02-18-2013, 01:34 AM
#8
Melting Slicks
Thread Starter
Put all the drivers side brackets behind the dash back in that I painted and cleaned up the vent, put new felt seals etc then put them back.
On the passenger side I pulled the fresh air vent assembly apart, took out the rivets and will have to order a new rubber seal.
Cleaned up all the brackets and dug heaps of leaves and rubbish out from behind the flap :-(
Finished off the servo and brackets etc.

Put the carpet and seats back in so I can drive it again while I wait for new carpets to arrive.
Once they arrive I will finish the Dynamat
On the passenger side I pulled the fresh air vent assembly apart, took out the rivets and will have to order a new rubber seal.
Cleaned up all the brackets and dug heaps of leaves and rubbish out from behind the flap :-(
Finished off the servo and brackets etc.
Put the carpet and seats back in so I can drive it again while I wait for new carpets to arrive.
Once they arrive I will finish the Dynamat
Last edited by CraigH; 04-09-2023 at 05:51 AM.
02-18-2013, 01:34 AM
#9
Melting Slicks
Thread Starter
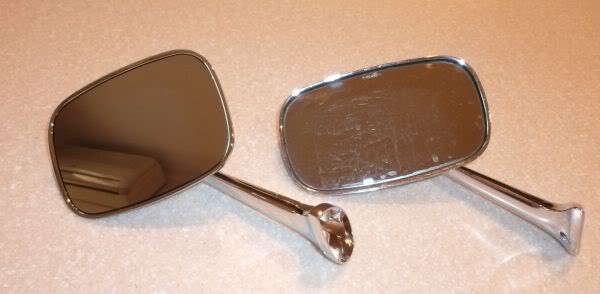
The drivers side mirror was a post 74 version and a bit wider then the passenger side so I replaced it with the correct size one.
Also this one stays in position a lot better.
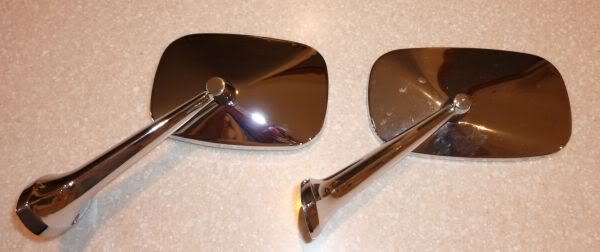
I also found that the seat belt openings in the 71 seats are still a bit rough on the edges (and over time will damage the seat belt edges) so I spent some time smoothing them out.
A bit more work on them after some usage and I will need to repaint the seat trim again.
Also this one stays in position a lot better.
I also found that the seat belt openings in the 71 seats are still a bit rough on the edges (and over time will damage the seat belt edges) so I spent some time smoothing them out.
A bit more work on them after some usage and I will need to repaint the seat trim again.
Last edited by CraigH; 04-09-2023 at 05:51 AM.
02-18-2013, 01:35 AM
#10
Melting Slicks
Thread Starter
I decided to have a look at how the shelf for the rear window worked and found it was just full of dust and dirt.
Took it out and gave it a clean up and repaired a minor crack and blended in the paint to match original (was close to perfect match for black bumper/trim paint.)
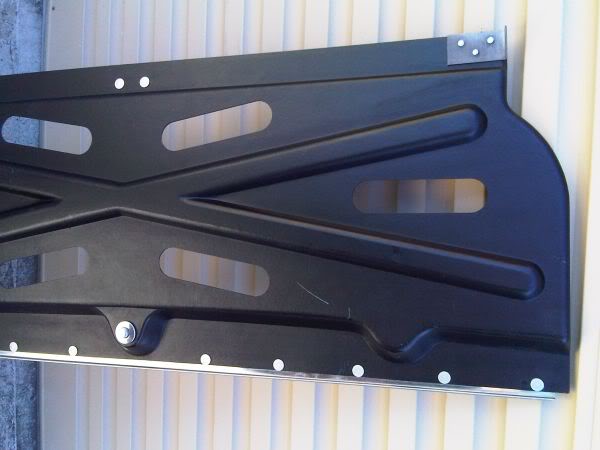
Cleaned up the brackets and they are ready to paint.
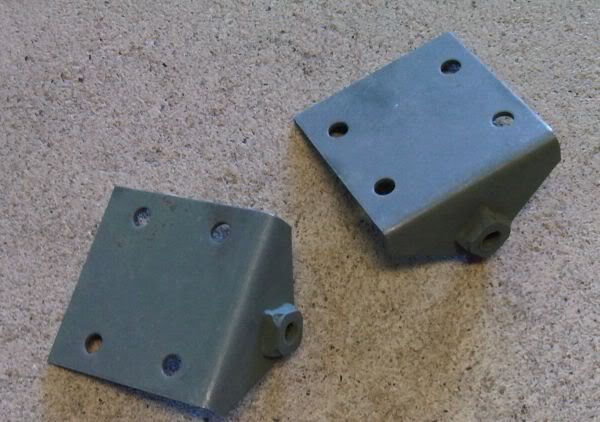
The shaft uses the same nylon bushes as the wiper door. After cleaning out the drain areas behind the kick panels I now have close to 10 of them that have fallen down over time. :-D
Finished and with window in to show how it goes.
May add some foam pads to stop any vibrations.
Took it out and gave it a clean up and repaired a minor crack and blended in the paint to match original (was close to perfect match for black bumper/trim paint.)
Cleaned up the brackets and they are ready to paint.
The shaft uses the same nylon bushes as the wiper door. After cleaning out the drain areas behind the kick panels I now have close to 10 of them that have fallen down over time. :-D
Finished and with window in to show how it goes.
May add some foam pads to stop any vibrations.
Last edited by CraigH; 04-09-2023 at 05:52 AM.
02-18-2013, 01:36 AM
#11
Melting Slicks
Thread Starter
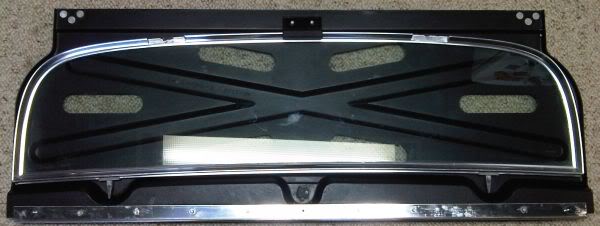
I had always thought the rear window was a tight fit and after having a better look it was because the weatherstrip was getting stuck under the window panel and was not stuck down properly.
So I glued it all down around the edges and now the window fits so much better
Used a wooden template to hold it in position as the previous strip was cut for some reason and stretched to fit.
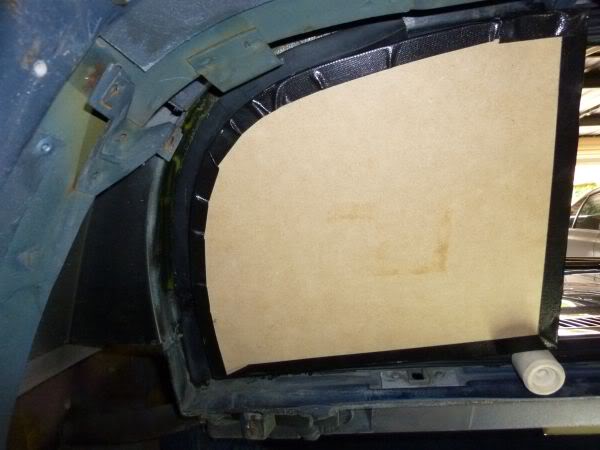
Will order a new weatherstrip I think and do it all again to ensure it is watertight etc. as the cut as seen in the picture above does not look that nice.
:-D
So I glued it all down around the edges and now the window fits so much better
Used a wooden template to hold it in position as the previous strip was cut for some reason and stretched to fit.
Will order a new weatherstrip I think and do it all again to ensure it is watertight etc. as the cut as seen in the picture above does not look that nice.
:-D
Last edited by CraigH; 04-09-2023 at 05:52 AM.
02-18-2013, 01:36 AM
#12
Melting Slicks
Thread Starter
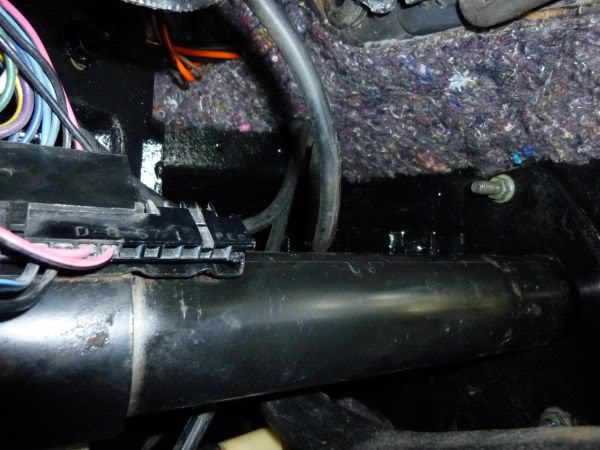
Before replacing carpets etc i wanted to be sure I had minimized as many leaks as possible - Something that from what read was going to be a long process. (I am sure i will find new ones as time goes on)
Well after a number of days of painful positions in the car with a hose being sprayed outside I think I have fixed most of the culprits.
Was using heaps of water (as some were only a drip every few minutes with the tap on full spray) ......so I may have been being a but **** but ....that me :?
Should have done this when the seats were out.
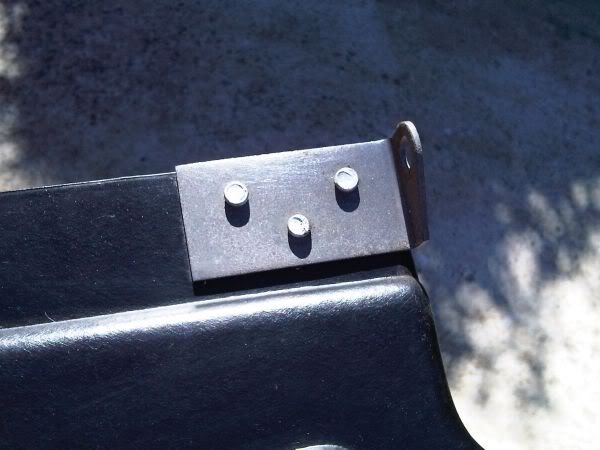
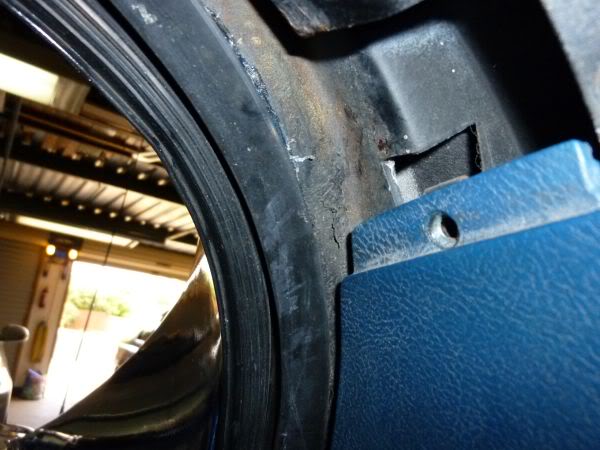
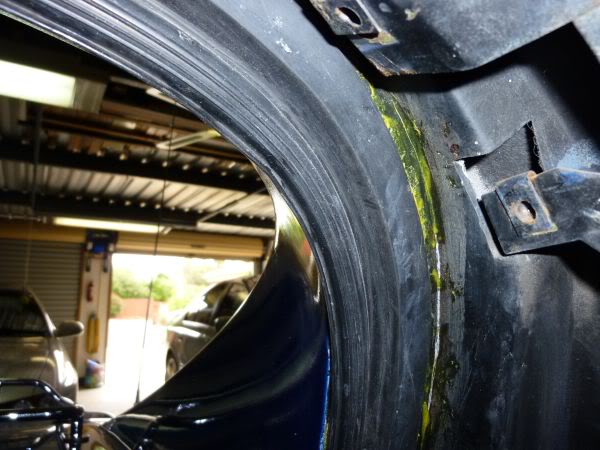
Down in the cowl the under the mechanism to open the wiper flap I found a few like this
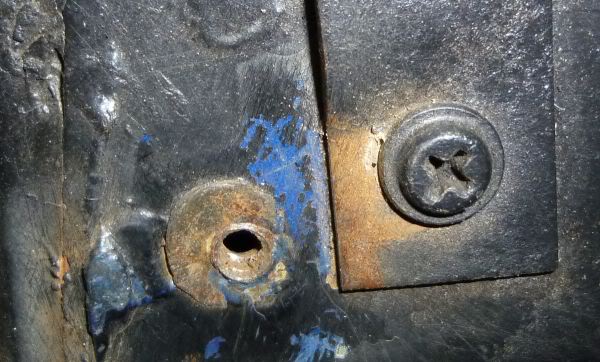
Screws through brackets that were not sealed and water makes its way down the thread. Also a number of fine cracks in seams etc etc.
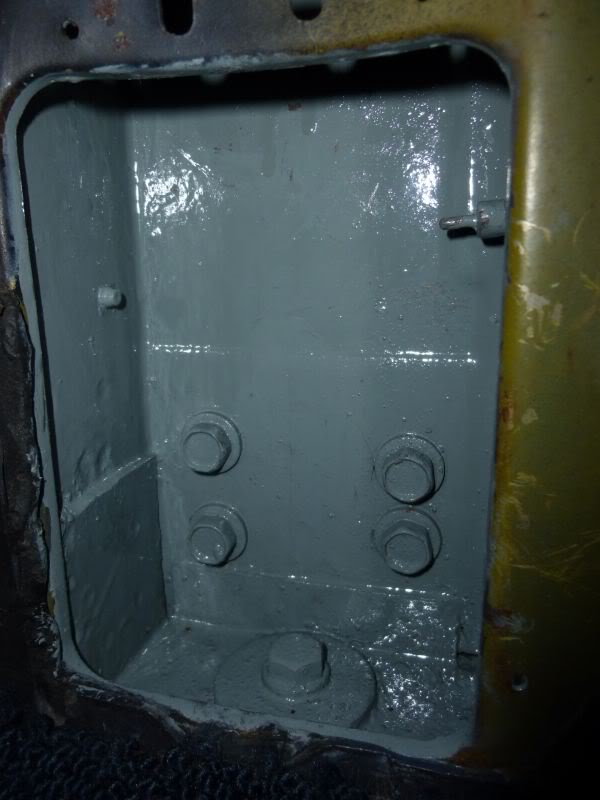
The birdcage only had minor surface rust, as far as I could see up it with mirrors and torches etc.
So I converted all that and painted as far as I could get up the inside of the pillars with grey killrust enamel.
Then I took out all the pillar trims etc and sprayed fishoil into all the birdcage cavities through the screw holes.
Next to replace the door open switches and make some craftwood speaker frames for the kickpanel areas of the birdcage.
Well after a number of days of painful positions in the car with a hose being sprayed outside I think I have fixed most of the culprits.
Was using heaps of water (as some were only a drip every few minutes with the tap on full spray) ......so I may have been being a but **** but ....that me :?
Should have done this when the seats were out.
Down in the cowl the under the mechanism to open the wiper flap I found a few like this
Screws through brackets that were not sealed and water makes its way down the thread. Also a number of fine cracks in seams etc etc.
The birdcage only had minor surface rust, as far as I could see up it with mirrors and torches etc.
So I converted all that and painted as far as I could get up the inside of the pillars with grey killrust enamel.
Then I took out all the pillar trims etc and sprayed fishoil into all the birdcage cavities through the screw holes.
Next to replace the door open switches and make some craftwood speaker frames for the kickpanel areas of the birdcage.
Last edited by CraigH; 04-09-2023 at 05:52 AM.
02-18-2013, 01:37 AM
#13
Melting Slicks
Thread Starter
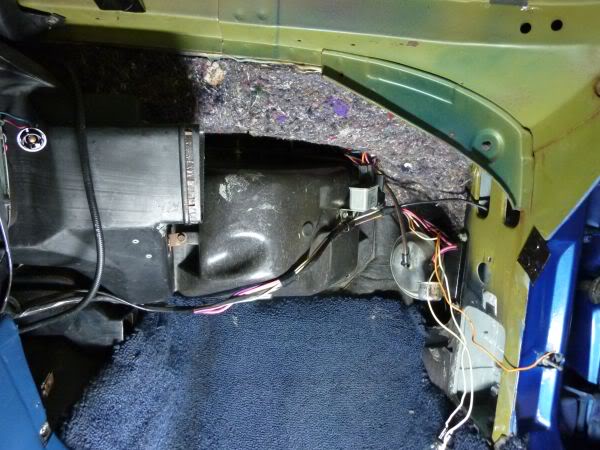
I had ordered a new heater blower motor so could I get some ventilation happening.
The original relay and wiring was toasted so not sure what had happened.
So after getting all the vacuum system working for vents etc I took the old blower motor out and guess what it still worked ok. !!!!
So I have re done much of the wiring with a new stronger earth lead from the alternator to the relay bracket on the firewall and then onto the blower motor relay and blower.
I have been using crimp connectors but removing the colored plastic sleeve and replacing with heat shrink as it looks more period correct.
All speeds seem to be working now for the fan big improvement. Not sure why they have these fans set so off still moves air but I can change that easy enough.
Started to put the wiper door back on and then decided to spend some time getting the alignment better.!!!!!!!!!!!!!!!!!!!!!!!!!!
6 refits later and its getting closer.
Took off some the mounting brackets to re align them a bit and repaint etc and as usual you find a few new holes that are not filled properly underneath.
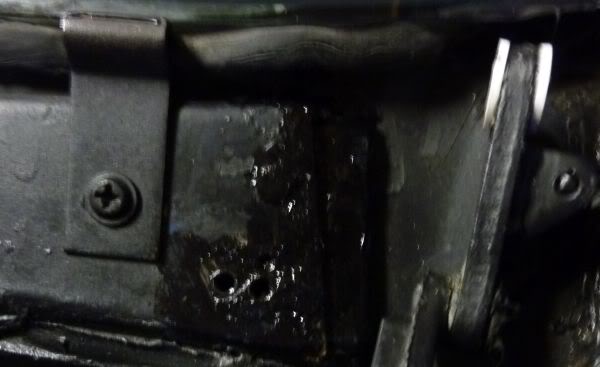
No wonder these things are prone to leaks.
Will fill them in tomorrow and refit the brackets etc.
The original relay and wiring was toasted so not sure what had happened.
So after getting all the vacuum system working for vents etc I took the old blower motor out and guess what it still worked ok. !!!!
So I have re done much of the wiring with a new stronger earth lead from the alternator to the relay bracket on the firewall and then onto the blower motor relay and blower.
I have been using crimp connectors but removing the colored plastic sleeve and replacing with heat shrink as it looks more period correct.
All speeds seem to be working now for the fan big improvement. Not sure why they have these fans set so off still moves air but I can change that easy enough.
Started to put the wiper door back on and then decided to spend some time getting the alignment better.!!!!!!!!!!!!!!!!!!!!!!!!!!
6 refits later and its getting closer.
Took off some the mounting brackets to re align them a bit and repaint etc and as usual you find a few new holes that are not filled properly underneath.
No wonder these things are prone to leaks.
Will fill them in tomorrow and refit the brackets etc.
Last edited by CraigH; 04-09-2023 at 05:52 AM.
02-18-2013, 01:38 AM
#14
Melting Slicks
Thread Starter
Time to repair some of the AC vents. The race tape repairs by previous owners may have worked but....
It had a number of cracks etc
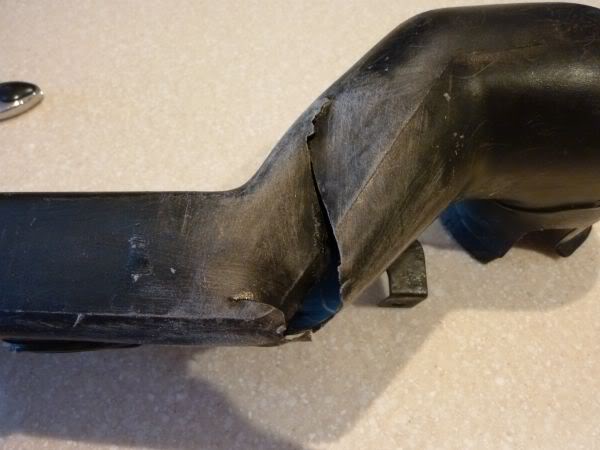
Sand it all and fiberglass over the problem areas.
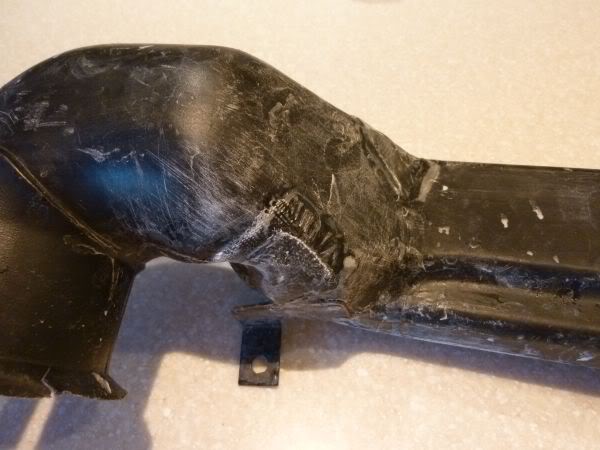
Then sand again.
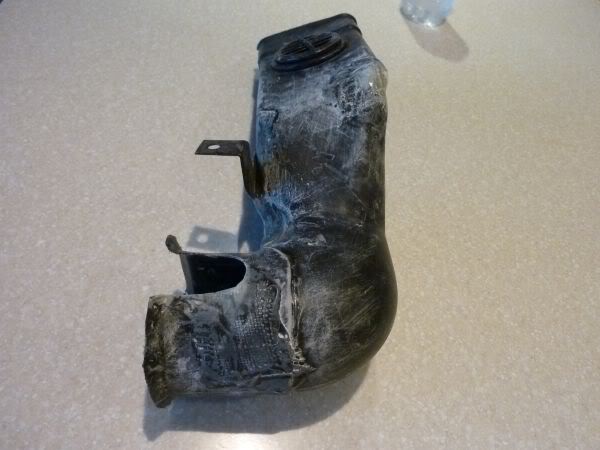
Then paint.
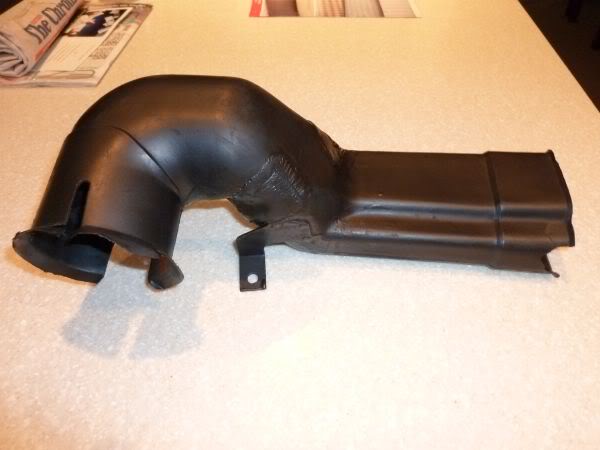
Possibly could have filled all the fiberglass mesh and made it 100% smooth but it is under the dash.
It had a number of cracks etc
Sand it all and fiberglass over the problem areas.
Then sand again.
Then paint.
Possibly could have filled all the fiberglass mesh and made it 100% smooth but it is under the dash.
Last edited by CraigH; 04-09-2023 at 05:53 AM.
The following users liked this post:
Primoz (05-13-2021)
02-18-2013, 01:38 AM
#15
Melting Slicks
Thread Starter
Cleaned up the passengers side under the dash.
Pulled out the old insulation and cleaned it up.

Then rebuilt the vent flap etc and put them back in
Got a few scratches on it when i put it back together so may take it out again and re spray it.
All vents etc now work well so happy with the HVAC at moment 8)
Then re did under felt vacuum lines, cleaned rust off relays and sprayed with clear paint.
Need to tidy up the wiring a bit more and make a mount for the under dash light as it is missing.
Pulled out the old insulation and cleaned it up.
Then rebuilt the vent flap etc and put them back in
Got a few scratches on it when i put it back together so may take it out again and re spray it.
All vents etc now work well so happy with the HVAC at moment 8)
Then re did under felt vacuum lines, cleaned rust off relays and sprayed with clear paint.
Need to tidy up the wiring a bit more and make a mount for the under dash light as it is missing.
Last edited by CraigH; 04-09-2023 at 05:53 AM.
02-18-2013, 01:39 AM
#16
Melting Slicks
Thread Starter
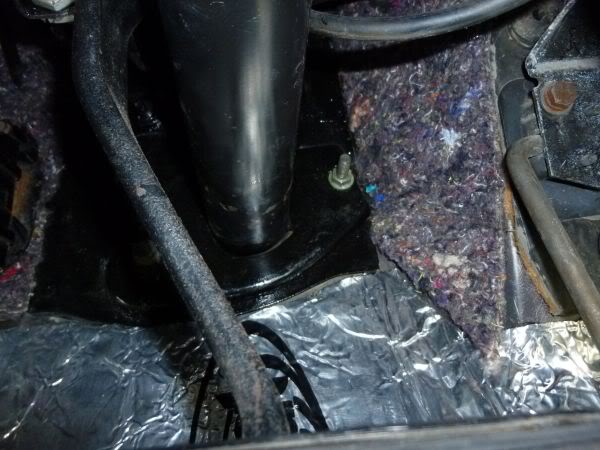
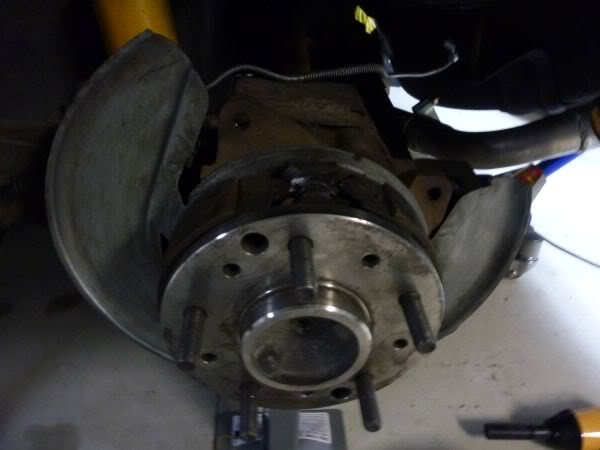
Have been doing a bit of work trying to stop a squeak I had in the drivers rear brake as well as a tapping noise sometimes from the passenger side rear.
So after removing the caliper, rotor etc and cleaning up the parts, greasing the handbrake etc its back on and the squeak is a lot less.
I need to do the same on the other side and then adjust the handbrake properly as I believe the taping noise could be a loose shoe on the passenger side.
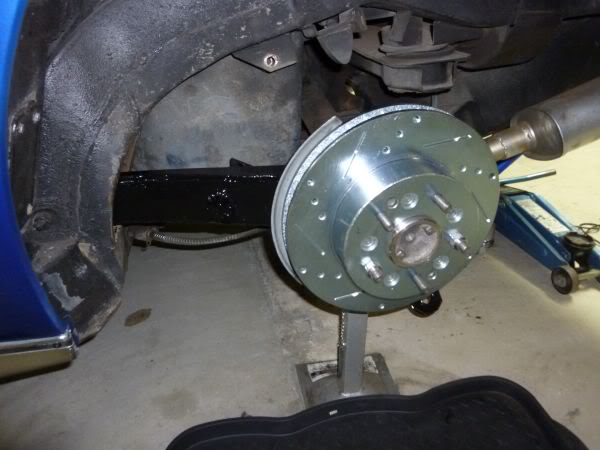
I have new rotors to put on but i kept them for when i can spend a bit more time doing it all up a bit neater.
Have ordered a digital dial gauge in case the existing rotor has run-out issues.
I found the handbrake cable was hitting the exhaust so that could have been part of the noise.
Trial and error to find all the possible causes....in fact after filling up the tank and zip tying the cable out if the way of the exhaust i can hardly hear the noise...Empty tank may have been acting as an amplifier ....
So after removing the caliper, rotor etc and cleaning up the parts, greasing the handbrake etc its back on and the squeak is a lot less.
I need to do the same on the other side and then adjust the handbrake properly as I believe the taping noise could be a loose shoe on the passenger side.
I have new rotors to put on but i kept them for when i can spend a bit more time doing it all up a bit neater.
Have ordered a digital dial gauge in case the existing rotor has run-out issues.
I found the handbrake cable was hitting the exhaust so that could have been part of the noise.
Trial and error to find all the possible causes....in fact after filling up the tank and zip tying the cable out if the way of the exhaust i can hardly hear the noise...Empty tank may have been acting as an amplifier ....
Last edited by CraigH; 02-19-2013 at 12:38 AM.
02-18-2013, 01:39 AM
#17
Melting Slicks
Thread Starter
While I had part of the dash off I decided to have a closer look at the gauge cluster and see why i did not have a door ajar light etc.
Found that once I replace a few bulbs its all working.....in fact the clock is now also working after attaching the proper wires.
The new one I have in a box will have to wait till it fails for real.
The only thing I am missing is the socket to hold the light in the Seat belt warning area.
Repco have ordered something for me (generic T10 socket for a dash)
Hope it fits....
Very happy most is now working.
All I need to do is then put the new bezel and radio in and it will look 100% better.
Last edited by CraigH; 04-09-2023 at 03:49 AM.
02-18-2013, 01:40 AM
#18
Melting Slicks
Thread Starter
I now have all the buttons and lights in the Gauge bezel working - Repco came through with the PC board fitting and now all operates as expected.
The clock works and then every now and then stops. May just be a contact inside - may pull apart to look or just install the new one I have.
Now it all needs to be transferred to my new bezel that has not been butchered like the original one.
The clock works and then every now and then stops. May just be a contact inside - may pull apart to look or just install the new one I have.
Now it all needs to be transferred to my new bezel that has not been butchered like the original one.
02-18-2013, 01:40 AM
#19
Melting Slicks
Thread Starter
Last weekend I decided to adjust the park brake and cables etc so they would not touch the exhaust.
Did one side ok and went onto other, removed the caliper so i could clean etc and noticed it was leaking.
Time to do the calipers.
After some deliberation I decided to try a rebuild.
So if I am going to rebuild the calipers they need to be clean. First step clean off all the dirt etc.
Then I used a citrus paint remover to soften the old paint on them.
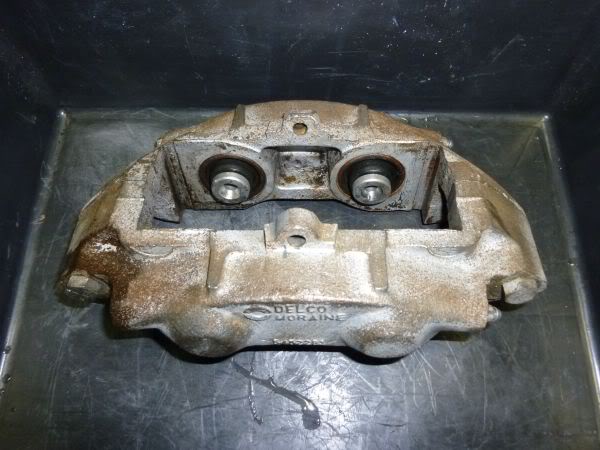
Then a fair amount of wire brush work and they look great - almost a shame to paint them.

I think I will paint them black.
Now to clean up the trailing arm etc before i put it back together
First pass lots more to clean off.
Did one side ok and went onto other, removed the caliper so i could clean etc and noticed it was leaking.
Time to do the calipers.
After some deliberation I decided to try a rebuild.
So if I am going to rebuild the calipers they need to be clean. First step clean off all the dirt etc.
Then I used a citrus paint remover to soften the old paint on them.
Then a fair amount of wire brush work and they look great - almost a shame to paint them.
I think I will paint them black.
Now to clean up the trailing arm etc before i put it back together
First pass lots more to clean off.
Last edited by CraigH; 04-09-2023 at 05:54 AM.
02-18-2013, 01:41 AM
#20
Melting Slicks
Thread Starter
Did not get as much time this weekend but still got a bit done.
Cleaned up the trailing arms then rust primer and black paint. Needed to take the spring bolts out to do a good job. Will need another coat.

Rebuilt the rear calipers with VB&P O-Ring piston kits. Hope they work as they were a bit stiff after the install.
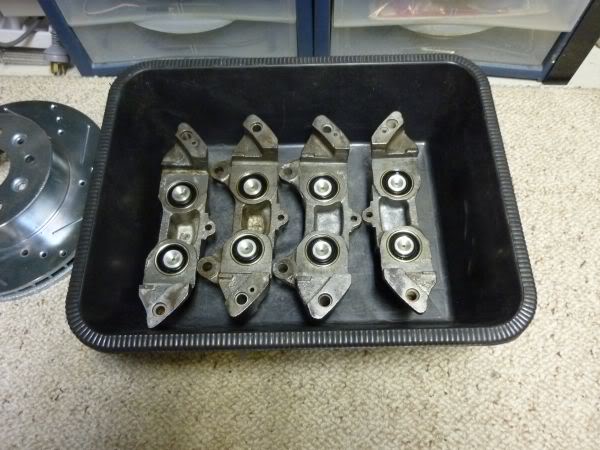
Now they need paint and it all goes back together.
Cleaned up the trailing arms then rust primer and black paint. Needed to take the spring bolts out to do a good job. Will need another coat.
Rebuilt the rear calipers with VB&P O-Ring piston kits. Hope they work as they were a bit stiff after the install.
Now they need paint and it all goes back together.
Last edited by CraigH; 04-09-2023 at 05:55 AM.