
1971 Journey
 03-04-2018, 05:02 PM
#1201
Race Director


Thanks for all the feedback.
I get what your saying DUB, the fact that it is bonded to the hoop of the birdcage means it should not move much.
The main flex would be taking the rear window in and out, especially if it is very tight.
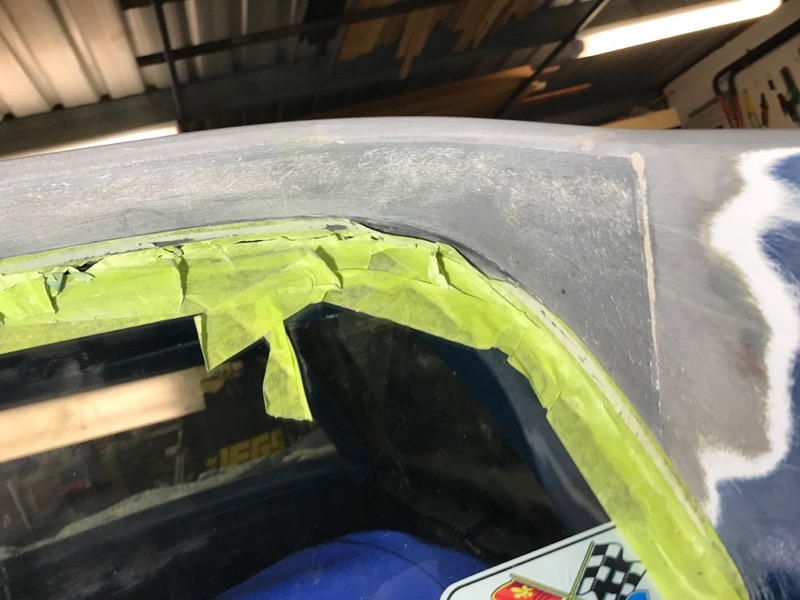
I now have it all back to glass.
There was original paint then VPA, Sealer, Spray putty etc then the final paint.
I was able to get most of it off with a razor blade then sand the original paint away.
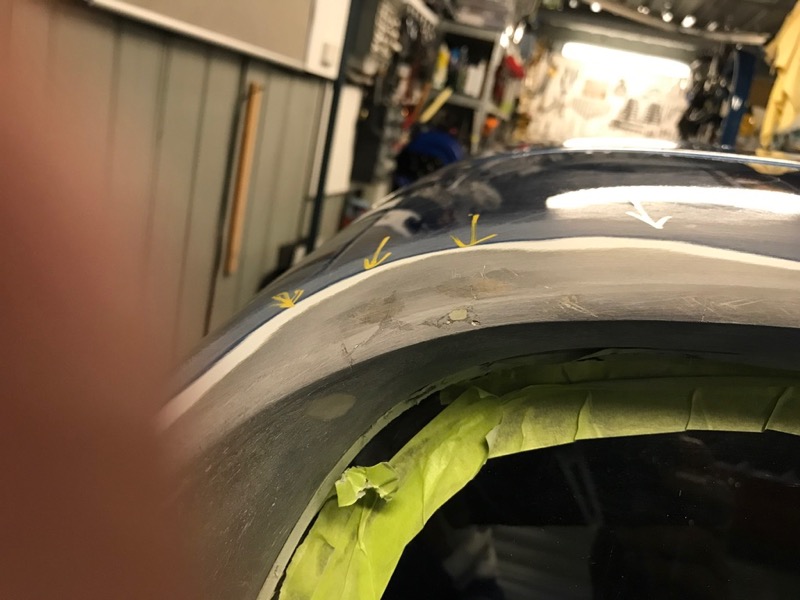
There is still a couple of cracks on the outer edge where it comes down towards the sails.
I will glass them up and grind out the side vertical joins and do them again.
In the center under the halo is a crack as well or possibly its a join.
The correct name is Evercoat Fiber Tech
http://www.evercoat.com/product-deta...art/100633/us/
I get what your saying DUB, the fact that it is bonded to the hoop of the birdcage means it should not move much.
The main flex would be taking the rear window in and out, especially if it is very tight.
I now have it all back to glass.
There was original paint then VPA, Sealer, Spray putty etc then the final paint.
I was able to get most of it off with a razor blade then sand the original paint away.
There is still a couple of cracks on the outer edge where it comes down towards the sails.
I will glass them up and grind out the side vertical joins and do them again.
In the center under the halo is a crack as well or possibly its a join.
The correct name is Evercoat Fiber Tech
http://www.evercoat.com/product-deta...art/100633/us/
 Thanks for clarifying that the product was from Evercoat.
knowing that you seem to really get into repairing your major cracks in the body correctly...these should not come back.
Mainly because...even though I LOVE VPA...if the area is not correctly prepped and it used correctly...it can fail.
DUB
 03-05-2018, 02:42 AM
#1202
Melting Slicks

Thread Starter

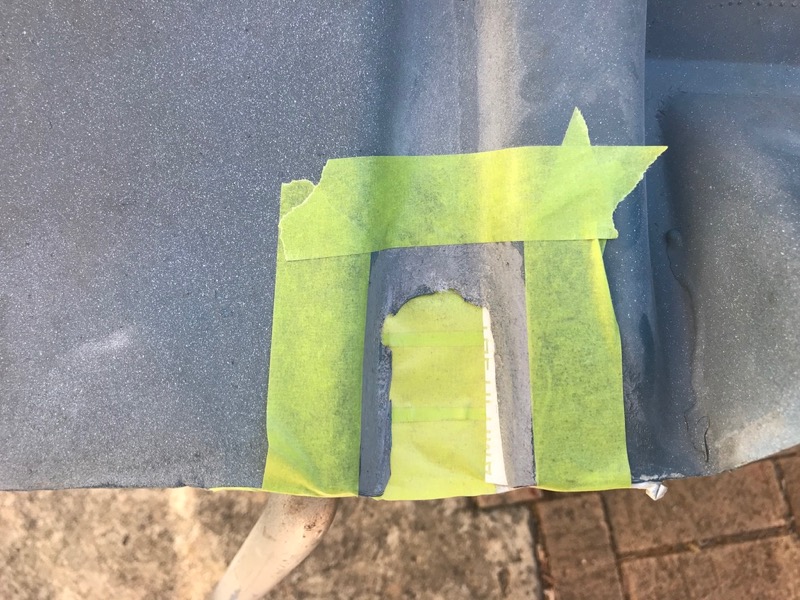
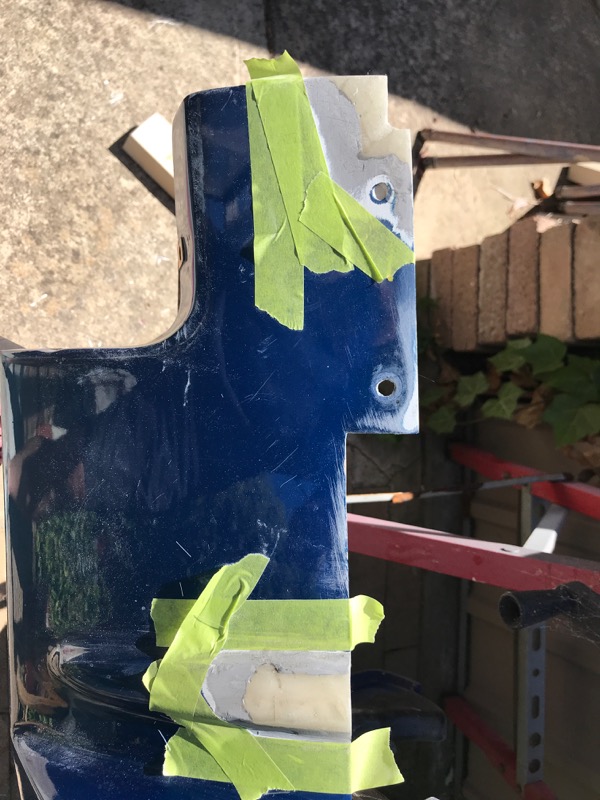
So it would appear that the top cracks were from some previous repairs.
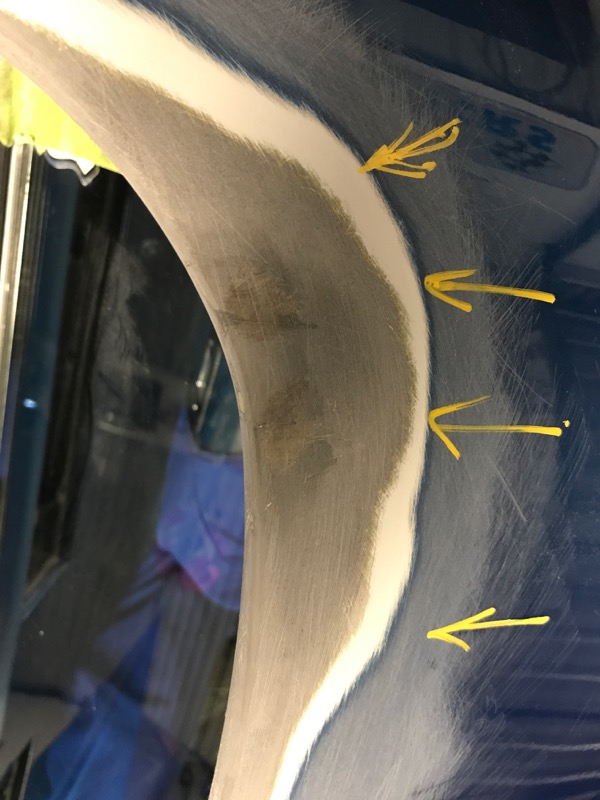
They do not seem to flow into the fill panel under the halo.
However it does have a fine crack in the middle
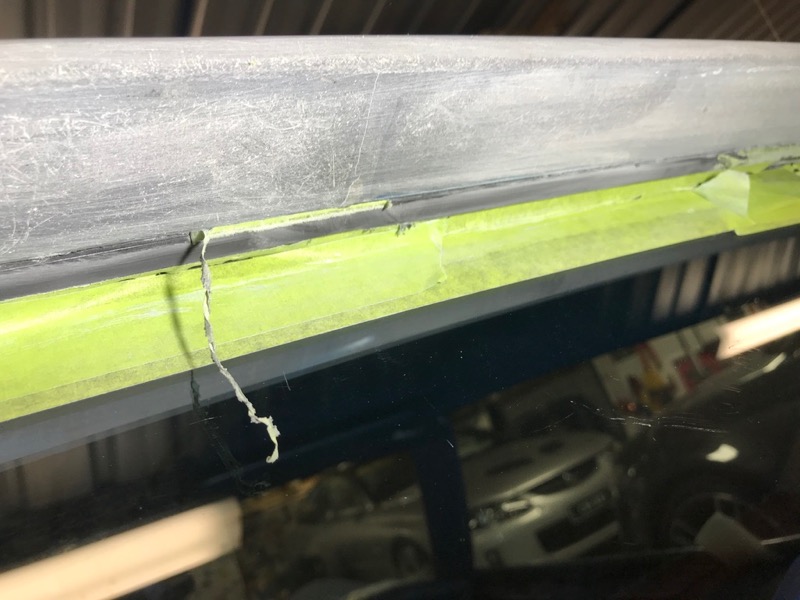
The seam does not look that bad at all, except on the passenger side where it is a mix of filler types.
They do not seem to flow into the fill panel under the halo.
However it does have a fine crack in the middle
The seam does not look that bad at all, except on the passenger side where it is a mix of filler types.
Last edited by CraigH; 04-10-2023 at 06:08 AM.
03-05-2018, 02:59 AM
#1203
Racer


At least your repairing it correctly now Craig
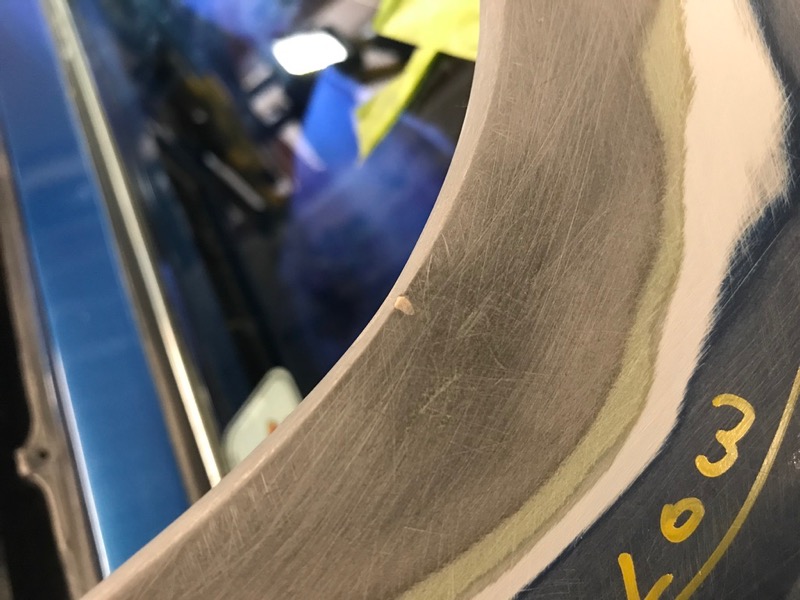
It's actually a join under the centre of the halo and not a crack. That section must be made up of two panels, I had the same on mine. I guess the factory didn't bother to smooth it out too much due to its location.
You should have the VPA by the weekend.
It's actually a join under the centre of the halo and not a crack. That section must be made up of two panels, I had the same on mine. I guess the factory didn't bother to smooth it out too much due to its location.
You should have the VPA by the weekend.
03-05-2018, 05:11 AM
#1204
Melting Slicks
Thread Starter
At least your repairing it correctly now Craig
It's actually a join under the centre of the halo and not a crack. That section must be made up of two panels, I had the same on mine. I guess the factory didn't bother to smooth it out too much due to its location.
You should have the VPA by the weekend.
It's actually a join under the centre of the halo and not a crack. That section must be made up of two panels, I had the same on mine. I guess the factory didn't bother to smooth it out too much due to its location.
You should have the VPA by the weekend.
03-05-2018, 07:00 PM
#1205
Race Director

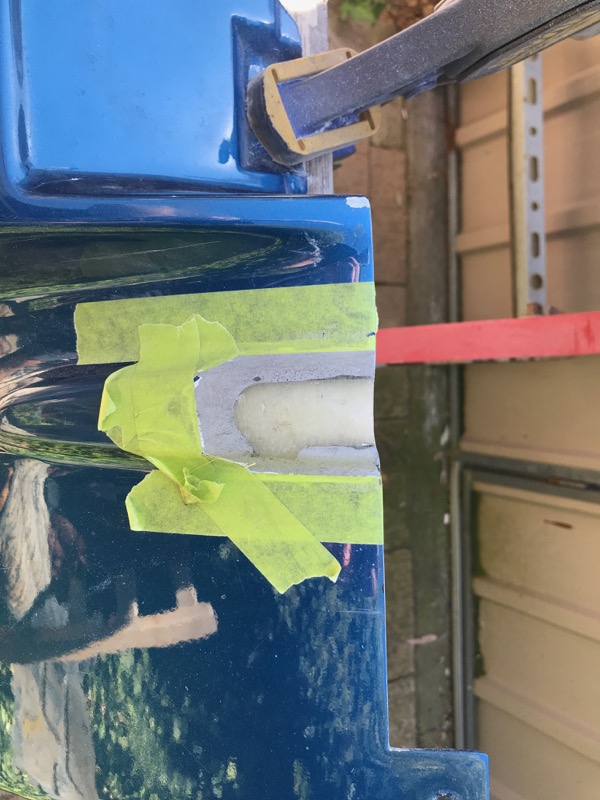
The line in the center is a bonding seam like the ones on the sides. Grind and fill.
DUB

 03-05-2018, 10:19 PM
#1207
Racer
It's in the mail Craig.
VPA is very thick stuff so you need to stir it well before use.
Also it drys very hard, so it's best to start sanding it while it's still soft. Usually a few minutes after applying it. If it clogs the sandpaper then it's still a bit too soft but it doesn't take long to harden up. Just don't leave it to long before you sand or you will be in for a workout!!!
03-06-2018, 04:39 AM
#1208


It's in the mail Craig.
VPA is very thick stuff so you need to stir it well before use.
Also it drys very hard, so it's best to start sanding it while it's still soft. Usually a few minutes after applying it. If it clogs the sandpaper then it's still a bit too soft but it doesn't take long to harden up. Just don't leave it to long before you sand or you will be in for a workout!!!
VPA is very thick stuff so you need to stir it well before use.
Also it drys very hard, so it's best to start sanding it while it's still soft. Usually a few minutes after applying it. If it clogs the sandpaper then it's still a bit too soft but it doesn't take long to harden up. Just don't leave it to long before you sand or you will be in for a workout!!!
Good Luck, I think you will like it once you get the dynamics of it.
03-06-2018, 05:59 PM
#1210
Race Director
I think Roger meant to type 80 grit and not 180 grit. Sanding with 180 grit right of the bat is futile.
For shaping /contouring and getting it down use 36 grit...then switch to 80 grit depending on how bad it is.
Then when you have to blocked with 80 grit...go over it with 180 grit and prime it.
That 'sweet spot' is when it is still soft enough to not fall off or peel away from the panel when you sand it with the 36 grit...but it is still soft enough to clog your paper...but yet hard enough to NOT STICK in the grit of your sandpaper and ruin it...but hard enough so when it does clogs your sandpaper...you can take a paint stick and slap the paper and the VPA falls right out of the grit of the sand paper. THAT is the sweet spot....if you do not want to waste good sandpaper due to going in while it is still gummy and clogging your sandpaper.
If you need to re-apply the VPA...make sure it is on a surface that is at least 80 grit scratch and clean. And also make sure any areas of the VPA that were not sanded with your sandpaper due to being low.,...you go in and make sure they are scuffed well.
Applying VPA on VPA that has not been sanded is A BIG NO-NO.
But do as you see fit.
DUB
03-06-2018, 11:06 PM
#1211
Melting Slicks
Thread Starter
I think Roger meant to type 80 grit and not 180 grit. Sanding with 180 grit right of the bat is futile.
For shaping /contouring and getting it down use 36 grit...then switch to 80 grit depending on how bad it is.
Then when you have to blocked with 80 grit...go over it with 180 grit and prime it.
That 'sweet spot' is when it is still soft enough to not fall off or peel away from the panel when you sand it with the 36 grit...but it is still soft enough to clog your paper...but yet hard enough to NOT STICK in the grit of your sandpaper and ruin it...but hard enough so when it does clogs your sandpaper...you can take a paint stick and slap the paper and the VPA falls right out of the grit of the sand paper. THAT is the sweet spot....if you do not want to waste good sandpaper due to going in while it is still gummy and clogging your sandpaper.
If you need to re-apply the VPA...make sure it is on a surface that is at least 80 grit scratch and clean. And also make sure any areas of the VPA that were not sanded with your sandpaper due to being low.,...you go in and make sure they are scuffed well.
Applying VPA on VPA that has not been sanded is A BIG NO-NO.
But do as you see fit.
DUB
For shaping /contouring and getting it down use 36 grit...then switch to 80 grit depending on how bad it is.
Then when you have to blocked with 80 grit...go over it with 180 grit and prime it.
That 'sweet spot' is when it is still soft enough to not fall off or peel away from the panel when you sand it with the 36 grit...but it is still soft enough to clog your paper...but yet hard enough to NOT STICK in the grit of your sandpaper and ruin it...but hard enough so when it does clogs your sandpaper...you can take a paint stick and slap the paper and the VPA falls right out of the grit of the sand paper. THAT is the sweet spot....if you do not want to waste good sandpaper due to going in while it is still gummy and clogging your sandpaper.
If you need to re-apply the VPA...make sure it is on a surface that is at least 80 grit scratch and clean. And also make sure any areas of the VPA that were not sanded with your sandpaper due to being low.,...you go in and make sure they are scuffed well.
Applying VPA on VPA that has not been sanded is A BIG NO-NO.
But do as you see fit.
DUB
That "sweet spot" sounds very hard to hit. Will give it my best try though.
03-10-2018, 08:41 PM
#1214
Melting Slicks
Thread Starter
Back in town yesterday afternoon and I had a parcel from Brad with some VPA. Thanks so much.
Looking forward to using it on my Halo panel seams.
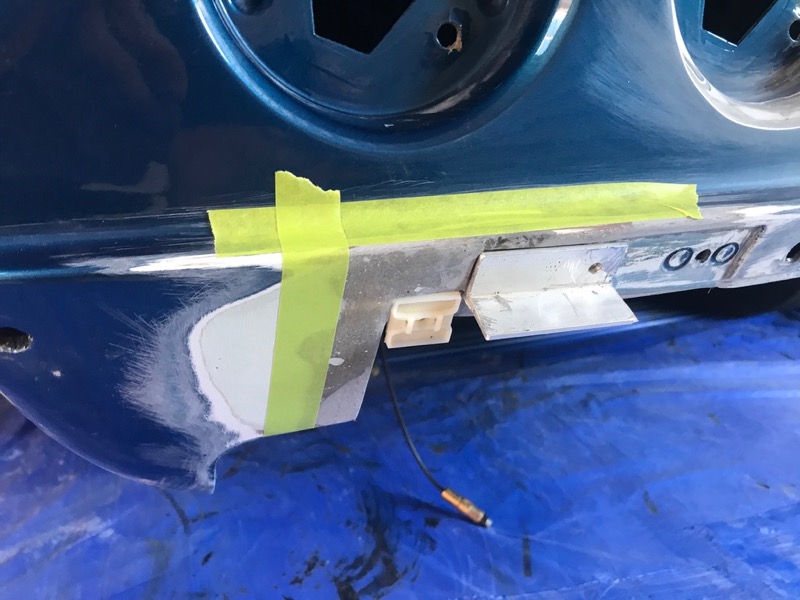
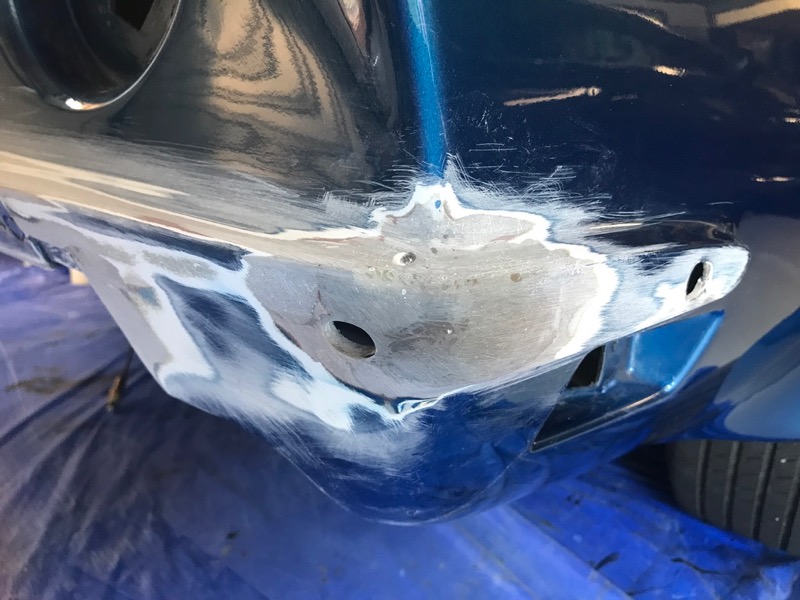
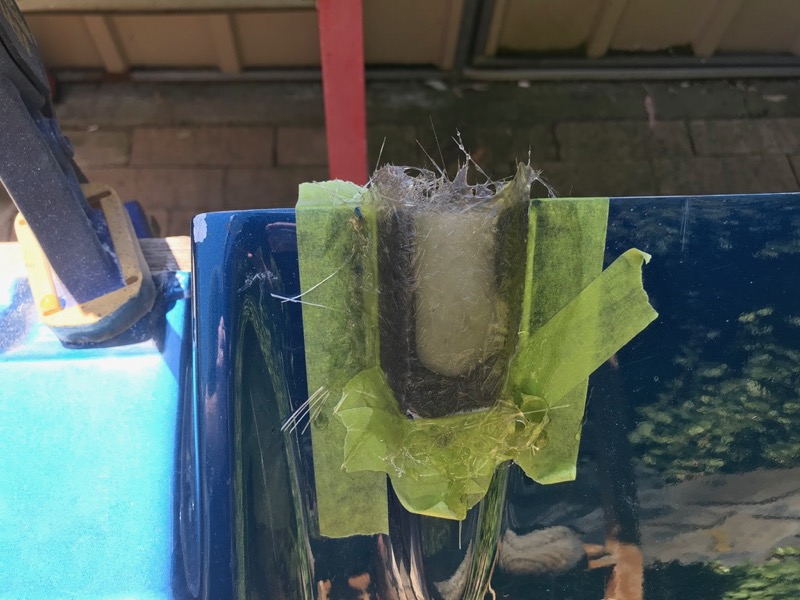
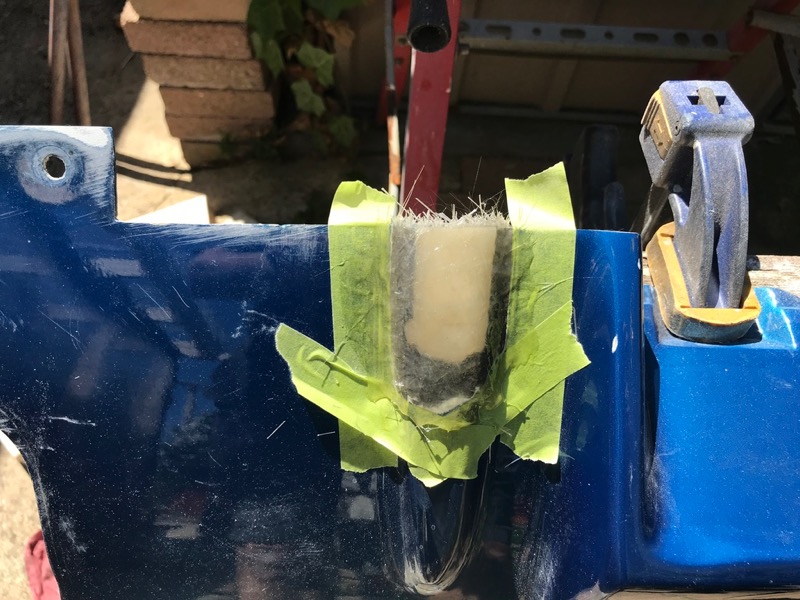
But first a bit more glassing around the exhaust fill panel and rear bumper mount.
Looking forward to using it on my Halo panel seams.
But first a bit more glassing around the exhaust fill panel and rear bumper mount.
Last edited by CraigH; 04-10-2023 at 06:08 AM.
03-10-2018, 08:48 PM
#1215
Melting Slicks
Thread Starter
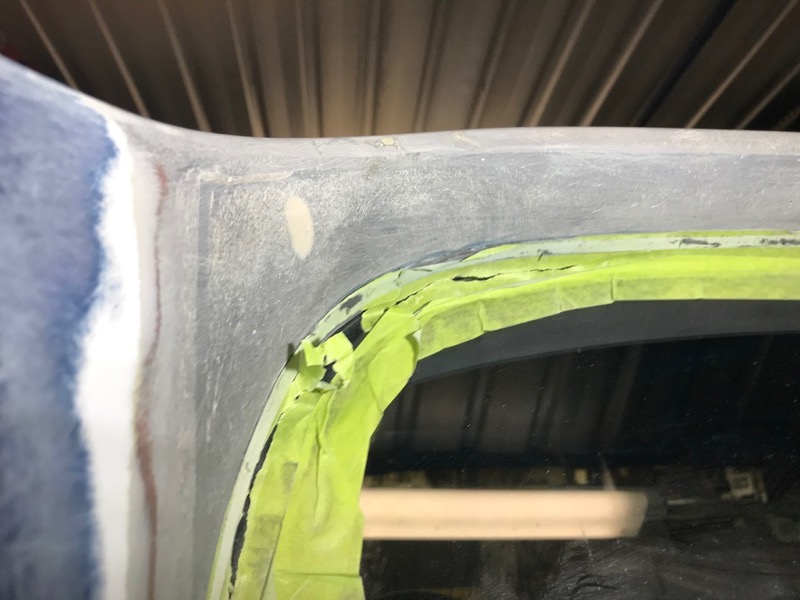
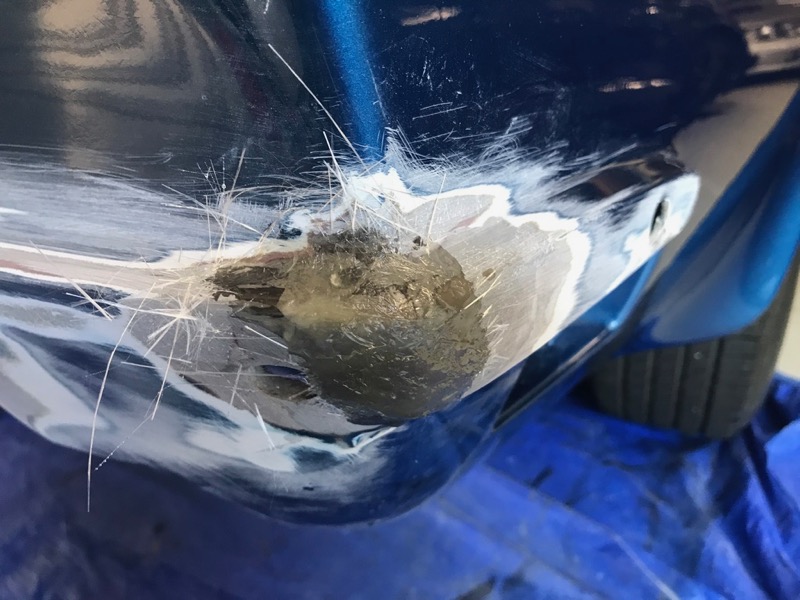
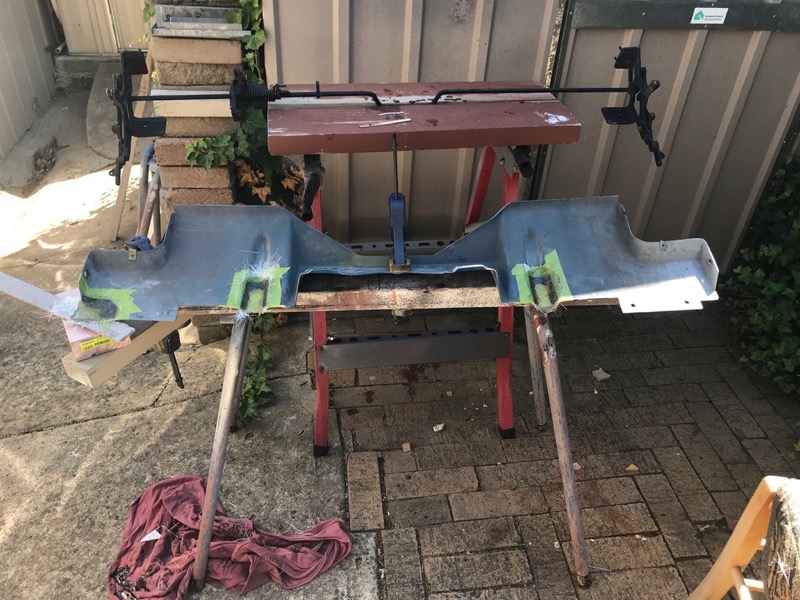
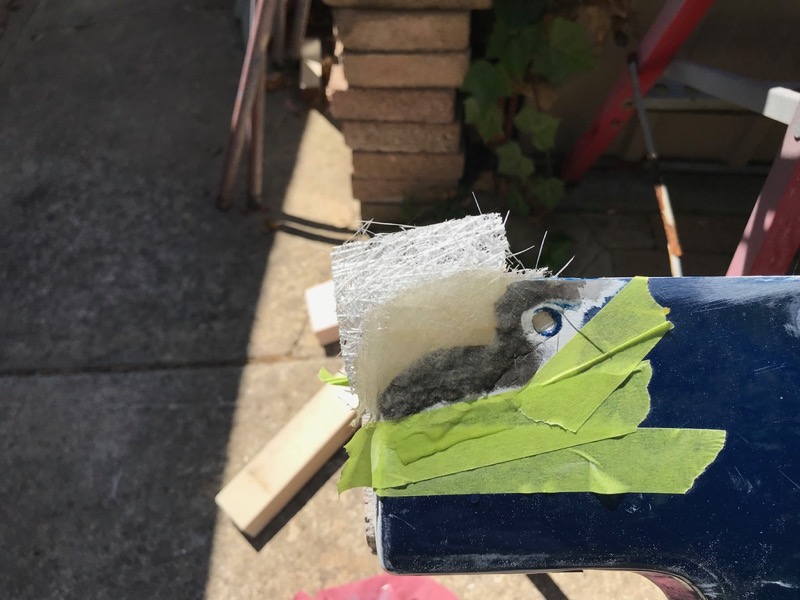
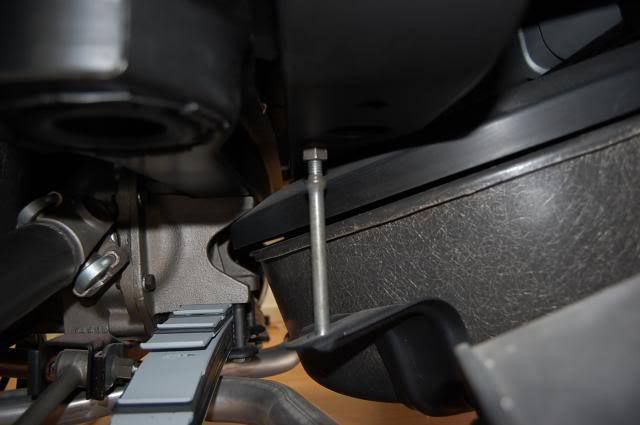
Now the exhaust fill panel.
Looks like the bracket cutouts were done with a bread knife so I will remake them and cut again.
Also for some reason one end was square edges and the other round where it bolts on.
Another previous repair.
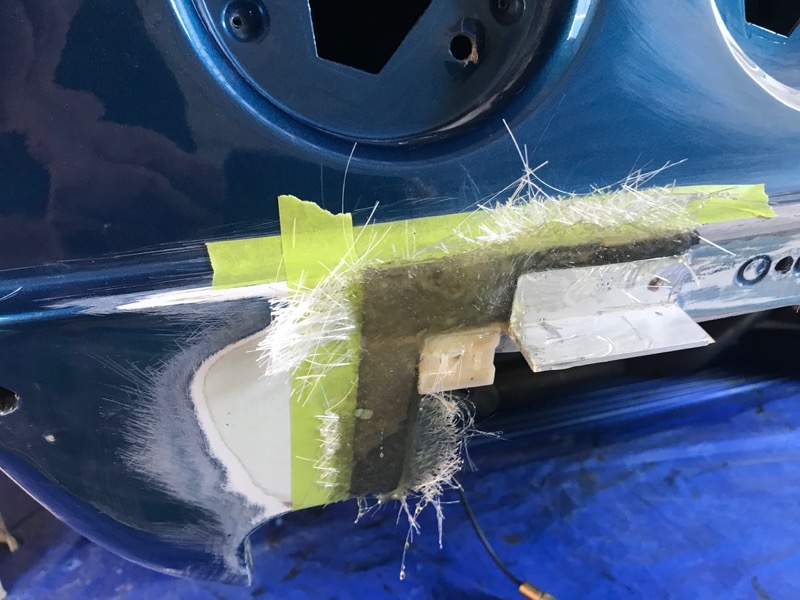
Ground out back of each part and taped it up ready for glass. Used plastic sheet to build up the space where needed to hold the glass.
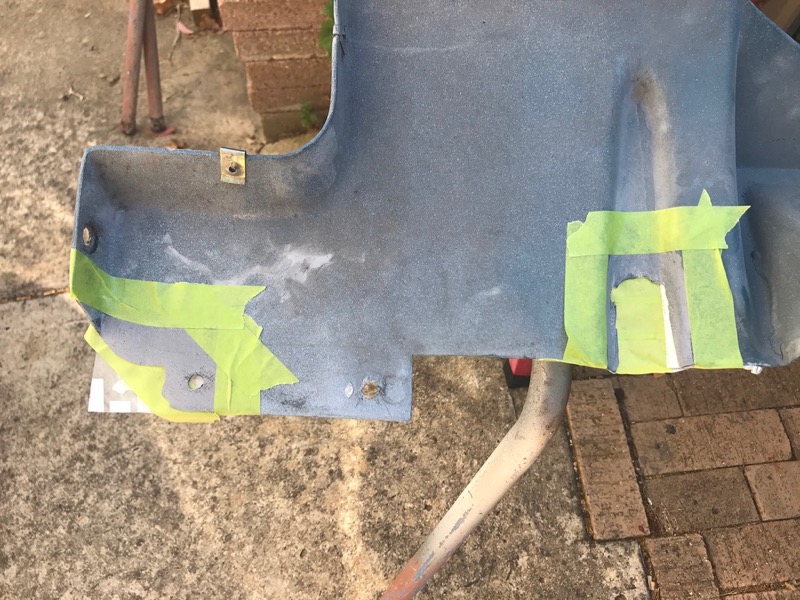
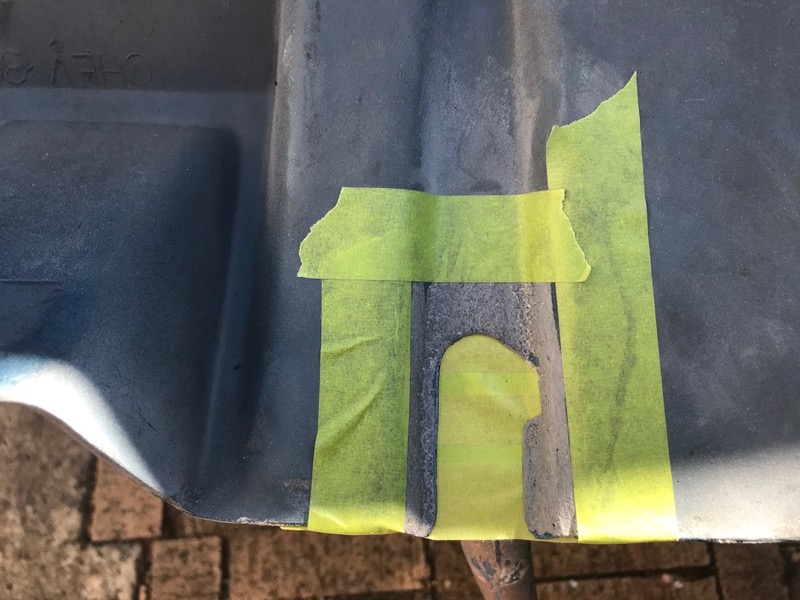
Then glassed it all in.

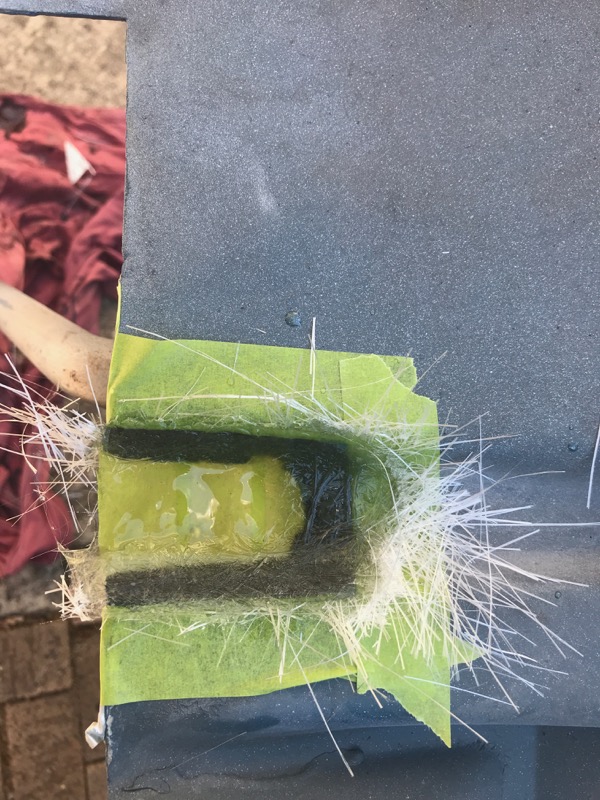

Once dry i will smooth it out and the flip it over and re glass the front.
Looks like the bracket cutouts were done with a bread knife so I will remake them and cut again.
Also for some reason one end was square edges and the other round where it bolts on.
Another previous repair.
Ground out back of each part and taped it up ready for glass. Used plastic sheet to build up the space where needed to hold the glass.
Then glassed it all in.
Once dry i will smooth it out and the flip it over and re glass the front.
Last edited by CraigH; 04-10-2023 at 06:07 AM.

 03-11-2018, 08:38 AM
#1217
Team Owner

Member Since: Sep 2006
Location: Westminster Maryland
Posts: 30,173
Likes: 0
Received 2,878 Likes
on
2,515 Posts

Hi Craig,
As usual your devotion/willingness to doing the amount of work needed in order for things to be RIGHT is remarkable!!!
The fact that it appears that you're working with an aftermarket exhaust panel isn't helping!
Regards,
Alan
Once again "BETTER is the constant enemy of good"....and you prove that over and over!
Last edited by Alan 71; 03-11-2018 at 08:42 AM.
03-11-2018, 04:35 PM
#1218
Melting Slicks
Thread Starter
Thanks Alan, what is the giveaway it’s an aftermarket panel ?
I did feel the fiberglass was different to the larger panels but that’s all I noticed.
I did feel the fiberglass was different to the larger panels but that’s all I noticed.
03-11-2018, 04:50 PM
#1219
Team Owner
Member Since: Sep 2006
Location: Westminster Maryland
Posts: 30,173
Likes: 0
Received 2,878 Likes
on
2,515 Posts
Hi Craig,
The original fiberglass panels have a particular appearance and 'feel' to them.
This happens to be an original side exhaust rear valance, but it shows how pretty the fiberglass is.
Regards,
Alan
The spare tire tubs are 'pretty' too!
The original fiberglass panels have a particular appearance and 'feel' to them.
This happens to be an original side exhaust rear valance, but it shows how pretty the fiberglass is.
Regards,
Alan
The spare tire tubs are 'pretty' too!
03-11-2018, 06:15 PM
#1220
Race Director
FOR WHAT IT IS WORTH:
This is not an opinion... it is fact.
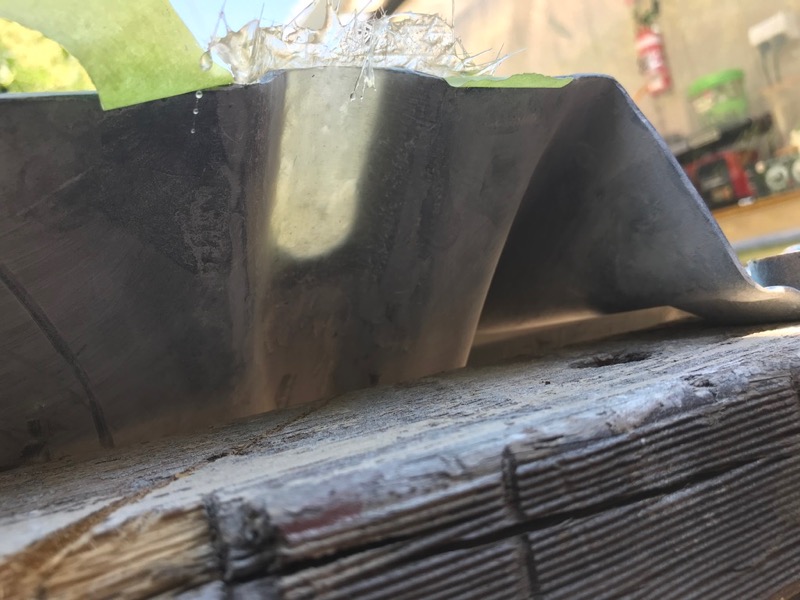
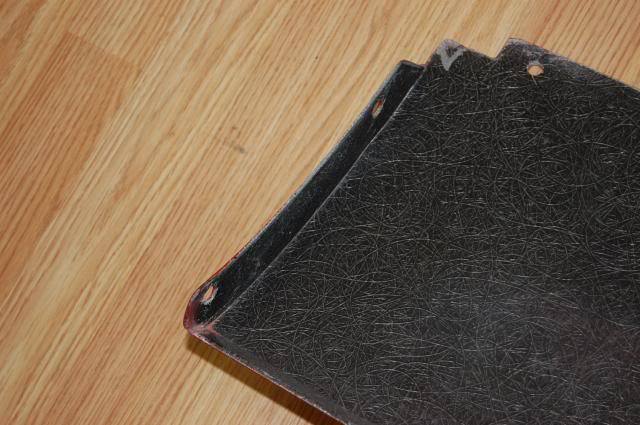
That lower exhaust filler panel is NOT an aftermarket one, it is original GM. And it is an early SMC one at that. And YES...it can be actually thicker than a polyester press molded one one earlier years...and a bit heavier also.
The photo shows that there is no hand laid fiberglass texture to the inside of the lower exhaust filler panel...thus is was made using two molds.
DUB
This is not an opinion... it is fact.
That lower exhaust filler panel is NOT an aftermarket one, it is original GM. And it is an early SMC one at that. And YES...it can be actually thicker than a polyester press molded one one earlier years...and a bit heavier also.
The photo shows that there is no hand laid fiberglass texture to the inside of the lower exhaust filler panel...thus is was made using two molds.
DUB