
Rookie's first attempt at a restoration...
 01-23-2008, 05:28 PM
#261
Safety Car

Thread Starter

My car has had some serious "bubba" wear and tear, and I only had one hole galled to where the stock bolts wouldn't hold - and that one was my fault (bolt is harder than frame...drive bolt out, don't turn it...  ). I fixed it with a little bit of brass shim stock wrapped around the splines, now it holds very tight.
From your post, I didn't think you were aware that the bolts were splined - I thought maybe some Bubba had installed regular bolts in the past.
). I fixed it with a little bit of brass shim stock wrapped around the splines, now it holds very tight.From your post, I didn't think you were aware that the bolts were splined - I thought maybe some Bubba had installed regular bolts in the past.
 01-23-2008, 08:18 PM
#262
Cruising


Member Since: Oct 2007
Posts: 11
Likes: 0
Received 0 Likes
on
0 Posts
I'm Batman, I will be rebuilding the trailing arms myself. I have a friend who owns a machineshop he is going to parallel grind my shims and spacers for me so I get .001-.002 bearing endplay. I have been contacting Dan at Vansteel, who rebuilds them for almost every company. I have the procedure down pat...I bought all the setup tools and have my own hydraulic press. I've read numerous papers on the rebuild procedure and bought myself the tools needed to do the job right. A dial indicator/mag base, all spoindle tools, bearing setup tool and so on. It cost me a total of around 450, but if i ever need to rebuild them again it will cost me nothing. I am very confident in my abilities, and I have learned alot from others on the forum.
01-23-2008, 10:24 PM
#264
Team Owner


Member Since: Oct 2004
Location: Springfield MO
Posts: 23,831
Likes: 0
Received 6 Likes
on
6 Posts
St. Jude Donor '07

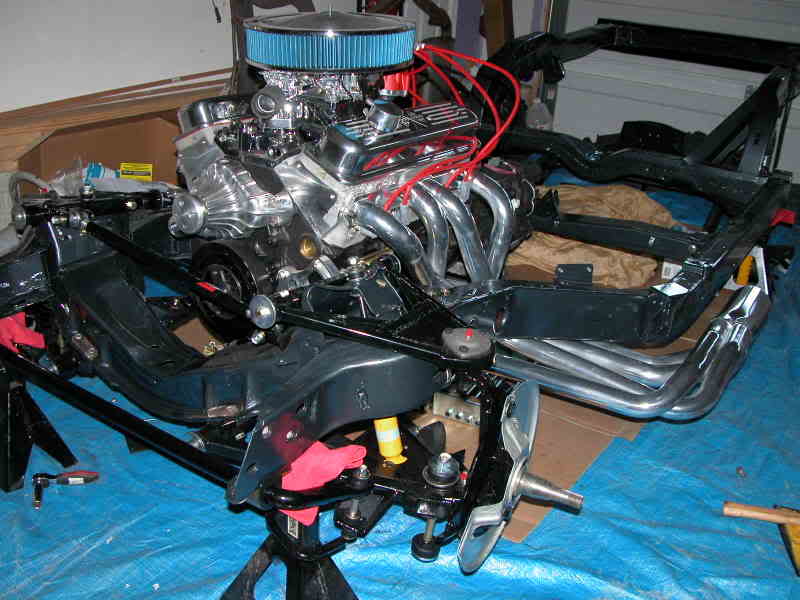
I've bonded in a replacement inner fender section, I just need to 'glas the gap between the two pieces closed.
01-24-2008, 12:07 AM
#265
Safety Car
Thread Starter
01-27-2008, 11:22 PM
#266
Safety Car
Thread Starter
Just finished making my setup bearings for my differential rebuild...holy crap did that take long. I had to use a die grinder to bore the ID on the bearings then use a cylinder hone to finish it off. I used some emery cloth too - I didn't want to have to wait for my friend to put it on his lathe and slip fit them for me...would have taken too long, plus he's already helping me with my posi case/steering box. They fit nice and snug. This will allow me to setup my differential without having to press the bearings on/off every two seconds. I bought 2 brand new timken bearings - the same ones I am installing into the case upon final assembly. The smaller one wasn't so hard...I just enlarged the ID a tiny bit to allow it to fit snug...it was really tight before I did that.
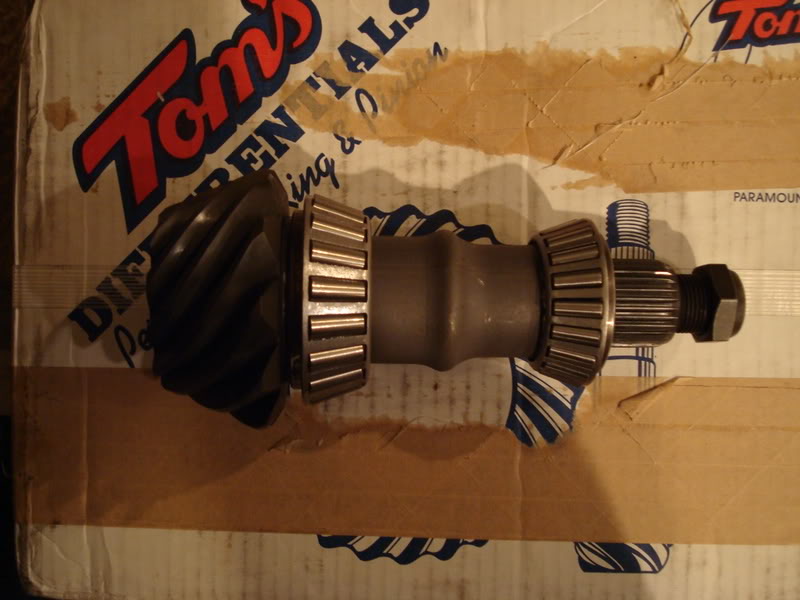
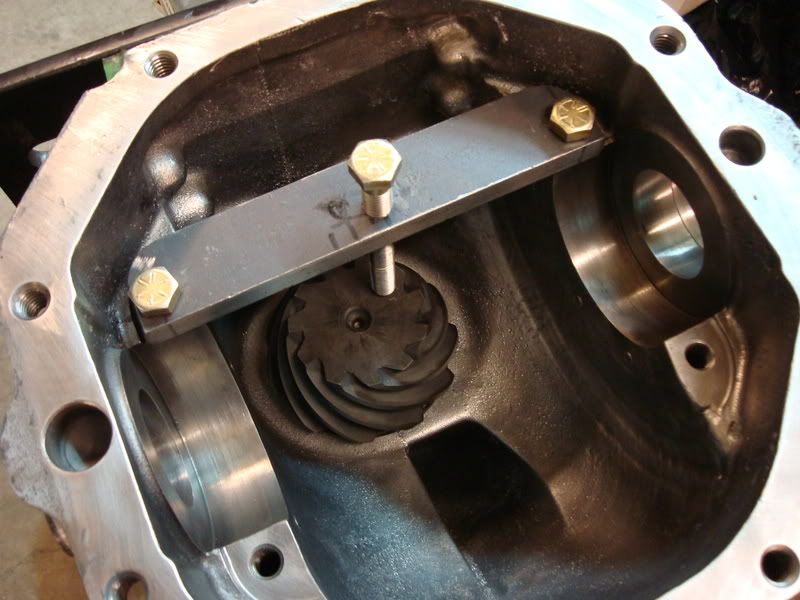
Here are two homemade tools I made for the diff rebuild. The first one holds the pinion in place and prevents it from falling out of the case when installing the outer bearing.
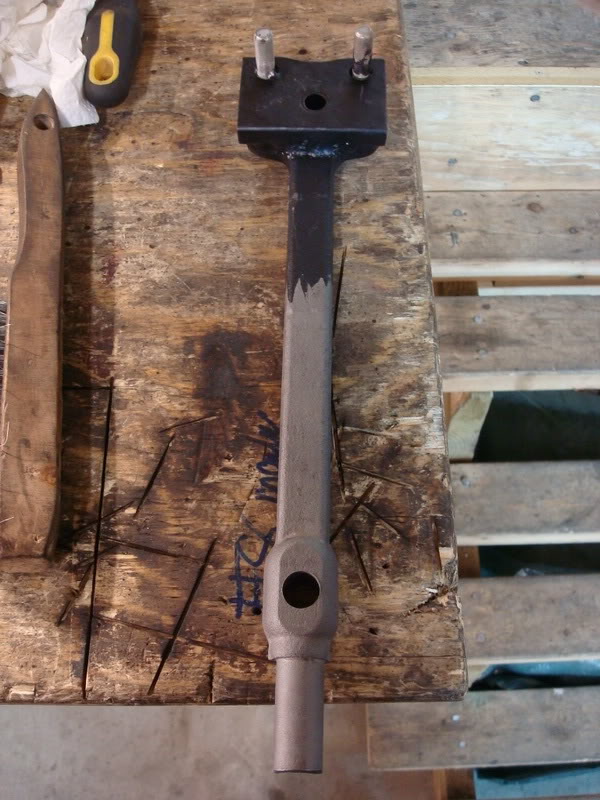
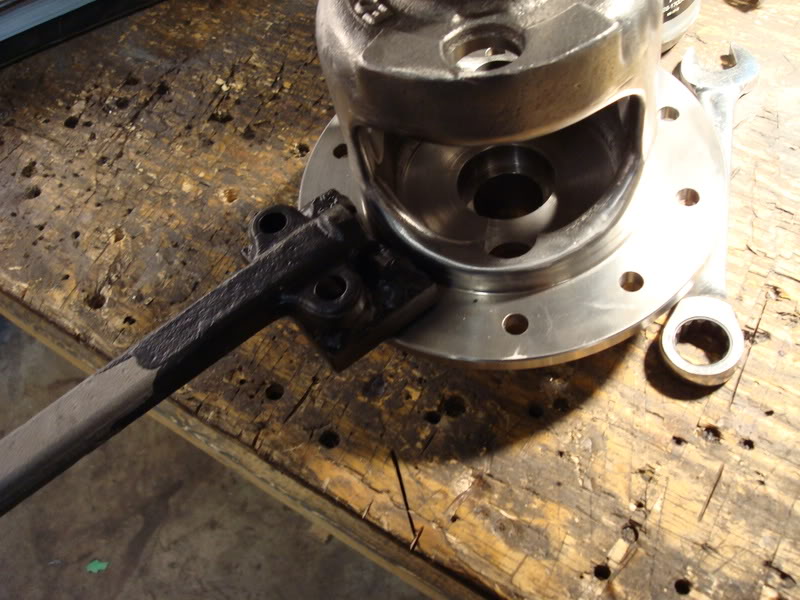
The second tool is a homemade spanner wrench for tuning the posi unit. I took an old lower control arm shaft I had laying around, welded a 1/2'' plate to the end and then welded two bolts to it. The two bolts fit into two of the holes on the posi case, which allows you to turn it with extra leverage. I coated the end of it in some black rubber I had laying around - it prevents me from accidentally scratching my posi case when working on it.
Here are two homemade tools I made for the diff rebuild. The first one holds the pinion in place and prevents it from falling out of the case when installing the outer bearing.
The second tool is a homemade spanner wrench for tuning the posi unit. I took an old lower control arm shaft I had laying around, welded a 1/2'' plate to the end and then welded two bolts to it. The two bolts fit into two of the holes on the posi case, which allows you to turn it with extra leverage. I coated the end of it in some black rubber I had laying around - it prevents me from accidentally scratching my posi case when working on it.


 01-28-2008, 06:52 PM
#270
Safety Car
Thread Starter
I'm going to try and post a step by step reassembly of the posi case later on tonight. I still haven't gone to my friend's machineshop (he's a working man...real busy all the time). I need to assemble the case for him so I can explain what I am trying to accomplish - he's a machinist...not a car mechanic. The first time I tried installing all the spider gears by myself was a pain in the ***...parts were falling out all over the workbench. If it will help even one person out there, then I will be happy. I wouldn't be able to do any of this stuff without Gary's help or the forum's help - I want to contribute back to the forum. I'll keep you posted
01-28-2008, 08:24 PM
#271
Race Director

I'm considering restoreing a C3 for my next project... and i think you made me decide
great work, I'll contiune my search and ill be sure to keep an eye on your progress
great work, I'll contiune my search and ill be sure to keep an eye on your progress
01-28-2008, 09:30 PM
#272
Safety Car
Thread Starter
01-29-2008, 09:45 AM
#273
Safety Car
Thread Starter
Okay, here is how I reassemble the posi...took a bit of practice when changing shims, but its really easy for me now.
This does not include any of the prep work I did to the posi case and internal gears. I polished the case's original cast edges and even the internal seams. I also beveled the edges on the gears using a dremel tool and grinding stone. You are going to be pulling the tolerances in very close, so you want the beveled edges - just walk the grinding stone across, don't apply any pressure (break the sharp corners).
Here is a picture of the beveled edges on one of the spider gears - I did it to all four gears in the case.
After you have the case polished and the gears cleaned up, you are ready to move onto the next phase. I'm not going to go into much detail here on which shim size you need - Gary's paper went into a lot of detail, but if you need any help, just PM me - I'm still asking Gary questions as to whether or not I am doing everything right. Here is a shot of all the shims that came in the kit from Gary.
I clean everything with brake cleaner and compressed air. The next step is to sort out the clutches. They are stamped differently on each side. If you draw you fingernail around the edges, you'll immediately know which side has the deeper stamping. Take a sharpie and put a small "d" on the deeper face so you don't have to keep checking when assembling. The marker will eventually wear off from the oil, but it will keep you organized. I asked Gary as to whether it mattered which way the two clutch packs faced (do all the deep stampings for both sides need to face to the left, or to the right). He said it didn't matter, but you need to keep the deep faces facing in one direction for each clutch pack. Lay all your parts onto a clean rag - once again, this will keep you organized.
Next, use GM additive to oil your clutches and retainers.
Take one of your oiled clutch packs and place it into the bottom of the case without the retainers. Take your finger and poke it through on of the holes in the bottom of the case, then put the retainer on then seat it, repeat for the other side.
Oil the shim you are using (see Gary's paper or for more info or questions, send me a PM) and place it on top of the clutch pack.
Next, take onee of your large side gears and install it on top of the clutches. Rotate it under it drops in the entire clutch pack.
Okay, this is where the tricky part comes in. Installing the other large side gear takes a little practice, but here is how you do it,. Take your other oiled down clutch pack and place it into the top of the case without the retainers. Hold one side with two fingers and tilt them down. Put the retainer on and then pull it back up. Repeat this process for the other side, you still need to support it with your hand.
Using your other hand place your selected shim on the other side gear and put it inside the case. Using two fingers, pull the gear up and get it seated into the clutches. To support the gear, take a screwdriver handle and stick it between the gears...you are ready to move onto the next step.
Take you spider gears and thrust washers - oil them with GM additive. Take on spider and put it into the case - rotate it until it is in front of the oval shaped window in the posi case. Take you king pin and put it through the spider gear - this will help you align the gears so the pin will slide through the holes.Put the other spider gear on the pin, and then remove the king pin from the assembly. Rotate the posi case until you can fit the washers behind the spiders. Do one at at time and them use something round and small to align the washers. Install the pin and retaining screw and you are done (camera died just before I snapped a shot of the assembled case - figures, right?).
I'll reup the pics when I assemble my posi case for the final time this week - this post had some errors in it, and I don't want you guys to work off of it.
Last edited by stinger12; 03-03-2008 at 07:03 AM.
01-30-2008, 08:46 PM
#274
Safety Car
Thread Starter
Just wanted to thank Binnie77 for the parts he sent me...for free!!!!
He's writing an article on me regarding my restoration, and he was so impressed, he sent me a new GM rag joint, paint chip protectors and a body mount kit
Binnie, I really appreciate the gift, can't thank you enough. They will go to good use, and if you ever need help with your suspension work or would like me to rebuild something for you just send me a PM
01-30-2008, 08:53 PM
#275
Safety Car
Thread Starter
I forgot to mention that I made a mistake when I was assembling the clutches...there is a picture on here showing the clutches stacked wrong - I noticed this after I snapped the photo when assembling them and posted the wrong picture. I'll upload the correct picture in a few minutes.
01-30-2008, 08:53 PM
#276
Safety Car
Thread Starter
Look at pictures 5&6 and you'll see what I'm talking about
I just disassembled my posi case for you guys just to get the correct pictures - I edited them....want to make sure you get the right info
I just disassembled my posi case for you guys just to get the correct pictures - I edited them....want to make sure you get the right info
Last edited by stinger12; 01-30-2008 at 09:44 PM.
01-31-2008, 07:30 AM
#277
Drifting

Member Since: Jun 2005
Location: Hanover Maryland
Posts: 1,725
Likes: 0
Received 0 Likes
on
0 Posts
Stinger 12,
You are doing an incredible job! It is awesome to see your talents being used in such a productive way. You're a natural.
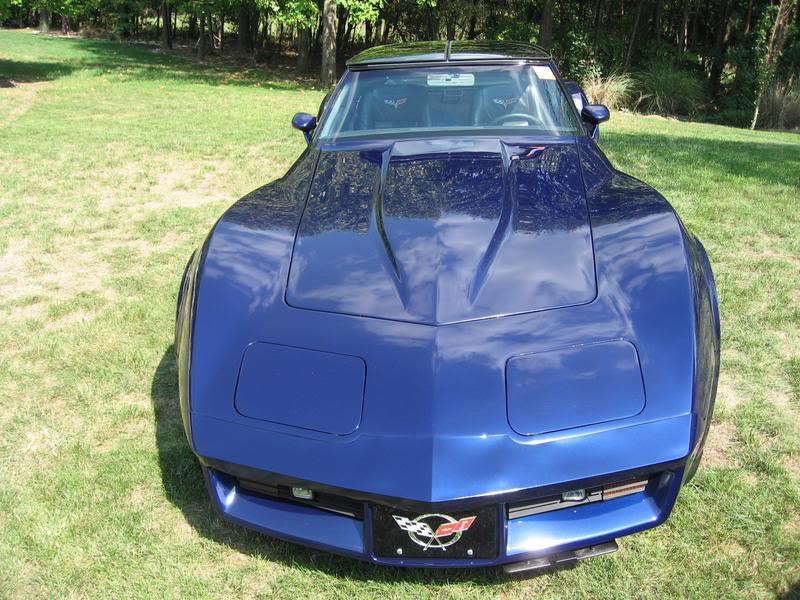
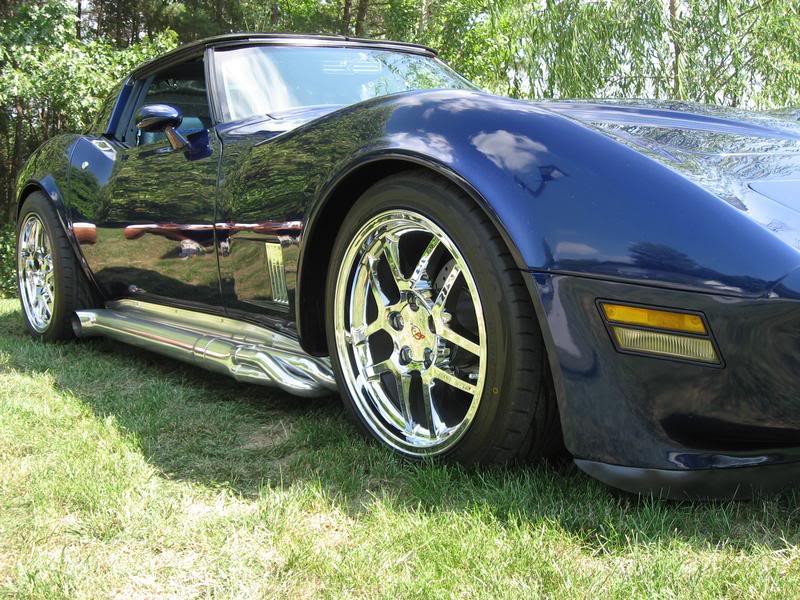
I too started my 1st restoration when I was 18 years old on a 1967 running Camaro that I had purchased for $350. My next project was not for another 20 years and was a home built 1982 resto-rod frame-off that is pictured below. Don't let the few nay sayers get you down. THEY will be the 1st ones to ask you for a ride when you are finished. Take your time and enjoy the project. Thanks for taking the time to photograph and document the restoration for the rest of us to enjoy.
http://forums.corvetteforum.com/show....php?t=1465589
You are doing an incredible job!
It is awesome to see your talents being used in such a productive way. You're a natural. I too started my 1st restoration when I was 18 years old on a 1967 running Camaro that I had purchased for $350. My next project was not for another 20 years and was a home built 1982 resto-rod frame-off that is pictured below. Don't let the few nay sayers get you down. THEY will be the 1st ones to ask you for a ride when you are finished. Take your time and enjoy the project. Thanks for taking the time to photograph and document the restoration for the rest of us to enjoy.
http://forums.corvetteforum.com/show....php?t=1465589
01-31-2008, 10:29 AM
#278
Safety Car
Thread Starter
I've seen you're thread before - you're one of the guys that has inspired me the most to build this car...I visit your thread often. You've done a great job
01-31-2008, 10:32 AM
#279
Safety Car
Thread Starter
I'm actually in the car on our way to Winnipeg its a 13 hour drive and my dad got wireless internet from bell...its awesome. You guys are going to keep me busy 
02-01-2008, 10:45 PM
#280
Safety Car
Thread Starter
I was reading through my post on rebuilding the posi case yesterday and noticed that I have been putting the shims on the side gears in the wrong place. Notice how I placed the clutches in the case, then the clutch retainers, then the shim, and then I placed the side gear on top and seated the side gear...well I looked at Gary's post and clearly saw that I was assembling it wrong. You are supposed to put the shim in first, then the clutches, retainers and then the side gears...I am such a retard. Hopefully it won't affect any of the work I have done on the posi case thus far, and all I have to do is move the shim to the correct spot. I am going to redo the entire posi rebuild thread using the correct steps - I'm sorry if I caused any confusion.