Free Bird!!
 07-11-2010, 10:21 PM
#21
Drifting


Thread Starter

Glad to be of help. I just about have the driver's side welds all removed so I can seperate the rocker from the hinge pillars. After both sides are removed from the rockers, the whole unit will be sent off to be dipped.
I have all new rockers, lock pillars, package stop, etc. to replace what's there in the rear of the car. As mentioned previously, my lock pillars are cracked (you can see the crack on the one side in the pic with the protractor). So, I figure that if I'm going to replace the lock pillars I might as well do a bit more with new metal and less with the old. Besides, it gives me a chance to play with my toys (such as the spot welder seen in the pics).

-- Joe
I have all new rockers, lock pillars, package stop, etc. to replace what's there in the rear of the car. As mentioned previously, my lock pillars are cracked (you can see the crack on the one side in the pic with the protractor). So, I figure that if I'm going to replace the lock pillars I might as well do a bit more with new metal and less with the old. Besides, it gives me a chance to play with my toys (such as the spot welder seen in the pics).
-- Joe
 07-12-2010, 08:41 AM
#22
Burning Brakes


Sounds like you have everything well planned. I thought I did when I started mine 5 years ago!
The spot welder looks cool; I did mine with a MIG by drilling holes where I wanted them but yours should be a lot less work. You most likely have your welding planned as well but I spent hours and a few pound spools of wire practicing before I hit the metal. As an 86 year old told me when he was building his Willey's for drag racing; it takes practice!
I finished splicing a donor part to the upper cowl last night and will be riveting the hood lock bracket on today. Now that the temp is still cool I will be adding more freon to the A/C of my '64 Chevelle conv.
You gotta have toys!
07-12-2010, 04:44 PM
#23
Burning Brakes
Joe, I took copies of your photos to the workshop and compared them to mine. I can work with that information and only need slight tweeking on most areas.
Maybe you see more than I do but I am looking at the windshield to rocker offset that you also have. I would think that the cars were made symetrical left and right but I can't see where that offset comes from. Everything I measure left and right seems identical but I can't believe that the windshield would be placed offset to the car? I did a cross measurement of the w/s frame and it is a match so it's not bent.
Do you have any idea what causes that?
07-12-2010, 09:10 PM
#24
Drifting
Thread Starter


Nope, I'm not sure. I just checked my windshield frame and it's square. Perhaps it's the mounting tabs for the trim that we are using as the basis of the measurement? Just eyeballing it, you would not think that it's offset so there has to be another explanation such as the mounting tab for the trim.
Thoughts?
-- Joe
07-13-2010, 08:35 AM
#25
Burning Brakes
Out2kayak, I started a new thread concerning the rocker offset and mentioned your thread so that you should be copied on replies as well.
Together we should figure this out with other members help! It could be part of a factory design!?!?
http://forums.corvetteforum.com/c1-a...post1574680310
Together we should figure this out with other members help! It could be part of a factory design!?!?
http://forums.corvetteforum.com/c1-a...post1574680310
07-15-2010, 10:30 PM
#26
Drifting
Thread Starter
Just a quick update. I received the new parts from Caledonia. The top level look at them is they are really nice! Here is a couple of pics:


-- Joe
-- Joe
07-17-2010, 02:53 PM
#27
Burning Brakes
Parts look nice. I did replace the rockers and one pillar but was able to save the other. Full fiberglass rockers were not availalbe when I look into it so I spent hours fixing my originals.
I realize that you took measurements and angle readings on the pillar welds and so did I before starting. BUT, I could not get all of them to match during the reweld so I went with the dimensions and not the angles.
Point example: The left and right lock pillar match dimensionally from hinge p bottom to lock p steel top. One angles at 10 deg and the other at 9. I went with the dimension.
Did you try your spot welder? Is it 220V or ?
07-17-2010, 03:01 PM
#28
Drifting
Thread Starter
I am still working on taking everything apart and getting the windshield frame, hinge pillars, etc. dipped down at Redi-strip. Then it will be a weld back together with the spot welder.
It's a 220v 20a unit. Really nice spot welds very, very easy. Take a bit of scrap of the correct thickness, keep tweaking the timer to get the welds just right, then put the part in the welder (thanks to the guy who invented vice-grips). Correct welds every time with no muss / fuss.
-- Joe
P.S. Normally the spot welder with a timer is on the order of >$1000. I found mine on flea-bay and snagged it for just over $100 with a stand. Not that I am a big flea-bay fan, but you can get a deal....
07-17-2010, 03:05 PM
#29
Drifting
Thread Starter
BTW, the full rocker / sill panels are available from http://www.scorvette.com/. They were making the molds when I picked up my front end this year and have just started offering the whole rocker panels that are press molded from the lock pillar to the firewall. They are, as other things I have received from Sermersheim's, nice units and I don't have to rebuild mine which were cut into three.
-- Joe
-- Joe
08-04-2010, 10:59 PM
#30
Drifting
Thread Starter
Just a quick progress check. I dropped what's left of the cage after removing the rockers to Redi Strip in Indy. Seem like nice guys. Will have to see how their work turns out. Should be done in about a week.
One thing that was mentioned is that I have to be careful of the faraday cage effect, where the e-coating won't penetrate seams and boxed in interior parts (such as inside of the windshield frame, which defeats the point of getting everything de-rusted and coated).
Anyhow, I started Googling around and found http://www.norcoind.com/norcoat/. Apparently they have a high quality E-Coat system generating a consistent film build, no faraday cage, over 2000 HR salt spray and PPG's automotive certification.
So, when I get it back and weld everything together, I'm going to head to Elkhart.
-- Joe
08-05-2010, 07:24 AM
#31
Le Mans Master

Member Since: Sep 2003
Location: Norwalk ohio
Posts: 8,927
Received 640 Likes
on
358 Posts
2019 Corvette of the Year Winner
St. Jude Donor '15

Just a quick progress check. I dropped what's left of the cage after removing the rockers to Redi Strip in Indy. Seem like nice guys. Will have to see how their work turns out. Should be done in about a week.
One thing that was mentioned is that I have to be careful of the faraday cage effect, where the e-coating won't penetrate seams and boxed in interior parts (such as inside of the windshield frame, which defeats the point of getting everything de-rusted and coated).
Anyhow, I started Googling around and found http://www.norcoind.com/norcoat/. Apparently they have a high quality E-Coat system generating a consistent film build, no faraday cage, over 2000 HR salt spray and PPG's automotive certification.
So, when I get it back and weld everything together, I'm going to head to Elkhart.
-- Joe
One thing that was mentioned is that I have to be careful of the faraday cage effect, where the e-coating won't penetrate seams and boxed in interior parts (such as inside of the windshield frame, which defeats the point of getting everything de-rusted and coated).
Anyhow, I started Googling around and found http://www.norcoind.com/norcoat/. Apparently they have a high quality E-Coat system generating a consistent film build, no faraday cage, over 2000 HR salt spray and PPG's automotive certification.
So, when I get it back and weld everything together, I'm going to head to Elkhart.
-- Joe
They can do the same down inside the box structures by shoving the gun inside with electrostatics off.
Dipping would be best but there are ways to deal with the powder coating....
08-16-2010, 09:19 PM
#32
Drifting
Thread Starter
A little more progress tonight. I received what's left of the birdcage after dipping it. Here's the pics:


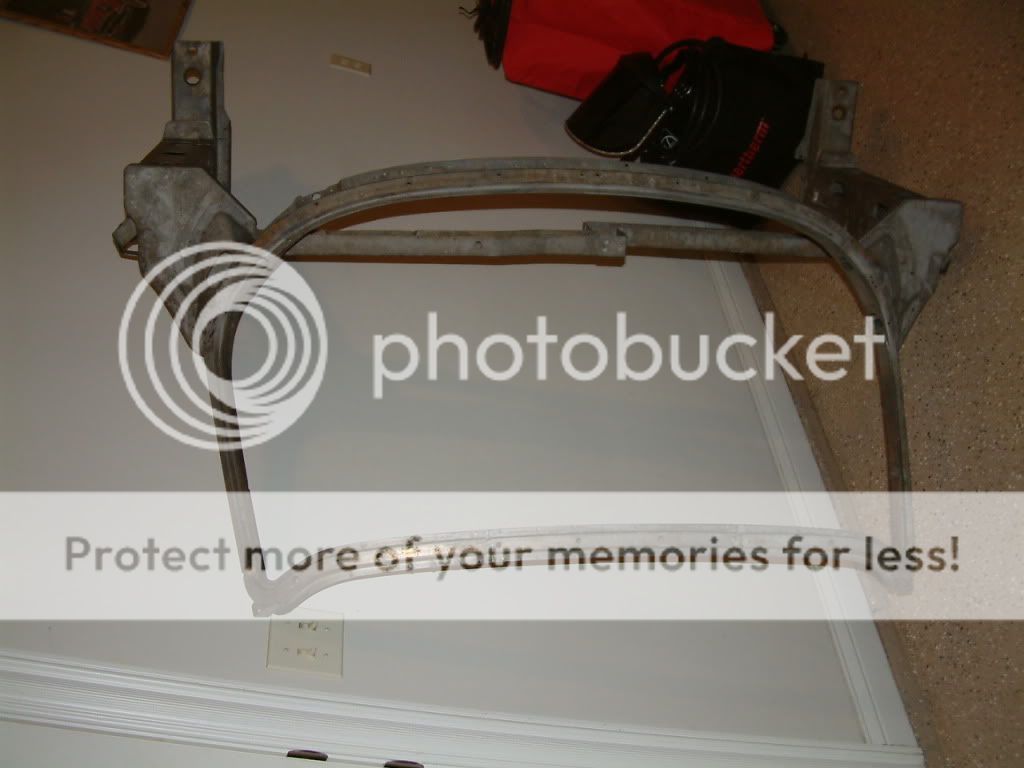
Some of the POR-15 that made it through the process:

Bit of factory damage:


-- Joe
Some of the POR-15 that made it through the process:
Bit of factory damage:
-- Joe
Last edited by out2kayak; 08-16-2010 at 09:22 PM.
08-16-2010, 09:34 PM
#33
Team Owner

from the looks of it you should have it back together by next week
jack
jack
01-02-2011, 08:29 PM
#34
Drifting
Thread Starter
OK, as I wanted to provide a nice thread with as many measurements needed for rebuilding a birdcage, here are a few more:
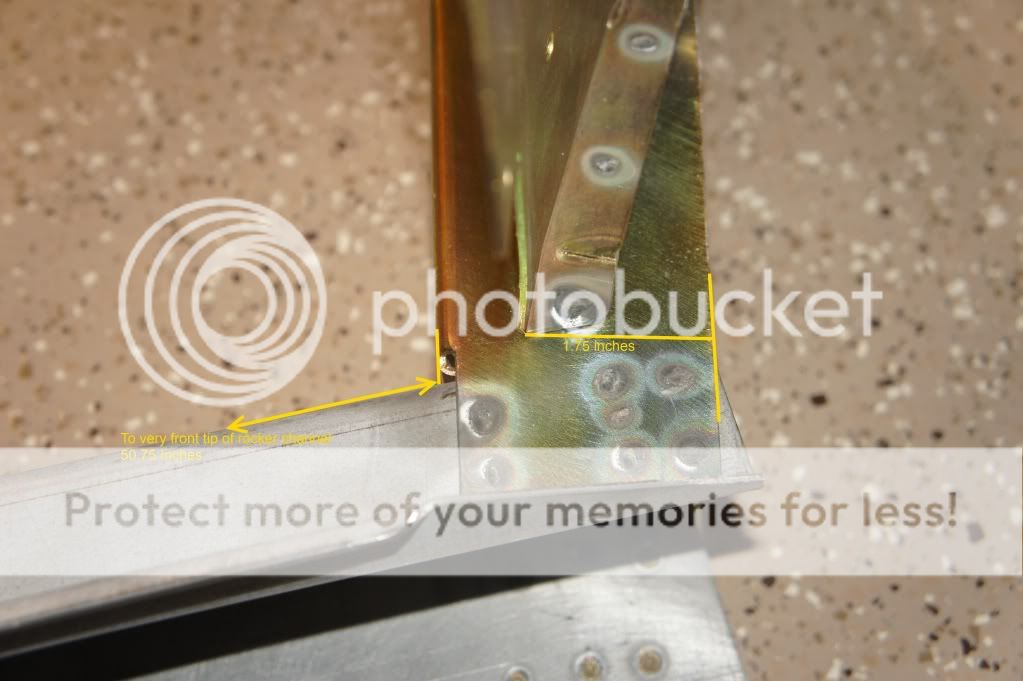
Going from the back of the lock pillar to the package tray gussets (convertible only) I measured 1.75".
As my old rocker panels were sliced, diced, brazed, and otherwise tweaked on, I don't trust the numbers I was getting from them. So, what I did was measure from the rear of the rocker channel to the front of the lock pillar and put the pillars at the correct angle. All said and done, what it comes out to is 50.75 inches from the very front tip of the rocker channel to the bottom of the lock pillar.
Is this close to what others have?
If you recall, I had a dime sized hole from the factory on my hinge pillar (if you look two posts up, fifth image from top you'll see it). Well, it's been welded up:

I ended up using a plasma cutter to remove what was left of the rocker channel. What a pain that was. In retrospect, the way I would attack doing it again is to simply fabricate the bottoms of the hinge pillars, cut the old hinge pillar bottoms (with the spot welds) off, then weld in the fabricated ones. It seems like they would be stronger and would have been quite a bit easier.
-- Joe
Going from the back of the lock pillar to the package tray gussets (convertible only) I measured 1.75".
As my old rocker panels were sliced, diced, brazed, and otherwise tweaked on, I don't trust the numbers I was getting from them. So, what I did was measure from the rear of the rocker channel to the front of the lock pillar and put the pillars at the correct angle. All said and done, what it comes out to is 50.75 inches from the very front tip of the rocker channel to the bottom of the lock pillar.
Is this close to what others have?
If you recall, I had a dime sized hole from the factory on my hinge pillar (if you look two posts up, fifth image from top you'll see it). Well, it's been welded up:
I ended up using a plasma cutter to remove what was left of the rocker channel. What a pain that was. In retrospect, the way I would attack doing it again is to simply fabricate the bottoms of the hinge pillars, cut the old hinge pillar bottoms (with the spot welds) off, then weld in the fabricated ones. It seems like they would be stronger and would have been quite a bit easier.
-- Joe
02-01-2011, 05:01 PM
#35
Burning Brakes
Joe, Snow is falling, ice is 6" over the gutters, more snow tomorrow, but the Vette is still the main project.
I see in one of your photos that you purchased the metal rocker reinforcements but I see a side exhaust. What's up with those? I hope you are not going to tell me that those go to all cars?
PJ
I see in one of your photos that you purchased the metal rocker reinforcements but I see a side exhaust. What's up with those? I hope you are not going to tell me that those go to all cars?
PJ
02-01-2011, 06:31 PM
#36
Drifting
Thread Starter
Joe, Snow is falling, ice is 6" over the gutters, more snow tomorrow, but the Vette is still the main project.
I see in one of your photos that you purchased the metal rocker reinforcements but I see a side exhaust. What's up with those? I hope you are not going to tell me that those go to all cars?
PJ
I see in one of your photos that you purchased the metal rocker reinforcements but I see a side exhaust. What's up with those? I hope you are not going to tell me that those go to all cars?
PJ
Actually, what you see are actual brand spanking new metal rockers, not reinforcements. They sell reinforcements, but they are not needed with the new metal (perhaps if yours is rusted out).
Thoughts?
-- Joe
02-01-2011, 07:00 PM
#37
Burning Brakes
Yes, I have thought a lot about it. I looked into the support brackets in the catalogs and they don't mention that only cars with the rocker moldings should get plates. I guess it would make sense to put those brackets in the steel rockers to make them stronger, but if they are ever hit hard enough to bend them, the body would suffer a much larger damage and if those rockers are going to bend, the chassis may also be involved.
I made every effort to pre measure and drill my new rockers before welding them in, now if I should add those 6 brackets, the welding will be a pain and have to be done from the under side. That is where your spot welder will do wonders.
Now, if you bought those brackets and are using side pipes, are you still going to add them in and cut the exposed tabs off?
Rocker Molding Support Bracket
Paragon Number: 3462
GM Part Number: 3821840
02-01-2011, 07:23 PM
#38
Burning Brakes
Joe, I just noticed something else that has me wondering. The measurements of your lock pillars. I have not welded the package tray divider in mine yet and looking at your photo, I'm confused as the two cross measures differ, and seem reversed when looking at the points where they are taken.
The upper measure of 5' 3/16" looks like the top outer most tab of the pillar. The lower measure of 5' 9/16" looks like the inner tab of the gussets.
I am guessing that the lock pillars stand vertical and plumb, 0 degrees. If I read your photo correctly, your pillars lean in at the top?
PJ
The upper measure of 5' 3/16" looks like the top outer most tab of the pillar. The lower measure of 5' 9/16" looks like the inner tab of the gussets.
I am guessing that the lock pillars stand vertical and plumb, 0 degrees. If I read your photo correctly, your pillars lean in at the top?
PJ
02-01-2011, 11:08 PM
#39
Drifting
Thread Starter

If you need a spot welder, drop by.... Will even offer a nice cup of tea.
-- Joe
02-01-2011, 11:12 PM
#40
Drifting
Thread Starter
Joe, I just noticed something else that has me wondering. The measurements of your lock pillars. I have not welded the package tray divider in mine yet and looking at your photo, I'm confused as the two cross measures differ, and seem reversed when looking at the points where they are taken.
The upper measure of 5' 3/16" looks like the top outer most tab of the pillar. The lower measure of 5' 9/16" looks like the inner tab of the gussets.
I am guessing that the lock pillars stand vertical and plumb, 0 degrees. If I read your photo correctly, your pillars lean in at the top?
PJ
The upper measure of 5' 3/16" looks like the top outer most tab of the pillar. The lower measure of 5' 9/16" looks like the inner tab of the gussets.
I am guessing that the lock pillars stand vertical and plumb, 0 degrees. If I read your photo correctly, your pillars lean in at the top?
PJ
I would like to have the nominal measurements for the whole birdcage. From some of the other comments that I have received, my measurements and theirs are not exactly the same.
I guess fiberglass can hide when the line workers have one too many over lunch.


-- Joe