

 02-20-2015, 01:47 PM
Last edit by: IB Advertising
See related guides and technical advice from our community experts:
Browse all: Exterior How-Tos
- How to Paint Your Hood Liner
Step by step instructions for do-it-yourselfers.
Browse all: Exterior How-Tos

As Requested: How to Paint Your Hood Liner
07-07-2005, 06:53 PM
#1
Race Director

Thread Starter

Member Since: Jan 2005
Location: Bay Shore, NY 11706 MILD2WILD (M2W)
Posts: 13,656
Likes: 0
Received 7 Likes
on
5 Posts
St. Jude Donor '06-'07
For those of you who would like to paint it yourself this is step by step how I do it. This does not insure it will work for you or come out the same as mine do. So many requested my method that I am posting it. Some would suggest acrylics, but I feel they lack the pop and depth of color I get. All in all it will take you 5+ hours over a few days to do it and cost around $40 in materials. If you screw up, Gene (fred beans) can get you a new liner for around $130 or have Paula (forum vendor) do it in the first place.
Supplies needed
1 can Krylon semi flat black spray #1613
Testors Model Masters 1/2 Oz enamels
Classic White (qty 2)
Silver or Silver Chrome
Gold
Gloss black
Testors Paint Markers Enamel
Silver
Flat Black
Gold
Duplicolor red caliper paint (autobarn carries it, do your calipers while you at it)
Set of brushes (Assorted FLAT brushes)

I start by sealing the material using the Krylon black. Lay the liner outside horizontally on a table or bench (pick a calm, warm and dry day). I spray the backside of the liner first holding the can 2 inches away and follow the outline of the emblem soaking the material with the paint (should go on very wet). The paint at first will soak right in like you never even sprayed it. Let it dry 20min between coats and give it 4 coats.
Turn the liner over and spray the front side of the emblem (2 inches away) soaking it with the paint staying inside the outer depressed part of the emblem, you should use the complete can between the front and back. After a few coats on the front you should notice the spray starting to puddle up before soaking in. After the last spray coat wait about 5 minutes and you can take a plastic spoon and using the back press and smooth any fibers that are sticking up The paint is almost a perfect match to the liners color so it�s almost invisible. You can also cover any problem on the remainder of the liner by spraying the same finish lightly staying 12 inches away. Let the complete liner dry overnight.
Use you factory emblem as a guide or print the one below.

I use the duplicolor red caliper paint because of a few reasons, it�s heat and chemical proof, it�s very thick and flows nice. I start by laying a heavy coat over the right side of the emblem covering the flags, bow tie and flower (use a wide flat brush 1/2"). Do not keep working this paint as it will tack up quickly and should be left alone to the next coat. Using smaller flat brushes (⅝" and a #10) also paint the complete boarder (the part the will become silver) and the soon to be white portion of the checkered flag (the recessed parts). The paint will be able to recoat in 15-20 minutes. This may take 4-8 coats depending on how pours the material is (I find each is different). Being perfect is not important at this time because you will trim and fix later with the paint pens, do stay away from the outer black surround and black parts of the flag as this will stay black.. To achieve the darker red in the right side of the red flag you will need to take about 1oz of the red caliber paint (in a small cup or jar, airbrush jars are best) and add a few drops (2) of black and mix it in so see if you like the color adjust if necessary. Once you are happy with the texture of the red, paint the darker red over the right side of the flag. NOTE: all red coats must be done within 3hrs or wait 5days as indicated on the can.
In about 4 hrs you can continue the process. I then paint the silver surround using the smaller flat brushes #10 and ⅝", it should only need 2 or 3 coats. Using the gold paint marker outline the bowtie and flower stroking the marker only one way and making a nice straight edge. Do the same with the flower and then fill them in using the gold in the bottle and a brush. Try to make even horizontal strokes, as the gold is reflective and will show if you overwork it. Paint the white part of the flag and this may take 5 or 6 coats or until solid white. The white takes longer to dry but each coat must be recoated within 2 hrs or wait 48 hrs.
With the white and silver try to keep a reasonability straight line, but you will fix it all later so don�t be concerned. Once all the colors are in wait 48hrs. Use the flat black paint marker to outline both flags, create the divide between the reds and trim and expand the black checks in the flag so each black meets the others. I use the raised part as a guide for the marker and keep the marker wet by pumping the marker from time to time to keep it wet and flowing. If you notice the marker picking up silver or white, stop let it dry and fit later. After I do the black I take the silver marker and fix any black lines that are not straight. Last step is to add the 4 lines in the flower using the darker red (see your emblem). If you need to fix the black in the checkered flag spray some krylon into the cap and brush it on.
If you are on Long Island email me and I can provide more help if needed.
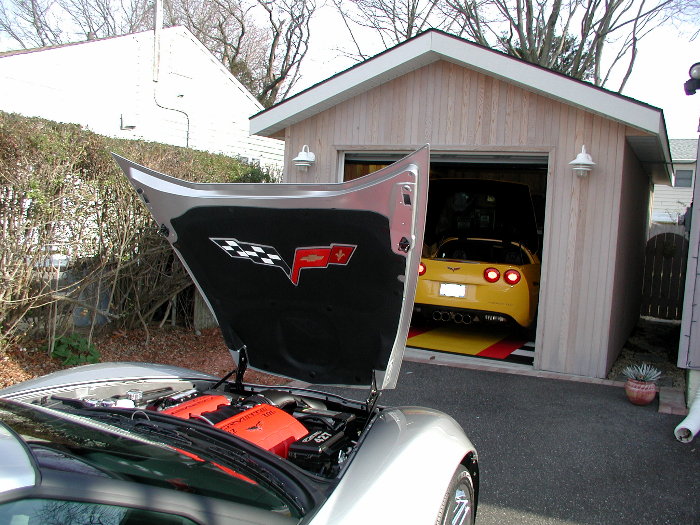
LINERS I HAVE PAINTED
VetteJoel's
Mine

Hoffie

In action

*** Click to see Hi Res picture ***
Supplies needed
1 can Krylon semi flat black spray #1613
Testors Model Masters 1/2 Oz enamels
Classic White (qty 2)
Silver or Silver Chrome
Gold
Gloss black
Testors Paint Markers Enamel
Silver
Flat Black
Gold
Duplicolor red caliper paint (autobarn carries it, do your calipers while you at it)
Set of brushes (Assorted FLAT brushes)
I start by sealing the material using the Krylon black. Lay the liner outside horizontally on a table or bench (pick a calm, warm and dry day). I spray the backside of the liner first holding the can 2 inches away and follow the outline of the emblem soaking the material with the paint (should go on very wet). The paint at first will soak right in like you never even sprayed it. Let it dry 20min between coats and give it 4 coats.
Turn the liner over and spray the front side of the emblem (2 inches away) soaking it with the paint staying inside the outer depressed part of the emblem, you should use the complete can between the front and back. After a few coats on the front you should notice the spray starting to puddle up before soaking in. After the last spray coat wait about 5 minutes and you can take a plastic spoon and using the back press and smooth any fibers that are sticking up The paint is almost a perfect match to the liners color so it�s almost invisible. You can also cover any problem on the remainder of the liner by spraying the same finish lightly staying 12 inches away. Let the complete liner dry overnight.
Use you factory emblem as a guide or print the one below.
I use the duplicolor red caliper paint because of a few reasons, it�s heat and chemical proof, it�s very thick and flows nice. I start by laying a heavy coat over the right side of the emblem covering the flags, bow tie and flower (use a wide flat brush 1/2"). Do not keep working this paint as it will tack up quickly and should be left alone to the next coat. Using smaller flat brushes (⅝" and a #10) also paint the complete boarder (the part the will become silver) and the soon to be white portion of the checkered flag (the recessed parts). The paint will be able to recoat in 15-20 minutes. This may take 4-8 coats depending on how pours the material is (I find each is different). Being perfect is not important at this time because you will trim and fix later with the paint pens, do stay away from the outer black surround and black parts of the flag as this will stay black.. To achieve the darker red in the right side of the red flag you will need to take about 1oz of the red caliber paint (in a small cup or jar, airbrush jars are best) and add a few drops (2) of black and mix it in so see if you like the color adjust if necessary. Once you are happy with the texture of the red, paint the darker red over the right side of the flag. NOTE: all red coats must be done within 3hrs or wait 5days as indicated on the can.
In about 4 hrs you can continue the process. I then paint the silver surround using the smaller flat brushes #10 and ⅝", it should only need 2 or 3 coats. Using the gold paint marker outline the bowtie and flower stroking the marker only one way and making a nice straight edge. Do the same with the flower and then fill them in using the gold in the bottle and a brush. Try to make even horizontal strokes, as the gold is reflective and will show if you overwork it. Paint the white part of the flag and this may take 5 or 6 coats or until solid white. The white takes longer to dry but each coat must be recoated within 2 hrs or wait 48 hrs.
With the white and silver try to keep a reasonability straight line, but you will fix it all later so don�t be concerned. Once all the colors are in wait 48hrs. Use the flat black paint marker to outline both flags, create the divide between the reds and trim and expand the black checks in the flag so each black meets the others. I use the raised part as a guide for the marker and keep the marker wet by pumping the marker from time to time to keep it wet and flowing. If you notice the marker picking up silver or white, stop let it dry and fit later. After I do the black I take the silver marker and fix any black lines that are not straight. Last step is to add the 4 lines in the flower using the darker red (see your emblem). If you need to fix the black in the checkered flag spray some krylon into the cap and brush it on.
If you are on Long Island email me and I can provide more help if needed.
LINERS I HAVE PAINTED
VetteJoel's
Mine
Hoffie
In action
*** Click to see Hi Res picture ***
Last edited by Pipedreams; 07-07-2005 at 07:32 PM.


 07-07-2005, 07:52 PM
#4
Drifting

Member Since: May 2005
Location: Las Vegas Location: Earth
Posts: 1,659
Received 0 Likes
on
0 Posts

Thanks, Pipedreams. Very thorough explanation. Hope mine turns out as good as yours did. On the Yellow coupe, did you paint the border yellow? Looks great. Finally, how resistant is the krylon, pen paint & testors bottle paint to the engine's heat? Thin k it will still look good 3 years from now? Just wondering.
 07-07-2005, 07:57 PM
#6
Race Director
Thread Starter
Member Since: Jan 2005
Location: Bay Shore, NY 11706 MILD2WILD (M2W)
Posts: 13,656
Likes: 0
Received 7 Likes
on
5 Posts
St. Jude Donor '06-'07
Originally Posted by ricatthebeach
Thanks, Pipedreams. Very thorough explanation. Hope mine turns out as good as yours did. On the Yellow coupe, did you paint the border yellow? Looks great. Finally, how resistant is the krylon, pen paint & testors bottle paint to the engine's heat? Thin k it will still look good 3 years from now? Just wondering.
07-07-2005, 09:27 PM
#7
Burning Brakes


Member Since: Jun 2005
Location: Davie, Florida
Posts: 750
Likes: 0
Received 0 Likes
on
0 Posts
St. Jude Donor '05-'06-'07
 Well done Pipedreams! Think I will just call Paula or even you, as if I do myself it will surely end up like many other disasters out there.
Thanks again for sharing your efforts.

 07-08-2005, 03:15 AM
#10
Le Mans Master


Awesome work
07-08-2005, 06:36 AM
#11
Race Director
Thread Starter
Member Since: Jan 2005
Location: Bay Shore, NY 11706 MILD2WILD (M2W)
Posts: 13,656
Likes: 0
Received 7 Likes
on
5 Posts
St. Jude Donor '06-'07
Originally Posted by Y2K253SS
Awesome work
 07-08-2005, 07:53 AM
#13
Race Director
Thread Starter
Member Since: Jan 2005
Location: Bay Shore, NY 11706 MILD2WILD (M2W)
Posts: 13,656
Likes: 0
Received 7 Likes
on
5 Posts
St. Jude Donor '06-'07
Originally Posted by Ucraz-E
Any tricks to removing the liner without causing any damage?
Thanx for the write up
Thanx for the write up
 07-08-2005, 06:14 PM
#16
Melting Slicks

Member Since: Jan 2005
Location: Austin, Texas Codes 660, 9448, and 295660 work in the C6 navigation unit. No DVD playback yet.
Posts: 3,168
Likes: 0
Received 0 Likes
on
0 Posts
Thanks for the write up! Can you drive the car without the liner? I'm trying to figure out how to do this over the course of several days when the car is a daily driver. 
07-08-2005, 07:14 PM
#17
Race Director
Thread Starter
Member Since: Jan 2005
Location: Bay Shore, NY 11706 MILD2WILD (M2W)
Posts: 13,656
Likes: 0
Received 7 Likes
on
5 Posts
St. Jude Donor '06-'07
Originally Posted by ein Tier
Thanks for the write up! Can you drive the car without the liner? I'm trying to figure out how to do this over the course of several days when the car is a daily driver.
Yes you can, the liner is for noise control and cosmetics only
07-08-2005, 07:23 PM
#18
Burning Brakes
Member Since: Feb 2005
Location: Central Jersey
Posts: 1,048
Likes: 0
Received 0 Likes
on
0 Posts
St. Jude Donor '05
Thanks for posting....I was thinking about doing it myself, but hearing how involved it is, think think is a job for someone w/ experience 
07-08-2005, 11:58 PM
#20
Melting Slicks
Member Since: Jan 2005
Location: Chicago IL
Posts: 2,864
Likes: 0
Received 0 Likes
on
0 Posts
Looks awesome. I like the yellow border. Thanks for taking the time to do the write up. I just don't think I trust my ability to do it myself. As a kid I always had problems coloring between the lines. 