
Re-clearing the tinted roof?
 07-19-2008, 10:26 AM
#1
Burning Brakes

Thread Starter

Can it be done? Mine is in bad shape. I read on this forum you can sand it down a bit and reclear it. I tried searching but nothing came up.
I thought maybe a mild sand, a good polish, lay down some adhesion promoter then a few new layers of clear coat. What do you guys think?
I thought maybe a mild sand, a good polish, lay down some adhesion promoter then a few new layers of clear coat. What do you guys think?

 07-19-2008, 12:00 PM
#3
Instructor


Yes it can be done. I think there are some instructions in the DIY Sticky in the Tech section if I remember correctly.
I decided to tackle mine a few months back. The top had delaminated on probably 60% of the top. I had no prior experience with wet sanding or painting anything prior to trying this. I figured I couldn't make it look any worse than it already did so I gave it a shot.
Unfortunately I didn't document the whole process but here's how I tackled it and the few pics I did take.
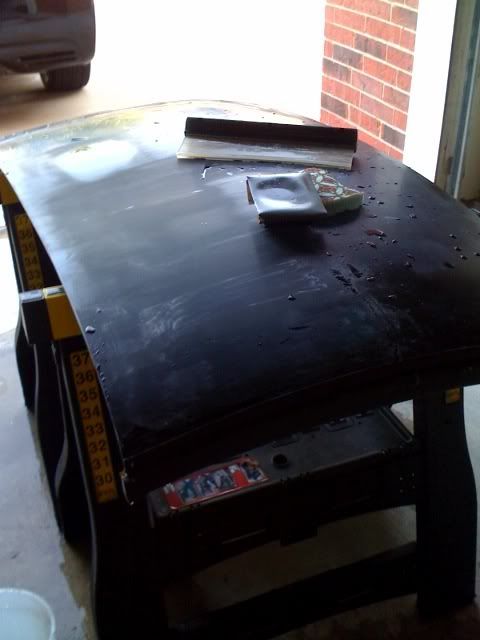
First step was to remove the remaining clear still on the top. I took the top out to the patio table and spent 3-4 hours with some 1000 grit wet sand paper removing the old paint. There is some kind of layer under the paint so be careful not to sand through this layer.
I had read that someone had some luck just polishing up the top itself without painting it. I brought out the Porter Cable and had no such luck myself.
Then I went to Pep Boys and bought a plastic adhesion promoter (rattle can) and some clear (rattle can). I picked up some more sand paper (600, 1000, 1500, & 2000 grit) as well. Get one of the tack rags as well.
On painting day, I started by cleaning and sweaping out the garage. I wet the floor to trap dust and not have it floating all around the garage. Then I roughed up the top with the 600 grit sand paper. I then washed it and ran the tack rag to remove towel lint. Next was 2 coats of the plastic adhesion promoter. Then I sprayed 3 coats of clear on the top. I think I waited 15-20 minutes between each coat.
I did a pretty crappy job with the clear (orange peel, overspray) so I had a bunch of sanding to do after it was dry. I waited a week before sanding. Here's a pic of the "fun":
I sanded with 1000 then 1500 and with 2000 last. Just make sure to sand in a straight line and when you move up to a lighter grit sand perpendicular to the previous grit scratches. Once I finished sanding out the imperfections I ran the porter cable over it a few times with a few different compounds and polishes.
This is how it turned out:
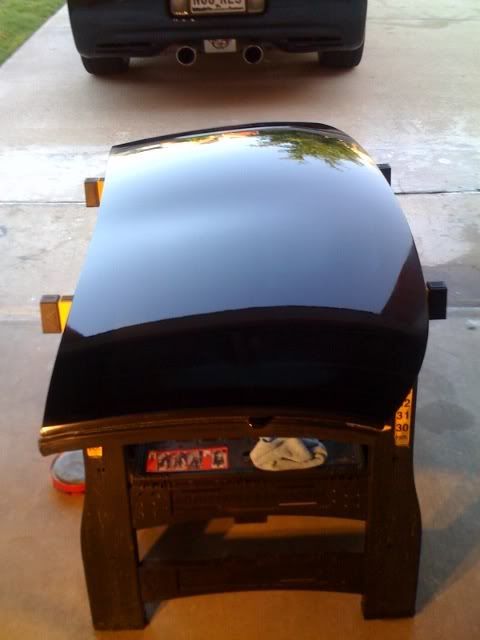
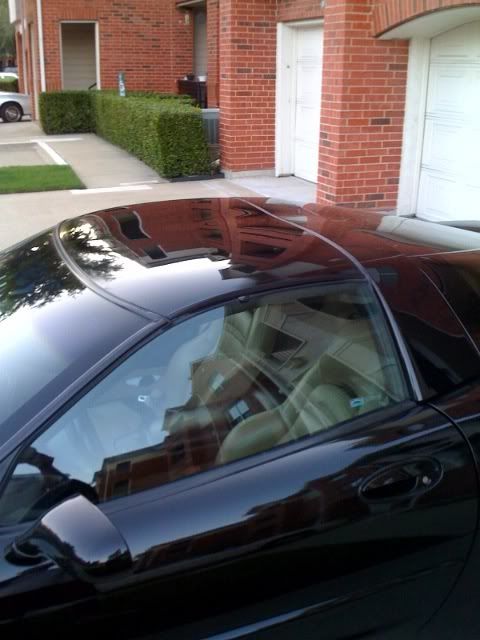
It didn't turn out perfect due to my painting skills but It's good enough that no one has noticed the imperfections without me showing them where they are.
Let me know if you have any questions.
Jeff
I decided to tackle mine a few months back. The top had delaminated on probably 60% of the top. I had no prior experience with wet sanding or painting anything prior to trying this. I figured I couldn't make it look any worse than it already did so I gave it a shot.
Unfortunately I didn't document the whole process but here's how I tackled it and the few pics I did take.
First step was to remove the remaining clear still on the top. I took the top out to the patio table and spent 3-4 hours with some 1000 grit wet sand paper removing the old paint. There is some kind of layer under the paint so be careful not to sand through this layer.
I had read that someone had some luck just polishing up the top itself without painting it. I brought out the Porter Cable and had no such luck myself.
Then I went to Pep Boys and bought a plastic adhesion promoter (rattle can) and some clear (rattle can). I picked up some more sand paper (600, 1000, 1500, & 2000 grit) as well. Get one of the tack rags as well.
On painting day, I started by cleaning and sweaping out the garage. I wet the floor to trap dust and not have it floating all around the garage. Then I roughed up the top with the 600 grit sand paper. I then washed it and ran the tack rag to remove towel lint. Next was 2 coats of the plastic adhesion promoter. Then I sprayed 3 coats of clear on the top. I think I waited 15-20 minutes between each coat.
I did a pretty crappy job with the clear (orange peel, overspray) so I had a bunch of sanding to do after it was dry. I waited a week before sanding. Here's a pic of the "fun":
I sanded with 1000 then 1500 and with 2000 last. Just make sure to sand in a straight line and when you move up to a lighter grit sand perpendicular to the previous grit scratches. Once I finished sanding out the imperfections I ran the porter cable over it a few times with a few different compounds and polishes.
This is how it turned out:
It didn't turn out perfect due to my painting skills but It's good enough that no one has noticed the imperfections without me showing them where they are.
Let me know if you have any questions.
Jeff
07-19-2008, 12:03 PM
#4
Burning Brakes
Thread Starter
Sweet, thanks for the time you took to go through that.
I'm going to have a friend who is a painter lay the clear, I'll sand it. I'm just glad it could be done!
Dave1998-I was thinking of that but I won't be able to get up there. Plus my guy will spray it for $100, I won't be able to find a used one anywhere near that cheap.
I'm going to have a friend who is a painter lay the clear, I'll sand it. I'm just glad it could be done!
Dave1998-I was thinking of that but I won't be able to get up there. Plus my guy will spray it for $100, I won't be able to find a used one anywhere near that cheap.
07-19-2008, 12:15 PM
#5
Instructor
No problem. With all the money I've saved using the write-ups here on the forum I'm just glad I could contribute myself.
It is definitely a very rewarding DIY job. Since it's only been 2 months, I have no idea how it will hold up over time. Having done it myself I'm not to concerned though as I can do it again. I'd rather repaint the thing every year or two for $30 than buy a new one!
It is definitely a very rewarding DIY job. Since it's only been 2 months, I have no idea how it will hold up over time. Having done it myself I'm not to concerned though as I can do it again. I'd rather repaint the thing every year or two for $30 than buy a new one!
 your top looks perfect from here
 07-19-2008, 01:31 PM
#8
Instructor
Thank you, thank you!
One thing I will add is that you can do this even if you don't have the Porter Cable or some kind of buffer for the final polishing.
You can see a circle just to the left of my sanding area on the first picture where I used some 3M rubbing compound (black bottle from walmart) by hand to get an idea of what the end result would look like. You can do the final polish by hand it will just take longer.
07-19-2008, 02:37 PM
#10
Melting Slicks


Member Since: Nov 2007
Location: NW Arkansas
Posts: 2,336
Likes: 0
Received 4 Likes
on
2 Posts
St. Jude Donor '08-'09
my top had the infamous 5 inch strip above the passenger window when I purchased it. last year I removed the remaining coating by sanding and recoated with clear. the factory coating was more substantial than paint, it took a lot of work to completely remove it. I started with 320 and worked my way to 1000. with a DA sander, be advised static electricity is a bear. I avoided any chemical strippers for fear of damaging the surface. since I already had spray equipment and dupont chromabase clear on hand, a few hours sanding and 3 wet coats and it was as good as new.
gun paint is far superior to what comes from a can
gun paint is far superior to what comes from a can
07-19-2008, 03:33 PM
#11
Pro

Member Since: Dec 2004
Location: Livingston NJ
Posts: 518
Likes: 0
Received 0 Likes
on
0 Posts
I have been thinking of doing mine. I was afraid to take sandpaper to it for fear that I would break through the tint layer and end up with a bigger problem.
I guess this inst an issue, time to go spend some time with a DA and a rattle can. It has to come out better then what it is now.
Thanks!
I guess this inst an issue, time to go spend some time with a DA and a rattle can. It has to come out better then what it is now.
Thanks!


 07-19-2008, 11:59 PM
#15
Administrator

Member Since: Mar 2001
Location: In a parallel universe. Currently own 2014 Stingray Coupe.
Posts: 343,374
Received 19,419 Likes
on
14,038 Posts
C7 of the Year - Modified Finalist 2021
MO Events Coordinator
St. Jude Co-Organizer
St. Jude Donor '03-'04-'05-'06-'07-'08-'09-'10-'11-'12-'13-'14-'15-'16-'17-'18-'19-
'20-'21-'22-'23-'24
NCM Sinkhole Donor
CI 5, 8 & 11 Veteran


You can also check out a post made by Itallian33. He did a good writeup on refinishing a top. http://forums.corvetteforum.com/show....php?t=2020059
08-07-2008, 03:33 PM
#18
Race Director

Member Since: Oct 2004
Location: Retired but working
Posts: 18,401
Likes: 0
Received 3 Likes
on
3 Posts
Cruise-In VI Veteran
I am in the process of doing mine now. Will hopefully finish this weekend. What I am looking for though is a clear with a bronze tint. (my color is Pewter). I saw one in columbus that they guy had redone and he gave me the color of the clear with the tint but I lost the number. It remains clear when looking out from the inside, but from the outside it is a shiny black with a hint of bronze. Has anyone used the clear with a tint of color. Need to find the manufacturer.
I do believe it is a Dupont paint, but can't recall.
I do believe it is a Dupont paint, but can't recall.

 08-07-2008, 05:09 PM
#20
Race Director

Member Since: Jan 2003
Location: San Antonio Texas
Posts: 19,802
Likes: 0
Received 0 Likes
on
0 Posts
St. Jude Donor '05-'06-'08
Yes it can be done. I think there are some instructions in the DIY Sticky in the Tech section if I remember correctly.
I decided to tackle mine a few months back. The top had delaminated on probably 60% of the top. I had no prior experience with wet sanding or painting anything prior to trying this. I figured I couldn't make it look any worse than it already did so I gave it a shot.
Unfortunately I didn't document the whole process but here's how I tackled it and the few pics I did take.
First step was to remove the remaining clear still on the top. I took the top out to the patio table and spent 3-4 hours with some 1000 grit wet sand paper removing the old paint. There is some kind of layer under the paint so be careful not to sand through this layer.
I had read that someone had some luck just polishing up the top itself without painting it. I brought out the Porter Cable and had no such luck myself.
Then I went to Pep Boys and bought a plastic adhesion promoter (rattle can) and some clear (rattle can). I picked up some more sand paper (600, 1000, 1500, & 2000 grit) as well. Get one of the tack rags as well.
On painting day, I started by cleaning and sweaping out the garage. I wet the floor to trap dust and not have it floating all around the garage. Then I roughed up the top with the 600 grit sand paper. I then washed it and ran the tack rag to remove towel lint. Next was 2 coats of the plastic adhesion promoter. Then I sprayed 3 coats of clear on the top. I think I waited 15-20 minutes between each coat.
I did a pretty crappy job with the clear (orange peel, overspray) so I had a bunch of sanding to do after it was dry. I waited a week before sanding. Here's a pic of the "fun":
I sanded with 1000 then 1500 and with 2000 last. Just make sure to sand in a straight line and when you move up to a lighter grit sand perpendicular to the previous grit scratches. Once I finished sanding out the imperfections I ran the porter cable over it a few times with a few different compounds and polishes.
This is how it turned out:
It didn't turn out perfect due to my painting skills but It's good enough that no one has noticed the imperfections without me showing them where they are.
Let me know if you have any questions.
Jeff