
Sound Insulation Project Phase II (Full Body insulating & more) - Photo's Galore!!
 02-18-2008, 01:24 AM
#1
Melting Slicks


Thread Starter

This is the second installment of a three part series on the my sound insulation project. To bring you up to speed on the project,
Phase I - Wheel wells
Phase II - Entire inside of car <--We're now here
Phase III - Doors
For those interested, Phase I was covered in,
http://forums.corvetteforum.com/show....php?t=1918988
Phase II was completed this weekend. Special thanks to razor2430 who made it all possible....he's da man!
The sound deadening used was SecondSkin Audio's Damplifier Pro (vibrational dampener) with a second layer of their Overkill material (Sound Absorber). I agonized over using Regular vs. Pro versions for the Damplifier and Overkill layers. See my impressions of this mod at the very end of the thread for more on that.
I'd like to briefly note that Phase II also included a Sound System pre-wiring. With all the seats and upholstery out, it would be a waste to not run wires for a future Sound System.
Well, it all starts with ripping out the upholstery and plastic molding pieces (It pains me to say this about our beloved cars, but the C5 is made with some really cheap stuff [e.g. plastic snap together moldings, ultra-thin carpeting that just lays in place]),

In this next set of pictures, its interesting to see what the C5 interior looks like naked,


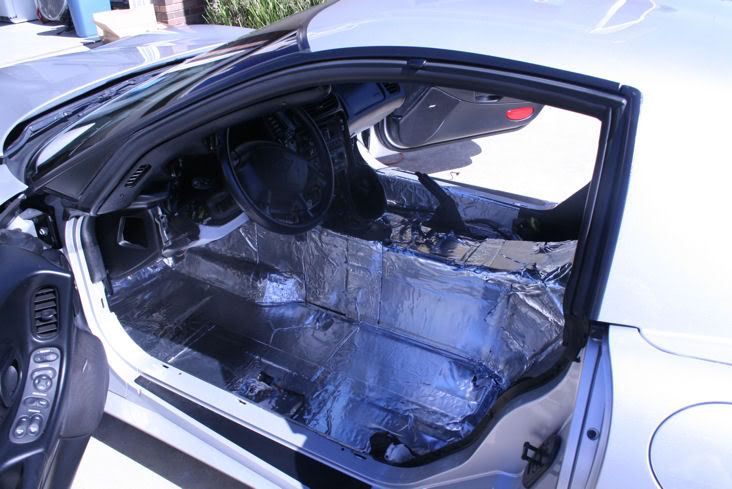
With the C5 naked, the Damplifier Pro was applied. No glue to use, it has a sticky side. You simply peel the paper off the backside and apply it like wallpaper (But don't forget the gloves, its easy to get small slices on your fingers from this stuff)...

Here's what it looked like after covering almost every square inch of the inside,

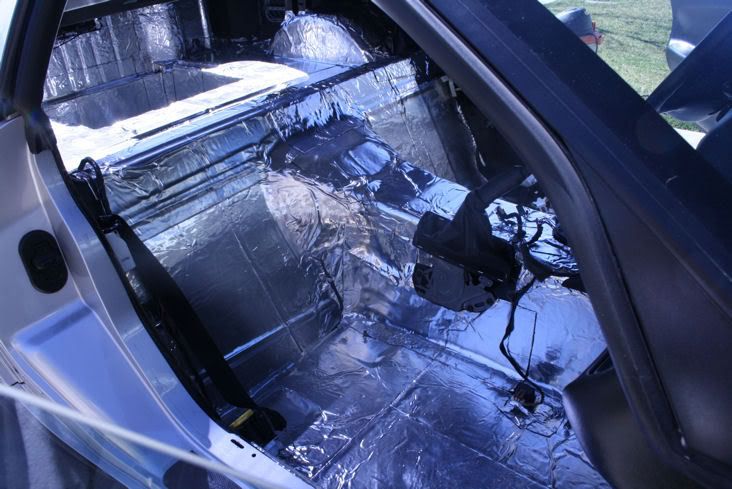

Now, application of the second sound insulation layer, Overkill,


Finally, with all the Overkill layer completed, in preparation for future Sound System,


I'll spare further pictures with the upholstery put back in... just looks like any ole' C5 at that point. That's what's funny about this mod... you can't tell its there by looking at!
With Phase II all said and done, many of you are probably asking, how's it now?
I would say the difference was demonstrative. But, at the same time, it has not quieted down that I can hear a pin drop. I still hear the outside noise. But, I can hear my cell phone ring now. The radio can be played softer. Carrying a conversation with a passenger is easier. I am expecting even better results after Phase III, door sound insulation is performed. On the flip side, I totally love my Corsa Pace Car with Kooks Headers exhaust setup, and don't get me wrong, you still know its there, but it is quieter now too ... of course, if this part could have stayed at the same volume, that would have been the ideal situation, but this mod has this obvious trade off (I guess if this would really bother me down the road, I could alwasys go back to Borla Stingers which I got rid of for the Corsa Pace Car [the subject of infinite Forum posts...we won't go there]). In view of stated observations, I'm glad I didn't go with the OverKill Pro which by the way is 3X thicker than the standard OverKill.
Stay Tuned for Phase III........
Phase I - Wheel wells
Phase II - Entire inside of car <--We're now here
Phase III - Doors
For those interested, Phase I was covered in,
http://forums.corvetteforum.com/show....php?t=1918988
Phase II was completed this weekend. Special thanks to razor2430 who made it all possible....he's da man!
The sound deadening used was SecondSkin Audio's Damplifier Pro (vibrational dampener) with a second layer of their Overkill material (Sound Absorber). I agonized over using Regular vs. Pro versions for the Damplifier and Overkill layers. See my impressions of this mod at the very end of the thread for more on that.
I'd like to briefly note that Phase II also included a Sound System pre-wiring. With all the seats and upholstery out, it would be a waste to not run wires for a future Sound System.
Well, it all starts with ripping out the upholstery and plastic molding pieces (It pains me to say this about our beloved cars, but the C5 is made with some really cheap stuff [e.g. plastic snap together moldings, ultra-thin carpeting that just lays in place]),
In this next set of pictures, its interesting to see what the C5 interior looks like naked,
With the C5 naked, the Damplifier Pro was applied. No glue to use, it has a sticky side. You simply peel the paper off the backside and apply it like wallpaper (But don't forget the gloves, its easy to get small slices on your fingers from this stuff)...
Here's what it looked like after covering almost every square inch of the inside,
Now, application of the second sound insulation layer, Overkill,
Finally, with all the Overkill layer completed, in preparation for future Sound System,
I'll spare further pictures with the upholstery put back in... just looks like any ole' C5 at that point. That's what's funny about this mod... you can't tell its there by looking at!
With Phase II all said and done, many of you are probably asking, how's it now?
I would say the difference was demonstrative. But, at the same time, it has not quieted down that I can hear a pin drop. I still hear the outside noise. But, I can hear my cell phone ring now. The radio can be played softer. Carrying a conversation with a passenger is easier. I am expecting even better results after Phase III, door sound insulation is performed. On the flip side, I totally love my Corsa Pace Car with Kooks Headers exhaust setup, and don't get me wrong, you still know its there, but it is quieter now too ... of course, if this part could have stayed at the same volume, that would have been the ideal situation, but this mod has this obvious trade off (I guess if this would really bother me down the road, I could alwasys go back to Borla Stingers which I got rid of for the Corsa Pace Car [the subject of infinite Forum posts...we won't go there]). In view of stated observations, I'm glad I didn't go with the OverKill Pro which by the way is 3X thicker than the standard OverKill.
Stay Tuned for Phase III........

 02-18-2008, 08:30 AM
#4
Administrator

Member Since: Mar 2001
Location: In a parallel universe. Currently own 2014 Stingray Coupe.
Posts: 343,891
Received 19,561 Likes
on
14,116 Posts
C7 of the Year - Modified Finalist 2021
MO Events Coordinator
St. Jude Co-Organizer
St. Jude Donor '03-'04-'05-'06-'07-'08-'09-'10-'11-'12-'13-'14-'15-'16-'17-'18-'19-
'20-'21-'22-'23-'24
NCM Sinkhole Donor
CI 5, 8 & 11 Veteran


Nice pics and an impressive job you did with the insulation. 
02-18-2008, 08:33 AM
#5
Melting Slicks

Looks like ALOT off work,im glad your happy with it.I have to ask a dumb ?,To mount the seats back in do you have to cut where the bracket attaches to the floor?????
02-18-2008, 08:35 AM
#6
Melting Slicks
Ahh, that brought back memories; you are doing a great job.  Here is a little trick that I learned when I did mine last Summer. Remove the deadner from the square indendents where the seat bolts are located. I didn't and it was impossible to slide my plastic seat track bolt covers over the bolts (I hope that made sense). Keep up the good work and pictures
Here is a little trick that I learned when I did mine last Summer. Remove the deadner from the square indendents where the seat bolts are located. I didn't and it was impossible to slide my plastic seat track bolt covers over the bolts (I hope that made sense). Keep up the good work and pictures
 02-18-2008, 10:12 AM
#8
Former Vendor
Member Since: Nov 2005
Location: Spring Texas
Posts: 8,995
Likes: 0
Received 2 Likes
on
2 Posts
St. Jude Donor '08
DOORS!!! you Really need to do the doors, they are the culprits for the major noise pollution in your car.
in the last pic you have 2 wires rolled up...what are those?
in the last pic you have 2 wires rolled up...what are those?
02-18-2008, 10:17 AM
#9
Melting Slicks
Thread Starter
Ahh, that brought back memories; you are doing a great job. Here is a little trick that I learned when I did mine last Summer. Remove the deadner from the square indendents where the seat bolts are located. I didn't and it was impossible to slide my plastic seat track bolt covers over the bolts (I hope that made sense). Keep up the good work and pictures
Here is a little trick that I learned when I did mine last Summer. Remove the deadner from the square indendents where the seat bolts are located. I didn't and it was impossible to slide my plastic seat track bolt covers over the bolts (I hope that made sense). Keep up the good work and pictures Damplifier Pro is 0.075-0.085 inches thick. The Overkill is 0.125 inches thick. At the worse case, close to a quarter of an inch thick. We were able to get the seats back on, but some pressure definitely had to be applied
 .
02-18-2008, 10:20 AM
.
02-18-2008, 10:20 AM
#10
Melting Slicks
Member Since: Aug 2006
Location: Issaquah WA
Posts: 2,123
Likes: 0
Received 0 Likes
on
0 Posts
St. Jude Donor '08-'09-'10
Good photos. Good Job. I just finished my interior. I have wheel wells and doors to do. Thanks for the link to your wheel well mod.

 02-18-2008, 11:43 AM
#13
Melting Slicks
Last edited by Vegas Vette; 02-18-2008 at 10:04 PM.


 02-19-2008, 02:00 AM
#18
Le Mans Master

I'm at the point of reinstalling my interior after just having done a similar job to my Z. My wife said the car looks very futuristic with all the aluminum showing. With all the work involved in doing this, it's a shame nobody gets to see the effort you put into your car. In regard to the comment about the quality of the interior components, it's amazing that you can install all that foil and all the interior pieces reinstall with very little effort. Good suggestion on doing the doors, I hadn't thought about that. I'll have to put that on my list. The next mod will be installing the LG headers and exhaust that are waiting to go in soon.
02-19-2008, 08:45 AM
#19
Cherish your Hopes...
Member Since: Feb 2002
Location: West Palm Beach FL
Posts: 13,032
Received 215 Likes
on
132 Posts
Cruise-In VII Veteran
St. Jude Donor '05-'06-'07
nice writeup...
...with that kind of "overkill"
...I hope you can get the console back down
very cool thing to do...
...it is the VERY BEST way to do a thorough interior clean
...with that kind of "overkill"
...I hope you can get the console back down
very cool thing to do...
...it is the VERY BEST way to do a thorough interior clean
