
ACA HID Headlight Install (lots of pics)
 12-28-2007, 07:21 PM
#1
Le Mans Master

Thread Starter

Well despite all the holiday chores and duties I did finally get my ACA headlights installed  What follows is some things I found that I think others doing this install might find useful. I will not be doing a step by step "How To" as there are several on CF and a well written PDF that I got from another CF member that I can email anyone who requests it. I did figure out a few short cuts to the step by step as i went along. Many thanks to all those who helped me with suggestions on CF and thanks to the original PDF maker for some of the photos and text I will use in the following info,
The first step is to remove the OEM housings to get ready to do the swap. Most of the instructions I saw have the installer doing this on the car with the headlights up........but this is way more difficult than just removing the entire pop up assembly from the car......it just takes removing two nuts and one slide on retainer and the entire assembly will come out and you can do all this work from the comfort of your bench or kitchen table
With the painted covers removed look for the two torx 20 screws and nuts that the pop ups hinge on.........see circled in pic
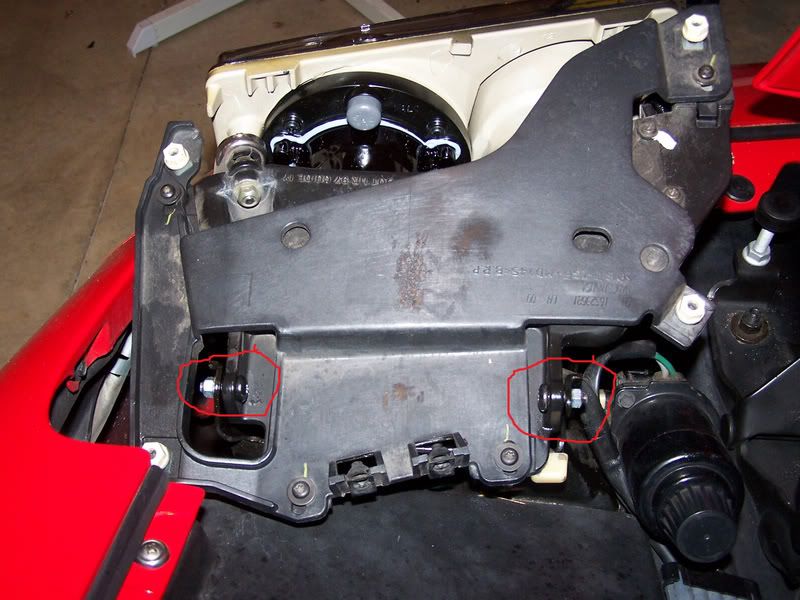
The first time you try to remove these it can be a major PITA as mine were secured with Red loctite. I had to use vise grips on the nuts and Torx side......but once you bust them loose, it is easy from then on. The torx screws are a shoulder bolt that uses a nylon bushing for the hinge action......DON"T LOSE the bushing !! Nut is a 5mm thread with a 10mm head.
Once you have these two nuts off and the torx screws out you can lower the entire popup assembly into the light well and disconnect the wiring much easier. The next thing to disconnect is the pivot bar which is held with a push on pressure retainer.......easily removed with a pair of needle nose pliers and some patience......see circled in pic
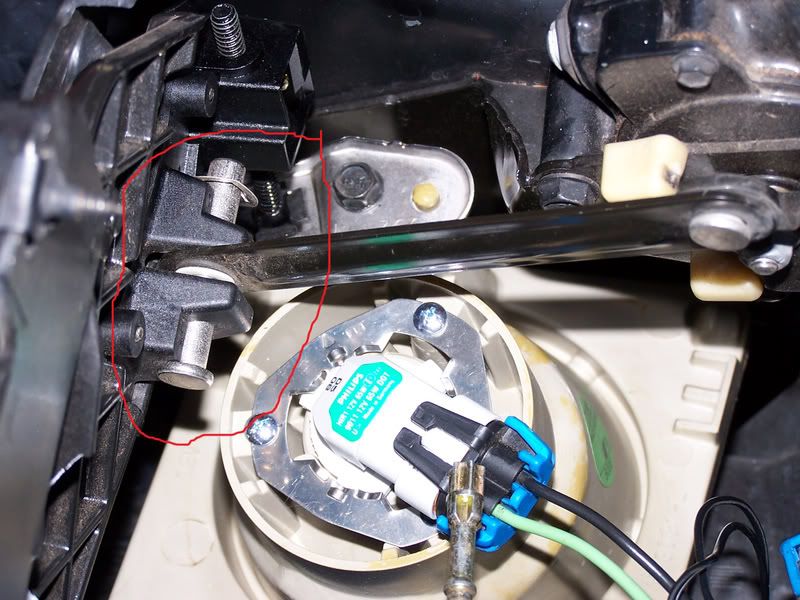
Again, do not lose these parts. Once removed you can now take the entire assembly out of the car for the remainder of the swap........much easier to do all the work
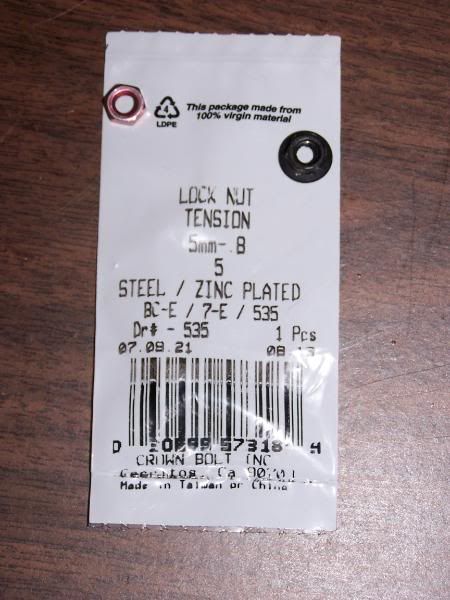
To make all this easier the next time and to insure that the two nuts do not loosen....I replaced all 4 OEM nuts with 5mm locking nuts....no loctite required.
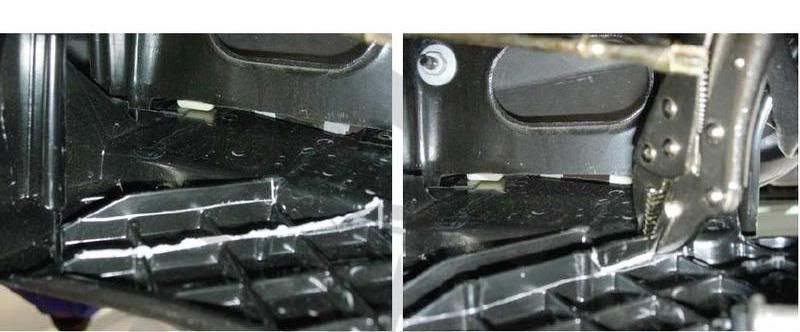
After you remove the three large bolt/screws that attach the OEM headlights you need to do some mods on the black plate of the brackets. As you look up onto the underside of each factory metal headlamp bracket assembly, you will see a metal grid structure. Two crossing bars are taller than the rest, and will be trimmed for our installation. These are not structural bits and do not affect the integrity of the bracket.
The pieces removed are approximately 3/8" high by 3" wide.
Identify the front and back tall crossbars. Using a utility knife, score a horizontal line along the uppermost edge of this crossing section more than once. You will find the soft metal cuts easily with the knife. Score a vertical line at the back edge of this section.
Using the Vice Grips, snap off this scored section by clamping and bending back the section. It may only come off in pieces, but will snap off at the scored lines. The larger posts will also snap off neatly with proper scoring. If you choose, you can use a Dremel tool or similar for this removal, but the effort and difficulty increase when using this method. This area will not be seen, so perfection is not the goal. Removal of this small obstruction is necessary to allow clearance for the longer projector housings. I did this on both sides of the car.
Once trimmed you can mount the ACA housings into the OEM mount assembly. Using the three self-tapping bolts removed from the OEM housings and a 10mm socket and ratchet, carefully tap the three mounting holes on the back of both HID lamp housings. Be careful and do not cross-thread or thread these holes sideways. Take your time and go in straight. For best results, screw the bolt in partially, then back it out and blowout the debris before resuming the threading. Seat the bolts fully in the holes, but do not over-tighten. Remember, you are screwing into plastic. Take your time.
Oh and while you have the assemblies out of the car, give the 4 headlight adjusting assemblies a good soak with WD40 or similar
I them laid the harnesses out into the engine bay. I ran the drivers side first from the battery bin down and under the edge of the coolant reservoir along the stock wiring harness path and down into the passenger light bay then down under the frame rails and under the radiator shroud to the drivers light bay. There is plenty of wire length in the supplied harnesses. I did the same with the pass side.
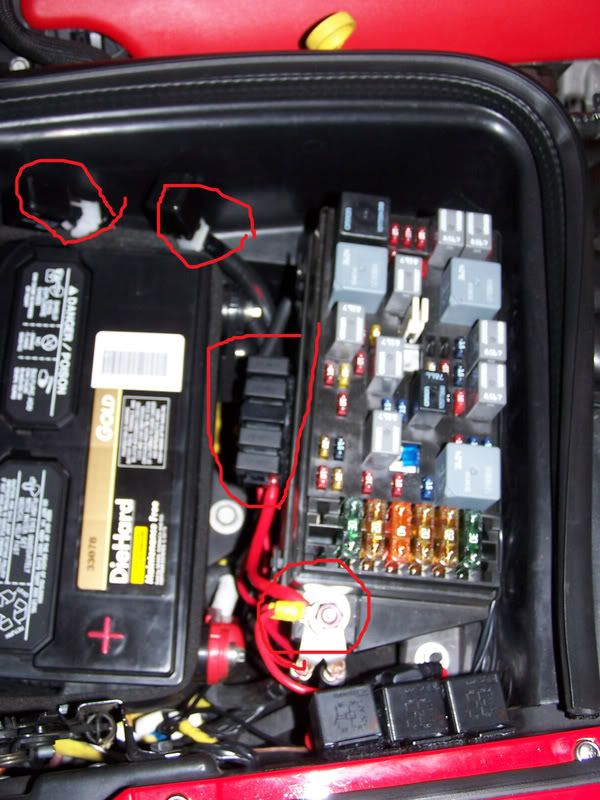
Rather than disconnecting the battery, I just popped out the fuses in the new harnesses so I could hook everything up. If you look at the pic you will see where I velcroed the fuse holders and kept the two relays accessible as well. I will also velcro up the relays. As to the fuses, I used velcro so I can pop them off and easily change the fuses. There are 5 on mine only because I installed a third harness for my HID fogs at the same time. All hot wires terminate at the direct battery bolt as shown.
The ground wires were too short, so I butt spliced them to a piece of 14ga black wire and snaked it down to the frame ground on the frame rail.
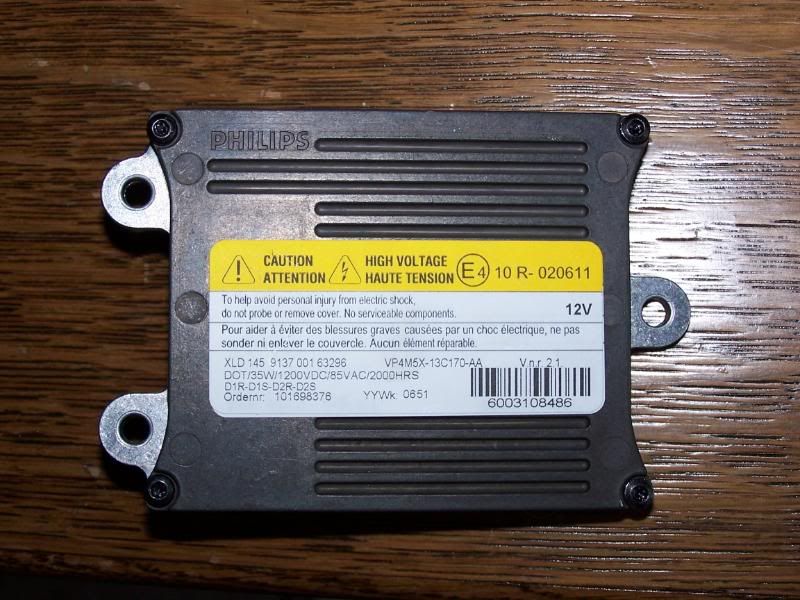
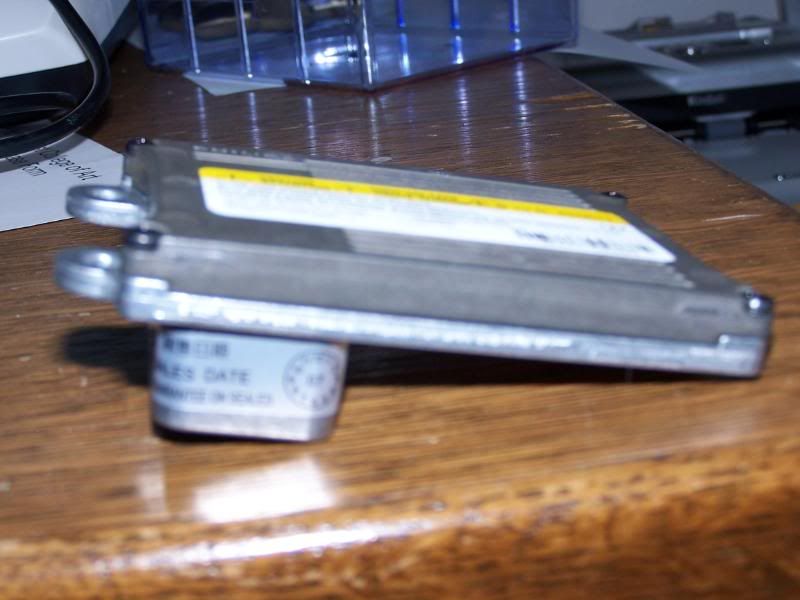
With the wiring all laid out time to mount the ballasts. The supplied ballasts were Phillips slimline.........nice
Remove the large doubled-sided foam tape square from an accessory packet and mount it on the rear of one of the ballasts. I put the connections at the top. For any future reference, try not to cover the bar code or the numbers underneath. Attach the ballast just underneath the driver's side headlamp assembly bracket and onto the inner fender wall. You will easily see the flat area under the metal bracket. I used stainless #6-32" machine screws and nylock nuts.
Once everything is ready, reinstall the housings into the light well but ONLY connect the large pivot rod with the press on retainer. Doing it this way will allow you to lower the light assembly into the well and have lots of room to make all your connections
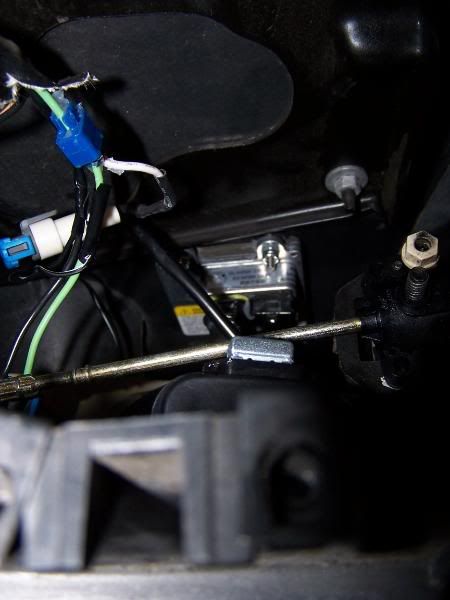
When making the connections it is pretty straight forward,except on my set there was a white wire that was heat shrinked to the diode that was not connected at one end.....see pic
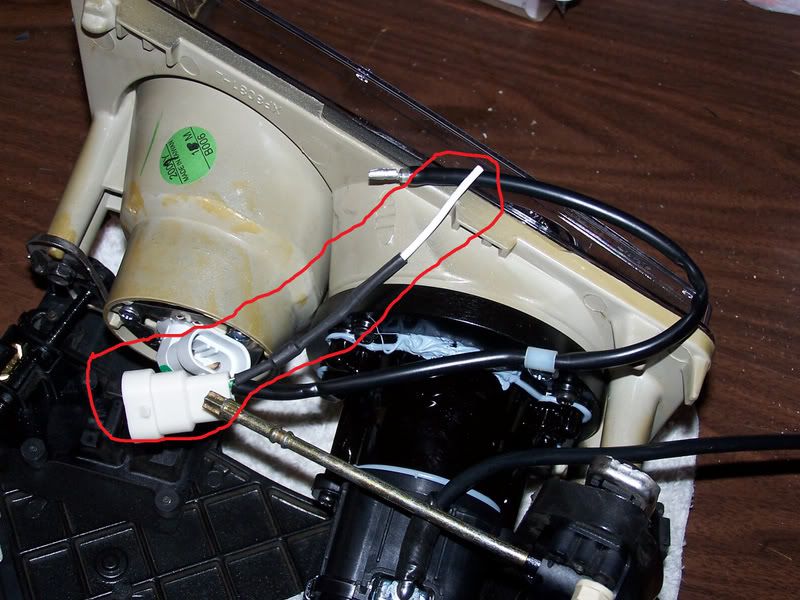
This needs to tap into the green power wire on the OEM high beam harness so that the low beams stay on with the high beams.

I think that is about it.....take your time and TEST BEFORE you bolt everything back together
What follows is some things I found that I think others doing this install might find useful. I will not be doing a step by step "How To" as there are several on CF and a well written PDF that I got from another CF member that I can email anyone who requests it. I did figure out a few short cuts to the step by step as i went along. Many thanks to all those who helped me with suggestions on CF and thanks to the original PDF maker for some of the photos and text I will use in the following info, The first step is to remove the OEM housings to get ready to do the swap. Most of the instructions I saw have the installer doing this on the car with the headlights up........but this is way more difficult than just removing the entire pop up assembly from the car......it just takes removing two nuts and one slide on retainer and the entire assembly will come out and you can do all this work from the comfort of your bench or kitchen table
With the painted covers removed look for the two torx 20 screws and nuts that the pop ups hinge on.........see circled in pic
The first time you try to remove these it can be a major PITA as mine were secured with Red loctite. I had to use vise grips on the nuts and Torx side......but once you bust them loose, it is easy from then on. The torx screws are a shoulder bolt that uses a nylon bushing for the hinge action......DON"T LOSE the bushing !!
Nut is a 5mm thread with a 10mm head. Once you have these two nuts off and the torx screws out you can lower the entire popup assembly into the light well and disconnect the wiring much easier. The next thing to disconnect is the pivot bar which is held with a push on pressure retainer.......easily removed with a pair of needle nose pliers and some patience......see circled in pic
Again, do not lose these parts. Once removed you can now take the entire assembly out of the car for the remainder of the swap........much easier to do all the work
To make all this easier the next time and to insure that the two nuts do not loosen....I replaced all 4 OEM nuts with 5mm locking nuts....no loctite required.
After you remove the three large bolt/screws that attach the OEM headlights you need to do some mods on the black plate of the brackets. As you look up onto the underside of each factory metal headlamp bracket assembly, you will see a metal grid structure. Two crossing bars are taller than the rest, and will be trimmed for our installation. These are not structural bits and do not affect the integrity of the bracket.
The pieces removed are approximately 3/8" high by 3" wide.
Identify the front and back tall crossbars. Using a utility knife, score a horizontal line along the uppermost edge of this crossing section more than once. You will find the soft metal cuts easily with the knife. Score a vertical line at the back edge of this section.
Using the Vice Grips, snap off this scored section by clamping and bending back the section. It may only come off in pieces, but will snap off at the scored lines. The larger posts will also snap off neatly with proper scoring. If you choose, you can use a Dremel tool or similar for this removal, but the effort and difficulty increase when using this method. This area will not be seen, so perfection is not the goal. Removal of this small obstruction is necessary to allow clearance for the longer projector housings. I did this on both sides of the car.
Once trimmed you can mount the ACA housings into the OEM mount assembly. Using the three self-tapping bolts removed from the OEM housings and a 10mm socket and ratchet, carefully tap the three mounting holes on the back of both HID lamp housings. Be careful and do not cross-thread or thread these holes sideways. Take your time and go in straight. For best results, screw the bolt in partially, then back it out and blowout the debris before resuming the threading. Seat the bolts fully in the holes, but do not over-tighten. Remember, you are screwing into plastic. Take your time.
Oh and while you have the assemblies out of the car, give the 4 headlight adjusting assemblies a good soak with WD40 or similar
I them laid the harnesses out into the engine bay. I ran the drivers side first from the battery bin down and under the edge of the coolant reservoir along the stock wiring harness path and down into the passenger light bay then down under the frame rails and under the radiator shroud to the drivers light bay. There is plenty of wire length in the supplied harnesses. I did the same with the pass side.
Rather than disconnecting the battery, I just popped out the fuses in the new harnesses so I could hook everything up. If you look at the pic you will see where I velcroed the fuse holders and kept the two relays accessible as well. I will also velcro up the relays. As to the fuses, I used velcro so I can pop them off and easily change the fuses. There are 5 on mine only because I installed a third harness for my HID fogs at the same time. All hot wires terminate at the direct battery bolt as shown.
The ground wires were too short, so I butt spliced them to a piece of 14ga black wire and snaked it down to the frame ground on the frame rail.
With the wiring all laid out time to mount the ballasts. The supplied ballasts were Phillips slimline.........nice
Remove the large doubled-sided foam tape square from an accessory packet and mount it on the rear of one of the ballasts. I put the connections at the top. For any future reference, try not to cover the bar code or the numbers underneath. Attach the ballast just underneath the driver's side headlamp assembly bracket and onto the inner fender wall. You will easily see the flat area under the metal bracket. I used stainless #6-32" machine screws and nylock nuts.
Once everything is ready, reinstall the housings into the light well but ONLY connect the large pivot rod with the press on retainer. Doing it this way will allow you to lower the light assembly into the well and have lots of room to make all your connections
When making the connections it is pretty straight forward,except on my set there was a white wire that was heat shrinked to the diode that was not connected at one end.....see pic
This needs to tap into the green power wire on the OEM high beam harness so that the low beams stay on with the high beams.
I think that is about it.....take your time and TEST BEFORE you bolt everything back together


 12-28-2007, 07:35 PM
#4
Le Mans Master
Thread Starter
Thanks,
Now if the rain and snow would let up long enough for me to adjust these.............
Just tried to adjust them........but I think I have them too low........see my other post and let me know
Now if the rain and snow would let up long enough for me to adjust these.............
Just tried to adjust them........but I think I have them too low........see my other post and let me know
Last edited by jrprich; 12-28-2007 at 09:14 PM.
12-28-2007, 08:49 PM
#5
Night Owl for life

Member Since: Nov 2003
Location: Bugs Bunny should'a made a left turn here
Posts: 23,217
Received 3,256 Likes
on
1,675 Posts

nice writeup!
12-28-2007, 08:59 PM
#6
Tech Contributor
Member Since: Aug 1999
Location: Should this thoughtful, valuable contribution meet with no acknowledgement or 'thanks' this post----
Posts: 16,382
Received 399 Likes
on
257 Posts
Best write-up I've seen on this mod. If and when I acquire the passenger housing I am good to go, and will use your tips!

 12-30-2007, 04:57 PM
#12
Former Vendor
Member Since: Nov 2005
Location: Spring Texas
Posts: 8,995
Likes: 0
Received 2 Likes
on
2 Posts
St. Jude Donor '08
So did the ACA kit come with a housing AND the headlight frame? The projector looks like it would have the same clearence problems I did otherwise.
*subscribed*
*subscribed*
12-30-2007, 08:05 PM
#13
Le Mans Master
Thread Starter
Just the custom headlight housing........not the black metal framework that the headlight housing mounts to. The only mod to the frame required is to snap off two of the metal ribs to allow some additional clearance for the back of the projector.....mainly to allow the headlights to be adjusted downward if needed.
12-30-2007, 08:50 PM
#14
Former Vendor
Member Since: Nov 2005
Location: Spring Texas
Posts: 8,995
Likes: 0
Received 2 Likes
on
2 Posts
St. Jude Donor '08
Just the custom headlight housing........not the black metal framework that the headlight housing mounts to. The only mod to the frame required is to snap off two of the metal ribs to allow some additional clearance for the back of the projector.....mainly to allow the headlights to be adjusted downward if needed.


