Made a cool tool!
 11-10-2007, 07:07 PM
#1
Melting Slicks


Thread Starter
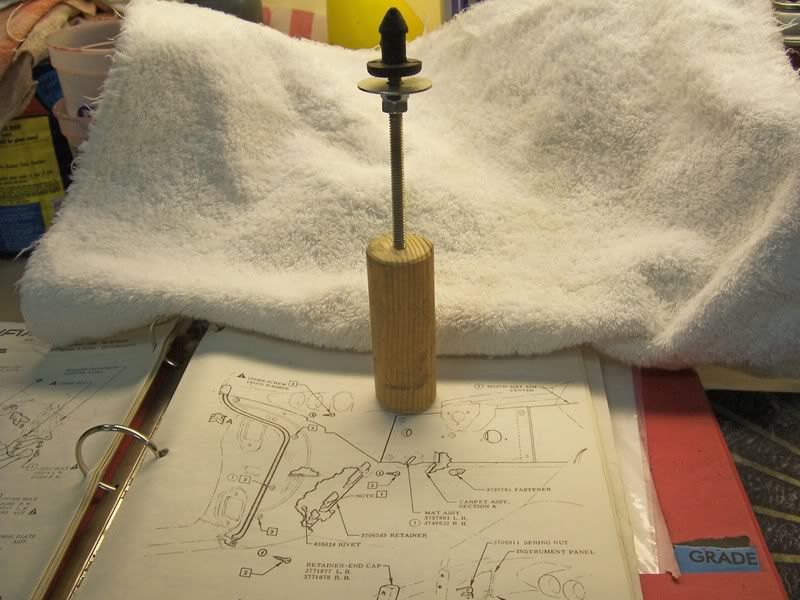
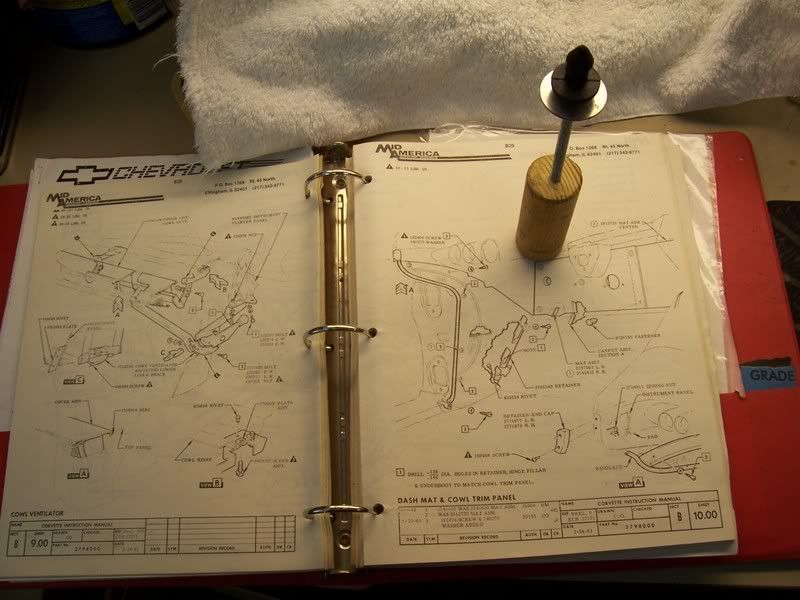
Anyone installed a firewall pad lately. Well let me tell you its a bear without a special tool. I could not get the tip of the fastner to go through the pad and the firewall and catch. I tried to use a punch but only pushed through the fastner. Figured there must be a tool for this so I went to see my friend at Va Vettes. He thought for a minute and said, lets make one. He's one of those engineer types. Soo! here is what we came up with and it works like a charm.
Short section of wood closet rod (cost $0) found in bottom of old tool box
Short section 1/4x20 threaded rod (cost $0) found in junk box
2 1/4x20 nuts (cost $0) everybody has a couple extra nuts
1 large 1/4 fender washer (cost $0) left over from last restoration job
Thanks to Va Vettes!
Enjoy


Some progress, back end is done and most trim on.


C1 Guys "Gotta Love This"


Earl
Short section of wood closet rod (cost $0) found in bottom of old tool box
Short section 1/4x20 threaded rod (cost $0) found in junk box
2 1/4x20 nuts (cost $0) everybody has a couple extra nuts
1 large 1/4 fender washer (cost $0) left over from last restoration job
Thanks to Va Vettes!
Enjoy
Some progress, back end is done and most trim on.
C1 Guys "Gotta Love This"
Earl


 11-10-2007, 10:04 PM
#4
Burning Brakes


Member Since: Sep 2005
Posts: 997
Likes: 0
Received 0 Likes
on
0 Posts

Anyone installed a firewall pad lately. Well let me tell you its a bear without a special tool. I could not get the tip of the fastner to go through the pad and the firewall and catch. I tried to use a punch but only pushed through the fastner. Figured there must be a tool for this so I went to see my friend at Va Vettes. He thought for a minute and said, lets make one. He's one of those engineer types. Soo! here is what we came up with and it works like a charm.
Short section of wood closet rod (cost $0) found in bottom of old tool box
Short section 1/4x20 threaded rod (cost $0) found in junk box
2 1/4x20 nuts (cost $0) everybody has a couple extra nuts
1 large 1/4 fender washer (cost $0) left over from last restoration job
Thanks to Va Vettes!
Enjoy
Hey Earl,
Had the same problem this summer, LIC has a tool that works similar as the one you made. As you said if you aren't careful you punch through the end. I bought an extra pack for that reason.
Good luck with the restoration!!
Shooter


 11-11-2007, 10:47 AM
#7
Team Owner


Member Since: Oct 2000
Location: Washington Michigan
Posts: 38,899
Received 1,859 Likes
on
1,102 Posts

That's exactly what we used on the line in the plant, except ours was made from a phillips screwdriver, end ground to a round shape, with a washer brazed to the shaft so the shaft was about 1/4" longer than the rubber plug (as yours is). The plugs were heated in a bench-top tray under a heat lamp, and the shaft part of the plug was dipped in a 50-50 Joy soap/water solution before installing them; the inside guy pushed them through, and the outside guy grabbed the tip with a pair of duckbill pliers and pulled to seat the plug.
 11-11-2007, 12:25 PM
#9
Le Mans Master


 11-11-2007, 12:52 PM
#10
Melting Slicks
Thread Starter
That's exactly what we used on the line in the plant, except ours was made from a phillips screwdriver, end ground to a round shape, with a washer brazed to the shaft so the shaft was about 1/4" longer than the rubber plug (as yours is). The plugs were heated in a bench-top tray under a heat lamp, and the shaft part of the plug was dipped in a 50-50 Joy soap/water solution before installing them; the inside guy pushed them through, and the outside guy grabbed the tip with a pair of duckbill pliers and pulled to seat the plug.
Earl
11-11-2007, 08:09 PM
#11
Race Director


Funny you should say that, using a worn out phillips. That was our first thought, but we had no welder. My friend said hay lets use this old 1/4-20 threaded rod and that way you can set the depth where you want it. Plans are to take the washer and have it tacked to the first nut as that was the weak link, washer would fall off after installation. To me this is some of the fun while restring a car. If it was easy everybody would be doing it.
Earl
Earl
Dave
11-12-2007, 09:54 AM
#12
Le Mans Master
Dave, how ironic, you were just talking about this yesterday.
Earl, great job on the tool, pics, and installation. She's looking great!
09-18-2009, 10:51 PM
#13
Team Owner

Member Since: Jan 2007
Location: cookeville tennessee
Posts: 28,847
Received 1,762 Likes
on
1,529 Posts
Anyone installed a firewall pad lately. Well let me tell you its a bear without a special tool. I could not get the tip of the fastner to go through the pad and the firewall and catch. I tried to use a punch but only pushed through the fastner. Figured there must be a tool for this so I went to see my friend at Va Vettes. He thought for a minute and said, lets make one. He's one of those engineer types. Soo! here is what we came up with and it works like a charm.
Short section of wood closet rod (cost $0) found in bottom of old tool box
Short section 1/4x20 threaded rod (cost $0) found in junk box
2 1/4x20 nuts (cost $0) everybody has a couple extra nuts
1 large 1/4 fender washer (cost $0) left over from last restoration job
Thanks to Va Vettes!
Enjoy
Some progress, back end is done and most trim on.
C1 Guys "Gotta Love This"
Earl
