
rear fascia overlay installation question
 05-05-2007, 04:00 PM
#1
Pro

Thread Starter

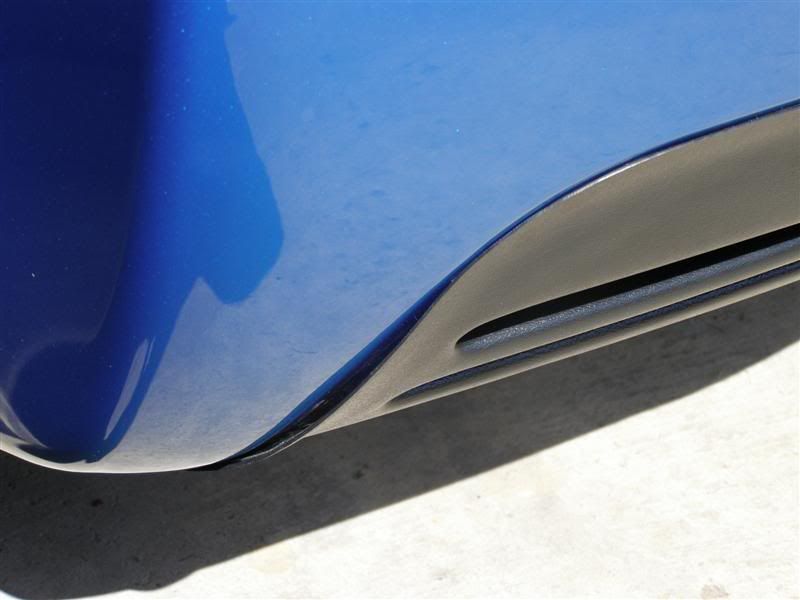
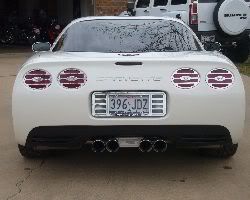
I received my rear fascia overlay the other day and decided to install it 2 days ago. It didn't turn out too bad, but i had some trouble getting it to "stick" in the corners, as you can see in the pictures. Anybody got any tips or solutions to getting rid of the gap?t seems like if I press in one place, it pops loose in another. Is there any way to loosen it and get it to stick a little better while still aminataing the "reversible' nature og thr overlay.
Just to let you know, Richard totally stands behind this product, and told me that we would fully refund my money if I wasn't satisfied. The thing is, I really like how it looks, except for the gaps in the corners. If i could fix those, i'd be happy with it.


Just to let you know, Richard totally stands behind this product, and told me that we would fully refund my money if I wasn't satisfied. The thing is, I really like how it looks, except for the gaps in the corners. If i could fix those, i'd be happy with it.
 05-05-2007, 04:07 PM
#2
Burning Brakes

I'm thinking about one of these myself, I'll be watching to see if there is a resolution. This seems like a better option than paint if it installs properly, as it can be changed back to stock easily.
Question for people who have had the same area painted, about how much did it cost?
Question for people who have had the same area painted, about how much did it cost?
05-05-2007, 05:18 PM
#3
Le Mans Master


Certainly has a very clean OE look. I'm considering one of these and I'll be watching this thread to see how it's resolved. 
05-05-2007, 07:03 PM
#4
Melting Slicks

Member Since: Oct 2004
Location: Big Bear City CA
Posts: 3,293
Likes: 0
Received 0 Likes
on
0 Posts
St. Jude Donor '06-'07-'08-'09

Mr. Blue, have you tried the Elmer's Rubber Cement? It won't harm your paint and any excess cement will rub right off using your thumb. A few other customers have had great success in doing so. Or if you would rather, I can send you out another unit and you can try the install again. Whatever works best for you, just keep me advised 
Richard
Richard
05-05-2007, 07:24 PM
#5
Le Mans Master
05-05-2007, 09:19 PM
#7
Melting Slicks
Member Since: Aug 2004
Location: Plainfield Ill.
Posts: 2,879
Likes: 0
Received 0 Likes
on
0 Posts
You could removed and reapply a new strip of 3M double sided tape. Like mrm1149 mentioned, not sure how you prep the surface area, but normally if your car was already washed and cleaned, prep it with rubbing alcohol,let the alcohol dry and heat up the surface area where the 3M tape would be applied on the car with a hair dryer and apply the cover, afterwhich you will need to heat up small sections of the cover again with a hair dryer and press the particular area while the hair dryer is on it for about 3 mins or longer, let it cool off afterwards but make sure you're still pressing for probably another 5 mins, do this to the rest of the area. This is what I did when I applied plastic body panels to my CRV and 2 years later ,they're still there like the first time I installed them.
P.S. - Make sure you wear gloves for protection from the heat from the hair dryer.
Hope this helps!
P.S. - Make sure you wear gloves for protection from the heat from the hair dryer.
Hope this helps!
05-05-2007, 09:32 PM
#8
Instructor


Member Since: May 2005
Location: Parkesburg PA
Posts: 208
Likes: 0
Received 0 Likes
on
0 Posts

I installed mine dry instead of misting with water. When its applied dry, the tape holds right away. Its a little trickey to do it dry.
May be hard to explain. Take a razor and cut through the wax paper backing of the tape in the middle of the panel. Pull off just enough of the tape backing so that it will hang below the panel when set against the bumper. Position the panel to the bumper. Because only some of the tape is exposed you will be able to pull it off and reposition it. do not put much presure on the tape at this point in time. When you are happy with the position, start pulling the backing paper off using what is hanging below the panel. The tape backing has to be pulled off in the proper sequence, top to bottom or you will trap tape with backing on it. Because you cut the backing paper in the middle of the panel you can pull off the right side then the left side. Once all the backing is removed, just apply presure to the complete panel and you are ready to drive. I hope this makes sence.
I was done in about 20 minutes.
Last edited by W.A.M.; 05-05-2007 at 09:34 PM.
 05-05-2007, 10:20 PM
#10
2018 Grand Sport
i would do it dry and have another person help you out. Not that hard. I really like the look. I wish I would have did it a long time ago. one of my good mods.
05-05-2007, 10:38 PM
#11
Instructor
Member Since: Oct 2006
Location: Northern NJ
Posts: 243
Likes: 0
Received 0 Likes
on
0 Posts
[QUOTE=Mr. Blue;1560127744]I received my rear fascia overlay the other day and decided to install it 2 days ago. It didn't turn out too bad, but i had some trouble getting it to "stick" in the corners, as you can see in the pictures. Anybody got any tips or solutions to getting rid of the gap?t seems like if I press in one place, it pops loose in another. Is there any way to loosen it and get it to stick a little better while still aminataing the "reversible' nature og thr overlay.
Just to let you know, Richard totally stands behind this product, and told me that we would fully refund my money if I wasn't satisfied. The thing is, I really like how it looks, except for the gaps in the corners. If i could fix those, i'd be happy with it.
first, i washed the entire area with dishwashing liquid. after drying used isopropyl rubbing alcohol and wiped the area clean. then sprayed lightly with soapy water.
next, removed tape backing and centered the overlay. at this point starting at the upper center (under your plate) using firm pressure with a towel, press the facia sort of like squeezing the water out. repeat untill the tape becomes more able to stick as the water is removed. i then used masking tape to hold this area in place.
this part i improvised. use a few towels folded to put pressure on the area thats in-between the louvers, and another towel over the exhaust tips to push up. now assuming you started from the center and worked outwards to the very outside lower corners, near the mufflers. this area may not be making good contact. i wedged a couple of short 2x4s on end from the ground on either side. let it sit for 24 hrs. pulled the tape and wood, done.
my suspicion is you may have not pressed from the center out, fear not! try to work out the upper edge as explained asap. tape and apply pressure where i noted. the bottom edge can also be held in place by the large butterfly paper clips. pm me if you need more info or instructions on how to remove the facia properly.
btw richard is a real good guy and stands behind his products 100%. the key to this install is pressure and patients. i have the same wcc tips on my coupe.
05-05-2007, 11:25 PM
#12
Melting Slicks
Member Since: Oct 2004
Location: Big Bear City CA
Posts: 3,293
Likes: 0
Received 0 Likes
on
0 Posts
St. Jude Donor '06-'07-'08-'09
Many thanks to all for suggesting your creative alternative installations. It's highly appreciated by me, and I'm sure Mr. Blue as well.
You guys are awesome
You guys are awesome
05-06-2007, 09:06 PM
#14
Pro
Thread Starter
Thanks a lot for the replies. I had my car at a show today, and several folks liked the look of the overlay until they noticed the gaps.
Tomorrow night, I will try to work on the ends of the piece using a hair dryer. I did prep the rear fascia by cleaning it and using the alcohol. I don't think the prep is the problem, it's the space that exists between the overlay and the fascia in those areas. The 3M tape can't grab because it's not touching the surface of the fascia, and if I press it real hard so it makes contact, it breaks loose as soon as I relax the pressure. Tape is not strong enough to hold it against the body either. Stay tuned, I'll post again if i get it to fit to my liking.
Tomorrow night, I will try to work on the ends of the piece using a hair dryer. I did prep the rear fascia by cleaning it and using the alcohol. I don't think the prep is the problem, it's the space that exists between the overlay and the fascia in those areas. The 3M tape can't grab because it's not touching the surface of the fascia, and if I press it real hard so it makes contact, it breaks loose as soon as I relax the pressure. Tape is not strong enough to hold it against the body either. Stay tuned, I'll post again if i get it to fit to my liking.
05-06-2007, 10:10 PM
#15
Melting Slicks
Member Since: Oct 2004
Location: Big Bear City CA
Posts: 3,293
Likes: 0
Received 0 Likes
on
0 Posts
St. Jude Donor '06-'07-'08-'09
Mr. Blue, I'm afraid that unless you towed your Vette in an enclosed trailer to an indoor show, that you now have so much dust stuck to the adhesive, that it will no long be able to adhere. Being that I can't connect your real name and address to your forum name, please PM me the information. I realize that it's somewhat of a PITA to remove the overlay & clean the area again, but I really think we need to start from scratch. Plus it should only take about 20 minutes of your time to do so. We tested the removal and clean up on two different C5's and both took about 20 minutes to complete. I'll send you a new unit with new adhesive, and strategize the install with you over the phone. We'll also cover all shipping costs, so there will be no additional expense to you. If you don't want to hassle with the R&R, I'm almost certain that you will need to resort to injecting rubber cement behind the overlay with a syringe. If you would rather go this route, we can send you the required products as well.
Thanks, and sorry for the inconvenience.
Richard
Thanks, and sorry for the inconvenience.
Richard
 05-07-2007, 09:14 AM
#17
Safety Car

Member Since: Jun 2004
Location: Palmdale CA
Posts: 3,717
Likes: 0
Received 0 Likes
on
0 Posts
St. Jude Donor '06
 Richard is da man. He sent me a 2nd one after I unsuccessfully tried to install my first one dry. I hadn't even sent him back the first one, when I already had the replacement at my door. Top notch vendor, no doubt.
05-07-2007, 09:32 AM
Richard is da man. He sent me a 2nd one after I unsuccessfully tried to install my first one dry. I hadn't even sent him back the first one, when I already had the replacement at my door. Top notch vendor, no doubt.
05-07-2007, 09:32 AM
#18
Drifting

Had the same problem-after a couple trys and the corners poping up overnight I just said screw it and glued the damn thing down. I'm like you- it's a nice piece and a nice look put those corners are a problem.
05-07-2007, 12:31 PM
#19
Le Mans Master

As a few guys have said first wash with dawn. As opposed to using rubbing alcohol I use denatured alcohol on anything that is going to be held on with tape... I've never found denatured to harm any of the surfaces interior or exterior and it cleans the prepped surface MUCH better than rubbing alcohol.
Comment on denatured Richard?
Comment on denatured Richard?