
Code C1214?
 05-03-2007, 08:18 AM
#21
3rd Gear


Member Since: May 2007
Posts: 3
Likes: 0
Received 0 Likes
on
0 Posts
Am not mechanically inclined but it is located towards the front of the motor straight down from the manifold.
Would go to dealer and ask them to show you
then drive away as fast as possible so they dont tell you that it is a very expensive part and smile really big at you.
They know it should be recalled but until everyone contacts the NHTSB
it wont.
Would go to dealer and ask them to show you
then drive away as fast as possible so they dont tell you that it is a very expensive part and smile really big at you.
They know it should be recalled but until everyone contacts the NHTSB
it wont.
 05-03-2007, 08:21 AM
#22
3rd Gear
Member Since: May 2007
Posts: 3
Likes: 0
Received 0 Likes
on
0 Posts
pass this on to EVERYONE
go to WWW.nhtsb.dot.gov and fill out complaint
we want GM to recall this part
I just had dealership fix mine and GM in not so many word said "kiss my butt" in helping to pay for it
No such "Goodwill" help
go to WWW.nhtsb.dot.gov and fill out complaint
we want GM to recall this part
I just had dealership fix mine and GM in not so many word said "kiss my butt" in helping to pay for it
No such "Goodwill" help
05-05-2007, 05:15 AM
#23
Heel & Toe

Member Since: Nov 2006
Location: Kolsva
Posts: 16
Likes: 0
Received 0 Likes
on
0 Posts
05-10-2007, 12:24 AM
#25
Heel & Toe
Member Since: Nov 2006
Location: Kolsva
Posts: 16
Likes: 0
Received 0 Likes
on
0 Posts
Does anybody know?
Is it safe to drive the car while the EBCM is removed for service (of course ABS etc will not work). I will send mine to Brandon.
I assume that you should also remove the corresponding fuses for the EBCM. Which are they? #52, 53 and 5?
Robert
Is it safe to drive the car while the EBCM is removed for service (of course ABS etc will not work). I will send mine to Brandon.
I assume that you should also remove the corresponding fuses for the EBCM. Which are they? #52, 53 and 5?
Robert
05-10-2007, 06:38 AM
#26
Burning Brakes


Member Since: Jan 2006
Location: Magnolia Greens NC
Posts: 1,170
Likes: 0
Received 25 Likes
on
8 Posts
Does anybody know?
Is it safe to drive the car while the EBCM is removed for service (of course ABS etc will not work). I will send mine to Brandon.yes, as long as you remember you have no abs,a/h & t/c
I assume that you should also remove the corresponding fuses for the EBCM. Which are they? #52, 53 and 5? not really, ...since you don't pull the fuse during normal replacement
Robert
05-10-2007, 08:05 AM
#27
Tech Contributor


Member Since: Dec 1999
Location: Anthony TX
Posts: 32,736
Received 2,182 Likes
on
1,585 Posts
CI 6,7,8,9,11 Vet
St. Jude Donor '08

Yes There have been a few people who have driven theirs with out the module in place (knowing that you have ZERO AH TC etc) with no ill effects. Make sure to bag the connector and cover the BPRV cavity. 
BC
BC
 05-12-2007, 07:36 PM
#30
Burning Brakes
Member Since: Jan 2006
Location: Magnolia Greens NC
Posts: 1,170
Likes: 0
Received 25 Likes
on
8 Posts
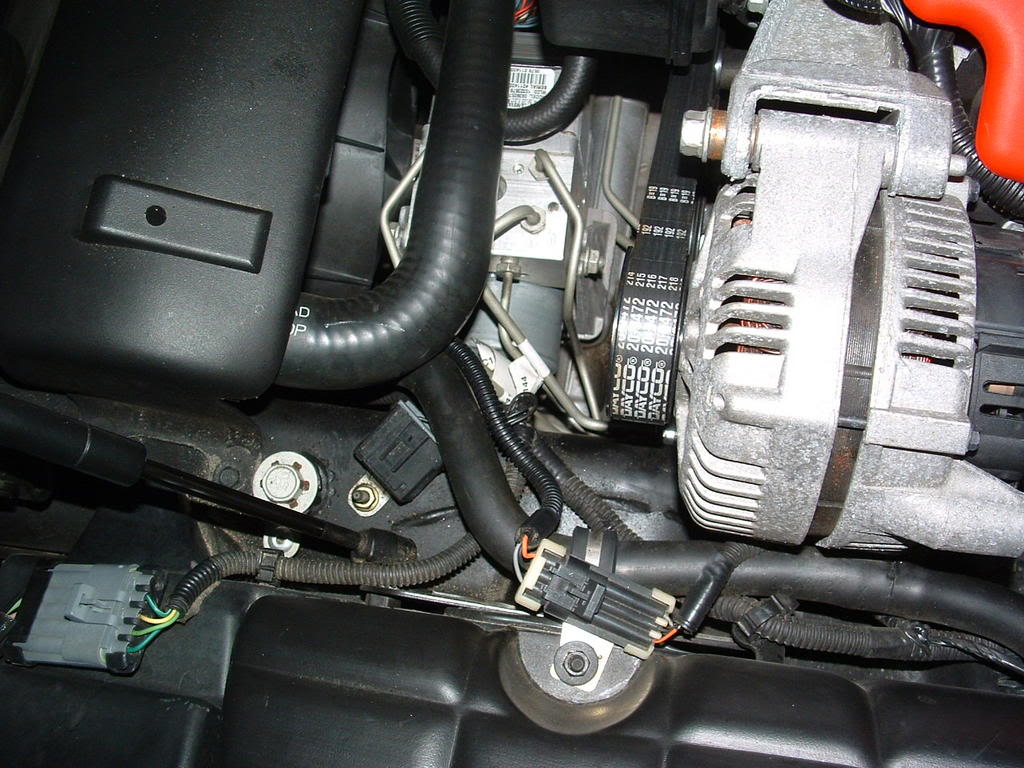
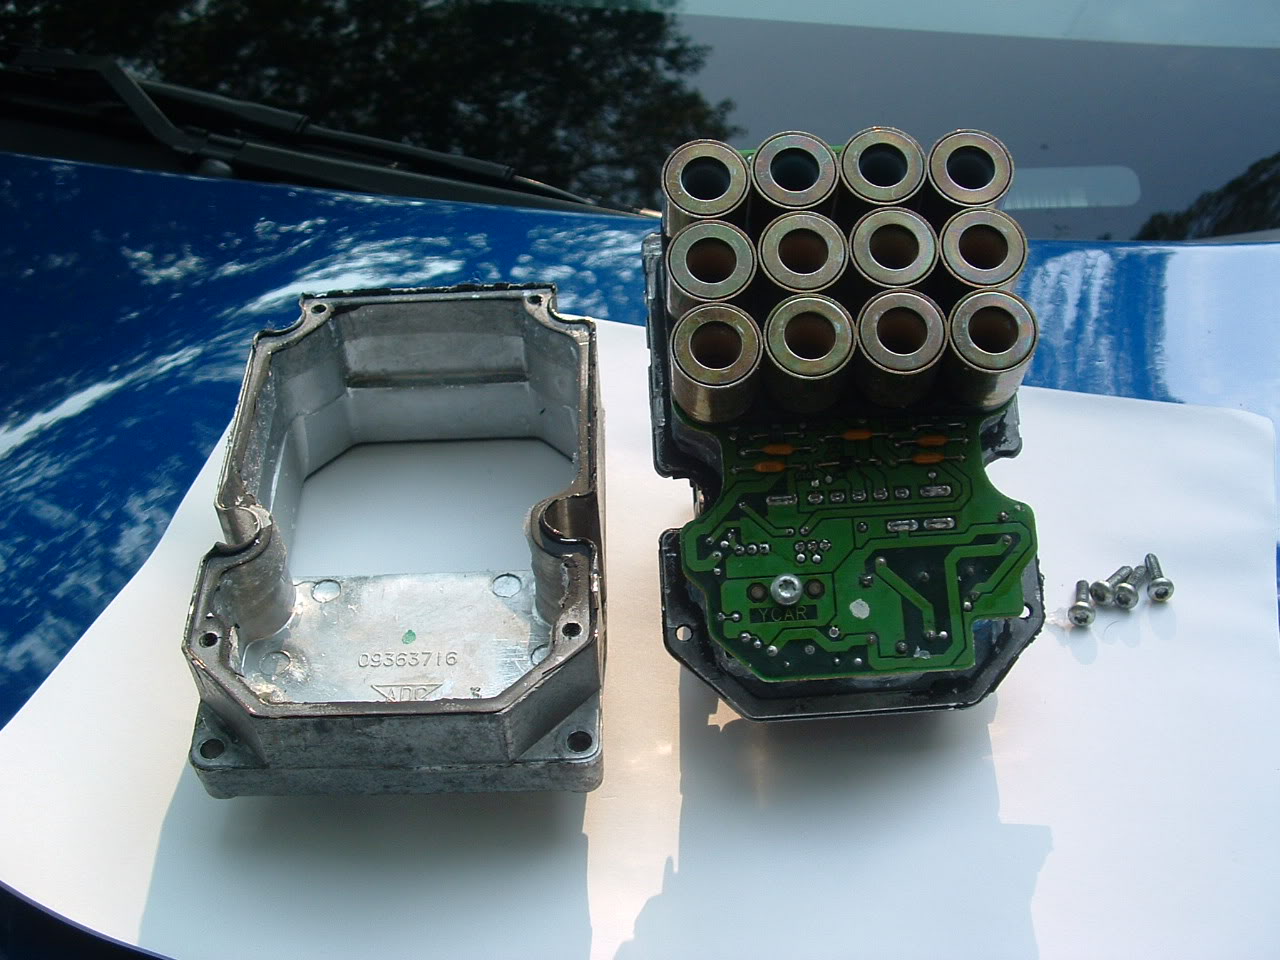
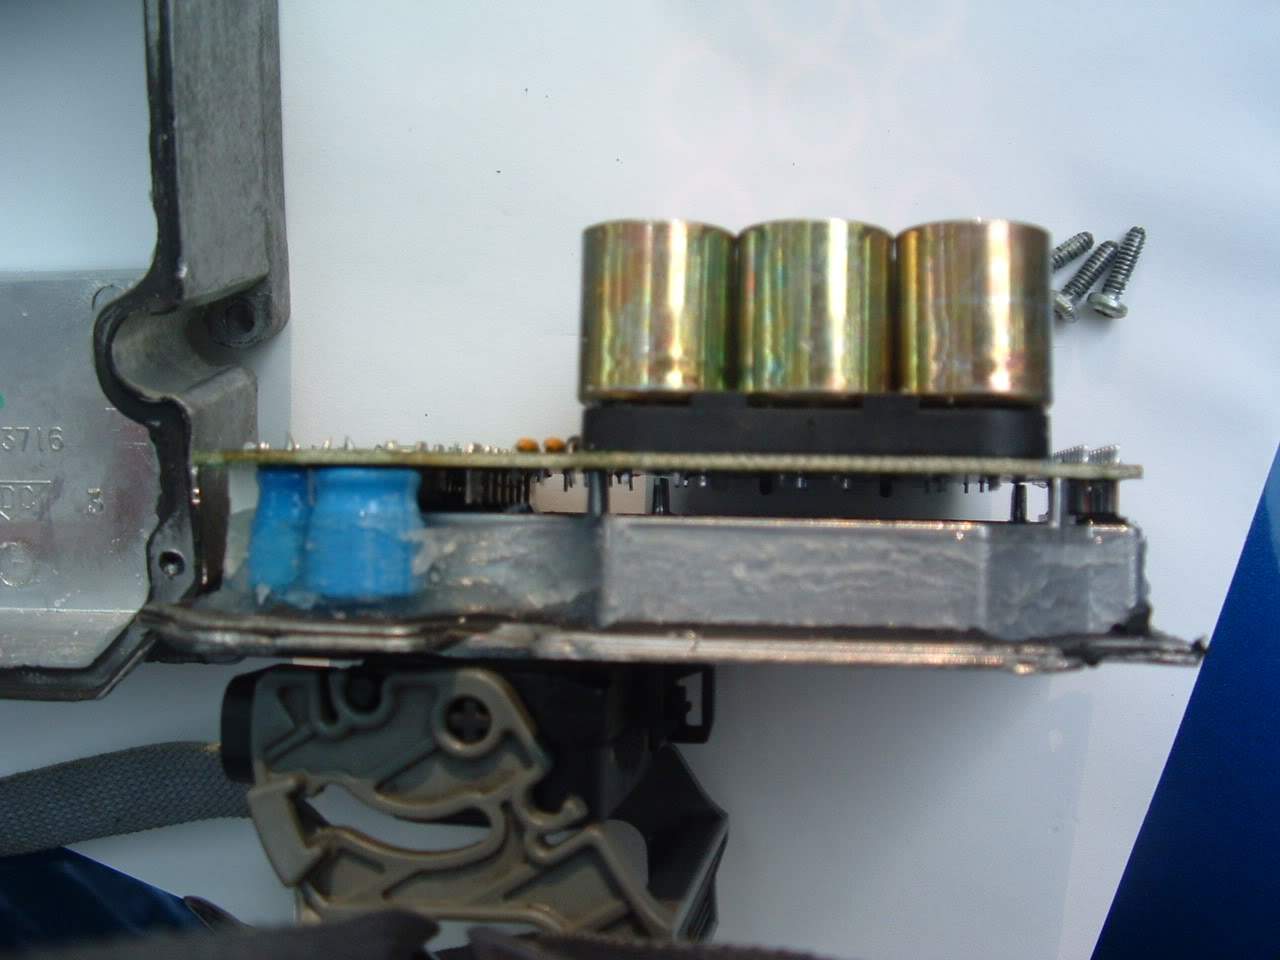
The EBCM sits between the engine and radiator. The EBCM is on the left with the large wire harness coming into it and the sticker on top. The Brake Pressure Modulator Valve (BPMV) in on the right with the brake lines coming out. The EBCM is a dry module, meaning that you can change it out without having to worry about bleeding the ABS system. All of the brake fluid is contained within the BPMV. The coils fit over small spools that have valves inside them. The valves are operated by an electromagnetic field supplied by the coils.
Start by doing a quick visual inspection of the wires. If there are any obvious signs of damage, you've likely found the problem. One Corvette forum member had a problem with the wires rubbing the serpentine belt
Also check to make sure the wire harness has a good connection. If the connection appears solid disconnect it & check the pins to ensure that they have not been bent or damaged in any way. If there is any sign of corrosion, clean it off. Once everything looks good, reseat the harness.
....if you need more info (including photos) PM me your email address.
05-12-2007, 08:17 PM
#31
Tech Contributor
Member Since: Dec 1999
Location: Anthony TX
Posts: 32,736
Received 2,182 Likes
on
1,585 Posts
CI 6,7,8,9,11 Vet
St. Jude Donor '08
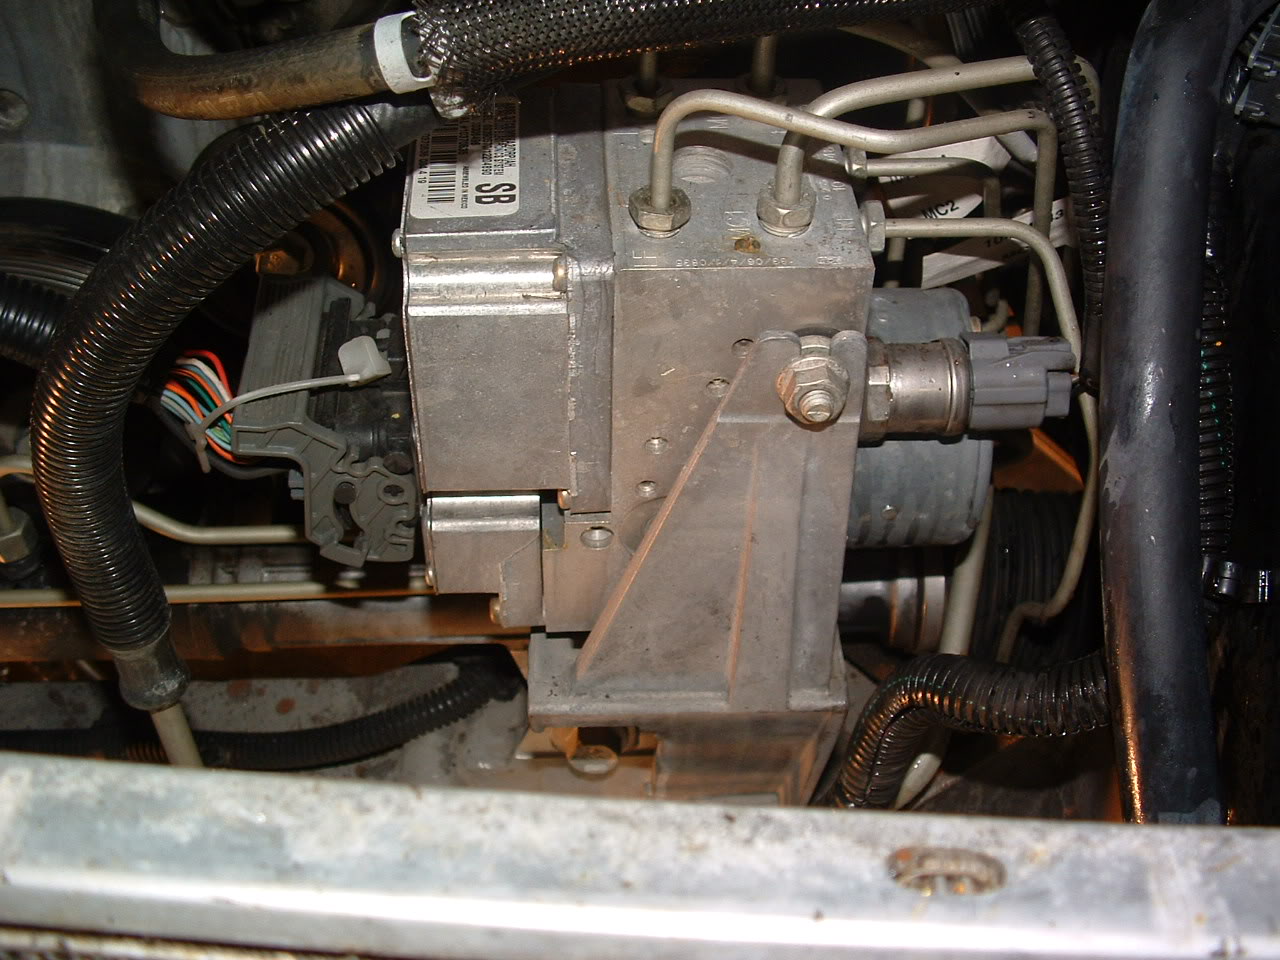
Looks like this:
The module removed from the BPMV:
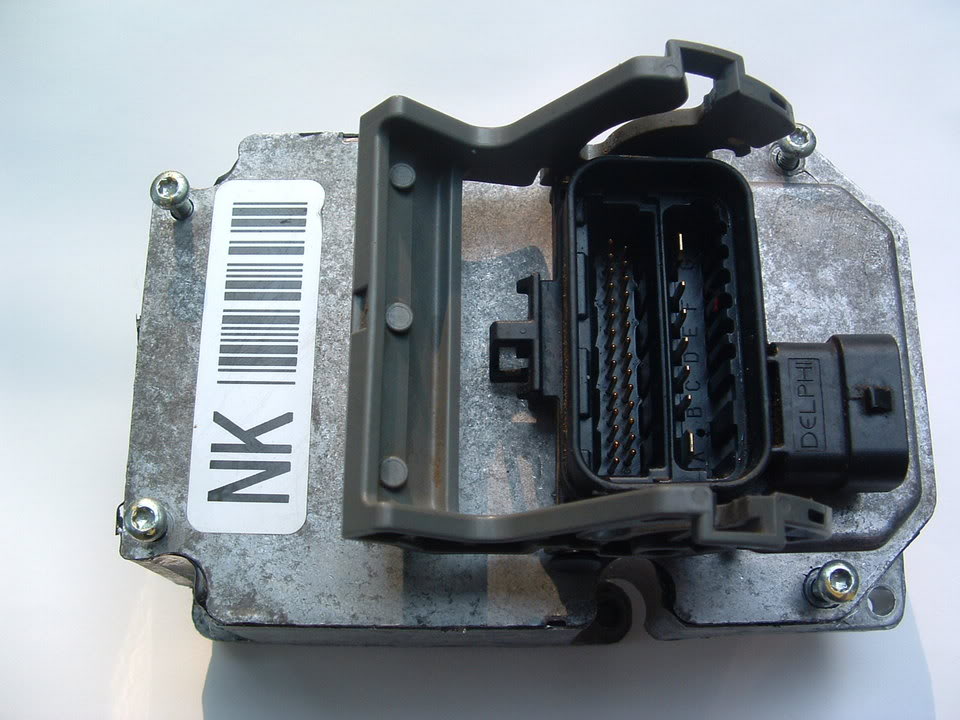
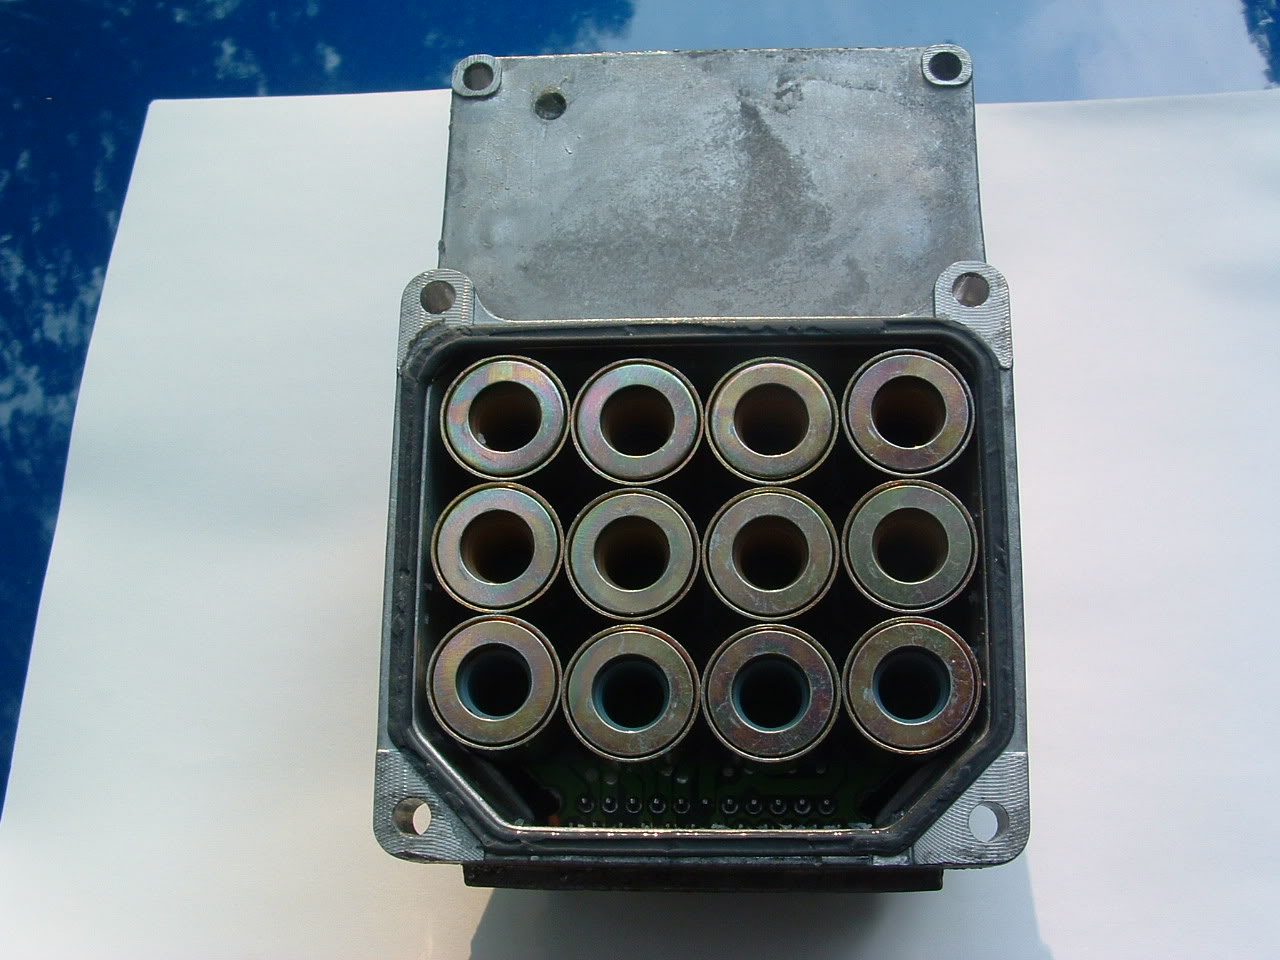
The connector:
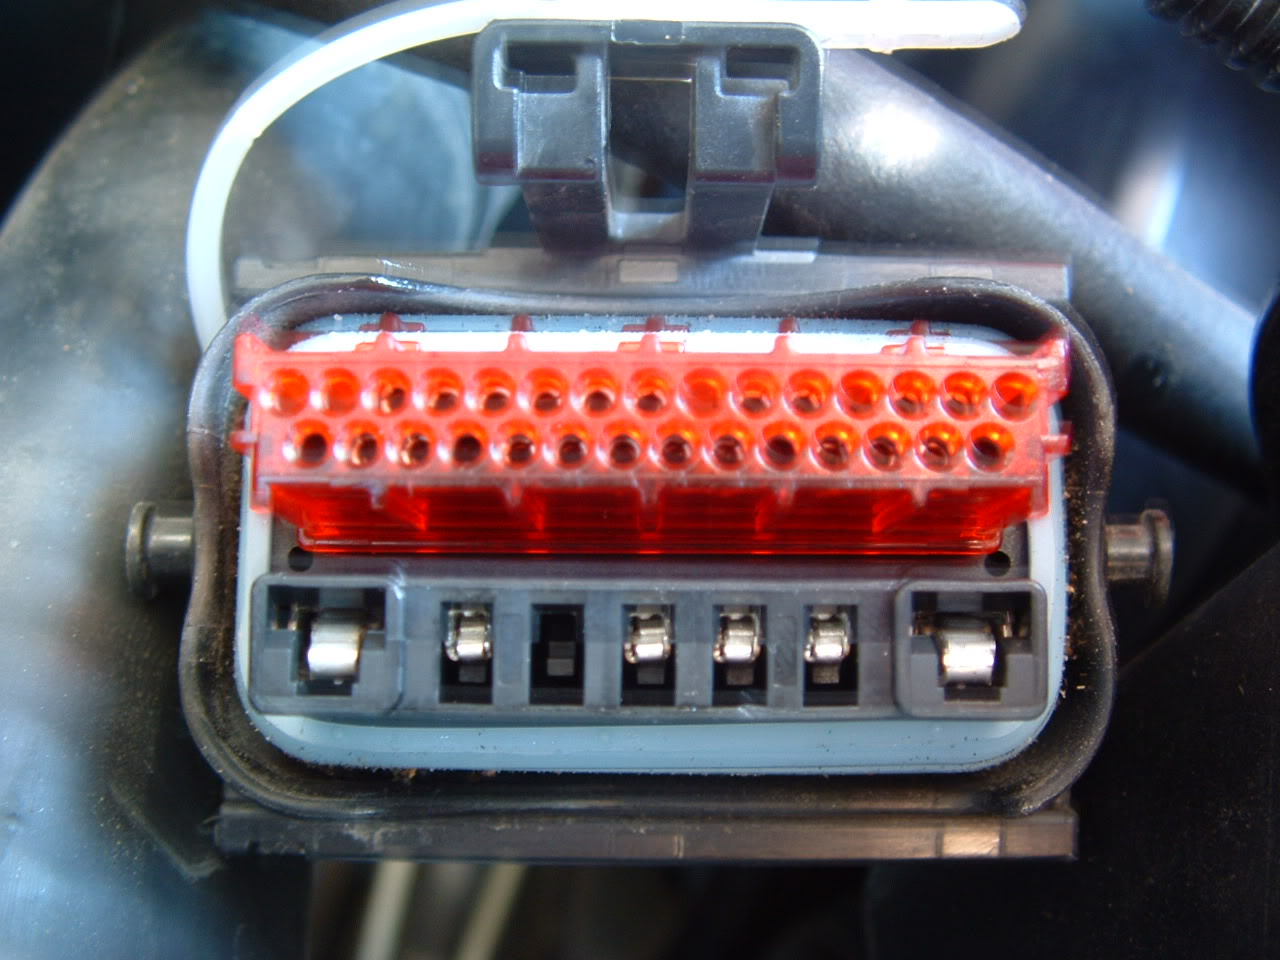
The module removed from the BPMV:
The connector:
05-12-2007, 10:29 PM
#32
Le Mans Master


 05-13-2007, 02:53 AM
#33
Safety Car

Thank you Bill, not only are those pics worth a thousand words but they are also worth about a thousand bucks .
I already had the EBTCM replaced (at least that is what they called it). After unsuccessful attempts by the shop I bought the car from to fix the 1296 DIC code I had the problem diagnosed by a seperate GM mechanic who knows corvetts inside and out. The problem was diagnosed as "Shorted brake pressure sensor circut 556 (1.6k ohm resistance). He thought that this is what killed the sensor. It was recommended to overlay a new wire to 556 and replace the valve #10343432.
Went back to the original place and they agreed to fix it (at no charge since the problem showed up the day I picked the car up when I bought it).
I'm assuming they replaced the EBTCM with a GM stock part, so I'm guessing it wont be the last I'll hear of this problem.
It was replaced in October 06 (about 4,000 miles ago), no problems or DIC codes from then until a few weeks ago
Got the Service ABS, TC, AH DIC messages, shut it down, started back up and the messages went away. I had recently replaced my factory battery with an Optima so I was hoping the reoccurrence may have been due to the low voltage prior to the battery change and the change itself screwing with the module communications. Cleared the history codes and no reoccurrence until today. Same thing, sfter about five minutes, no codes, all is well.
I guess if it comes back and doesnt go away, I'm getting the unit serviced by the vendor (above) who guarantees the work.
Had no idea taking off the problem part did not involve screwing with the brake fluid.
The pics are a great help, I may even try and take care of it myself if it comes to that. Thx :-)
.I already had the EBTCM replaced (at least that is what they called it). After unsuccessful attempts by the shop I bought the car from to fix the 1296 DIC code I had the problem diagnosed by a seperate GM mechanic who knows corvetts inside and out. The problem was diagnosed as "Shorted brake pressure sensor circut 556 (1.6k ohm resistance). He thought that this is what killed the sensor. It was recommended to overlay a new wire to 556 and replace the valve #10343432.
Went back to the original place and they agreed to fix it (at no charge since the problem showed up the day I picked the car up when I bought it).
I'm assuming they replaced the EBTCM with a GM stock part, so I'm guessing it wont be the last I'll hear of this problem.
It was replaced in October 06 (about 4,000 miles ago), no problems or DIC codes from then until a few weeks ago
Got the Service ABS, TC, AH DIC messages, shut it down, started back up and the messages went away. I had recently replaced my factory battery with an Optima so I was hoping the reoccurrence may have been due to the low voltage prior to the battery change and the change itself screwing with the module communications. Cleared the history codes and no reoccurrence until today. Same thing, sfter about five minutes, no codes, all is well.
I guess if it comes back and doesnt go away, I'm getting the unit serviced by the vendor (above) who guarantees the work.
Had no idea taking off the problem part did not involve screwing with the brake fluid.
The pics are a great help, I may even try and take care of it myself if it comes to that. Thx :-)
Last edited by Jistari; 05-13-2007 at 03:07 AM.
05-13-2007, 03:13 AM
#34
Safety Car
BTW, in the second picture down, the small silver cylinder with the wires coming out of it on the right side (which I believe is the brake pressure sensor) on my car has that brake line pressed right up against the wires as they come out of the clip (looks to be the same in your picture).
When I was poking around in there back when all this started, I noticed that engine vibration had almost worn through the insulation on the black wire coming out of the sensor.
Just mentioning it, in case others will be disassembling theirs. May want to take a look at that and armor that wire. I put a small piece of hard wire casing over mine before I put it back.
05-13-2007, 09:04 AM
#35
Tech Contributor
Member Since: Dec 1999
Location: Anthony TX
Posts: 32,736
Received 2,182 Likes
on
1,585 Posts
CI 6,7,8,9,11 Vet
St. Jude Donor '08
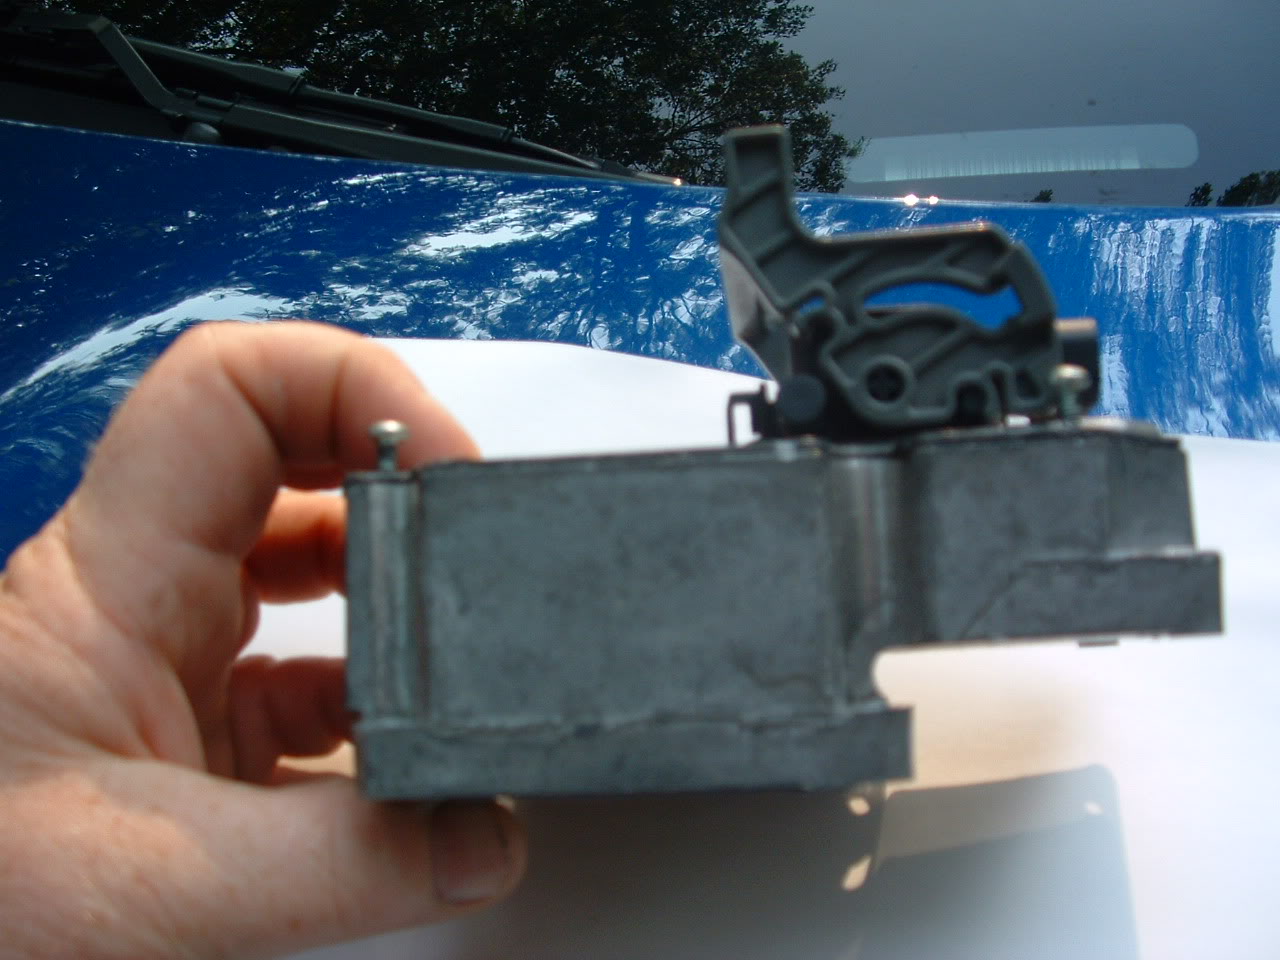
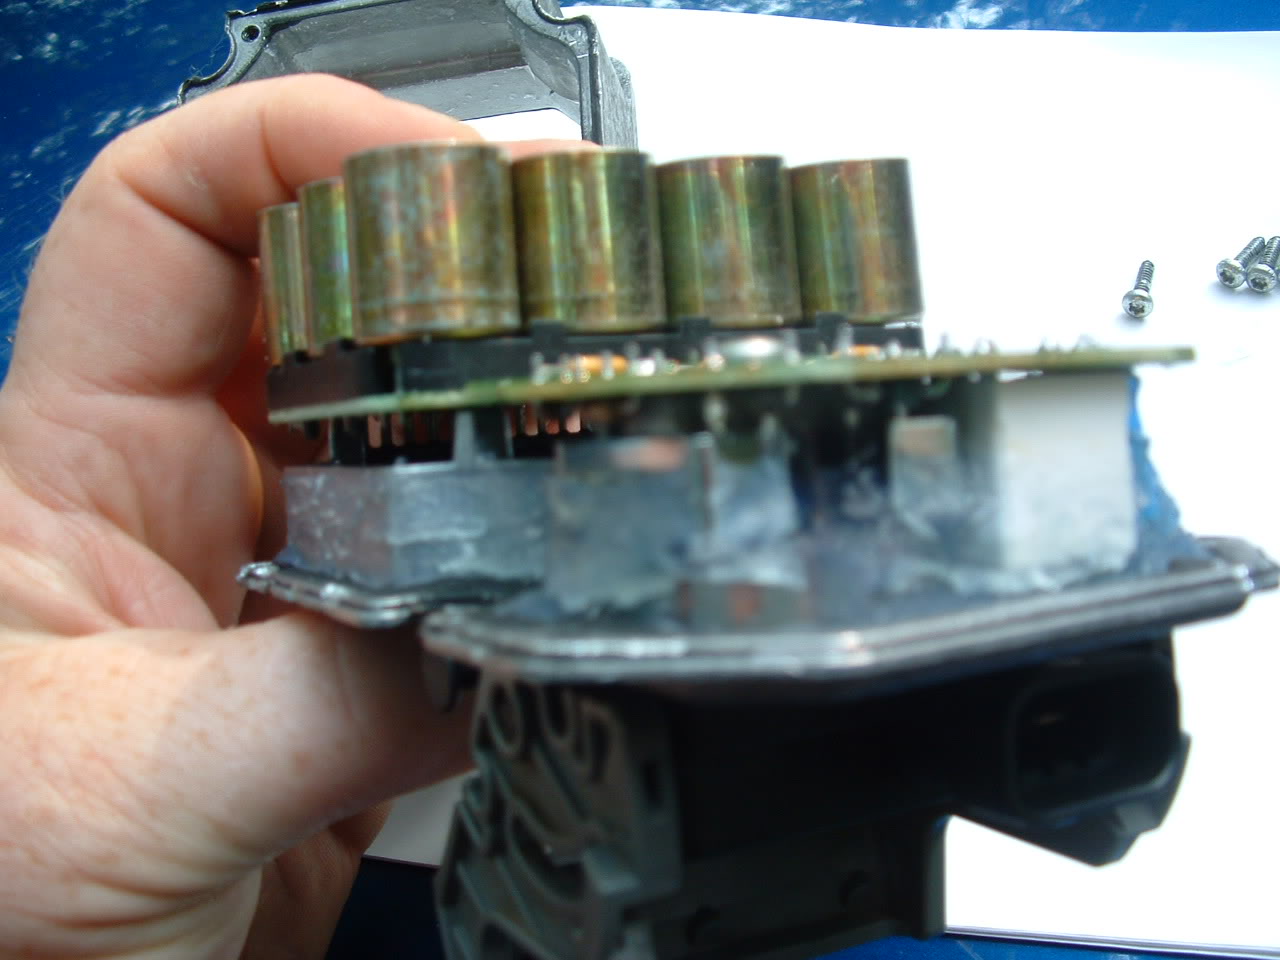
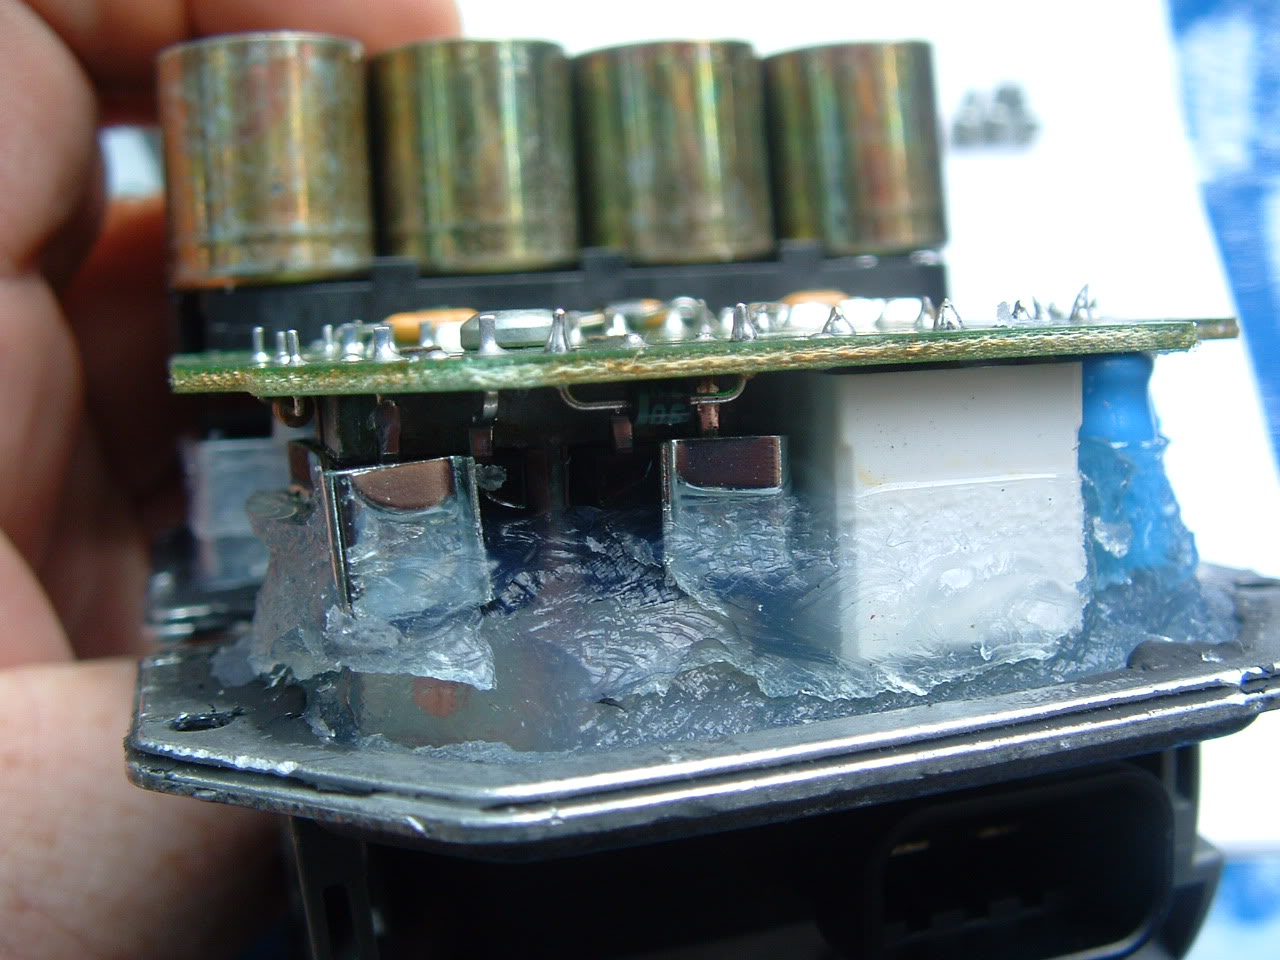
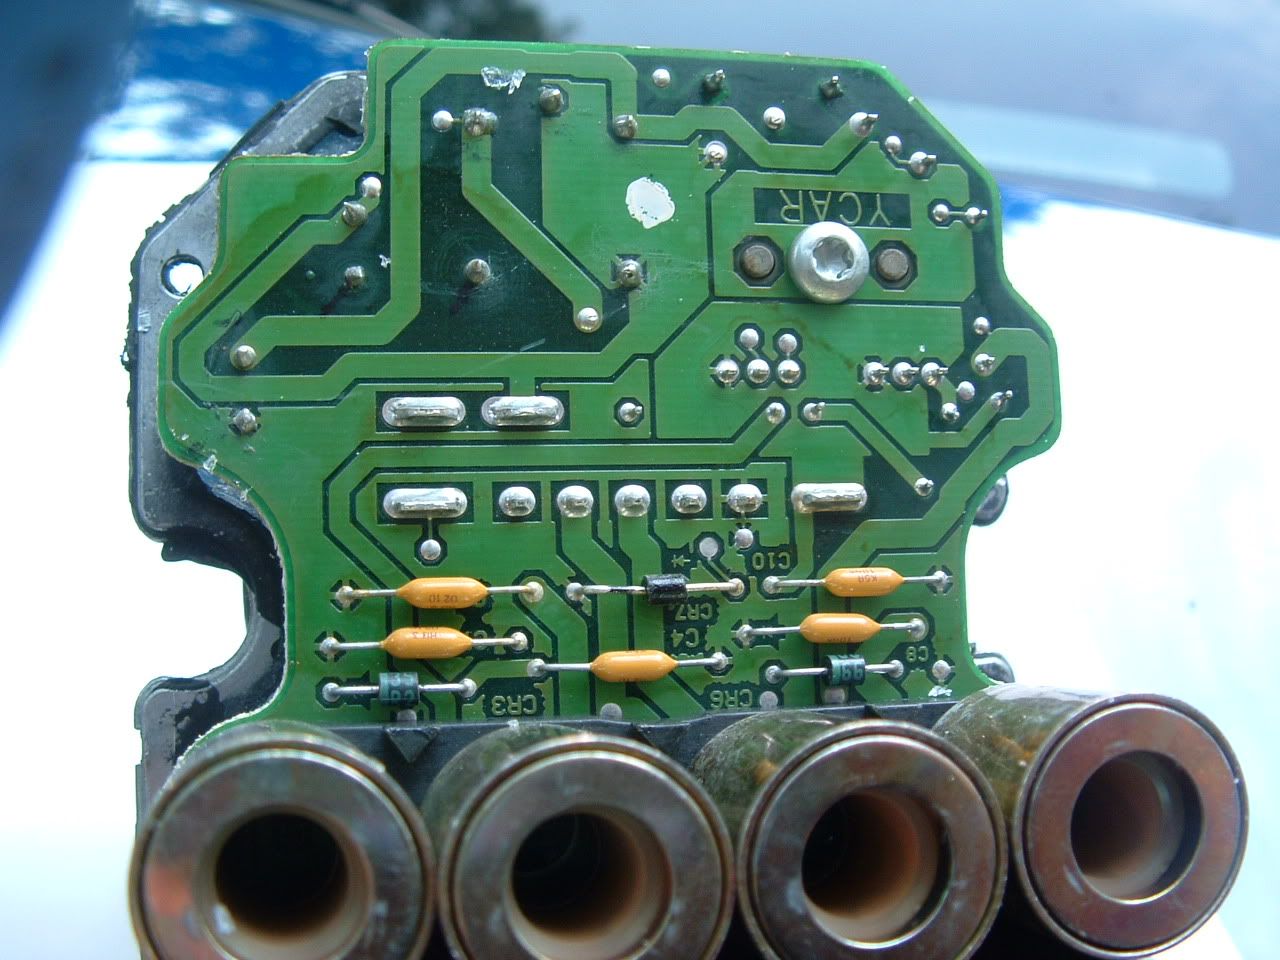
Something that you dont get to see very often; the inside of that module:
05-13-2007, 03:56 PM
#37
Burning Brakes

Well after cleaning all the grounds, I still have C1214! Looks like I'll be calling Brandon at ABSFixer.com tomorrow morning. From what I've read, he seems reliable and warrants the part as long as I own the car. I can live with $150......much better than the $600 that I'm sure the dealer would charge me.
05-13-2007, 06:54 PM
#38
Burning Brakes
Ok, ive got the unit pulled off and all the wiring zip-tied out of the way. When I started the car I didnt get the ABS/TC/AH warning anymore, all I got was service vehicle soon. Is this normal. I'm sending the unit out tomorrow, but will still be driving the car in the meantime.
As far as the removal goes it was not to hard. I searched and found vague answers to my questions. So I'll quickly go through what I did to get it off.
1) remove air bridge.
2) using needle nose pliers, pull the small white plastic pin out of the hole on top of the wiring harness.
3) push the grey "handle" which is on top of the harness down toward the passenger side of the car.
4) pull harness out of receptical (it pulls straight out toward passenger side.
5) if you can get to it pull the small harness off of the bottom of unit. (if you cant get it just wait)
6) unit is held on with 6 hex screws. 2 at the top, 2 in the "slots in the middle and 2 at the bottom. I'm skinny so I did'nt have to much trouble reaching the screws with a regular hex screwdriver. Just have to move the radiatior hose out of the way. (by the way...this is much easier if the car is bone cold.) The top 2 screws are easy, because you can see them. The middle ones and bottom ones have to be felt for. A magnetic screw driver is a big help.
7) after all 6 screws are out try and pull the unit off. I had to use a flat head as a crowbar, they even put a nice little slot on top to help pry it off. Once the seal is broke it comes off fairly easy. (don't worry none of the parts inside will fall out, and there is no liquid. If you didnt pull the bottom harness off, this is the time to do it, the wire is pretty short, and its kind of a pain to get a flat-head down there to pop the harness clip, but I managed...like i said...im pretty skinny....you guys with big arms and hands might have trouble.
8) if you plan on driving the car while your ebcm is getting fixed, zip tie the loose wires to something so they don't fall into the fans or belts.
I tried to cover the exposed "pins" on the brake module , but couldn't find anything that I thought would hold, without melting. So, I'll just blow the stuff off with compressed air before I put the new unit back on.
I'm sure many of you know this info already, but some of us, including me, dont like to rip into our cars without knowing exactly what to expect.
Hope this helped someone!
05-14-2007, 09:00 AM
#39
Le Mans Master
Thanks
I cleaned the grounds on both sides of the frame. Not only the ground "posts" , but I pulled the ground plugs apart. The one on the left side was pretty bad, not green corroded, but it didn't look like it would make a good contact. After cleaning I used a spray I found at a Marine Supply store, "Corrosion Block". I put everything back together and I'll let everyone know how I make out.
My car is an early 1998, so the EBCM is in the rear of the car.
 .. Have a Great Day..
I cleaned the grounds on both sides of the frame. Not only the ground "posts" , but I pulled the ground plugs apart. The one on the left side was pretty bad, not green corroded, but it didn't look like it would make a good contact. After cleaning I used a spray I found at a Marine Supply store, "Corrosion Block". I put everything back together and I'll let everyone know how I make out.
My car is an early 1998, so the EBCM is in the rear of the car.
.. Have a Great Day..
05-18-2007, 09:53 AM
#40
Le Mans Master
Thanks
I cleaned the grounds on both sides of the frame. Not only the ground "posts" , but I pulled the ground plugs apart. The one on the left side was pretty bad, not green corroded, but it didn't look like it would make a good contact. After cleaning I used a spray I found at a Marine Supply store, "Corrosion Block". I put everything back together and I'll let everyone know how I make out.
My car is an early 1998, so the EBCM is in the rear of the car.
.. Have a Great Day..
I cleaned the grounds on both sides of the frame. Not only the ground "posts" , but I pulled the ground plugs apart. The one on the left side was pretty bad, not green corroded, but it didn't look like it would make a good contact. After cleaning I used a spray I found at a Marine Supply store, "Corrosion Block". I put everything back together and I'll let everyone know how I make out.
My car is an early 1998, so the EBCM is in the rear of the car.
.. Have a Great Day.. Thanks for the help.