C1 - Installation of SPW Wiper System
 04-18-2007, 11:17 PM
#1
Le Mans Master


Thread Starter
Member Since: Sep 2003
Location: Norwalk ohio
Posts: 8,927
Received 642 Likes
on
360 Posts
2019 Corvette of the Year Winner
St. Jude Donor '15

Yesterday was not a first good day, a lot of things did not want to go together and I left the garage depressed. I figured that leaving was better than getting really frustrated. So today I went at it with never energy and thought about what needed to be done.
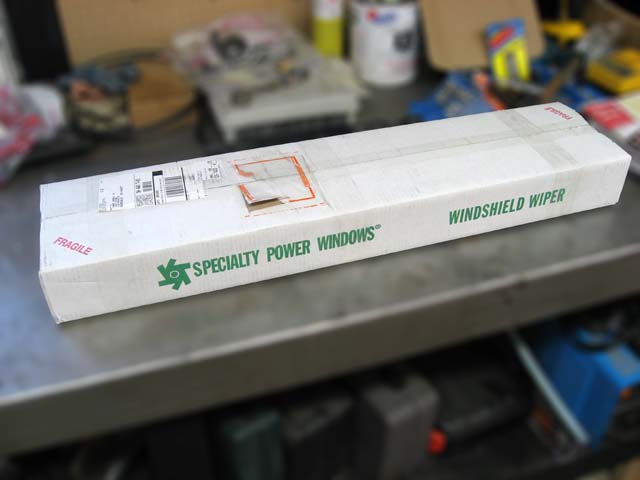
Here is the box you get when you order the WWK-5762V-2, 57-62 Corvette Wiper Kit W/2 speed Switch. Cost $350 + $10.25 shipping from zip 31029 to 44857. SPW phone number 478-994-9248
This is what you get in the kit
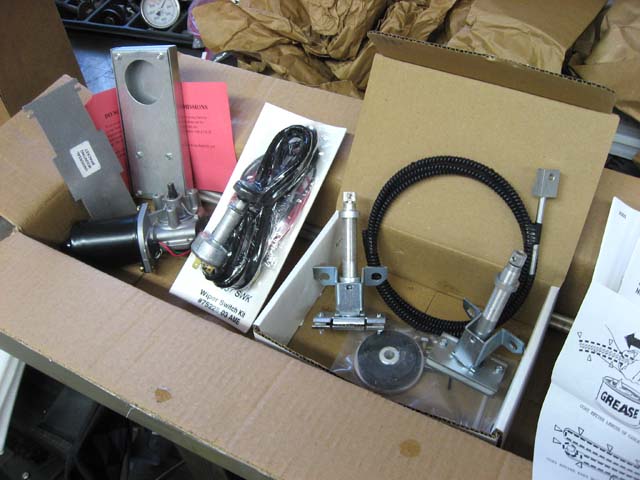
You need to add these to the kit if you want new ones, otherwise you could get away with your old if you are ok with how they look.

you need to add 2 chrome spacers Corvette America #28936, 2 nuts #32917 (there is a note in the box that says in order to use these new nuts you need to run them over a 5/8-24 tap because the flash chrome gets in the threads and will not go over the threads. SPW offers you to send them to them no charge they will take care of them and send them back) and 2 gaskets #28937. If you add these parts you have everything you need.
Comparison of old and new
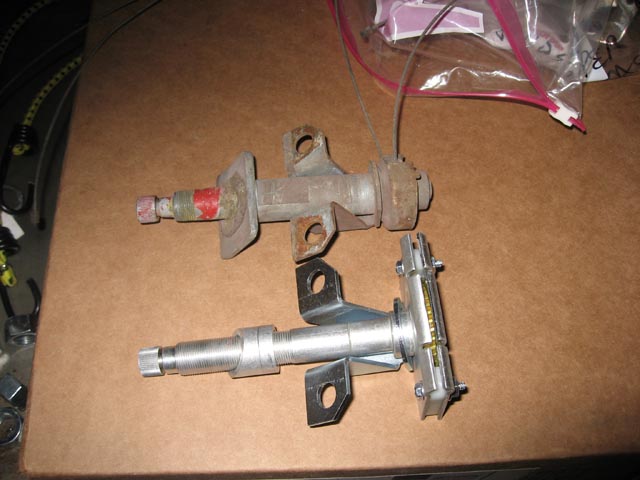
In the above photo you will notice that there is a notched side to the transmission end covers. One of these goes up and the other transmission has this go down. that is how they get these to wipe from the middle out. If you get this set up remember they go in a different orientation, not the same.
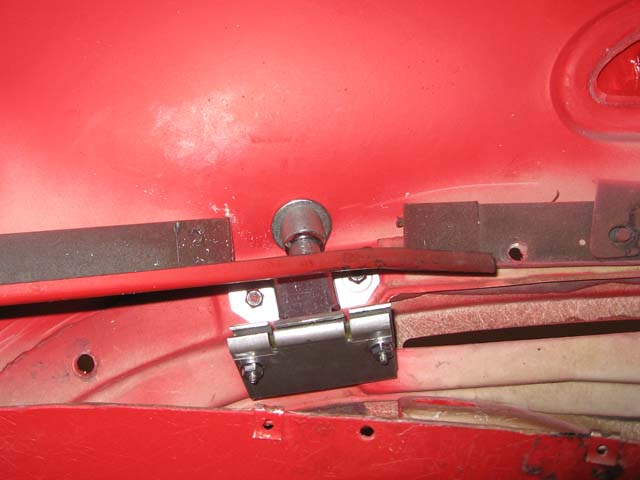
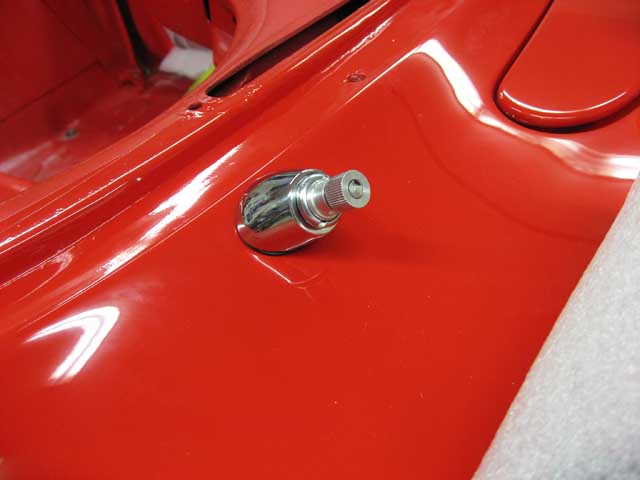
Here is the passenger side installed.
And finally the out side installed.....
As I go along, I will add more photos to this posting to show all the steps.....enjoy!!!
Here is the box you get when you order the WWK-5762V-2, 57-62 Corvette Wiper Kit W/2 speed Switch. Cost $350 + $10.25 shipping from zip 31029 to 44857. SPW phone number 478-994-9248
This is what you get in the kit
You need to add these to the kit if you want new ones, otherwise you could get away with your old if you are ok with how they look.
you need to add 2 chrome spacers Corvette America #28936, 2 nuts #32917 (there is a note in the box that says in order to use these new nuts you need to run them over a 5/8-24 tap because the flash chrome gets in the threads and will not go over the threads. SPW offers you to send them to them no charge they will take care of them and send them back) and 2 gaskets #28937. If you add these parts you have everything you need.
Comparison of old and new
In the above photo you will notice that there is a notched side to the transmission end covers. One of these goes up and the other transmission has this go down. that is how they get these to wipe from the middle out. If you get this set up remember they go in a different orientation, not the same.
Here is the passenger side installed.
And finally the out side installed.....
As I go along, I will add more photos to this posting to show all the steps.....enjoy!!!
 04-18-2007, 11:39 PM
#2
Safety Car


Herb,
I had to chase the threads on my nuts. Thet are exactly right about the nuts not going on unless you do. I also ground a considerable amount on the backside of the transmissions and rounded off the corners with a big radius. This made it a lot easier to get the transmissions in place. There is a lot of extra material in this area that can be lost without affecting the transmissions. I took the transmissions to the belt grinder and really trimmed them down.
Don't get too frustrated, and just walk away for a while when it starts to get to you. These setups are not the easiest thing to install, but it will be worth it when it is done!
Regards, John McGraw
04-18-2007, 11:41 PM
#3
Le Mans Master
Thread Starter
Member Since: Sep 2003
Location: Norwalk ohio
Posts: 8,927
Received 642 Likes
on
360 Posts
2019 Corvette of the Year Winner
St. Jude Donor '15
Herb,
I had to chase the threads on my nuts. Thet are exactly right about the nuts not going on unless you do. I also ground a considerable amount on the backside of the transmissions and rounded off the corners with a big radius. This made it a lot easier to get the transmissions in place. There is a lot of extra material in this area that can be lost without affecting the transmissions. I took the transmissions to the belt grinder and really trimmed them down.
Don't get too frustrated, and just walk away for a while when it starts to get to you. These setups are not the easiest thing to install, but it will be worth it when it is done!
Regards, John McGraw
I had to chase the threads on my nuts. Thet are exactly right about the nuts not going on unless you do. I also ground a considerable amount on the backside of the transmissions and rounded off the corners with a big radius. This made it a lot easier to get the transmissions in place. There is a lot of extra material in this area that can be lost without affecting the transmissions. I took the transmissions to the belt grinder and really trimmed them down.
Don't get too frustrated, and just walk away for a while when it starts to get to you. These setups are not the easiest thing to install, but it will be worth it when it is done!
Regards, John McGraw

 04-18-2007, 11:59 PM
#5
Racer

Member Since: Aug 2003
Location: Sitka Alaska
Posts: 404
Likes: 0
Received 0 Likes
on
0 Posts
Thank you for sharing the pictures and advice, this is a project I will do in the near future. One question tho', awhile back when my speedo was at Jason's I tried to remove the driver's side wiper transmission and could not figure out how to get those dang nuts off under the dash, any hints?
Thank you,
Jerry
Thank you,
Jerry
04-19-2007, 06:32 AM
#6
Le Mans Master
Thread Starter
Member Since: Sep 2003
Location: Norwalk ohio
Posts: 8,927
Received 642 Likes
on
360 Posts
2019 Corvette of the Year Winner
St. Jude Donor '15
Thank you for sharing the pictures and advice, this is a project I will do in the near future. One question tho', awhile back when my speedo was at Jason's I tried to remove the driver's side wiper transmission and could not figure out how to get those dang nuts off under the dash, any hints?
Thank you,
Jerry
Thank you,
Jerry
Take a photo of what you see under there and post it, perhaps someone has run into the same problem and can provide some pointers. In my case the entire car came apart, so getting them out was not a problem.
04-19-2007, 06:35 AM
#7
Le Mans Master
Thread Starter
Member Since: Sep 2003
Location: Norwalk ohio
Posts: 8,927
Received 642 Likes
on
360 Posts
2019 Corvette of the Year Winner
St. Jude Donor '15
one more thing, even though you run those nuts over the tap to get the flash chrome off, I found that the old ones would go right on the new transmission, where the new ones after being run over the tap still had a heck of a time screwing on. Don't use an old tap for this, it needs to be a NEW one that is sharp and can cut off all the chrome necessary to get over the threads of the transmission.
04-19-2007, 09:54 PM
#8
Le Mans Master
Thread Starter
Member Since: Sep 2003
Location: Norwalk ohio
Posts: 8,927
Received 642 Likes
on
360 Posts
2019 Corvette of the Year Winner
St. Jude Donor '15
I got the second transmission installed no problem. But I realized after they were in that there is probably a strategic position for both of them that makes it the easiest to install. Remember that they had to be turned opposite of each other in order to get the wipers to open in the middle, sweep to the outside and back to the middle again.
I put the passenger side with the notch down and the driver side with the notch up, I am not sure at this point which one would be easier up and which one should be down. When I am done I will tell you my opinion, just remember that I am doing this without any wires or much of anything else in my way. As I am doing this I keep thinking what a PIA to keep dodging the cluster or the grab handle. Those of you that have done this in fully assembled cars, I take my hat off to you!
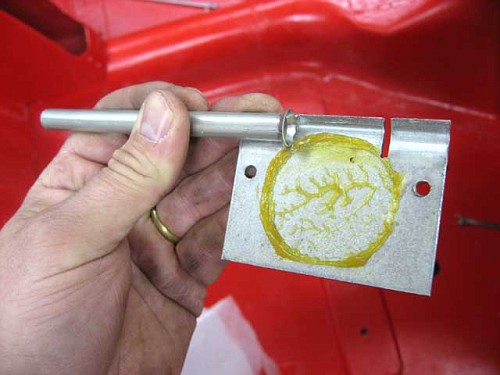
The instructions call for the ends of the 3/8" aluminum tubes to be flared. This is done to make sure that the drive mechanism flows smoothly into and out of the tubes as it drives the gear attached to the wiper drive shaft. They do not want a double flare used since this might cause noise as the drive goes in and out and rubs over the double flared end. Fortunately I have a single flare tool.

The short tube is for the side furtherest away from the drive location. In my case I am putting it in the kick pad area on the driver side, so this short 4" tube will go on the outboard side of the passenger transmission.
I also flared a longer tube that will go between the two transmissions. In this case I attached one end after it was flared to the passenger side and then marked, cut and flared the driver side of that tube.
Now comes the really tricky part. To get both tubes in and positioned while you put the cover plate on. Ok, this is where 3 arms and hands would be really nice.
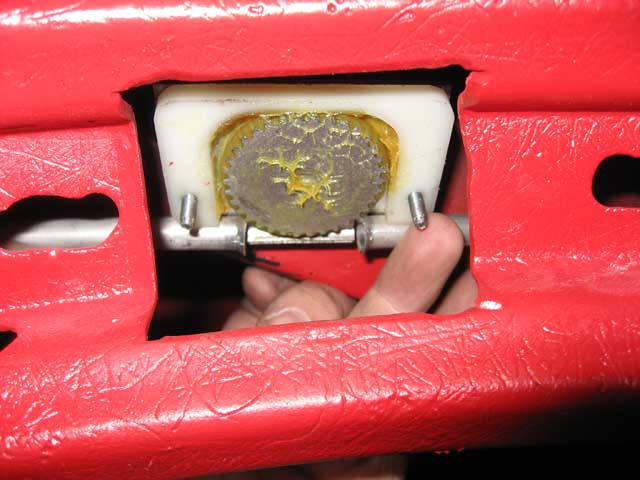
Put the plate back on, keep it tight and attach the two screws making sure that the flared end of the tube stays in the notch. STAYS in the NOTCH!!! Crud, look at the photo below, I thought I had it there and tightened it all up only to see in the photo below that it looks like the flare for the long tube may have moved. I will check it tomorrow, if it moved, I will get the privilege of taking it apart and double checking the flare (and repairing if it got crushed in the assembly). At any rate, here is the assembly from underneath.
The two nuts that hold on the end plate of the transmission are 9mm, so it is best to have that wrench handy to do this part since getting a socket up there is darn impossible!
One more note, I chewed up two of the end nuts trying to get them cleaned up via the 5/8-24 tap. While they went on the tap ok, the transmissions seemed to have their major thread diameter a bit on the high side and the nuts did not want to go on. I ordered up another set and will send them to SPW to fix tap clean them out.
I am also looking for some Stainless Steel 5/8-24 nuts that I can put a wrench on to turn them down tight. The stock nuts with the two notches in them , well are for the birds! Anyone doing this conversion that needs some nuts with a hex on them, PM me and hopefully I will have some extra ones.
I put the passenger side with the notch down and the driver side with the notch up, I am not sure at this point which one would be easier up and which one should be down. When I am done I will tell you my opinion, just remember that I am doing this without any wires or much of anything else in my way. As I am doing this I keep thinking what a PIA to keep dodging the cluster or the grab handle. Those of you that have done this in fully assembled cars, I take my hat off to you!
The instructions call for the ends of the 3/8" aluminum tubes to be flared. This is done to make sure that the drive mechanism flows smoothly into and out of the tubes as it drives the gear attached to the wiper drive shaft. They do not want a double flare used since this might cause noise as the drive goes in and out and rubs over the double flared end. Fortunately I have a single flare tool.
The short tube is for the side furtherest away from the drive location. In my case I am putting it in the kick pad area on the driver side, so this short 4" tube will go on the outboard side of the passenger transmission.
I also flared a longer tube that will go between the two transmissions. In this case I attached one end after it was flared to the passenger side and then marked, cut and flared the driver side of that tube.
Now comes the really tricky part. To get both tubes in and positioned while you put the cover plate on. Ok, this is where 3 arms and hands would be really nice.
Put the plate back on, keep it tight and attach the two screws making sure that the flared end of the tube stays in the notch. STAYS in the NOTCH!!! Crud, look at the photo below, I thought I had it there and tightened it all up only to see in the photo below that it looks like the flare for the long tube may have moved. I will check it tomorrow, if it moved, I will get the privilege of taking it apart and double checking the flare (and repairing if it got crushed in the assembly). At any rate, here is the assembly from underneath.
The two nuts that hold on the end plate of the transmission are 9mm, so it is best to have that wrench handy to do this part since getting a socket up there is darn impossible!
One more note, I chewed up two of the end nuts trying to get them cleaned up via the 5/8-24 tap. While they went on the tap ok, the transmissions seemed to have their major thread diameter a bit on the high side and the nuts did not want to go on. I ordered up another set and will send them to SPW to fix tap clean them out.
I am also looking for some Stainless Steel 5/8-24 nuts that I can put a wrench on to turn them down tight. The stock nuts with the two notches in them , well are for the birds! Anyone doing this conversion that needs some nuts with a hex on them, PM me and hopefully I will have some extra ones.
04-20-2007, 12:31 AM
#9
Racer
Member Since: Aug 2003
Location: Sitka Alaska
Posts: 404
Likes: 0
Received 0 Likes
on
0 Posts
hmmm, not knowing exactly what you see up there, I would get a long flexible extension on a 1/4" drive ratchet. I was able to get under there with just a 2" extension and a socket. Obviously you need line of sight, so what ever is in the way needs to be moved.
Take a photo of what you see under there and post it, perhaps someone has run into the same problem and can provide some pointers. In my case the entire car came apart, so getting them out was not a problem.
Take a photo of what you see under there and post it, perhaps someone has run into the same problem and can provide some pointers. In my case the entire car came apart, so getting them out was not a problem.
 That puppy would not let me get at the inboard nut even with a universal joint! Your idea of using a flex extension sounds reasonable tho'. Won't pull the dash until fall as I'm having too much fun driving right now.
Thanks for the reply.
Jerry
04-20-2007, 01:58 AM
#10
Race Director

Member Since: Jun 2006
Location: Inverness FL
Posts: 17,891
Received 729 Likes
on
623 Posts
St. Jude Donor '07

Herb
2 things:
the flare on the end of the tubes is really to hold the tubes in place in the notches of the transmissions and motor/gear case so that the tubes don't slide when the inner cable pushes/pulls when the cable is in motion.
and, i reckon you're going to have to make those 'special' 5/8-24 nuts, like i had to.

Bill
2 things:
the flare on the end of the tubes is really to hold the tubes in place in the notches of the transmissions and motor/gear case so that the tubes don't slide when the inner cable pushes/pulls when the cable is in motion.
and, i reckon you're going to have to make those 'special' 5/8-24 nuts, like i had to.
Bill
04-20-2007, 06:28 AM
#11
Le Mans Master
Thread Starter
Member Since: Sep 2003
Location: Norwalk ohio
Posts: 8,927
Received 642 Likes
on
360 Posts
2019 Corvette of the Year Winner
St. Jude Donor '15
I will post photos when I get them and see how they look.
04-20-2007, 07:17 AM
#12
Race Director
Member Since: Jun 2006
Location: Inverness FL
Posts: 17,891
Received 729 Likes
on
623 Posts
St. Jude Donor '07
i didn't know that one could get 5/8-24 nuts in stainless steel, but then i never looked 30 years ago (wouldn't even have known where to look...) hopefully the nuts you ordered are half-nuts as the ones i have are probably no thicker than 1/4". of course, if you do have to 'thin them down'. you can make them the thickness you need to take up the room on the shaft.
Bill
04-20-2007, 07:43 AM
#13
Safety Car

I believe the "thin" nuts you need are called jamb nuts, sometimes used in pairs to "lock" the nuts in position. A really good hardware store will carry them.
Charles
04-20-2007, 07:53 AM
#14
Race Director
Member Since: Jun 2006
Location: Inverness FL
Posts: 17,891
Received 729 Likes
on
623 Posts
St. Jude Donor '07
On my SPW system you could get the flared tubes into position without having to completely removing the cover plate. Just loosen the nuts to where they are almost off and push the tube into the slot.
I believe the "thin" nuts you need are called jamb nuts, sometimes used in pairs to "lock" the nuts in position. A really good hardware store will carry them.
Charles
I believe the "thin" nuts you need are called jamb nuts, sometimes used in pairs to "lock" the nuts in position. A really good hardware store will carry them.
Charles
if memory serves me right (and lately it sometimes lets me down..), 5/8-24 is not a standard thread pitch, and therefore aren't hardware variety nuts...
Bill
04-20-2007, 11:16 AM
#15
Le Mans Master
Thread Starter
Member Since: Sep 2003
Location: Norwalk ohio
Posts: 8,927
Received 642 Likes
on
360 Posts
2019 Corvette of the Year Winner
St. Jude Donor '15
On my SPW system you could get the flared tubes into position without having to completely removing the cover plate. Just loosen the nuts to where they are almost off and push the tube into the slot.
I believe the "thin" nuts you need are called jamb nuts, sometimes used in pairs to "lock" the nuts in position. A really good hardware store will carry them.
Charles
I believe the "thin" nuts you need are called jamb nuts, sometimes used in pairs to "lock" the nuts in position. A really good hardware store will carry them.
Charles
The 5/8-24 is considererd Extra Fine thread, I called Totally Stainless thinking they might have them, they told me that they don't exist. I explained they did, they were adament that they don't.
I found that this is a common thread size for electrical control box lights, switches and BN type connectors.
I found a company that had some over runs that were 1/8" thick (would have been perfect) but they couldn't find the stock. I will call back and find out if they had any luck finding the inventory.
Bill, 30 years ago, there wasn't the internet and there wasn't Google....with both of those I can usually find anything if it exists...I call the internet the "Great Equalizer"!
04-20-2007, 10:26 PM
#16
Le Mans Master
Thread Starter
Member Since: Sep 2003
Location: Norwalk ohio
Posts: 8,927
Received 642 Likes
on
360 Posts
2019 Corvette of the Year Winner
St. Jude Donor '15
ok, I did some checking on the 5/8-24 jamb nut I bought, turns out it wasn't a box of nuts, it was ONE!!! And I thought Corvette parts were expensive!!! YIKES!!! Sorry everyone, I won't have extras, in fact if the one works, I have to buy another one. I will post the link of where to get it after I sort out if it works like I want it to or not.
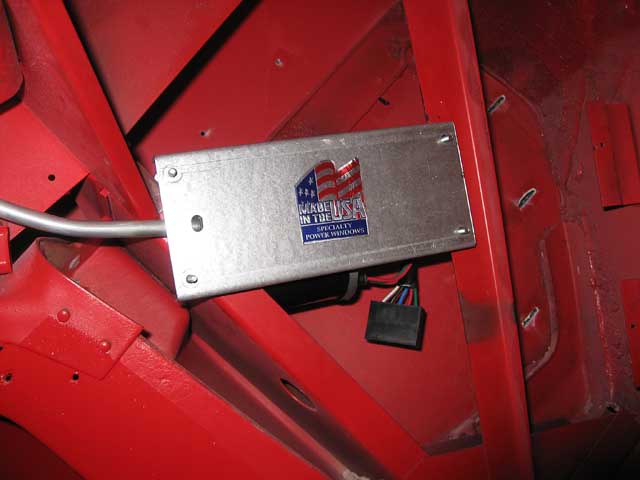
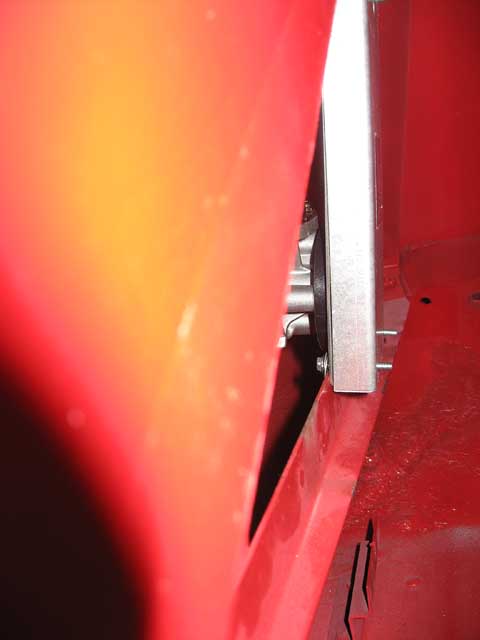
Well, got the other transmission and electric motor mounted tonight. I put the motor by the drivers leg behind the kick pad.
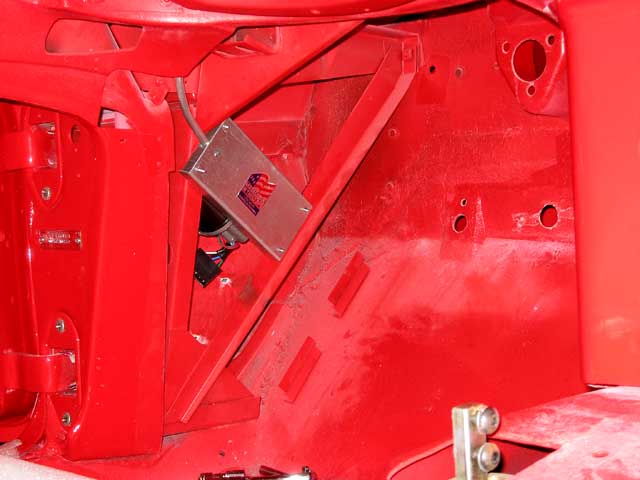
I was able to put some progressively larger washers on the screw that goes through the motor mount case in 3 spots and basically clamped it onto the metal in the area.
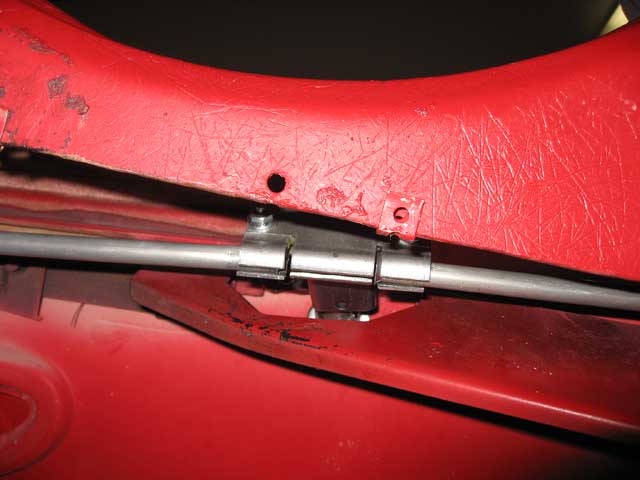
The tube between the electric drive and the driver side transmission sweeps very nicely in place as you can see in the photo below.

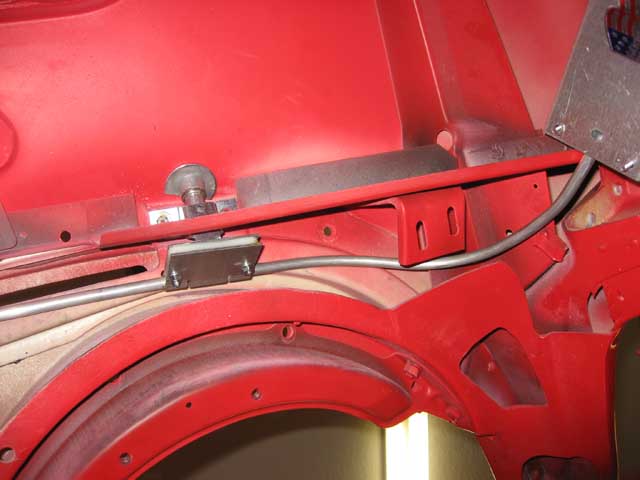
I didn't have to cut any of the bracings nor encounter any difficulty in getting the tubes in position. The hardest part was dragging my self up and down from under the dash and by the end my elbow was nearly raw!
In the photo below you will see a shot from the side that shows the motor BELOW the height of the side bracing which will be below the side kick panels.
I figure that when I get the nuts on the bolts for the last time I will cut off the protruding portion of the screw threads.
Here I put a 2X4 down the side to give you an idea of how the kick panel will cover without a problem.
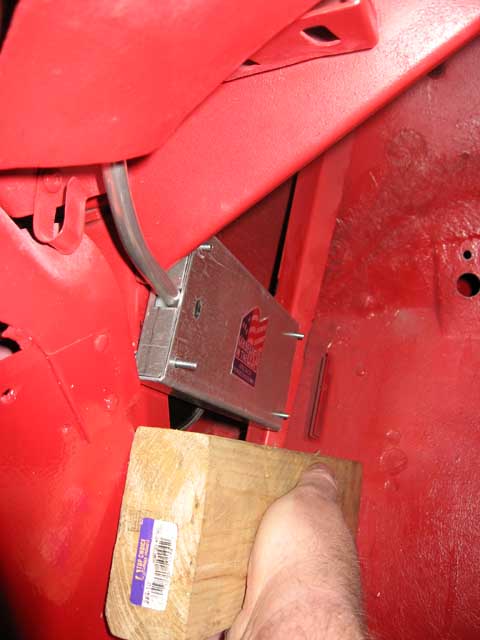
The nuts on the transmission cover take a 9mm wrench and the machine screws take a 1/4", go figure!!!
I need to put the drive helix in and cut it to length as well as run the set up to make sure everything runs smoothly. That will be sometime this weekend. Bending the tubes was easily done by hand, you don't need a tube bender, but a tube flaring tool is a must. On Saturday I have a friend coming over to assist with some of the wiring so hopefully we can put a dent in that tomorrow.
Hopefully that helps anyone thinking of putting one of these in. The worse part of the whole thing is where it goes, under the dash and you are on your back most of the time.
Sorry everyone, I won't have extras, in fact if the one works, I have to buy another one. I will post the link of where to get it after I sort out if it works like I want it to or not.Well, got the other transmission and electric motor mounted tonight. I put the motor by the drivers leg behind the kick pad.
I was able to put some progressively larger washers on the screw that goes through the motor mount case in 3 spots and basically clamped it onto the metal in the area.
The tube between the electric drive and the driver side transmission sweeps very nicely in place as you can see in the photo below.
I didn't have to cut any of the bracings nor encounter any difficulty in getting the tubes in position. The hardest part was dragging my self up and down from under the dash and by the end my elbow was nearly raw!
In the photo below you will see a shot from the side that shows the motor BELOW the height of the side bracing which will be below the side kick panels.
I figure that when I get the nuts on the bolts for the last time I will cut off the protruding portion of the screw threads.
Here I put a 2X4 down the side to give you an idea of how the kick panel will cover without a problem.
The nuts on the transmission cover take a 9mm wrench and the machine screws take a 1/4", go figure!!!
I need to put the drive helix in and cut it to length as well as run the set up to make sure everything runs smoothly. That will be sometime this weekend. Bending the tubes was easily done by hand, you don't need a tube bender, but a tube flaring tool is a must. On Saturday I have a friend coming over to assist with some of the wiring so hopefully we can put a dent in that tomorrow.
Hopefully that helps anyone thinking of putting one of these in. The worse part of the whole thing is where it goes, under the dash and you are on your back most of the time.
04-20-2007, 10:59 PM
#17
Burning Brakes

Member Since: Jan 2006
Location: Westminster Maryland
Posts: 844
Likes: 0
Received 2 Likes
on
2 Posts
St. Jude Donor '08
I bought the same system over a year ago, it is only partially installed. Still have to figure where I'm going to put the motor. To much stuff in the way.
04-20-2007, 11:30 PM
#18
Burning Brakes
Member Since: Jan 2006
Location: Westminster Maryland
Posts: 844
Likes: 0
Received 2 Likes
on
2 Posts
St. Jude Donor '08
Herb
2 things:
the flare on the end of the tubes is really to hold the tubes in place in the notches of the transmissions and motor/gear case so that the tubes don't slide when the inner cable pushes/pulls when the cable is in motion.
and, i reckon you're going to have to make those 'special' 5/8-24 nuts, like i had to.
Bill


These came with the kit.
04-22-2007, 05:57 AM
#19
Melting Slicks


Herb. Do not button up the motor till you set the ratio in the box. You need to have the windshield on so you can get the sweep right with the wiper arms on. You will have to take the motor apart a few times to get it right. It's not a fun job. Don't even try it with out the windshield on. It will not be right. The curve of the glass makes it diff. than you think. I think I wound up in the second to last hole in the wheel by the time I got it right. As much as I love my 60. I hope I never have to put one together again. Midyears are cake compared to C1's. The fun is just starting. Brian G.
04-22-2007, 08:13 AM
#20
Le Mans Master
Thread Starter
Member Since: Sep 2003
Location: Norwalk ohio
Posts: 8,927
Received 642 Likes
on
360 Posts
2019 Corvette of the Year Winner
St. Jude Donor '15
Herb. Do not button up the motor till you set the ratio in the box. You need to have the windshield on so you can get the sweep right with the wiper arms on. You will have to take the motor apart a few times to get it right. It's not a fun job. Don't even try it with out the windshield on. It will not be right. The curve of the glass makes it diff. than you think. I think I wound up in the second to last hole in the wheel by the time I got it right. As much as I love my 60. I hope I never have to put one together again. Midyears are cake compared to C1's. The fun is just starting. Brian G.