
winter mods. yep; I'm doing it too. No more plastic. (dialup = absolute zero)
 01-11-2007, 08:19 PM
#1
Team Owner

Thread Starter
Member Since: Apr 2001
Location: S.W. Ohio. . . . . . NRA Life Member
Posts: 54,199
Received 173 Likes
on
107 Posts

I knew my C5 had a "small block Chevy" - but you couldn't see it after opening the hood... it was mostly covered up !!! . So I decided to remove the plastic fuel rail covers permanently. Sadly, that didn't help much since the ignition coils are bolted to the face of the factory valve covers.
Like many others, I had painted and decaled my fuel rail covers - which did dress it it nicely; but I still yearned for that classic small block Chevy look.
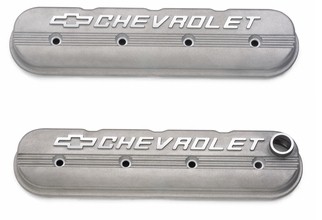
I've read where others have relocated the coil packs and installed fancy valve covers. I found these in the GM Racing Parts catalog - and at $220 shipped for the pair - I decided to take on this task.
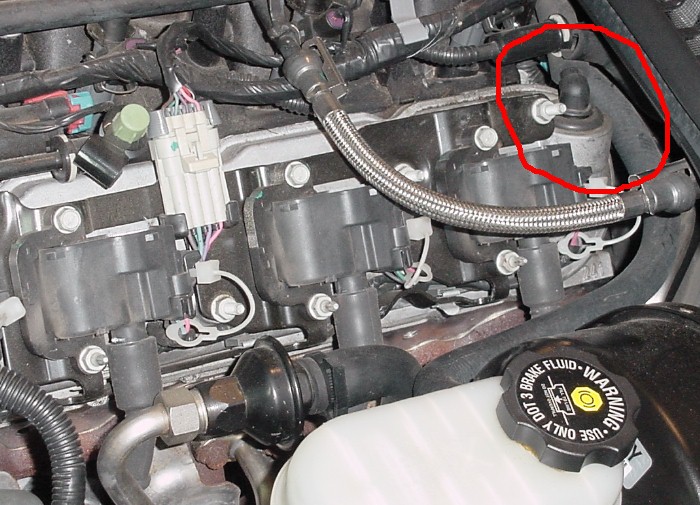
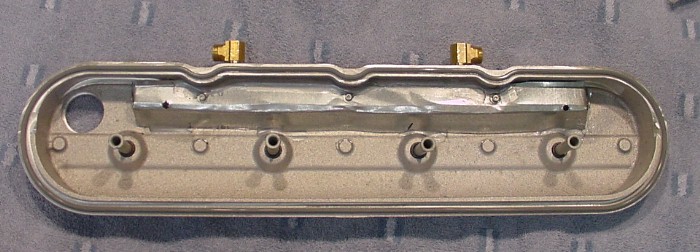
My 2002 LS1 is stock, and I needed to accomidate the polution control devices that are a part of the factory covers. On the drivers side the hole lined up almost perfectly with the crankcase ventilation hole in the factory valve covers (see red circle in first pic).
and on the passenger side the hole was exactly in the same location as the factory oil fill neck. So I ordered two of the "breather hole" valve covers (GM part #25534398).
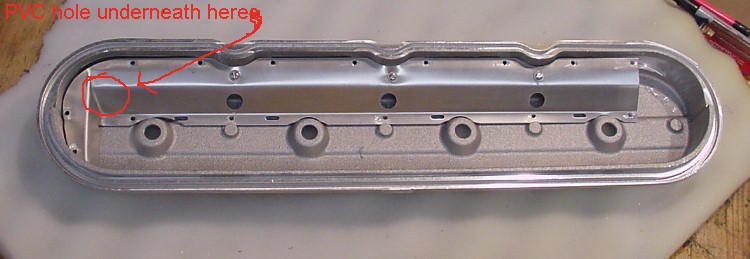
When I removed the drivers side factory valve cover, I discovered a seperator plate on the inside; apparently placed there to keep oil from splashing directly in to (and swallowed-up by) the crankcase ventilation tube. I was able to remove this thin plate and mount it on the inside of the new valve cover.
The passenger side factory cover has two crankcase ventilation ports.
I duplicated these with right-angle fittings - that mated up to the braided lines I already had on hand.
But on the underneath side of the passenger factory cover were two thin "boxes" that are meant to keep oil from getting directly to these crankcase ventilation ports. They are 3 sided plastic boxes; the forth side is aluminum and a part of the factory cover casting.
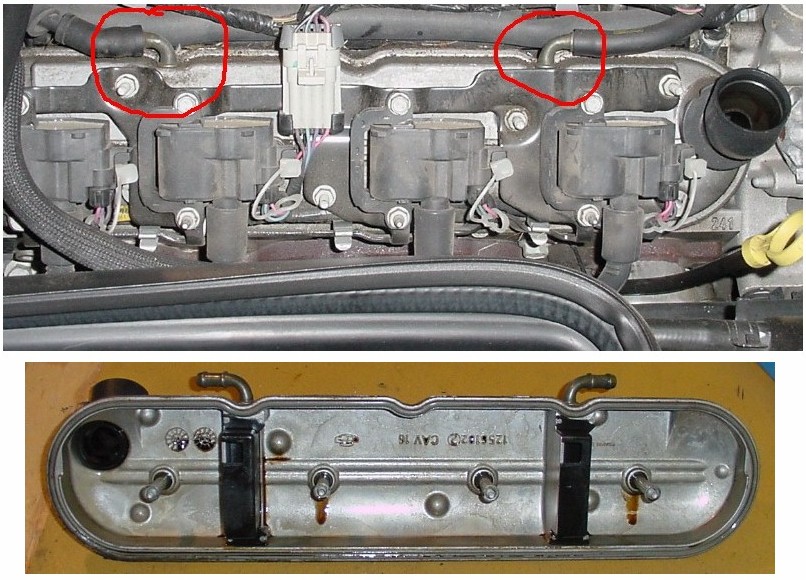
Since I couldn't transfer these over to the new cover, I made a seperator out of sheet aluminum stock. It doesn't look pretty, but being totally hidden (obviously) it didn't matter.
(not visable in this pic are are vapor holes on the ends as well)
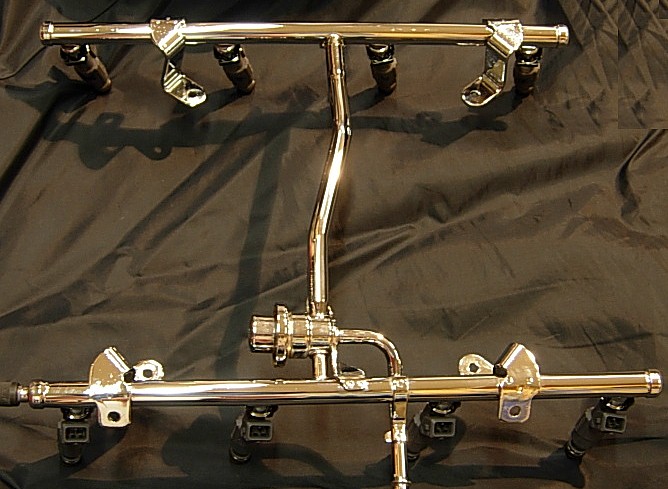
I also decided to chrome the factory fuel rail assembly. At first I thought to buy anodized aftermarket fuel rails, but I got my original one chromed for $40.
I moved the drivers side coil packs to a cavity directly below the drivers side hood-latch mechanism. I was able to bow the existing coil pack bracket and it followed the contour of the wheel-well nicely.
In this pic, the windshield washer fluid reservoir has been removed; and you're looking downwards; the power brake booster is just in the left edge of the picture.
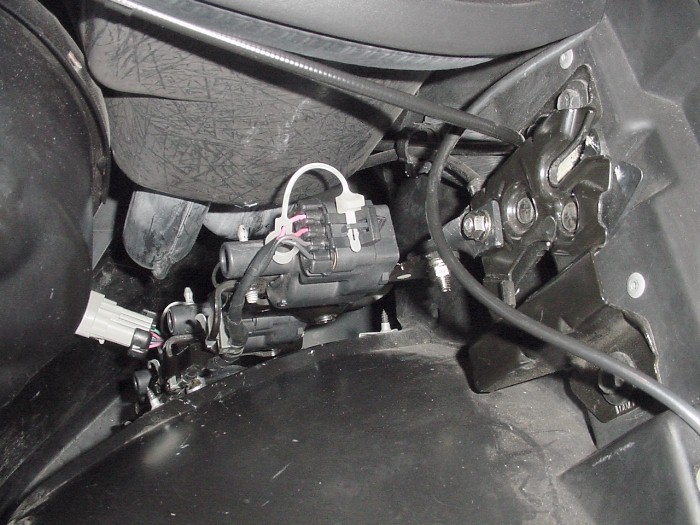
one attachment point was a fabricated bracket attached to an unused hole in the hood latch mechanism; the second mounting point is through the wheel-well. I extended the factory wire harness that originally fed the coil pack - to the new location. Obviously I purchased a set of MSD 8.5mm universal plug wires (#32079) made specifically for the LS1/LS6, cut and crimped each one to the new coil pack location.
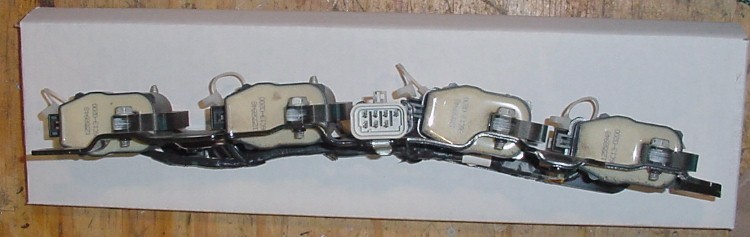
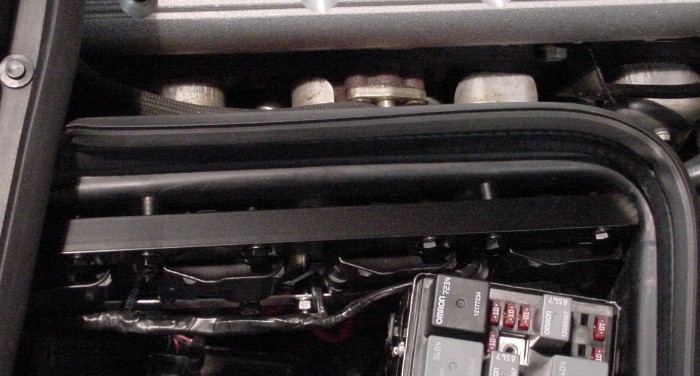
I went to relocate the passengers coil packs to the same spot as shown by others doing this mod, but there were so many wire bundles and hoses there, that I couldn't figure it out how to accomplish this task. I ended-up using the cavity between the battery and the compartment seperator (battery removed for this pic)
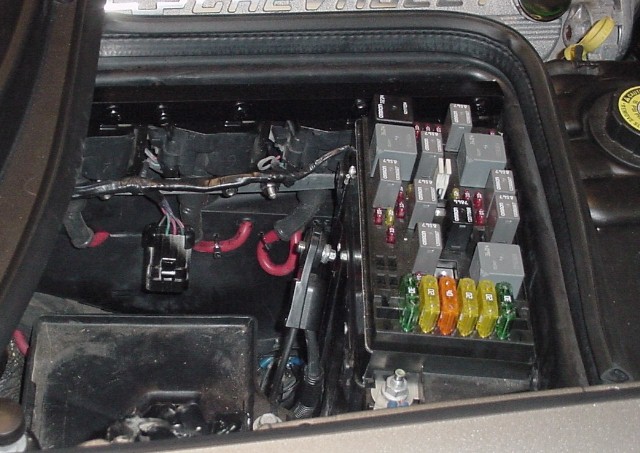
And since length was limited in this location, I removed the coil packs from the factory bracket and made brackets that allowed the coils to be closer together. Also had to extend the power/signal wire harness to the coils new spot. I painted it all semi-gloss black to blend in.
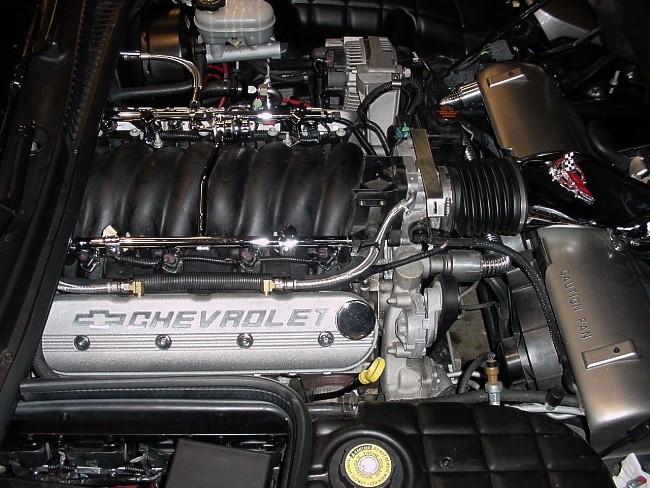
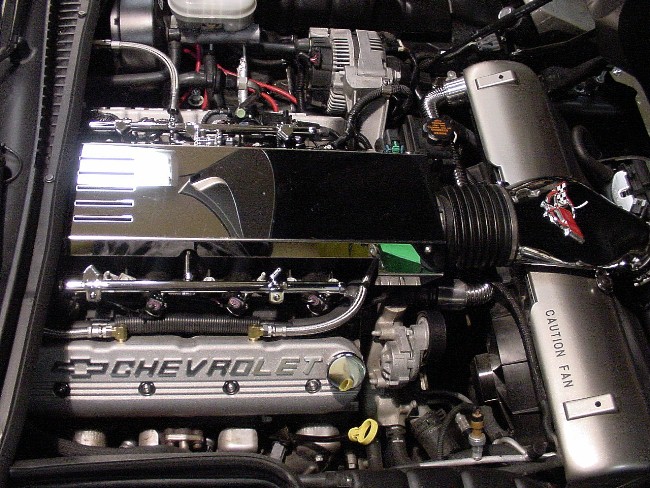
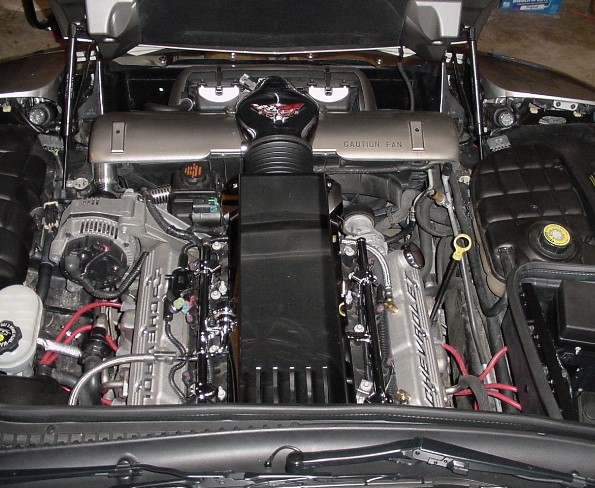
here's a few pics of the finialized project, some have the polished intake cover installed, some don't:
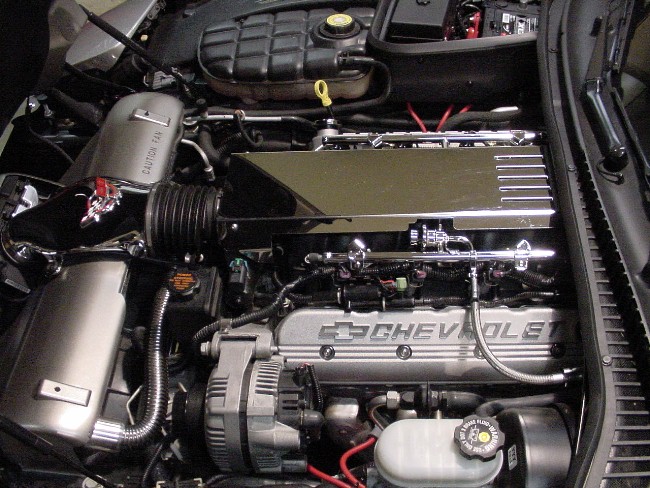
Like many others, I had painted and decaled my fuel rail covers - which did dress it it nicely; but I still yearned for that classic small block Chevy look.
I've read where others have relocated the coil packs and installed fancy valve covers. I found these in the GM Racing Parts catalog - and at $220 shipped for the pair - I decided to take on this task.
My 2002 LS1 is stock, and I needed to accomidate the polution control devices that are a part of the factory covers. On the drivers side the hole lined up almost perfectly with the crankcase ventilation hole in the factory valve covers (see red circle in first pic).
and on the passenger side the hole was exactly in the same location as the factory oil fill neck. So I ordered two of the "breather hole" valve covers (GM part #25534398).
When I removed the drivers side factory valve cover, I discovered a seperator plate on the inside; apparently placed there to keep oil from splashing directly in to (and swallowed-up by) the crankcase ventilation tube. I was able to remove this thin plate and mount it on the inside of the new valve cover.
The passenger side factory cover has two crankcase ventilation ports.
I duplicated these with right-angle fittings - that mated up to the braided lines I already had on hand.
But on the underneath side of the passenger factory cover were two thin "boxes" that are meant to keep oil from getting directly to these crankcase ventilation ports. They are 3 sided plastic boxes; the forth side is aluminum and a part of the factory cover casting.
Since I couldn't transfer these over to the new cover, I made a seperator out of sheet aluminum stock. It doesn't look pretty, but being totally hidden (obviously) it didn't matter.
(not visable in this pic are are vapor holes on the ends as well)
I also decided to chrome the factory fuel rail assembly. At first I thought to buy anodized aftermarket fuel rails, but I got my original one chromed for $40.
I moved the drivers side coil packs to a cavity directly below the drivers side hood-latch mechanism. I was able to bow the existing coil pack bracket and it followed the contour of the wheel-well nicely.
In this pic, the windshield washer fluid reservoir has been removed; and you're looking downwards; the power brake booster is just in the left edge of the picture.
one attachment point was a fabricated bracket attached to an unused hole in the hood latch mechanism; the second mounting point is through the wheel-well. I extended the factory wire harness that originally fed the coil pack - to the new location. Obviously I purchased a set of MSD 8.5mm universal plug wires (#32079) made specifically for the LS1/LS6, cut and crimped each one to the new coil pack location.
I went to relocate the passengers coil packs to the same spot as shown by others doing this mod, but there were so many wire bundles and hoses there, that I couldn't figure it out how to accomplish this task. I ended-up using the cavity between the battery and the compartment seperator (battery removed for this pic)
And since length was limited in this location, I removed the coil packs from the factory bracket and made brackets that allowed the coils to be closer together. Also had to extend the power/signal wire harness to the coils new spot. I painted it all semi-gloss black to blend in.
here's a few pics of the finialized project, some have the polished intake cover installed, some don't:
Last edited by Mike Mercury; 02-26-2010 at 10:11 PM.


 01-11-2007, 08:33 PM
#3
Tech Contributor
Member Since: Oct 1999
Location: Charlotte, NC (formerly Endicott, NY)
Posts: 40,078
Received 8,918 Likes
on
5,327 Posts
Many years ago everybody wanted Corvette Valve covers. Chevrolet covers didn't cut it.
Bill
Bill

 01-11-2007, 09:12 PM
#6
Burning Brakes

Member Since: Nov 2004
Location: Independence Missouri
Posts: 1,037
Likes: 0
Received 0 Likes
on
0 Posts
St. Jude Donor '06

Mike...Awesome write up and excellent pics. Question. Do you have a pic of the rear of the drivers side cover? Im curious about the pcv hole and how that was done. Thanks and 
01-11-2007, 11:06 PM
#7
Team Owner
Thread Starter
Member Since: Apr 2001
Location: S.W. Ohio. . . . . . NRA Life Member
Posts: 54,199
Received 173 Likes
on
107 Posts
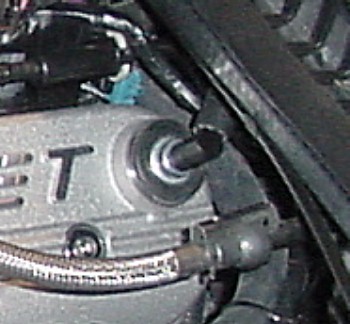
Not any "after" pics of that area specifically. But it was easy to do. The "breather" model of those GM racing valve covers comes with two rubber grommets. One of them takes the breather holes 1.22 inch opening to a 3/4" hole. This is the perfect size for the factory plastic fitting.
Sadly; the factory plastic elbow fitting was not true 90 degrees, and it wouldn't work (clearance problem)
I went to AutoZone and found a "universal PCV kit"; it contained an standard steel straight PVC valve, and three different plastic 90 degree elbows.
I gutted the PVC valve, making it in to a hollow fitting, and selected a 90 degree elbow. It worked perfectly.
the factory tubing wouldn't quite reach , so I extended it with black rubber hose.


 01-12-2007, 12:58 PM
#17
Drifting


Tim,
Thanks for the great post, and timely too since I have been looking at those covers in GM Performance Parts catalog but coulldn't find any info on how to apply them. I was thinking of going with the MSD coil packs but relocating the stock coils is the way to go. Looks great.
Thanks for the great post, and timely too since I have been looking at those covers in GM Performance Parts catalog but coulldn't find any info on how to apply them. I was thinking of going with the MSD coil packs but relocating the stock coils is the way to go. Looks great.
01-12-2007, 12:59 PM
#18
Le Mans Master

Looks GREAT! I would love to do the same thing, but instead of covering the intake, I'd like to get a chromed or polished intake.
Nice work!!!
Nice work!!!
01-12-2007, 01:17 PM
#19
Team Owner
Thread Starter
Member Since: Apr 2001
Location: S.W. Ohio. . . . . . NRA Life Member
Posts: 54,199
Received 173 Likes
on
107 Posts
Tim,
Thanks for the great post, and timely too since I have been looking at those covers in GM Performance Parts catalog but coulldn't find any info on how to apply them. I was thinking of going with the MSD coil packs but relocating the stock coils is the way to go. Looks great.
Thanks for the great post, and timely too since I have been looking at those covers in GM Performance Parts catalog but coulldn't find any info on how to apply them. I was thinking of going with the MSD coil packs but relocating the stock coils is the way to go. Looks great.
and purchased polished stainless center-valve-cover bolts and washers. They have both allen-head and button-head versions.
Allen Head Polished #1-0280 12.50
Button Head Polished #1-0282 14.50
per set of 8.
I could not find a forum vendor that was selling these

Last edited by Mike Mercury; 01-12-2007 at 01:23 PM.