
Adjusting the replacement SMC roof – DIY w/pics
 09-02-2006, 11:45 PM
#1
Burning Brakes


Thread Starter
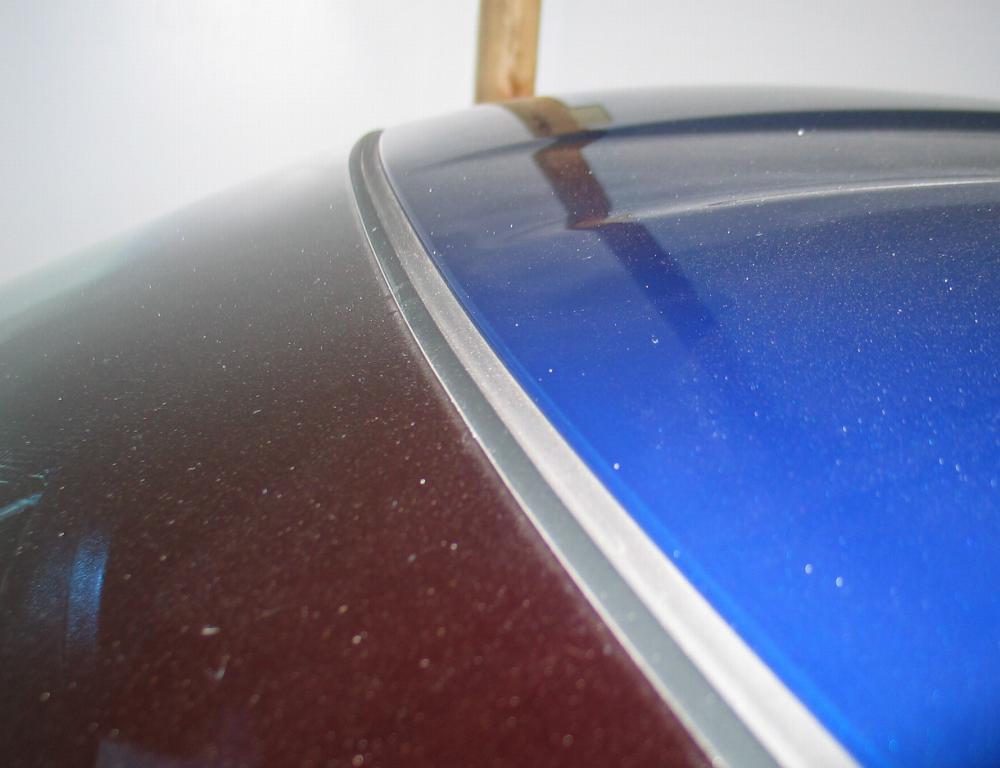
The recall instructions were revised on Aug 25 to mention that the new SMC painted roof sits LOWER then the original one and needs to be adjusted.
If your dealer neglects to do this or isn’t aware it needs to be done, here’s some DIY instructions explaining how I fixed mine.
Please note, the instructions in the service manual say that you need to remove the visors and headliner to make this adjustment.
My car had enough of a gap in there to adjust the front mount WITHOUT doing this.
Please check your car out and make sure you don’t have to do this the long way without damage.
When I picked up my car after the SMC replacement top was installed the top was noticeably lower in the front.
The very next day I saw posted here that the dealer is supposed to raise the front roof mounting points 1.5mm to 2.0mm to compensate for this.
I didn’t want to take the car back to the body shop so I did it myself.
Here is what I did.
This is the drivers side front roof mount
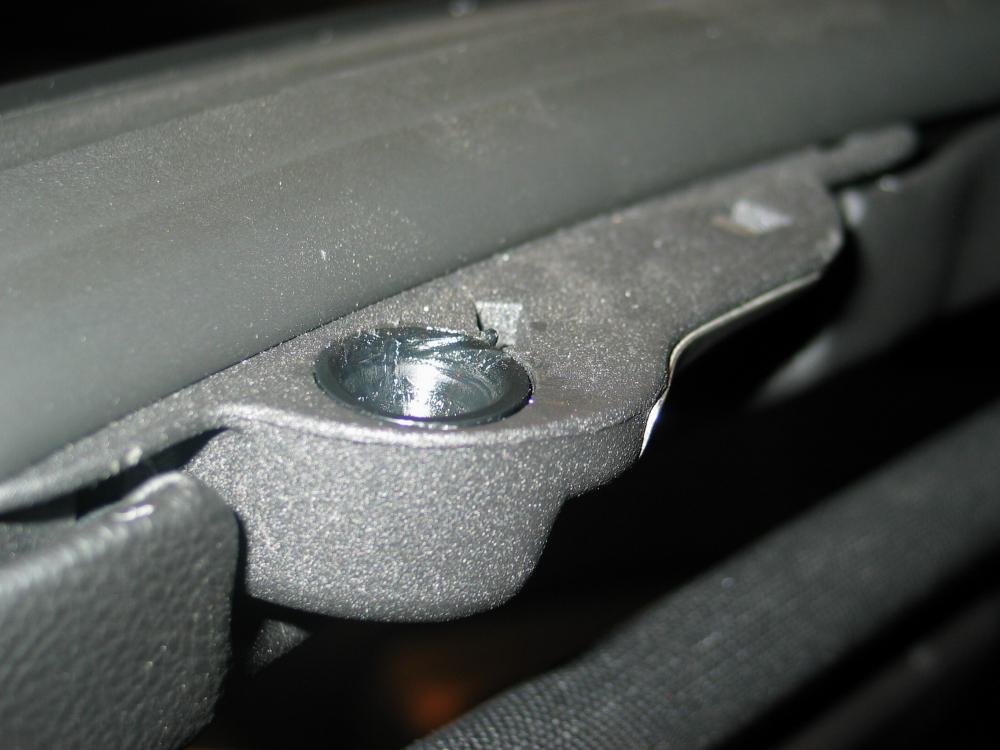
Notice the adjustment screw if you pull away the headliner piece
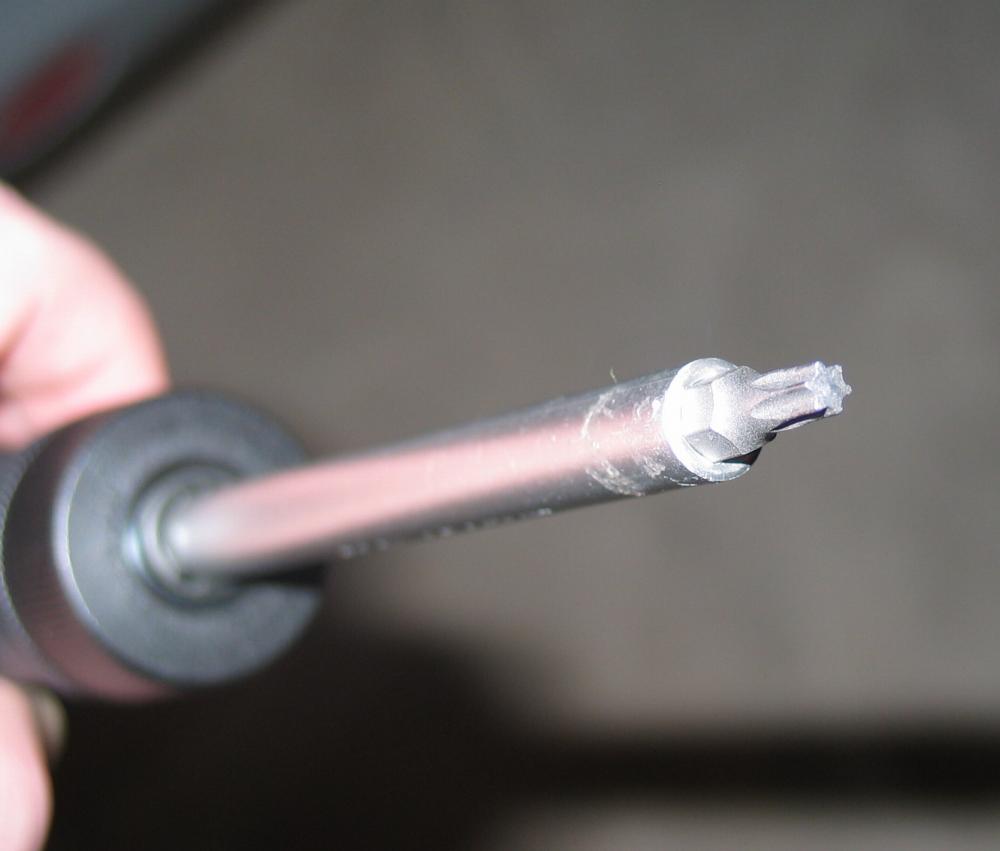
It requires a T25 TORX bit
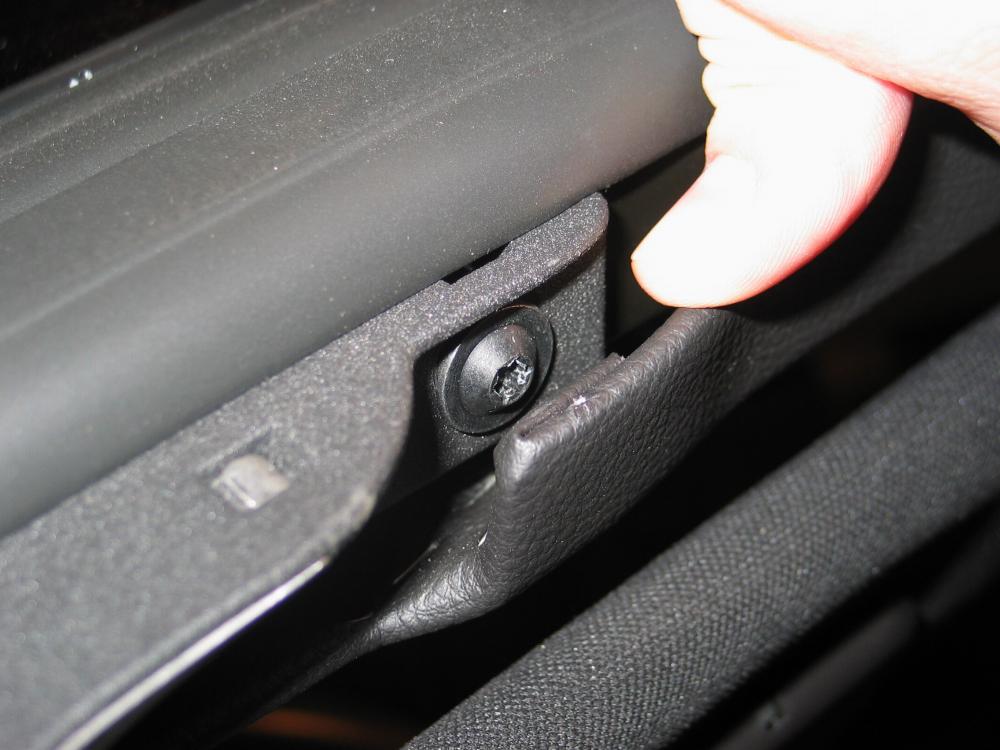
I pulled the headliner back and slipped the screwdriver into place.
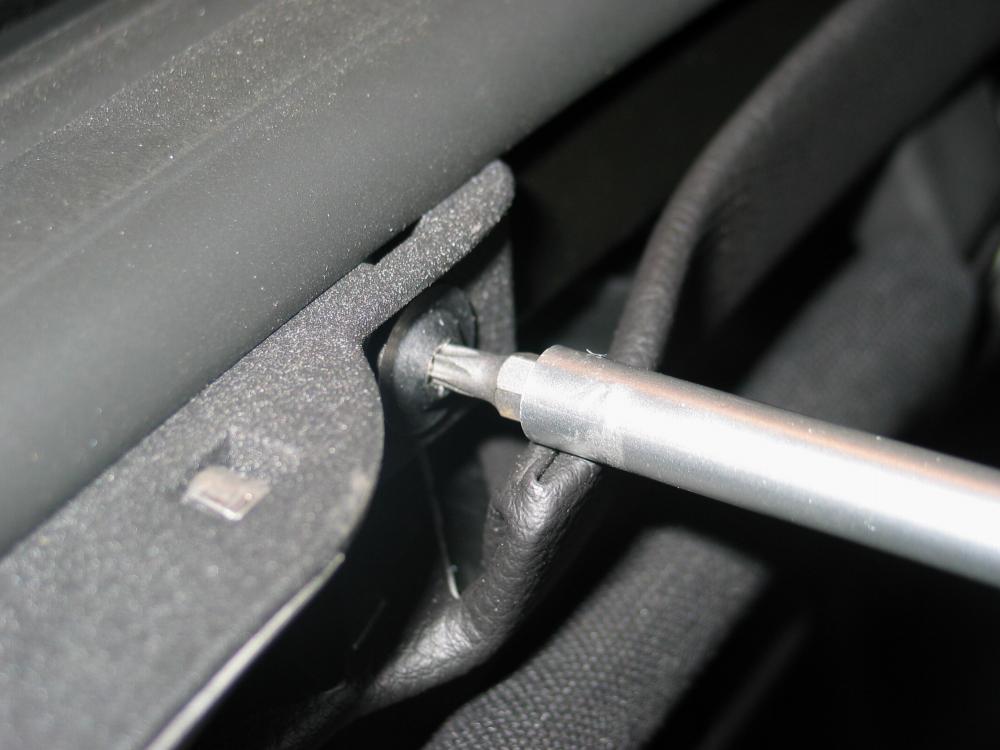
Loosened up the two screws and raised the mounting bracket.
Tightened it up and did the passengers side next.
Roof lines up great now.
Sorry for the dust & fingerprints. She needs some detailing attention
If your dealer neglects to do this or isn’t aware it needs to be done, here’s some DIY instructions explaining how I fixed mine.
Please note, the instructions in the service manual say that you need to remove the visors and headliner to make this adjustment.
My car had enough of a gap in there to adjust the front mount WITHOUT doing this.
Please check your car out and make sure you don’t have to do this the long way without damage.
When I picked up my car after the SMC replacement top was installed the top was noticeably lower in the front.
The very next day I saw posted here that the dealer is supposed to raise the front roof mounting points 1.5mm to 2.0mm to compensate for this.
I didn’t want to take the car back to the body shop so I did it myself.
Here is what I did.
This is the drivers side front roof mount
Notice the adjustment screw if you pull away the headliner piece
It requires a T25 TORX bit
I pulled the headliner back and slipped the screwdriver into place.
Loosened up the two screws and raised the mounting bracket.
Tightened it up and did the passengers side next.
Roof lines up great now.
Sorry for the dust & fingerprints. She needs some detailing attention

The following users liked this post:
UCC (01-12-2019)


 09-03-2006, 10:11 AM
#4
Racer


I have the same problem with my new SMC top. It sits lower and makes a "styroform blocks rubbing together noise" when driving on rough pavement or bumps. When I lower the window a bit the noise goes away so I believe this fix may help. However I wonder how this will affect the fit of my transparent top. Would be a bitch if adjustment was needed every time the roofs were changed.
Any one have any experience with this yet.
Gary
Any one have any experience with this yet.
Gary

 09-03-2006, 10:40 AM
#6
Former Vendor
Member Since: Aug 2005
Location: Loganville GA
Posts: 5,774
Likes: 0
Received 0 Likes
on
0 Posts
Originally Posted by ZMEGO
However I wonder how this will affect the fit of my transparent top. Would be a bitch if adjustment was needed every time the roofs were changed.
Any one have any experience with this yet.
Gary
Any one have any experience with this yet.
Gary
09-03-2006, 02:54 PM
#7
Melting Slicks


Member Since: Mar 2001
Location: El Paso TX
Posts: 2,117
Likes: 0
Received 0 Likes
on
0 Posts

I know GM should have gotten this right from the get go, but....
Seems like this would be a good opportunity for someone to make a permanent extension for the transparent top pins to add a little height without having to adjust the roof mount when you wanted to switch tops.

Matt
Seems like this would be a good opportunity for someone to make a permanent extension for the transparent top pins to add a little height without having to adjust the roof mount when you wanted to switch tops.
Matt
09-03-2006, 03:42 PM
#8
Team Owner

I adjusted my C5 (both roofs) and C6 roof slightly lower than the leading edge to eliminate roof creaking and noises. What's the problem with the roof front edge being low?
09-03-2006, 07:25 PM
#9
Le Mans Master

I'm also wondering about the tranparent top? Is everyone getting new SMC top? I have not put back my painted top ever since I got my transparent top.
09-03-2006, 07:36 PM
#10
Team Owner
Originally Posted by dark_phantom
I'm also wondering about the tranparent top? Is everyone getting new SMC top? I have not put back my painted top ever since I got my transparent top.
09-03-2006, 08:15 PM
#11
Le Mans Master
Member Since: Jan 2005
Location: Thousand Oaks California
Posts: 5,611
Likes: 0
Received 5 Likes
on
5 Posts
Thank you. I was putting this off since I figured removing the windshield header trim and sunvisors was a big job. Nice photos and write up.
I was able to adjust the stricker(s), as per your instructions.
I only have the transparent roof. My original roof cracked about 6 months ago. Ever since I installed the new transparent roof panel, it fits very low on the the W/S header. Also, even though I lubed the weather strips with silicone and I replaced both top pin "guides" as per the bulletin, the roof would still "pop" at the front right side latch area. I thought that maybe since the new roof fits so low, there may be "hard contact" between the roof panel and the W/S header, since i had some "witness marks" in the vinyl W/S header trim near the latch. I hope that raising the W/S header stricker (which allow the roof height to increase) will eliminate the roof poping noise. (No, the roof is not separating).
I do feel it is risky, since the header trim could be easily damaged. Not that a tech at the Chevy store would ever shortcut the procedure in the service manual.
Last edited by calemasters; 09-05-2006 at 11:02 AM.
09-03-2006, 10:20 PM
#12
Team Owner
Member Since: Mar 2006
Location: God Bless America
Posts: 53,282
Likes: 0
Received 3 Likes
on
3 Posts
Shawn,
Regardless if there will be issues with the transparent top or not, very nice thought on your part to take the time to show everyone how to make the adjustment on the new tops. Thanks for the effort and the thoughtfulness. Nice job man, great post.
Regardless if there will be issues with the transparent top or not, very nice thought on your part to take the time to show everyone how to make the adjustment on the new tops. Thanks for the effort and the thoughtfulness. Nice job man, great post.
09-04-2006, 12:30 PM
#13
Racer
Originally Posted by 30YR W8T
Shawn,
Regardless if there will be issues with the transparent top or not, very nice thought on your part to take the time to show everyone how to make the adjustment on the new tops. Thanks for the effort and the thoughtfulness. Nice job man, great post.
Regardless if there will be issues with the transparent top or not, very nice thought on your part to take the time to show everyone how to make the adjustment on the new tops. Thanks for the effort and the thoughtfulness. Nice job man, great post.
Sorry I neglected to thank you for the great write up, nice job.
Gary
09-04-2006, 03:45 PM
#14
Le Mans Master
Originally Posted by Hoonose
Only painted tops are being replaced...
09-05-2006, 12:32 AM
#15
Safety Car

Member Since: Sep 2006
Location: Boca Raton Inlet, Atlantic Ocean (Floridas east coast)
Posts: 3,846
Likes: 0
Received 0 Likes
on
0 Posts
SHAWN, S, Great pics and post about adjusting the SMC roof. I have a question though. Do you think that the new roof is supposed to sit lower so that the wind flows over the top windshield lip and doesnt create turbulence against the new roof panel shell? It may be on purpose as another preventative of separation. I recently had my top fly off while driving and the dealer replaced it with a brand new top, frame and all. I noticed the new top sat lower. Do you really think its a good idea to raise it back?
09-05-2006, 07:18 AM
#16
Drifting

Member Since: Jul 2006
Location: Bridgewater Corners Vermont VT
Posts: 1,482
Likes: 0
Received 0 Likes
on
0 Posts
Originally Posted by D. Togo
SHAWN, S, Great pics and post about adjusting the SMC roof. I have a question though. Do you think that the new roof is supposed to sit lower so that the wind flows over the top windshield lip and doesnt create turbulence against the new roof panel shell? It may be on purpose as another preventative of separation. I recently had my top fly off while driving and the dealer replaced it with a brand new top, frame and all. I noticed the new top sat lower. Do you really think its a good idea to raise it back?
 09-05-2006, 09:39 AM
#17
Team Owner

Does this adjustment affect how the lexan top sits? The lexan top is PERFECT while the new SMC top seems a tad lower. If so I wonder what the consequences are when using the lexan top?
Thanks
Tom
Thanks
Tom
09-05-2006, 10:20 PM
#18
Safety Car
Member Since: Sep 2006
Location: Boca Raton Inlet, Atlantic Ocean (Floridas east coast)
Posts: 3,846
Likes: 0
Received 0 Likes
on
0 Posts
ahhhhhhhhhhhh...........good point Shortski but knowing GM as I stated, it may be another preventative measure, Ill align the roof and hope I dont kill anybody with another flying panel on the interstate. Once was one time too many.
09-08-2006, 11:56 PM
#19
Racer
Member Since: Jul 2004
Location: Schenectady NY
Posts: 313
Likes: 0
Received 0 Likes
on
0 Posts
Great pictures and awesome instructions...but I can't budge either of the two screws in my driver side bracket...and that is the one that I have to move...any idea of what I could do to help them out a little?
09-09-2006, 12:16 AM
#20
Drifting
Member Since: Jul 2006
Location: Bridgewater Corners Vermont VT
Posts: 1,482
Likes: 0
Received 0 Likes
on
0 Posts
Originally Posted by ChuckTu
Great pictures and awesome instructions...but I can't budge either of the two screws in my driver side bracket...and that is the one that I have to move...any idea of what I could do to help them out a little?
