Frustrated beyond belief
 06-01-2006, 02:28 PM
#21
Le Mans Master


I notice that your first link displays a gold M10 x 1 Bubble Flare nut
and lists it as a FORD part. Might be a stocking item at their dealers?
Another link to a stateside source is for Fedhill
Still, as I note above, the 'European' bubble flare nut looks like a
suitable replacement. The threads spec out the same & I checked
thread pitch with a gauge - the slight visual difference is probably
due to different mfg methods.
The one in the pic is from NAPA; I think Pep Boys, Autozone and other
local outlets will carry or be able to bring these in on request. Unless
there is a hidden catch, this route seems the path of least resistance.
A project in the near future will give me an opportunity to test fit
one in my master cylinder and I'll post back with results.
.
 06-08-2006, 04:59 PM
#22
Safety Car


Thread Starter
I got the fitting in yesterday and tried to finish the project but ran into a snag and need some info.
This will be my first ISO flare on a brake pipe. I tested the flare tool out on a old piece of metal pipe I had laying about with discouraging results. It seems that even though the inside of the pipe clamp is "threaded" for grip, the pipe was still sliding out when I started screwing in the ISO flare adapter. I tightened the wing nuts as tight as I could get with a pair of vice grips and the pipe still slides out. I even tried using a hole who's diameter was smaller than the pipe and it still slid out. Got any pointers?
I cut the pipe close to the flare the factory made. When I put the fitting on and then placed the flare pipe clamp on, there wasnt enough pipe left to make an ISO flare. So, now I have to straighten the pipe in order to slide the fitting farther back so I can flare the end. I managed to straighten the pipe so it looks like a lazy "S". There are tons of pipe benders, not so many pipe straighteners. In fact, I havent found anything that will help. I am trying to avoid using pliers since this may crimp the line when I start forcing the line straight. Any thoughts?
I PM'ed Slalom4me and he responded with this:
Anyone else have thoughts on this?
This will be my first ISO flare on a brake pipe. I tested the flare tool out on a old piece of metal pipe I had laying about with discouraging results. It seems that even though the inside of the pipe clamp is "threaded" for grip, the pipe was still sliding out when I started screwing in the ISO flare adapter. I tightened the wing nuts as tight as I could get with a pair of vice grips and the pipe still slides out. I even tried using a hole who's diameter was smaller than the pipe and it still slid out. Got any pointers?
I cut the pipe close to the flare the factory made. When I put the fitting on and then placed the flare pipe clamp on, there wasnt enough pipe left to make an ISO flare. So, now I have to straighten the pipe in order to slide the fitting farther back so I can flare the end. I managed to straighten the pipe so it looks like a lazy "S". There are tons of pipe benders, not so many pipe straighteners. In fact, I havent found anything that will help. I am trying to avoid using pliers since this may crimp the line when I start forcing the line straight. Any thoughts?
I PM'ed Slalom4me and he responded with this:
Originally Posted by Slalom4me
Let me start by saying I have not created an ISO 'Bubble'
flare. I own/use a Snap-On set for single and double imperial
flares.
A flaring tool must hold the material. IMO, a bubble flare
should require the same or less clamping than an inverted/double
flare.
Some thoughts.
The wing nuts need to be tight, but there is a limit. I use the
handle/bar provided for the 'C' shaped mandrel driver to tighten
the wing nuts on mine - place the rod between the ears and twist.
When the two sides of the die block come together on either side
of the tubing and you have a few inch pounds of clamping force,
then any more effort on the wing nuts is only going to lead to
trouble like breaking the wings off the nuts.
The die blocks and the 'threads' are intentionally sized to clamp
enough to hold, but not so much as to crush or score the pipe.
To conclude, if you are using 3/16 Bundy in the 4.75mm die and
the tool will not hold well enough to flare the bubble, I would
consider exchanging the tool for a better one.
About straightening the strain-relief section (pigtail) on the
OEM pipe to provide clearance for the new tube nut and flaring
tool. I agree about avoiding pliers - any object that concentrates
loads into one spot threatens to create a kink.
The coils are pretty tight. I've used my thumbs and fingers on
other projects, working slowly I've opened up enough straight
material. I thought about suggesting coil spring style tubing
benders - these help spread loads but I do not see sets with 3/16".
Maybe someone else will have some suggestions.

As a closing comment, this is not a 'do or die' situation. A
couple of contingencies you may have to fall back on are
flare. I own/use a Snap-On set for single and double imperial
flares.
A flaring tool must hold the material. IMO, a bubble flare
should require the same or less clamping than an inverted/double
flare.
Some thoughts.
- Is it failing to hold for the first of the two contours
that makes up the flare?
. - Was the old sample material a piece of 3/16" Bundy tubing for
hydraulic brake systems (ie: OEM or replacement brake line)?
Another material might be harder with a different surface and
the tool may not be capable of working it. (Practicing on a
sample piece is a superb idea, one I didn't think to suggest
in the thread. If you need some brake line, either get some from
a coil or just buy a pre-made line from one of the auto parts
shops.)
. - You wrote that you tried two die size positions. 3/16" tube
converts to 4.7625mm. Measure your OEM line to confirm, but my
information is that GM used 3/16, so place this size in the 4.75 die.
. - Is the tool a brand name item? I've been happy with ToolAid
items and have read compliments about Old Forge. Did you get the
Astro AST-7827? How does the quality appear? Made in?
Incidently, I see the Astro has 4.75 and 6, no 5mm. There is no
way 3/16 could be clamped securely in a 6mm die.
The wing nuts need to be tight, but there is a limit. I use the
handle/bar provided for the 'C' shaped mandrel driver to tighten
the wing nuts on mine - place the rod between the ears and twist.
When the two sides of the die block come together on either side
of the tubing and you have a few inch pounds of clamping force,
then any more effort on the wing nuts is only going to lead to
trouble like breaking the wings off the nuts.
The die blocks and the 'threads' are intentionally sized to clamp
enough to hold, but not so much as to crush or score the pipe.
To conclude, if you are using 3/16 Bundy in the 4.75mm die and
the tool will not hold well enough to flare the bubble, I would
consider exchanging the tool for a better one.
About straightening the strain-relief section (pigtail) on the
OEM pipe to provide clearance for the new tube nut and flaring
tool. I agree about avoiding pliers - any object that concentrates
loads into one spot threatens to create a kink.
The coils are pretty tight. I've used my thumbs and fingers on
other projects, working slowly I've opened up enough straight
material. I thought about suggesting coil spring style tubing
benders - these help spread loads but I do not see sets with 3/16".
Maybe someone else will have some suggestions.
As a closing comment, this is not a 'do or die' situation. A
couple of contingencies you may have to fall back on are
- Forming a new strain relief section and then replacing
the existing one by splicing the new section in with a tube coupler.
This would free you to flare the existing pipe below the pig tail
where it is straight. My 540 uses OEM brake line tube couplers in
several locations. I do not know with certainty that
BMW uses the ISO/Bubble flare but I recall seeing
this style coupler in the fitting links in the thread.
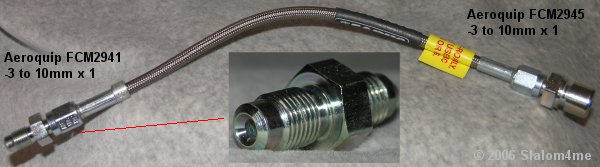
. - Another approach might be to use fittings and braided hose to
complete the tube run. A male Aeroquip FCM2941 (-3 to 10M x 1)
has a combination bubble/inverted tip for the M/C. With a suitable
length of hose and a female Aeroquip FCM2945 (-3 to 10M x 1) to
connect to a new end on the OEM hard line, the line will be
complete.
.
. - Note that Earl's states their SS lines are for off-road use.
It is up to you to determine the fitness of such a modification
for your intended application.
06-08-2006, 11:08 PM
#23
Le Mans Master
I suggested to Performance nut that we continue the
discussion here so that other people can participate.
Did I hit the key points and get the facts right? Who can
join in with experience on forming ISO / Bubble flares?
Let's get PN back on the road...
.
discussion here so that other people can participate.
Did I hit the key points and get the facts right? Who can
join in with experience on forming ISO / Bubble flares?
Let's get PN back on the road...
.
06-08-2006, 11:33 PM
#24
Safety Car
Thread Starter
I went ahead and bought some steel brake pipe from Napa ($3) and practiced on it. For some reason, this pipe stayed put when I clamped it down and I was able to form my ISO flare. I will practice a couple more times before I try on my installed brake lines.
I am still looking for suggestions on how to bend the pipe enough to slide my fitting back so I can flare the end of the pipe.


I am still looking for suggestions on how to bend the pipe enough to slide my fitting back so I can flare the end of the pipe.
Originally Posted by Slalom4me
Let's get PN back on the road...
06-09-2006, 12:55 AM
#25
Safety Car
Thread Starter
Belay my last.
Last edited by Performance nut; 06-09-2006 at 03:15 AM. Reason: Head up my... orifice
06-09-2006, 02:28 AM
#26
Le Mans Master
Originally Posted by Performance nut
I thought the flare on the brake line was an ISO flare. Its not, its a double flare. I tried three times and got similar results. The ISO flare is on the left, the flare that is on my current brake pipe and on the NAPA brake pipe is on the right. I just performed a double flare and it is identical to the one on my car.


What???? Not according to your earlier picture?
Look at these fittings - your OEM is like the Bubble one on the right.
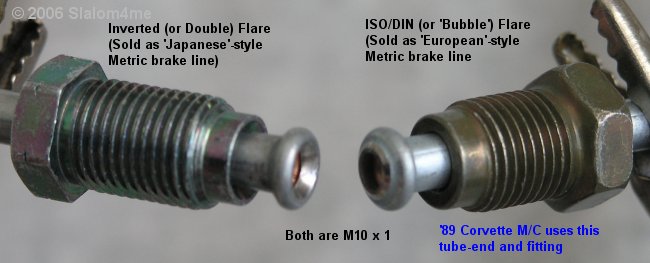
An inverted or double flare needs the left fitting with a recessed
end matching the inverted flare.
.
06-09-2006, 03:14 AM
#27
Safety Car
Thread Starter
I'm glad one of us is paying attention. I have about a dozen pipe bits with flares on them, I lost track of which one was the original. Thanks for setting me straight.
Last edited by Performance nut; 06-09-2006 at 03:18 AM.
06-09-2006, 03:26 AM
#28
Le Mans Master
Whew! You had me going there for a moment. Where would
we be without digi cams, huh?
On your ISO Bubble sample, the backside appears quite flat.
Does the die (that clamps together over the pipe) have a
counter-sunk opening for the pipe end to form into?
.
we be without digi cams, huh?
On your ISO Bubble sample, the backside appears quite flat.
Does the die (that clamps together over the pipe) have a
counter-sunk opening for the pipe end to form into?
.
06-09-2006, 03:50 AM
#29
Safety Car
Thread Starter
Originally Posted by Slalom4me
Whew! You had me going there for a moment. Where would
we be without digi cams, huh?
On your ISO Bubble sample, the backside appears quite flat.
Does the die (that clamps together over the pipe) have a
counter-sunk opening for the pipe end to form into?
.
we be without digi cams, huh?
On your ISO Bubble sample, the backside appears quite flat.
Does the die (that clamps together over the pipe) have a
counter-sunk opening for the pipe end to form into?
.

The recess is small but it is there. It recesses about 45 degrees and it is less than a 1/16" deep.
06-09-2006, 04:08 AM
#30
Le Mans Master
Well, then you should be on the home stretch.
Additional practice might help determine the right way to
'hold your mouth' for best results regarding the shape of the
end. While less clamping might reduce the scoring, it also
raises the chances of the tube slipping - you are short of
room on the target piece, so I'd live with the marks. In no
case will it look as nice as OEM, but the tube nut will cover
a lot.
.
06-09-2006, 04:13 AM
#31
Safety Car
Thread Starter
Originally Posted by Slalom4me
Well, then you should be on the home stretch.
Additional practice might help determine the right way to
'hold your mouth' for best results regarding the shape of the
end. While less clamping might reduce the scoring, it also
raises the chances of the tube slipping - you are short of
room on the target piece, so I'd live with the marks. In no
case will it look as nice as OEM, but the tube nut will cover
a lot.
.
Additional practice might help determine the right way to
'hold your mouth' for best results regarding the shape of the
end. While less clamping might reduce the scoring, it also
raises the chances of the tube slipping - you are short of
room on the target piece, so I'd live with the marks. In no
case will it look as nice as OEM, but the tube nut will cover
a lot.
.

I am not too worried about scoring, the tube nut should be big enough. My concerns at this point are 1) moving the fitting far enough back so I can flare the end (this means bending the already bent pipe) and 2) leverage. Its one thing to do this outside my car, I am almost certain that something will make it more difficult when I attempt it on my car.
06-09-2006, 04:33 AM
#32
Le Mans Master
There's always something that helps. Just make sure
nobody around has their video cam pointed your way.
I don't think the in-car will be too bad (easy for me
to say.) That line terminates somewhere, maybe take
a look to see whether it is a simple matter to remove
it. Would make for easy flushing, too. If so, good, but
my vote is that you don't obsess on this point.
Sorry, no more ideas about straightening. Use thumbs,
go slow?
If you can, leave it to see whether others post here over Friday.
Perhaps additional ideas might come forth. What about posting
a link to this thread over in General-Autocross & RR? Title it
'Brake-line fab help req'd'
.
06-09-2006, 04:04 PM
#33
Safety Car
Thread Starter
Anyone else have some knowledge to add to this thread?
06-16-2006, 01:15 AM
#34
Safety Car
Thread Starter
Its done. Man, what a major PITA that was but its done. The flare is great, the fitting is in, and the lines look somewhat similar to the rear lines (might bend them more later).

I certainly hope this is it...
I certainly hope this is it...
06-16-2006, 02:58 AM
#35
Le Mans Master
Congratulations on doing such a nice job.
Glad it worked out so well for you. The posts you made
here are sure to help others in the future. Judging by
how little traffic there was on the thread, this has been
uncharted territory.
BTW - You didn't need it, but here is the Plan B contingency.
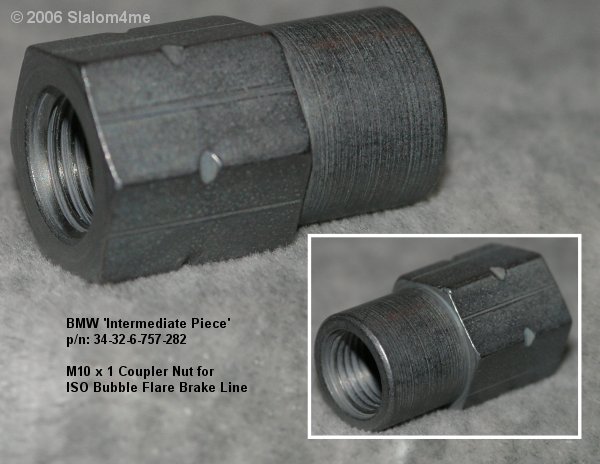
An M10 x 1 coupler nut from BMW, p/n 34-32-6-757-282.
If it had become necessary to cut the line back
and to add an extension section, the coupler nut
is a tidy way to splice a new piece of brake line
into the system. They are used in a number of
locations by BMW as part of an OEM system.
.
Glad it worked out so well for you. The posts you made
here are sure to help others in the future. Judging by
how little traffic there was on the thread, this has been
uncharted territory.
BTW - You didn't need it, but here is the Plan B contingency.
An M10 x 1 coupler nut from BMW, p/n 34-32-6-757-282.
If it had become necessary to cut the line back
and to add an extension section, the coupler nut
is a tidy way to splice a new piece of brake line
into the system. They are used in a number of
locations by BMW as part of an OEM system.
.
06-16-2006, 05:21 AM
#36
Safety Car
Thread Starter
Originally Posted by Slalom4me
Congratulations on doing such a nice job.
Glad it worked out so well for you. The posts you made
here are sure to help others in the future. Judging by
how little traffic there was on the thread, this has been
uncharted territory.
BTW - You didn't need it, but here is the Plan B contingency.
An M10 x 1 coupler nut from BMW, p/n 34-32-6-757-282.
If it had become necessary to cut the line back
and to add an extension section, the coupler nut
is a tidy way to splice a new piece of brake line
into the system. They are used in a number of
locations by BMW as part of an OEM system.
.
This was my first time flaring brake pipe. If someone does read this in the future, some things I learned (yeah, I know, obvious to some):
-Everything I used: ISO flare kit (actually, I bought a combination flare kit that does double flares as well as ISO flares), 1/2" metal spacers (found them at ACE hardware), and a 1/8" to 7/8" pipe cutter (also found at ACE).
-If your flaring tool wobbles when it is extended, your flares won't come out straight. I added spacers under the pipe clamp so the flare tool would not extend as far (lessening the wobble).
-If your cut isnt straight, the flare wont be straight either.
-Make sure the ISO flare fitting touches the pipe clamp before you remove the fitting and clamp (That last 1/32" is a real bitch). Mine came out looking like globes when the fitting didnt touch the clamp.
-I had the clamp on tight to prevent slipping (which happened on my first attempt on the practice pipe). As you can see from the picture, most of the "scaring" is covered by the fitting.
-Dont forget to put the fitting on before you flare the end (a mistake I am glad I avoided). Should also make sure the fitting fits before flaring the end as well.
-Buy a test pipe to practice. It took me 5 tries to get a good flare.
Hope this helps though I hope no one has to do this.

Last edited by Performance nut; 06-16-2006 at 05:31 AM.
06-16-2006, 09:20 AM
#37
Melting Slicks


Very cool! Thanks for keeping this in the open guys. I need to do some brake line work on mine and I have asked a few times about information that appears in this thread with no response so I have kept it on the back burner. The tubing sizes, flare types and contingency info were all concerns and they could not have been addressed better . I can now do some planning and have a little inventory on hand when I begin!
This is one of those great tech threads that everybody should save, you will likely need this info later!
Congrats PN (thanks for wrapping it up too), and thanks to Slalom 4 thoroughnessitivity.
. I can now do some planning and have a little inventory on hand when I begin!This is one of those great tech threads that everybody should save, you will likely need this info later!
Congrats PN (thanks for wrapping it up too), and thanks to Slalom 4 thoroughnessitivity.