Hood Release Cable: Fix it before it fixes you.
 04-22-2006, 07:29 PM
#1
Le Mans Master

Thread Starter


Recently, I felt the hood release was feeling a little more springy and
the hood was a little more reluctant to pop open. Although I have a
hood release tool, I preferred not to wait until the cable broke.
For an '89, the p/n is: #10250486 Cable Asm
Some pointers.

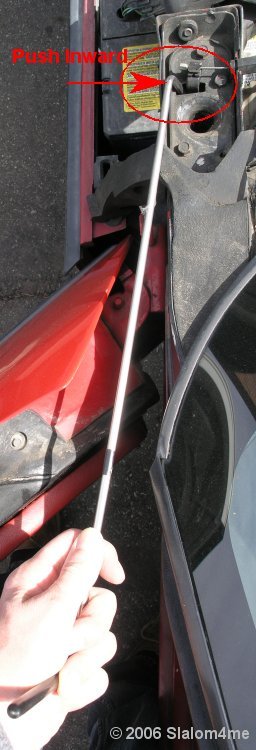
While I hope I won't need to use Gordon Killebrew's Hood Latch Release
tool in the foreseeable future, I realized that I'd never tested it with a
dry run and I didn't know HOW to use it.
Since it is easier to practice when you can see what you are doing, I did
this while the hood was open and took a picture with the thought this might
help someone else down the road.
.
the hood was a little more reluctant to pop open. Although I have a
hood release tool, I preferred not to wait until the cable broke.
For an '89, the p/n is: #10250486 Cable Asm
Some pointers.
- on an '89, there is a push-on 'speed nut' that holds the hush panel in
place above the toes between the brake and gas pedals. For best results, use
a fork-shaped upholstery tool to remove this - or pry it off with a screw driver. - once the small rectangular trim panel surrounding the release lever has been
removed, use a mirror to see the Phillips screw that holds the lever and the
cable retaining clip in place. Look for it ahead of the ends of the cable
housings. Work the Phillips up between the two cables at an angle - should be
perpendicular to the release handle. - although it looks like the sound underlay needs to come out to reach the
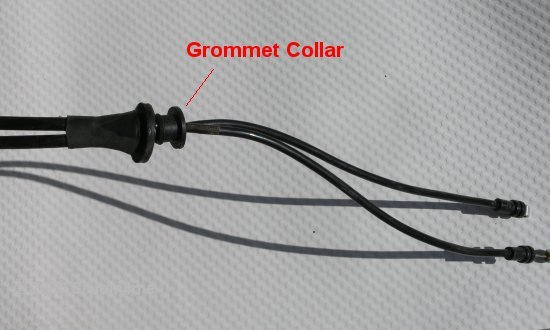
grommet, this is not the case. I was able to pull up the edge of the underlay. - there is a round plastic collar inserted into the cone shaped grommet where
the cables pass through the firewall. You can see it in the picture below.
This needs to move back out of the grommet toward the passenger compartment.
After trying to grab it from the inside of the pass compartment, I changed tactics
and used a large screw driver to push through the grommet against the collar from
the engine compartment. A patient person could probably do this without tearing
the grommet.
While I hope I won't need to use Gordon Killebrew's Hood Latch Release
tool in the foreseeable future, I realized that I'd never tested it with a
dry run and I didn't know HOW to use it.
Since it is easier to practice when you can see what you are doing, I did
this while the hood was open and took a picture with the thought this might
help someone else down the road.
.


 04-23-2006, 07:31 AM
#3
Burning Brakes

Member Since: Aug 2005
Location: It's Bad Ass in Black! Macomb, MI
Posts: 1,148
Likes: 0
Received 0 Likes
on
0 Posts

Changed mine last year. I did not have the tool last year. I had to take the pass. side wheel and wheel well off, stick my arm up there and move the locking device by hand, but I did it! Too bad I can't figure out how to make my hood pop up! It is loose, I just have to pull it up.
Too bad I can't figure out how to make my hood pop up! It is loose, I just have to pull it up.
 04-23-2006, 05:44 PM
#5
Originally Posted by AGENT 86
Awhile back someone posted on how to add a zip tie to the latch for emergency entry. Anyone got that pic 
LOCAL BUILDERS SUPPLY STORE AND 4 "CRIMP" LUGS (SO-TO- SPEAK).
2).......I DRILLED A SMALL HOLE IN THE HOOD LATCH PIN RECEIVER
AND FISHED THE WIRE THROUGH THE HOLE AND WRAPPED
SNUGLY AROUND THE HOOD LATCH "ARM" OF WHICH THE HOOD
LATCH CABLE IN THE CAR IS ATTACHED TO.
3)......I THEN CRIMPED THE WIRE TO ITSELF USING THE LUGS AS
MENTIONED ABOVE.
THE OTHER END OF THE WIRE LAYS IN AND NEAR THE WINDSHIELD WIPER ARMS (AND OUT OF SITE).
4).....I THEN TOOK SOME CLEAR OXYGEN TUBING (ANY VACUUM LINE
TUBING WILL WORK WELL) AND FISHED THE WIRE THROUGH IT.
5)......I THEN TOOK THE END OF THAT WIRE AND CRIMPED IT TO
ITSELF.
6)......LASTLY, I LUBED THE HINGE PIN RECEIVER LEVER AND WIRE AND
TUCKED IT OUT OF SIGHT DEEP IN THE WIPER COMPARTMENT.
NOTE;...BE SURE ALL ADJUSTMENTS ARE MADE SO THAT THERE IS SLACK IN THE WIRE AT REST SO THAT THE HOOD WILL LATCH NORMALLY AND THAT THERE IS ENOUGH SLACK TO GRAB THROUGH THE WIPER COMPARTMENT IN CASE OF CABLE FAILURE.
http://i27.photobucket.com/albums/c1...n/DSC00006.jpg
http://i27.photobucket.com/albums/c1...n/DSC00005.jpg
http://i27.photobucket.com/albums/c1...n/DSC00004.jpg
sorry about the caps as i forgot to kill it. i am also not sure how to resize these picts, so if they are huge, sorry 'bout that!
Last edited by Da Mail Man; 04-23-2006 at 06:31 PM.
04-23-2006, 06:26 PM
#7
Originally Posted by Vis Croceus
Nice! You should submit this as a tech tip. 
hey, let me ask you a question...are the pages loading up very slowly for you and also, are you able to click on the pict links and pull up the picts?...
the reason i ask is because since the forum was down for maint a few weeks ago, i have been having this trouble and also cannot view picts.......please advise and thanks!
04-23-2006, 07:25 PM
#9
Originally Posted by thecatmac
Here is one of your pictures, I think its wold be a good write-up!
[IMG]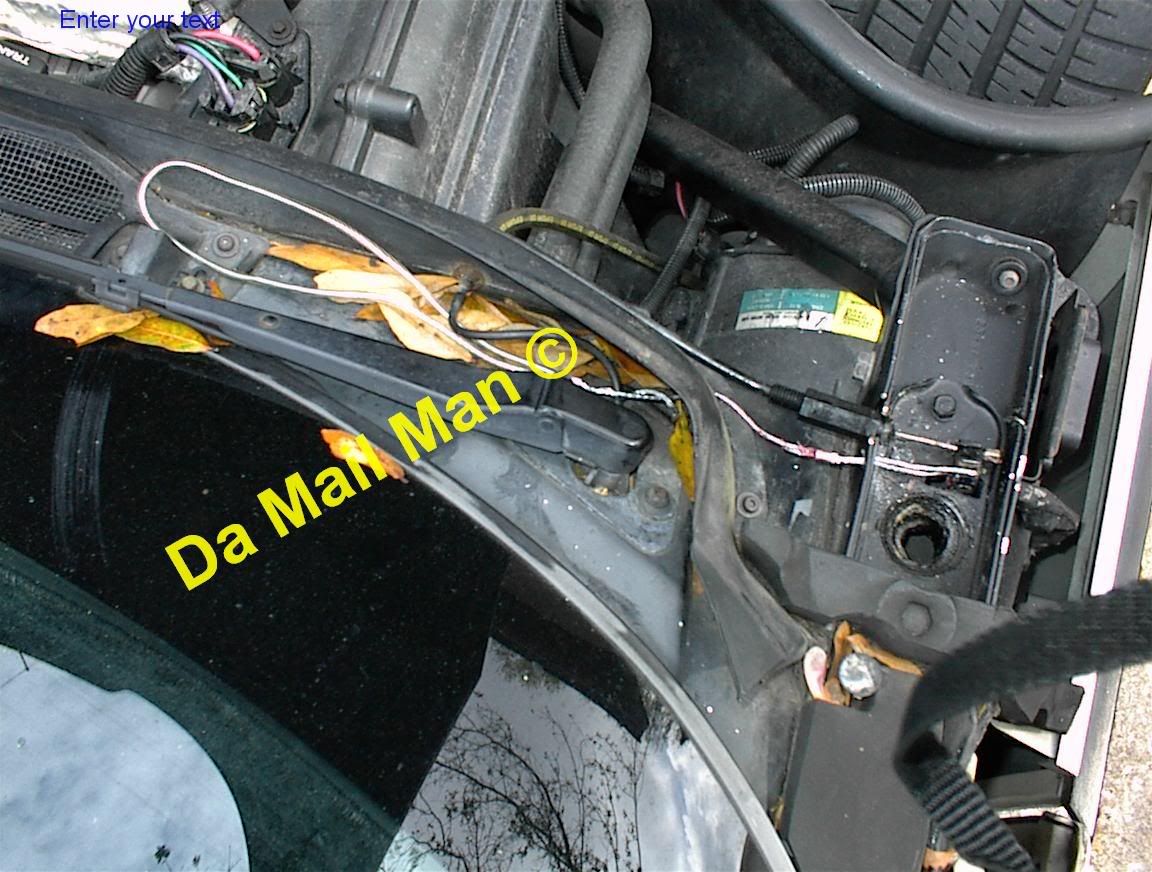 [/IMG]
[IMG]
[/IMG]