
Started engine teardown today, having second thoughts
 02-26-2006, 06:34 PM
#1
Drifting

Thread Starter
Member Since: Aug 2005
Location: East Waterboro Maine
Posts: 1,289
Likes: 0
Received 3 Likes
on
1 Post

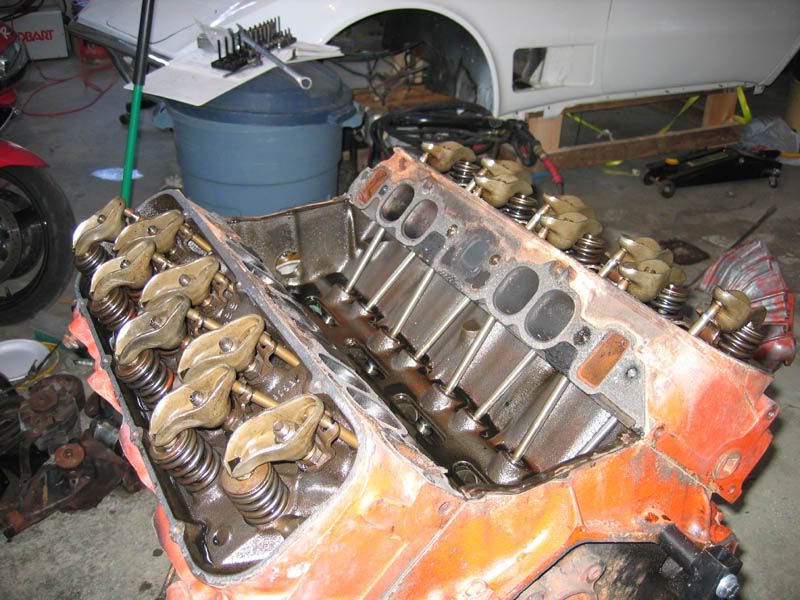
As the title says I started tearing down my 73 454 today and now I'm second-guessing myself. Originally, my plan was to redo the top end only (cam, heads, intake, & carb) and leave the bottom end alone since there didn't seem to be any noticible issues with the way it ran, not to mention I could save a fair bit of $$ this way. As I was taking things apart today I started wondering if this approach is "penny wise and pound foolish". It's an awful lot of work to do this type of stuff and it would be really annoying to have to do it all over again if something goes wrong in the bottom end in the future. 
Based on my initial (visual) inspection things look to be in decent shape. So what do you folks think? Am I just being paranoid? Any suggestions? The plus side to doing the bottom end would be installing new dome pistons to get the CR up a bit, the stock CR is 8.5:1

Based on my initial (visual) inspection things look to be in decent shape. So what do you folks think? Am I just being paranoid? Any suggestions? The plus side to doing the bottom end would be installing new dome pistons to get the CR up a bit, the stock CR is 8.5:1

 02-26-2006, 06:55 PM
#4
Race Director

The engine is out and heads removed. NOW IS THE TIME!! Rebuld bottom with the flat tops you have if the bore is within limits with new rings and bearings. Flattops are excellent performance pistons for street. Buy a set of smaller chamber aluminum heads to bump the compression. Install a cam, carb and intake to compliment the new comp ratio. A complete Edelbrock RPM Performer kit is an economical choice and they are matched. No brainwork. Includes cam lifters heads pushrods intake carb all matched to compliment each other and economicaly price for what you get. Nice street setup for a Big block all the extra cost doing this is the rings, bearings and honing compared to what you are doing anyway and you can sleep at night. Good luck on the build 
02-26-2006, 07:10 PM
#5
Melting Slicks

Member Since: Nov 2004
Location: Pineville Kentucky
Posts: 2,540
Likes: 0
Received 1 Like
on
1 Post
CI 6-8-9 Veteran
Man, you are me 4 weeks ago. I had a wiped lifter/cam and was going to go thru the TOP end of the car and replace the engine especially since it had just been done about 5,000 miles ago. I would advise you to DEFINITELY do an entire rebuild. You have the biggest job done and this build should last you a lifetime. I would NOT advise you to do what I did. Buy a roller shortblock and added alumuminum heads,intake, roller rockers,billet pulleys,Lakewood bellhousing, Keisler 500 TKO tranny.($10k later  ) But DAMN it sure does look good!
[IMG]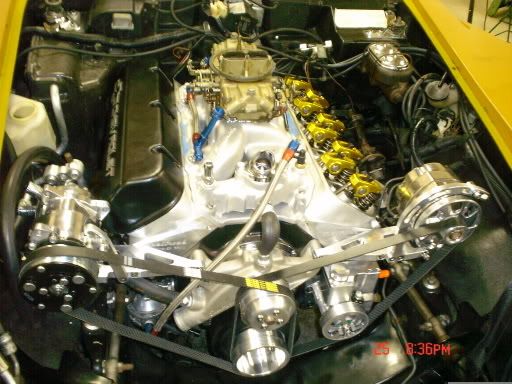 [/IMG]
) But DAMN it sure does look good! [IMG]
[/IMG]
02-26-2006, 07:13 PM
#6
Le Mans Master


I would definitely go the refresh route with a re-ring kit (fresh bearings and rings). Get the crank polished and measured for the new bearings, check the rod condition and size the rod bearings, Hot tank/clean the short block and lay down a fresh cylinder hone on the cylinder walls and good set of moly rings. Clean the tops of the pistons, fresh oil pump, freeze plugs and gasket set and you are good to go. Not a whole lot of cost considering the peace of mind knowing it will be good to go another 100k+ miles.
02-26-2006, 07:54 PM
#8
Melting Slicks
Member Since: Nov 2004
Location: Pineville Kentucky
Posts: 2,540
Likes: 0
Received 1 Like
on
1 Post
CI 6-8-9 Veteran
Originally Posted by Maine Vette
Thanks for the advice guys, I appreciate it. Looks like I'll be asking around for a good machine shop this week.
 02-26-2006, 08:12 PM
#9
Drifting
Originally Posted by 2th farmer
I would NOT advise you to do what I did....($10k later )....
)....Go for a total rebuild, stroke it while you're at it. Aluminum heads, retro roller cam, the works...700HP
03-03-2006, 01:54 PM
#10
Drifting
Thread Starter
Member Since: Aug 2005
Location: East Waterboro Maine
Posts: 1,289
Likes: 0
Received 3 Likes
on
1 Post
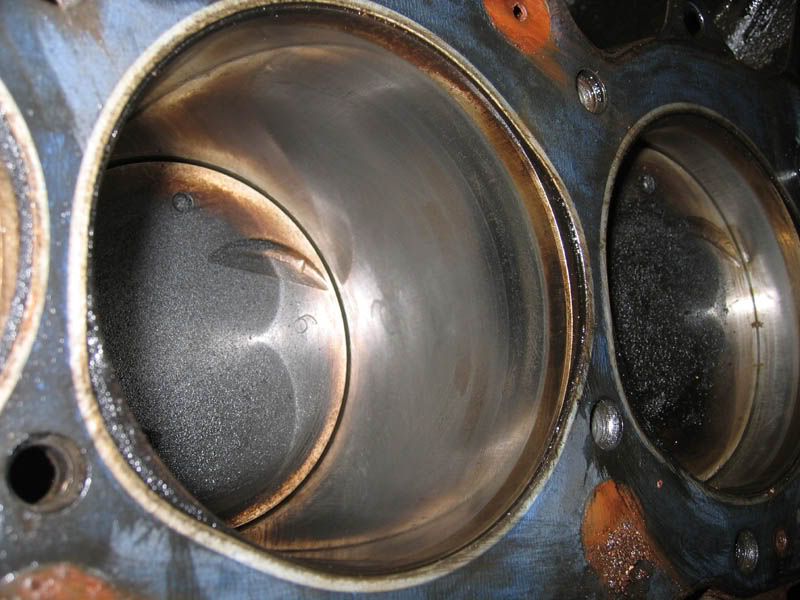
Ok, so here's a little update. I took the day of today to get a little work done on my motor. Let's just say I'm really, really glad I decided to go through the bottom end. I've only got the first 4 pistons assemblies out, heres a photo of the #1 cylinder piston lower compression ring and connecting rod bearings.

 03-03-2006, 03:13 PM
#12
Race Director
Member Since: Jan 2000
Location: Corsicana, Tx
Posts: 12,641
Received 1,911 Likes
on
931 Posts
2020 C2 of the Year - Modified Winner
2020 Corvette of the Year (performance mods)
C2 of Year Winner (performance mods) 2019
2017 C2 of Year Finalist

Good catch!
That engine has been into before. Those were Felpro blue headgaskets on there. So either it's had a quicky rebuild or someone just did the heads.
Look at back of bearings and see what marking are on there. OEM original bearings will be different than replacements. Check to see any sizes on them....STD.....001.....010....020....03 0 etc.
The pistons look to be original, so my guess is it had a ring and bearing job maybe in it's life. Those marks on the bearings are from trash that likely went through it when it was first started after rebuild.
You will need to have cylinders measured for size and taper to see what you have and to make sure it hasn't been bored already...but replacement pistons are usually configured different on the top.
It also looks like a plastic timing chain gear in it..so that is strange if it was rebuilt...unless it had a real quicky one in the car.
It was getting oil in the chambers too....you can see all of it on the piston deck, the crevice around head gasket and the top of bores.
Might be time to get new pistons and do it right. Depends on your goals....get crank checked to make sure it's OK. If you have to get a new one it's just as cheap to stroke it to a 496!
OK, people always accuse me of going off the deep end...but I would get forged pistons with at least small domes to get compression up around 10.0 with those heads. Use your crank, get a cam and freshen up heads. Some pocket port work can really help here!
JIM
 03-03-2006, 04:31 PM
#14
Race Director
Member Since: Jan 2000
Location: Corsicana, Tx
Posts: 12,641
Received 1,911 Likes
on
931 Posts
2020 C2 of the Year - Modified Winner
2020 Corvette of the Year (performance mods)
C2 of Year Winner (performance mods) 2019
2017 C2 of Year Finalist
That's where you port on the heads inside the "pocket". When you dissassemble them and pull the valves out, the area of the port just under the valve head that turns back toward the intake manifold is the "pocket" This is where power is made or lost. A couple of hours work in there with a grinder and polishing rolls can add 30-40 hp. You are cleaning up all the casting lines and smoothing the port out. Not necessarily making it a lot bigger...just a lot smoother.
What's the casting numbers on your heads? Are the last 3 digits 049 maybe? It appears that you have the larger oval ports which are good. They will have open chambers which is good as long as you put some pistons in there to get compression up. They said those 454's had 8.0-8.5 compression....reality it was more like 7.8 on a good day often. And when someone put a thicker blue gasket on it than the factory used, it just made it worse.
It does look like you have double valvesprings in it. Does it have an aftermarket cam?
You could use a set of open chamber 11.0 pistons and end up with maybe 10.5-10.8 without messing with heads or decks. Or you could use 11.0 closed chamber pistons and end up with maybe 10.0-10.2. Small dome 10.25 type pistons will end up around 9.8 or so. You also have to be careful..many cheaper aftermarket pistons are made shorter to allow for block decking and the piston ends up even further down the hole at TDC...which hurts again on compression.
Good news is you have a great starting point for a very strong engine using your heads, crank and rods. Change pistons and cam and a little head work etc etc...and you can be in the 500-550 hp range without much effort.
JIM
03-03-2006, 04:45 PM
#15
Safety Car


I'd do it in a heartbeat, if you have the funds. All the hard work is half done, and a decent set of pistons, a double roller chain, that cam you will want to add, and a bit of head work will be so worth it! You have no idea how much horsepower just a mild upgrade provides when you have that much engine to start with.
Hans
Hans
03-03-2006, 05:39 PM
#16
Drifting
Thread Starter
Member Since: Aug 2005
Location: East Waterboro Maine
Posts: 1,289
Likes: 0
Received 3 Likes
on
1 Post
Thanks for the input Jim,
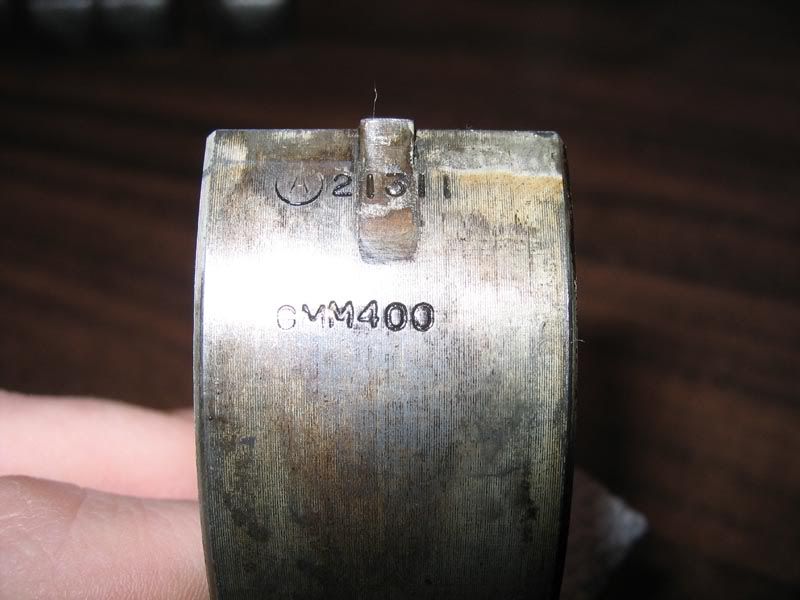
It looks like the main and connecting rod bearings are stock, the main bearings are stamped 5 73 which I imagine is the date of manufacture.
Connecting rod bearing stamp:
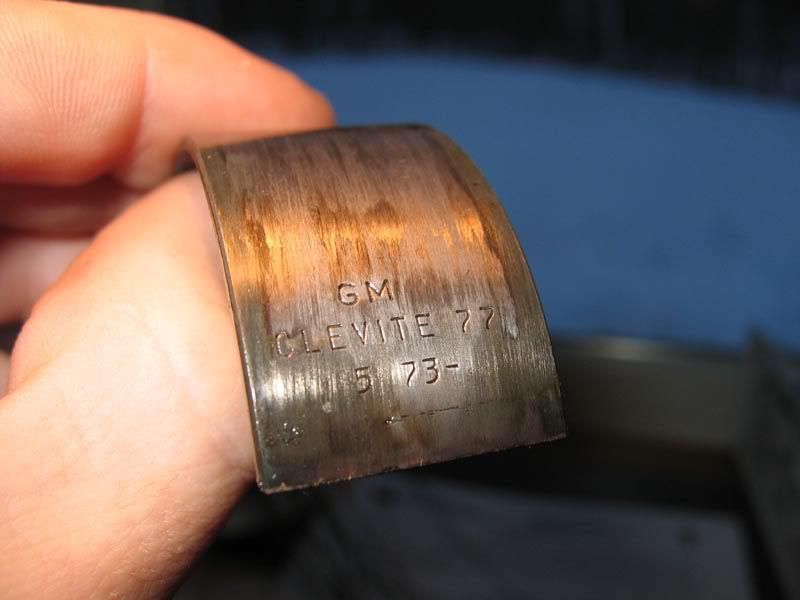
Main bearing stamp:
The shortblock is a 73 (casting #3999289) which is not original to the car (1971). However, I think the heads are original to the car (casting #3993820). They are oval ports, 113cc, 2.06 intake / 1.72 exhaust. I guess that explains why it had felpro gaskets (which took a total of 15 seconds to remove, real easy ). The upper timing gear is nylon/plastic, I thought that was what came from the factory. At this point I have no idea what cam I have, but it's being replaced anyhow.
My plan was to keep the original pistons and use some aluminum heads with smaller chambers to get the compression ratio up a bit. I may do a combination of new pistons and heads though depending on whether I need to bore the engine. I cant feel much of a ridge at the top of the cylinders though so a ridge ream and hone may suffice.
The thought of stroking the engine crossed my mind, I'm not sure I'd do it though unless the crank is no good. We'll see what the machine shop has to say when they check things out. I do have a little concern about the crank being straight based on what I saw from the main bearings (working on those photos next).
As much as I'm trying to do this job right, I still want to avoid sinking $10k into my motor. I still have a long way to go on my resto and my original budget is already somewhere far behind me in a cloud of dust.
It looks like the main and connecting rod bearings are stock, the main bearings are stamped 5 73 which I imagine is the date of manufacture.
Connecting rod bearing stamp:
Main bearing stamp:
The shortblock is a 73 (casting #3999289) which is not original to the car (1971). However, I think the heads are original to the car (casting #3993820). They are oval ports, 113cc, 2.06 intake / 1.72 exhaust. I guess that explains why it had felpro gaskets (which took a total of 15 seconds to remove, real easy
). The upper timing gear is nylon/plastic, I thought that was what came from the factory. At this point I have no idea what cam I have, but it's being replaced anyhow.My plan was to keep the original pistons and use some aluminum heads with smaller chambers to get the compression ratio up a bit. I may do a combination of new pistons and heads though depending on whether I need to bore the engine. I cant feel much of a ridge at the top of the cylinders though so a ridge ream and hone may suffice.
The thought of stroking the engine crossed my mind, I'm not sure I'd do it though unless the crank is no good. We'll see what the machine shop has to say when they check things out. I do have a little concern about the crank being straight based on what I saw from the main bearings (working on those photos next).
As much as I'm trying to do this job right, I still want to avoid sinking $10k into my motor. I still have a long way to go on my resto and my original budget is already somewhere far behind me in a cloud of dust.
03-03-2006, 07:37 PM
#17
Drifting
Thread Starter
Member Since: Aug 2005
Location: East Waterboro Maine
Posts: 1,289
Likes: 0
Received 3 Likes
on
1 Post
Well, I finished tearing down the engine today. I'm pretty glad I did it at this point since some of the bearings are showing some significant damage and wear.
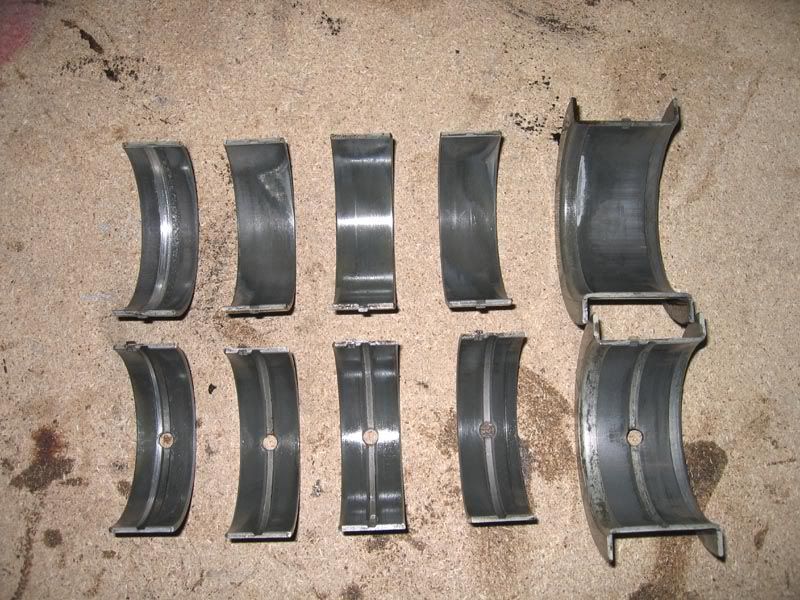
Below are the main bearings in order of front (left) to back (right). Some of the wear patterns seem kind of odd to me, I'll be sure to have my machinist check to ensure the crank is straight and that the journals are true.
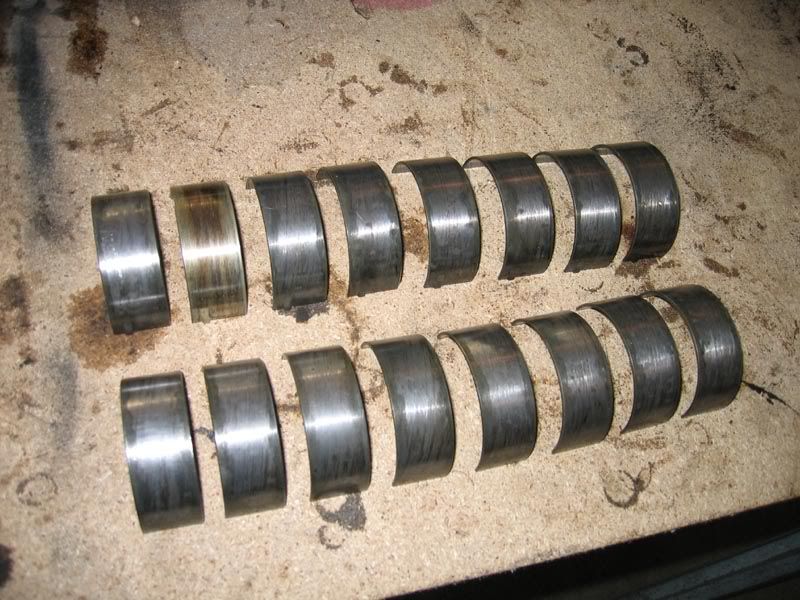
Here are the inside faces of the connecting rod bearings, again ordered from cyl. #1 (left) to cyl. #8 (right). #1 and #5 cause me some concern. I thought the stock bearings came with lead babbit bearings but the #1 bearing seems to have a copper babbit. Maybe someone has been in here before me...

Below are the outside faces of the connecting rod bearings. Notice the discoloration of the upper portion of bearing #2. What would cause a discoloration to only the top half of a bearing like this? It seems odd since the lower portion of the bearing looks fairly normal.
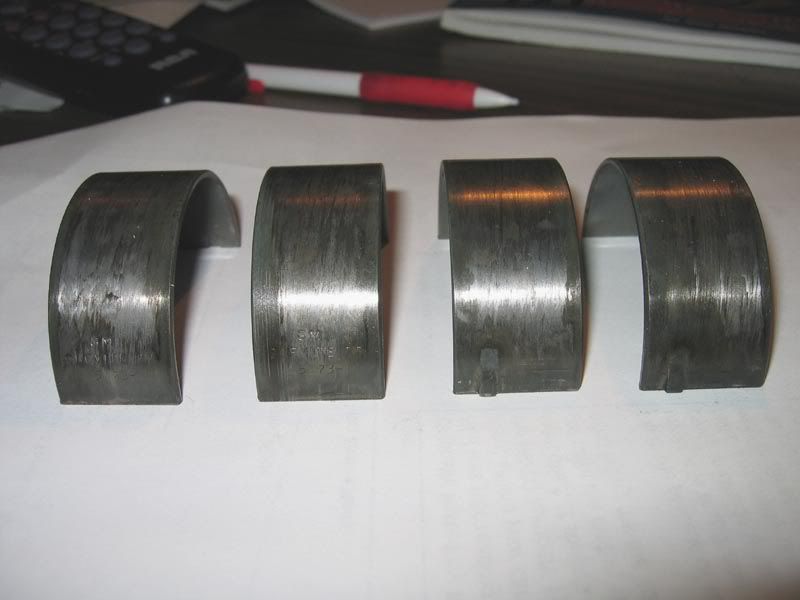
Here is a close-up of the outside faces of a few of the connecting rod bearings, is the blotchy/streaky appearance normal? I noticed that when I removed them some were bone dry between the outside of the bearing face and connecting rod while others seemed to be lubricated. Thankfully, they all seemed to be well lubricated between the bearing and crank journal though.
Any input would be appreciated. I'll be replacing all these bearings as part of my rebuild, but hopefully reading the bearings will clue me into any other problems that may existing.
Below are the main bearings in order of front (left) to back (right). Some of the wear patterns seem kind of odd to me, I'll be sure to have my machinist check to ensure the crank is straight and that the journals are true.
Here are the inside faces of the connecting rod bearings, again ordered from cyl. #1 (left) to cyl. #8 (right). #1 and #5 cause me some concern. I thought the stock bearings came with lead babbit bearings but the #1 bearing seems to have a copper babbit. Maybe someone has been in here before me...
Below are the outside faces of the connecting rod bearings. Notice the discoloration of the upper portion of bearing #2. What would cause a discoloration to only the top half of a bearing like this? It seems odd since the lower portion of the bearing looks fairly normal.
Here is a close-up of the outside faces of a few of the connecting rod bearings, is the blotchy/streaky appearance normal? I noticed that when I removed them some were bone dry between the outside of the bearing face and connecting rod while others seemed to be lubricated. Thankfully, they all seemed to be well lubricated between the bearing and crank journal though.
Any input would be appreciated. I'll be replacing all these bearings as part of my rebuild, but hopefully reading the bearings will clue me into any other problems that may existing.
 03-03-2006, 10:05 PM
#19
Burning Brakes

Member Since: Apr 2004
Location: Des Allemands LA
Posts: 847
Likes: 0
Received 0 Likes
on
0 Posts
Have you looked closely at your balancer and flywheel for anything out of the ordinary? It also wouldn't surprise me if the block needed to be align bored, I may be wrong but it looks to me like an alignment/harmonics issue happening. Also what did the thrust portion of the crank look like? You may be alright with turning the crank but something just doesn't look quite right to me from the pictures-of course I have had a couple of cold beers so....
ltlevil
ltlevil
03-03-2006, 10:44 PM
#20
Le Mans Master
Member Since: Oct 2002
Location: Las Vegas - Just stop perpetuating myths please.
Posts: 7,098
Received 373 Likes
on
356 Posts
Nice timing as it looks like u saved the motor from major damage.
Minimum have the crank polished or turned down for larger brgs.
Can't tell from ur pix the milage on eng or bore wear?
And its really ur call on reboring or just fresh'n bores with a hand hone and install new rings.
Since u allready have fairly flat flat-top pistons u would need to install domed pistons to increase compression.
But if using original pistons or flat-top replacements some cheaper ways to increase compression is to zero deck the block and shave the heads (or even angle mill). This can get u another point of compression but remind urself u need to shave the intake to match the shaved heads.
And boring will increase the c.r. also. So just my 2 cents - i would waite and see if boring with new pistons needed and crunch the numbers looking for a more desireable c.r. with just block decking and boring - then just shop around for pocket porting heads (shouldn't be more than $250 for PP).
If no boring or pistons needed then maybe time for tighter heads but BB heads just ain't cheap. I guess what i'm saying is that u need to find out how much to need to replace and re-evaluate/crunch the numbers again for c.r. to get ur 9.0 to 9.5 (well thats what i would want if using iron heads). And really a mild BB makes plenty of torque to have fun with. Another advantage to a low c.r. eng is they will take a beating and last forever. It sounds like ur more interested in a good running eng with fewer problems but has some pwr than a wound up hi-po mtr thats an animal to drive on the street (let alone cost u big $$$$).
U need to buy cheap calibrated tube/vile and a plexaglass plate to measure the head chambers and piston volumes for urself (while engine out and apart) - don't use bubbas guesstimates off the internet.
Well thats enough for now. My guess is < $1000 to get u back on the road. When u get some parts back from the machinist let us know if u need help.
cardo0