
Did my tag lights with LEDs!!!
 03-17-2005, 10:25 PM
#1
Advanced

Thread Starter

Member Since: Mar 2004
Location: raytown mo
Posts: 89
Likes: 0
Received 0 Likes
on
0 Posts

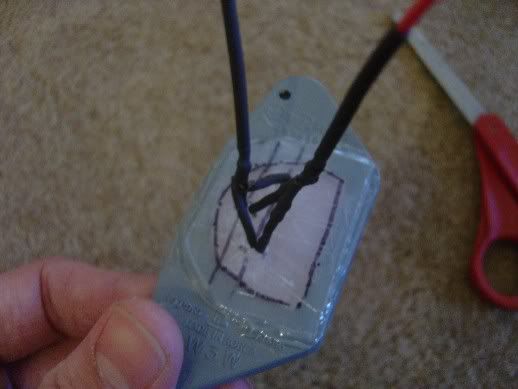
After seeing some members do their license plate lights, i decided to do something similar. I bought some Clear Casting Resin (plastic) at a craft store for $10.00. I had to buy the hardener also ($5.00). I took the plugs out, and then mixed the resin about 2 inches thick , then poured the mixture into the plug opening. Then placed the LED's (2 5MM' Blue LEDs from Oznium) into the mold and let it set for the night. Then i installed them in the morning... Here are some pics.... Took about an hour total, most of which was soldering the LED's etc.. Another tip was to use a 9V battery attached to 2 wires to test the LED's before setting them in plastic. They work great, no heat issues or anything..
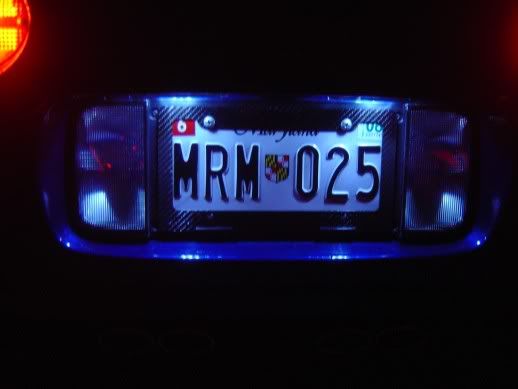
Pretty easy to do and the end result looks great, not too bright, but bright enough to see the plate. I was going to do the Rear View mirror lights, but found out they are much different from the 2001 Vette from SpldKilz's site. Mine is a 99 Vette and didnt have any LED's in there, just (2) 212-2 bulbs, easy enough, i ordered 2 of the Blue LED ones from ebay for $13.00 total so no more soldering for me for awhile...


Pretty easy to do and the end result looks great, not too bright, but bright enough to see the plate. I was going to do the Rear View mirror lights, but found out they are much different from the 2001 Vette from SpldKilz's site. Mine is a 99 Vette and didnt have any LED's in there, just (2) 212-2 bulbs, easy enough, i ordered 2 of the Blue LED ones from ebay for $13.00 total so no more soldering for me for awhile...

 03-17-2005, 10:43 PM
#3
Team Owner

I like it - good idea
 03-17-2005, 10:52 PM
#6
Supporting Tuner


Schweeetttt!!! 
EG

EG
 03-18-2005, 12:19 AM
#8
Le Mans Master

looks good man!! I originally did mine with the 2 white LED's but switched it up to 3 white LED's because it wasn't bright enough...
(unpainted)

(unpainted)
Last edited by CUlookin; 03-18-2005 at 12:31 AM.
03-18-2005, 12:28 AM
#9
Advanced
Thread Starter
Member Since: Mar 2004
Location: raytown mo
Posts: 89
Likes: 0
Received 0 Likes
on
0 Posts
Right now, (2) 5mm Leds seem to work just right. If i need to add another one, doesn't seem to be a big deal, i am sure i can push one into the resin. Its not hard plastic, but more of a molded plastic...
Thanks to everyone for the comments, it wasn't alot of work, and my soldering problems (problem being i am not very good) caused to project to be an hour or so. If your a pro, i am sure you can do it in less than 45 minutes ...
Total cost with LED's about $20.00 or so.. I love the cheap Mods
Thanks to everyone for the comments, it wasn't alot of work, and my soldering problems (problem being i am not very good) caused to project to be an hour or so. If your a pro, i am sure you can do it in less than 45 minutes ...
Total cost with LED's about $20.00 or so.. I love the cheap Mods
03-18-2005, 12:48 AM
#10
Drifting

Member Since: Jun 2000
Location: Northwest Suburbs of Chicago IL
Posts: 1,335
Likes: 0
Received 0 Likes
on
0 Posts
Originally Posted by CUlookin
looks good man!! I originally did mine with the 2 white LED's but switched it up to 3 white LED's because it wasn't bright enough...
(unpainted)
(unpainted)
 That would match my HIDs From where did you buy your parts... how did u do that?
 Thanks
03-18-2005, 09:34 AM
#12
Safety Car

Another way to do this is to use a thin piece of clear plastic as a mold bottom shaped as a rectangle large enough to overlap the mounting holes in the car. Use aluminum tape around the sides of the plastic so that there is at least a 1/2" wall. Place the leds, resistors, any circuit board and wire ends so they will all be inside the 1/2"+ deep cube then the pour in clear cast to cover it all. When the resin has cured just peel away the aluminum tape; place the cube in the car and drill thru using the car mounting holes. Two long 4-40 or 6-32 SS machine screws with nuts secure the cube to the car. A connector can be made using the old bulb by breaking the glass and attaching the led wires to the bulb wires with silver epoxy then normal epoxy to cover that. If you ever want to go back to the old lamps it's easy. There is plenty of room to make the led cube thicker; the important thing is to cover all the leds, etc. with something to keep out moisture. It only takes a few weeks for water to ruin exposed leads or wires.
 03-18-2005, 01:01 PM
#15
Administrator


Member Since: Mar 2001
Location: In a parallel universe. Currently own 2014 Stingray Coupe.
Posts: 342,953
Received 19,293 Likes
on
13,966 Posts
C7 of the Year - Modified Finalist 2021
MO Events Coordinator
St. Jude Co-Organizer
St. Jude Donor '03-'04-'05-'06-'07-'08-'09-'10-'11-'12-'13-'14-'15-'16-'17-'18-'19-
'20-'21-'22-'23-'24
NCM Sinkhole Donor
CI 5, 8 & 11 Veteran


Nice job on the lights. I like the way they look.