

 02-20-2015, 01:03 PM
Last edit by: IB Advertising
See related guides and technical advice from our community experts:
Browse all: Exterior How-Tos
- C6 Corvette Favorite C6 Picture Gallery
Important information to help you understand your Corvette..
Browse all: Exterior How-Tos

C6 FAQ (Frequently Asked Questions)
04-15-2006, 11:28 AM
#121
Get Some!


...
Originally Posted by Shawn S
I’ve been using the V1 since it was available back in 1992 so of course there was one going in the vette.
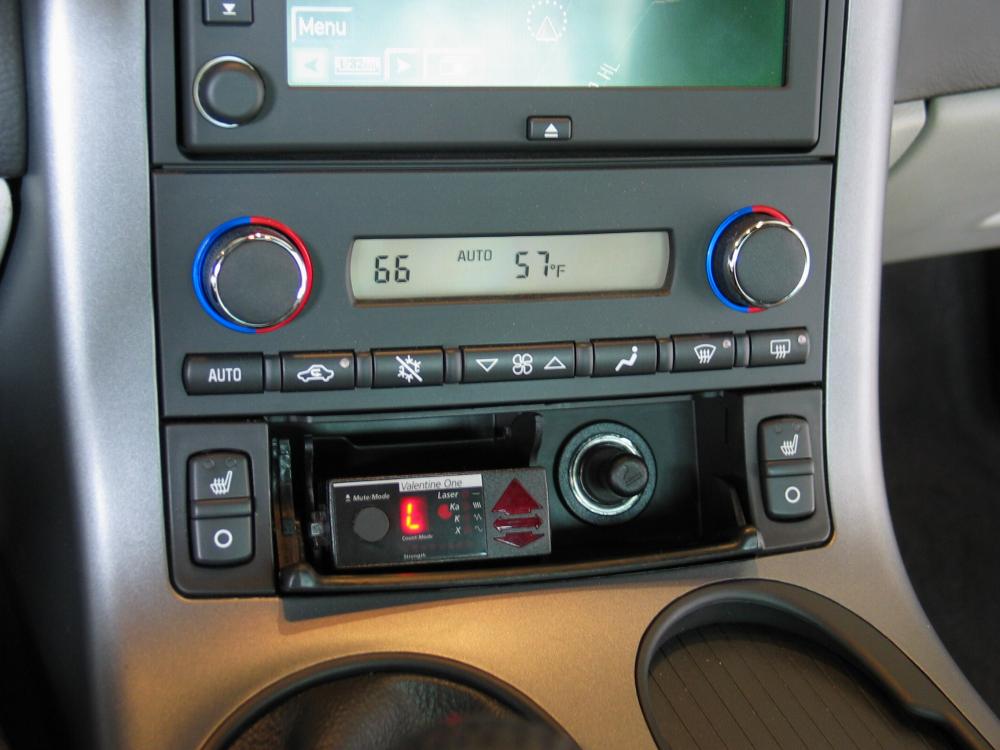
Problem is, I couldn’t find a good spot for the remote display.
In other cars I’ve installed it right on top of the steering column, but in the Corvette the DIC would be blocked if you did that.
So I decided to install it into the unused ashtray location just forward of the center console.
I took some photos along the way in case anyone want to duplicate this install.
I don’t think I’ve seen anyone here mount it this way.
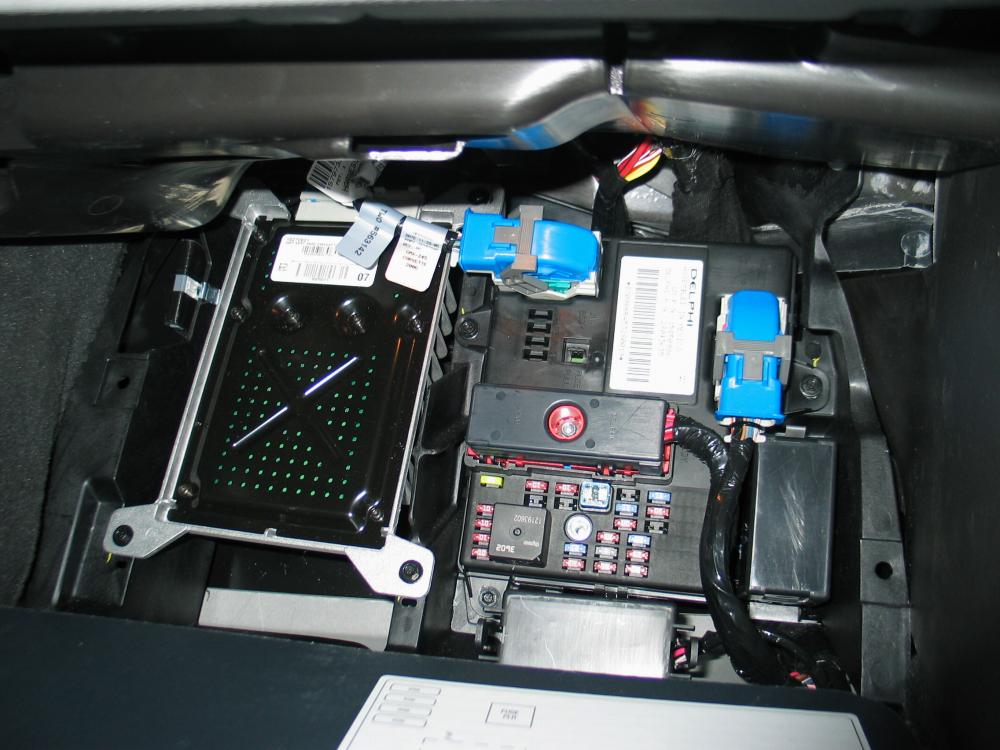
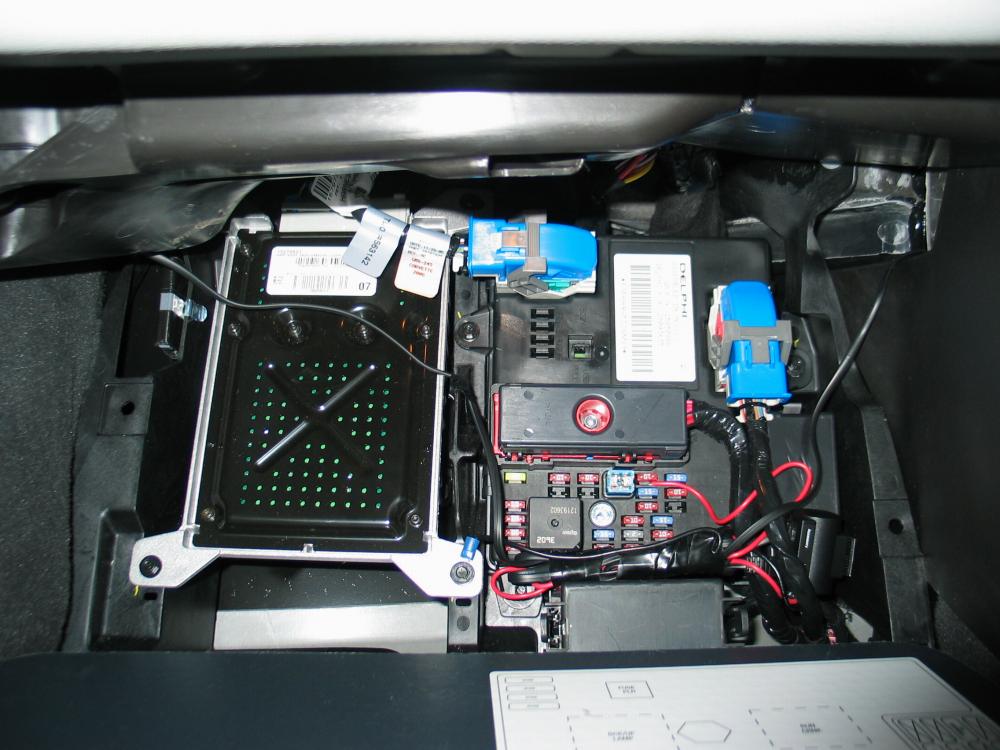
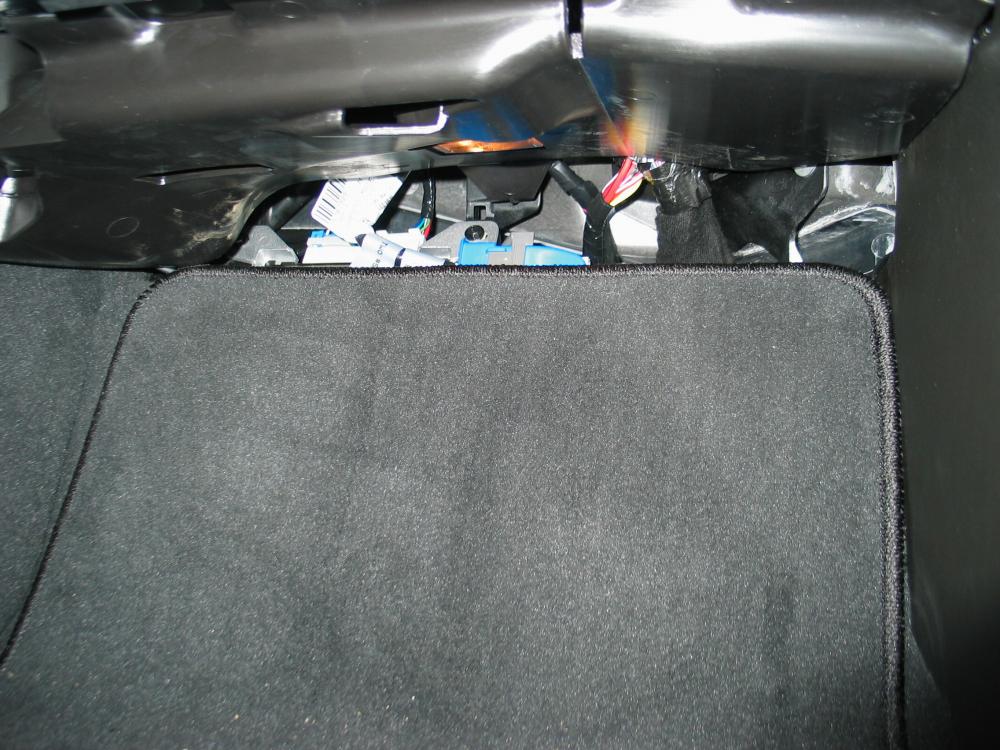
Here’s the passengers side fusebox before the install
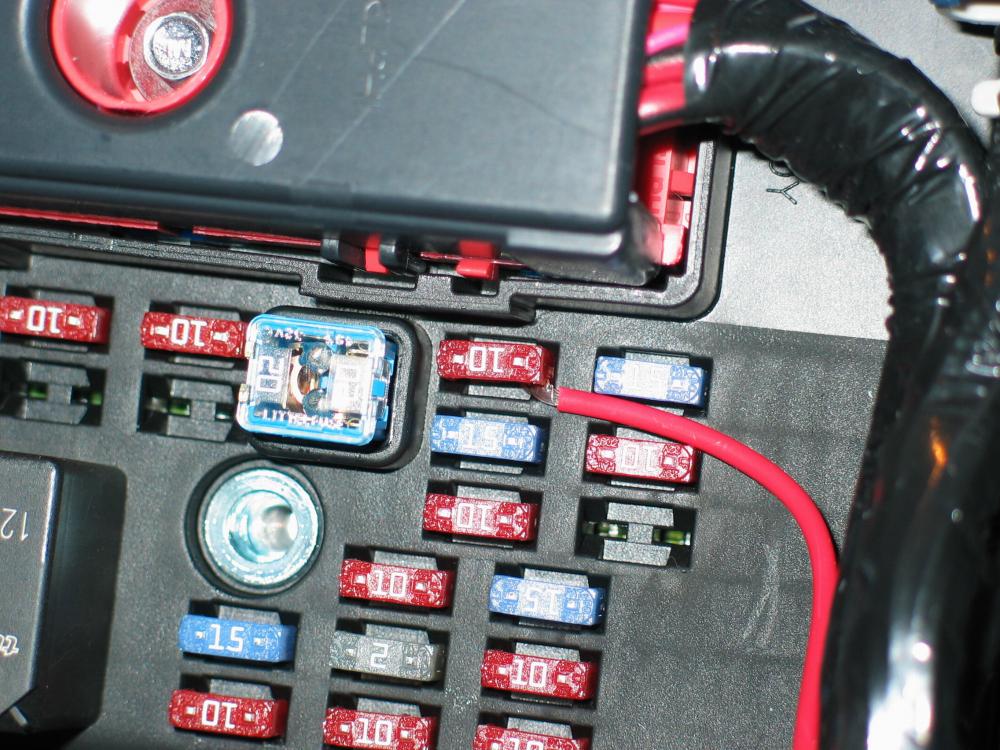
I tapped power off the seat heater circuit because it’s switched on/off with the ignition
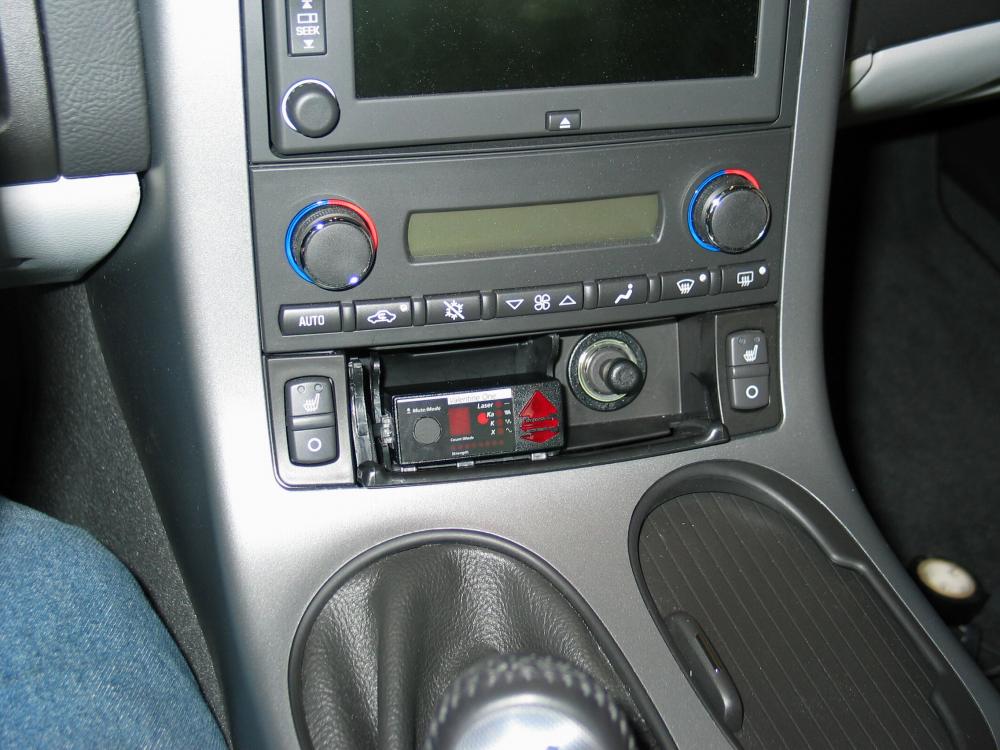
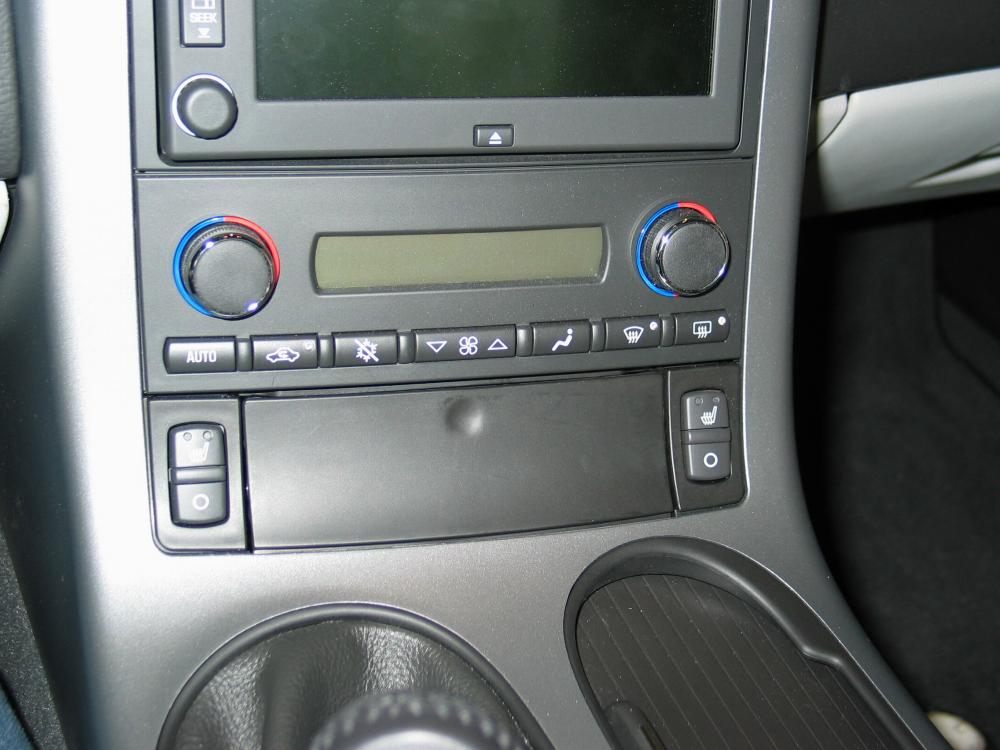
Here’s the console with the flip-down ashtray removed
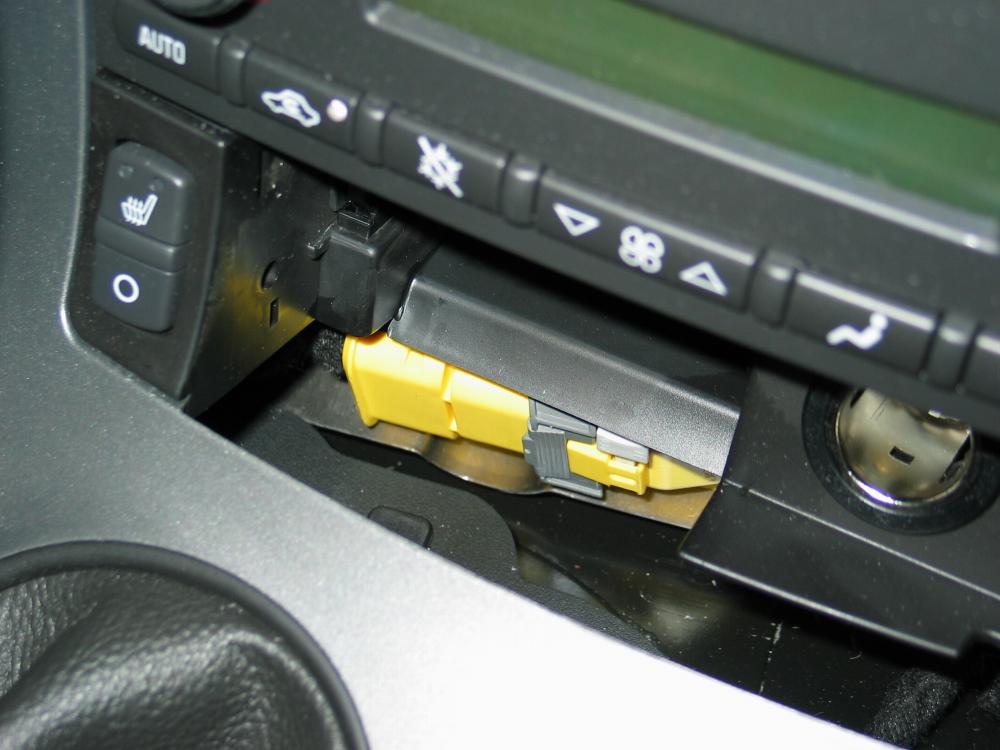
I had to shave a bit of the plastic off with a utility knife to clear the power connector
Remote is attached and the power wire is run into the console
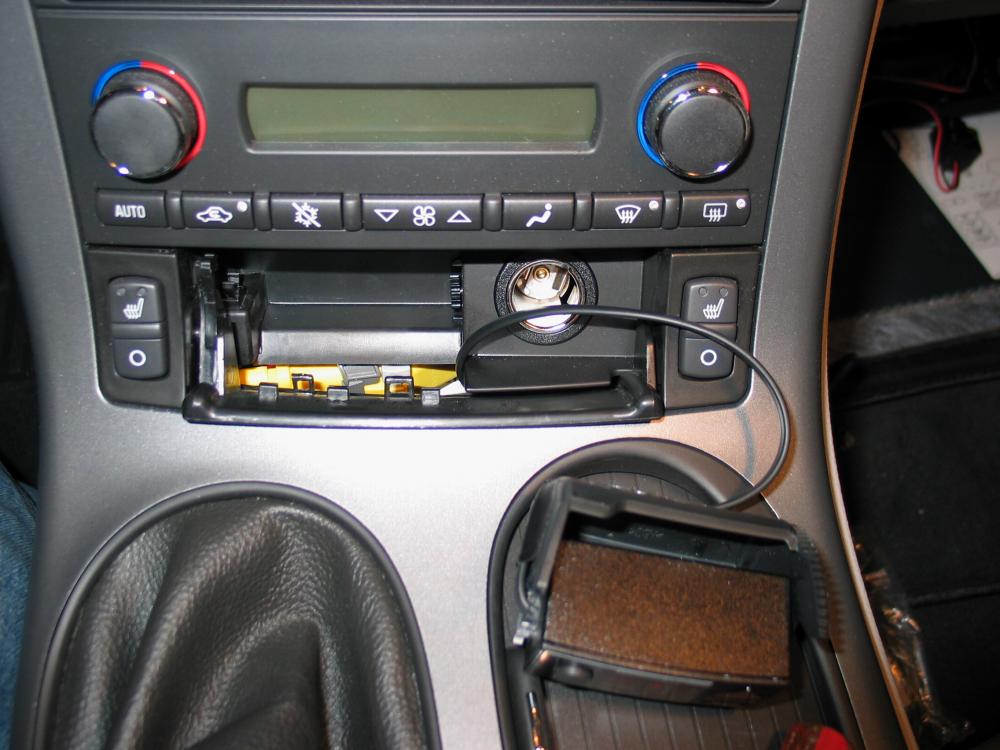
And out the edge on the passengers side
Problem is, I couldn’t find a good spot for the remote display.
In other cars I’ve installed it right on top of the steering column, but in the Corvette the DIC would be blocked if you did that.
So I decided to install it into the unused ashtray location just forward of the center console.
I took some photos along the way in case anyone want to duplicate this install.
I don’t think I’ve seen anyone here mount it this way.
Here’s the passengers side fusebox before the install
I tapped power off the seat heater circuit because it’s switched on/off with the ignition
Here’s the console with the flip-down ashtray removed
I had to shave a bit of the plastic off with a utility knife to clear the power connector
Remote is attached and the power wire is run into the console
And out the edge on the passengers side
Last edited by LTC Z06; 04-15-2006 at 11:30 AM.
 04-15-2006, 11:31 AM
#122
Get Some!
...
Originally Posted by Shawn S
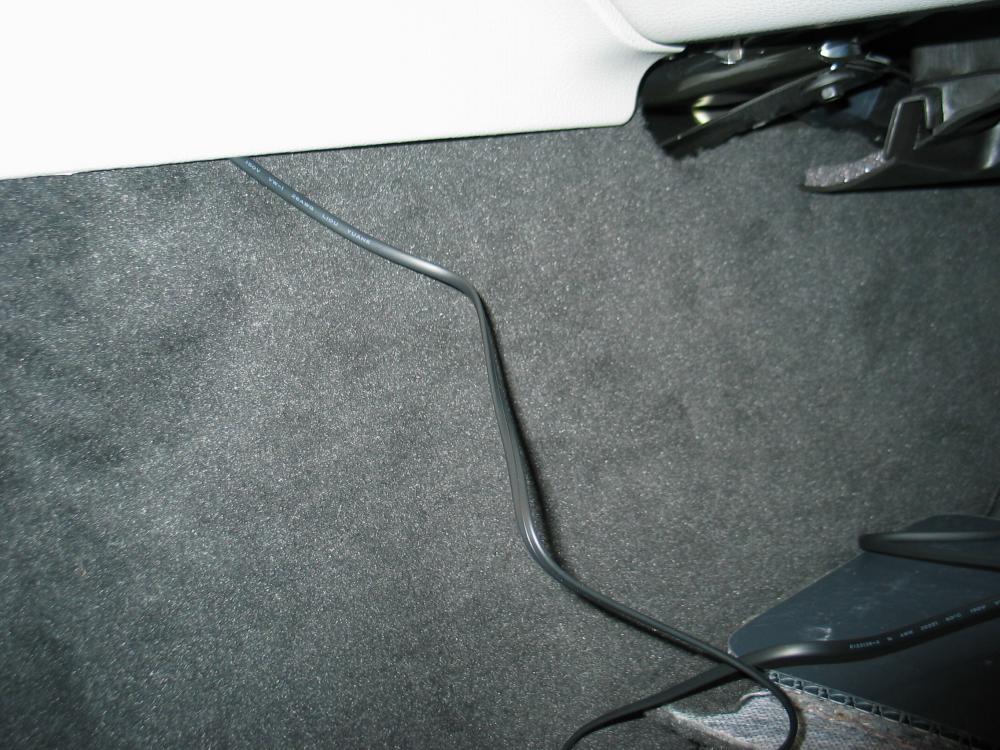
All tucked in under the carpet
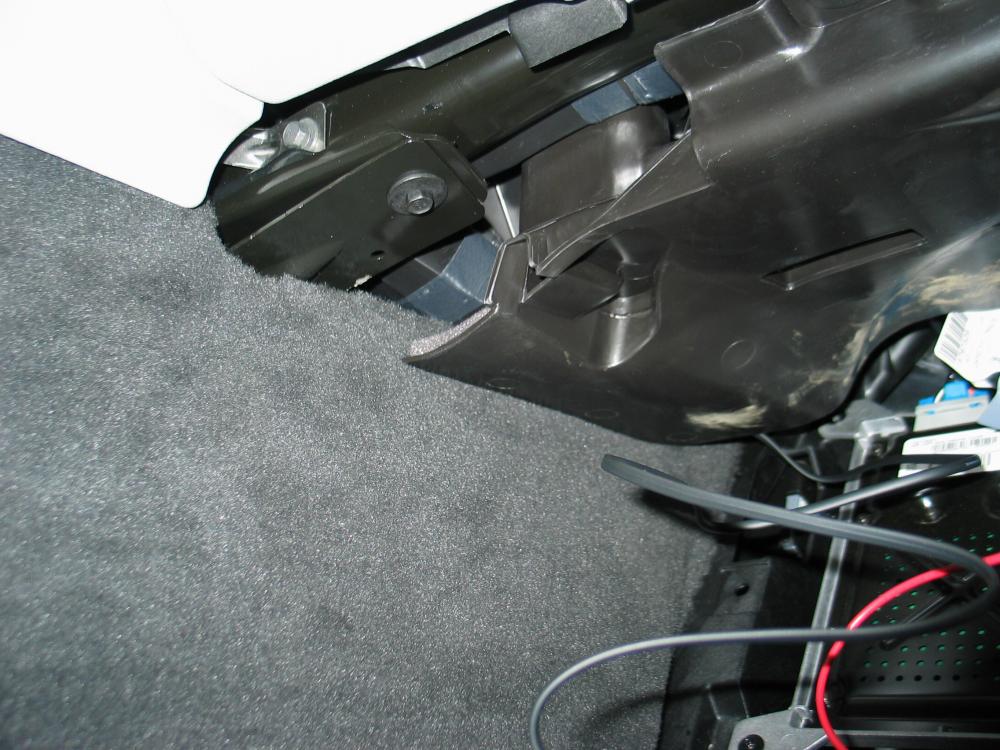
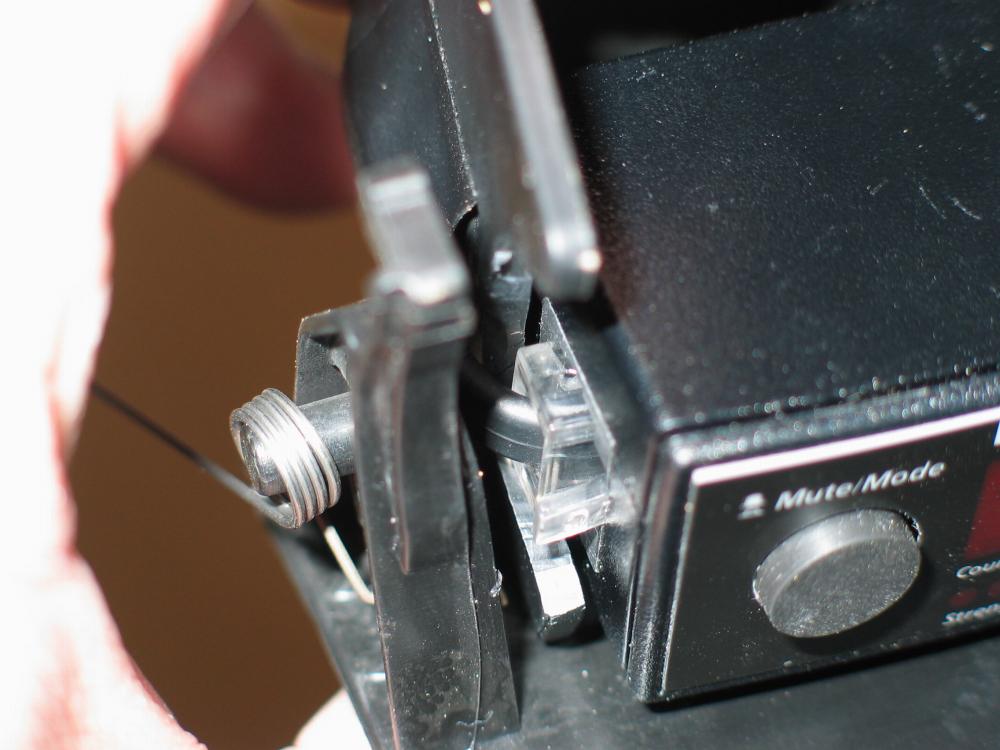
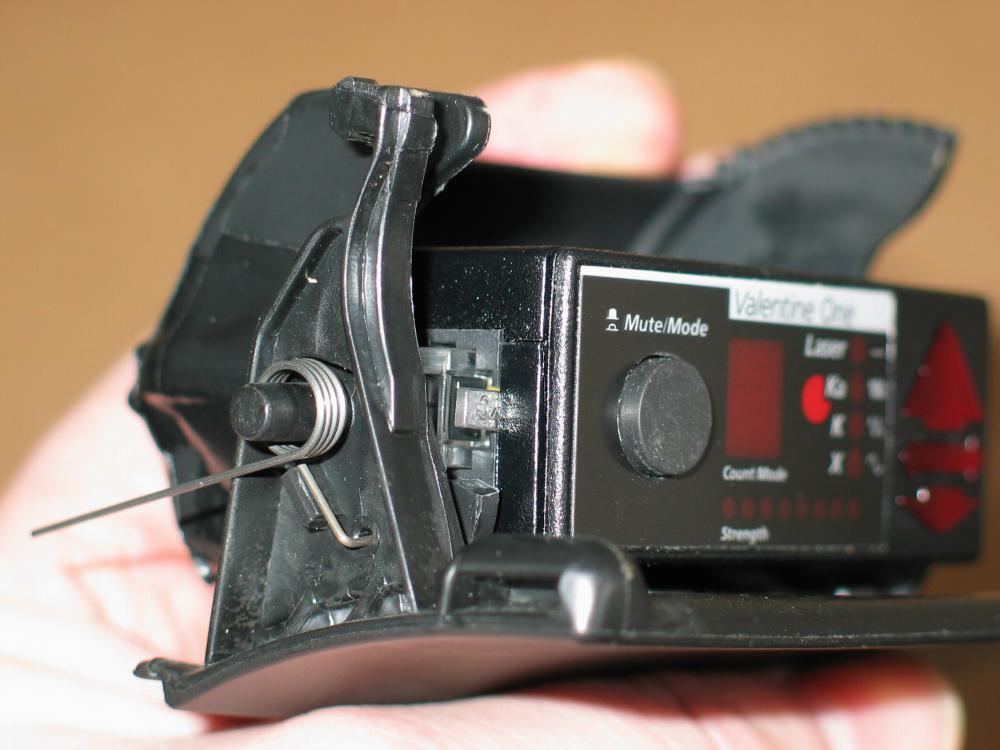
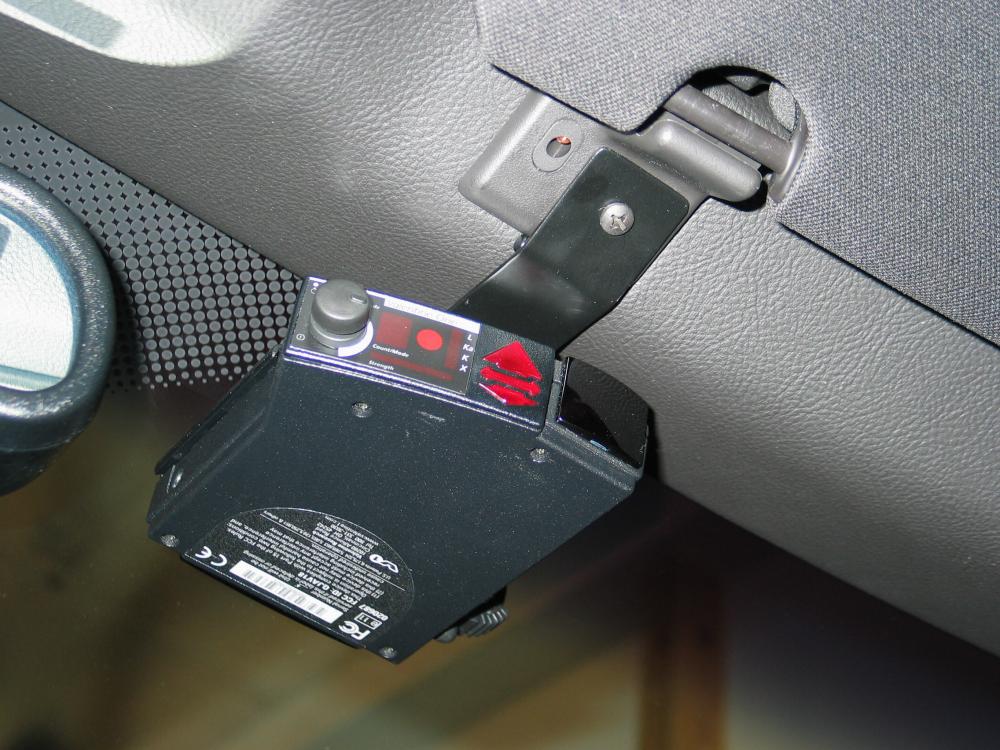
Two shots of the “Great Lakes” V1 visor mount Link: http://8.3.8.118/greatlakes/corvette.htm
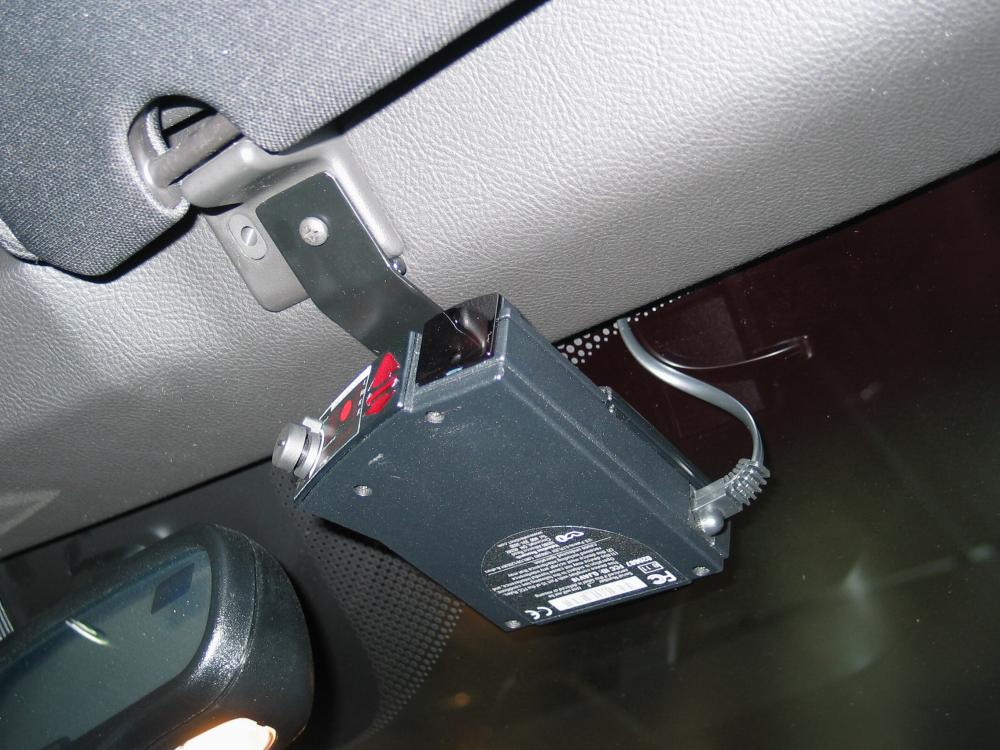
Ran the wire across the header and down inside the A-Pillar cover (shown before it was closed up)

Connected the V1 “Hard-Wire” power adapter and wrapped up the wires as best I could
Panel closed up and no V1 power wires showing
OPEN
CLOSING

STEALTH MODE
Two shots of the “Great Lakes” V1 visor mount Link: http://8.3.8.118/greatlakes/corvette.htm
Ran the wire across the header and down inside the A-Pillar cover (shown before it was closed up)
Connected the V1 “Hard-Wire” power adapter and wrapped up the wires as best I could
Panel closed up and no V1 power wires showing
OPEN
CLOSING
STEALTH MODE


 04-16-2006, 01:47 PM
#124
Le Mans Master

I had started a thread this morning asking about the mfg of the MN6, which is Tremec. An excellent PDF was posted in that thread and it might not be a bad link to include in the FAQ:
http://www.cadillacfaq.com/faq/answers/pdf/t56-06.pdf
http://www.cadillacfaq.com/faq/answers/pdf/t56-06.pdf
04-18-2006, 08:21 PM
#125
Get Some!
It’s Official! – Changes for 2007 Corvettes
--------------------------------------------------------------------------------
Just in from Chevrolet… 4/18/06
Exterior Color:
83U Atomic Orange Metallic Tintcoat (a bright chromatic orange), replaces Daytona Sunset Orange Metallic
GM mailed every dealer the new color selection with an actual chip of the new color. It is MUCH brighter and lighter than Daytona Sunset Orange Metallic!!!
Interior:
Two-tone Modified Seats (perforated leather seating surface) with crossed flag embroidery and contrasting stiching.
Available in 026 Red, 316 Cashmere, 846 Titanium
Available on Coupe and Convertible with 2LT or 3LT equipment packages
UK3 Steering-wheel mounted audio controls included with Bose premium audio systems (US9/U3U)
Larger glovebox storage space
UE1 OnStar now available on Z06 with 2LZ equipment group
Enhanced acoustic package reduces road noise and is included with Z06 2LZ equipment group
Bose audio enhancements
New keyless access transmitter with integrated mechanical key
CM7 Power convertible top is now included with Convertible 3LT equipment group
Cross-drilled brake rotors now included with F55 Magnetic Selective Ride Control
New Dealer Accessories Available for 2007:
Racing spoiler
Body side moldings
Racing stripe package
Z06 sillplates
Z06 427 hood badge
Hood blanket with color logo
2007 Order Guide Information
Three models:
1YY07 Corvette Coupe
1YY67 Corvette Convertible
1YY87 Corvette Z06 Coupe
1YY07 Coupe Information:
3 Packages; 1LT, 2LT, 3LT
2 Transmissions: MX0 Automatic, MN6 6 Speed
Options:
F55 Suspension Package
Z51 Suspension Package
QG7 Polished Wheels
QX1 Competition Gray Wheels
QX3 Chrome Wheels
R8C Museum Delivery
U3U Navigation with Single CD
VK3 Front License Plate Bracket
CC3 Transparent Top
C2L Transparent and Painted Top
Interior:
023 Cobalt Red
193 Ebony
313 Cashmere
843 Titanium
026 Cobalt Red Two Tone
316 Cashmere Two Tone
846 Titanium Two Tone
Colors:
10U Arctic White
19U LeMans Blue Metallic
41U Black
45U Velocity Yellow Tintcoat
67U Machine Silver Metallic
74U Victory Red
80U Monterey Red Metallic
83U Atomic Orange Metallic Tintcoat
1YY67 Convertible Information:
2 Packages; 2LT, 3LT
2 Transmissions: MX0 Automatic, MN6 6 Speed
Options:
CM7 Power Convertible Top
F55 Suspension Package
Z51 Suspension Package
QG7 Polished Wheels
QX1 Competition Gray Wheels
QX3 Chrome Wheels
R8C Museum Delivery
U3U Navigation with Single CD
VK3 Front License Plate Bracket
Interior:
023 Cobalt Red
193 Ebony
313 Cashmere
843 Titanium
026 Cobalt Red Two Tone
316 Cashmere Two Tone
846 Titanium Two Tone
Colors:
10U Arctic White
19U LeMans Blue Metallic
41U Black
45U Velocity Yellow Tintcoat
67U Machine Silver Metallic
74U Victory Red
80U Monterey Red Metallic
83U Atomic Orange Metallic Tintcoat
Top Colors:
29T Storm Gray
35T Beige
41T Black
1YY87 Z06 Coupe Information:
2 Packages; 1LZ, 2LZ
1 Transmissions: MN6 6 Speed
Options:
QL9 Polished Wheels
Q44 Competition Gray Wheels
R8C Museum Delivery
U3U Navigation with Single CD
VK3 Front License Plate Bracket
Interior:
023 Cobalt Red
193 Ebony
843 Titanium
Colors:
19U LeMans Blue Metallic
41U Black
45U Velocity Yellow Tintcoat
67U Machine Silver Metallic
74U Victory Red
83U Atomic Orange Metallic Tintcoat
04-24-2006, 10:22 AM
#126
Get Some!
How to tint over the black dots.
Originally Posted by Italian-
Its real easy to get the tint to lay down. When they are getting ready to put the tint on. Have them take a clear glue stick (like the one your kids use) rub it over the black dots and lay the tint over the back glass. It can be done with just one piece of tint for the entire back glass. When they heat the glass with a heat gun from the outside the tint will suck up to the dots. I use to own a tint shop and we did a ton of vettes and my BMW M3 had it-no probs at all. My Vette will be getting built tomorrow. When it shows up it will be getting 5 %. I am not worried about the back window, my tint guy has been tinting 27 years.
04-30-2006, 11:39 AM
#127
Burning Brakes

Thread Starter
sorry, but some of the HTML coding has gone awry, and the "colors" section is messed up. The code looks correct, but it isnt' displaying properly...

05-02-2006, 02:10 PM
#128
Drifting

Member Since: Aug 2004
Location: Pasadena, California
Posts: 1,720
Likes: 0
Received 0 Likes
on
0 Posts
 05-30-2006, 03:04 PM
#131
Get Some!
...
Originally Posted by SilverCoupe
Try one of these threads for the answer to the original question.
http://forums.corvetteforum.com/show....php?t=1402619
http://forums.corvetteforum.com/show....php?t=1403285
http://forums.corvetteforum.com/show....php?t=1403326
http://forums.corvetteforum.com/show....php?t=1403430
http://forums.corvetteforum.com/show....php?t=1402619
http://forums.corvetteforum.com/show....php?t=1403285
http://forums.corvetteforum.com/show....php?t=1403326
http://forums.corvetteforum.com/show....php?t=1403430
06-03-2006, 09:06 AM
#132
Racer


Member Since: Mar 2006
Location: Kalispell Montana
Posts: 324
Likes: 0
Received 0 Likes
on
0 Posts
Hey Doc - Thanks for all the info. I have searched for info on how the Ca. cars differ from the rest. I find HP is the same, but I wonder if you run into any issues in driving, modding, etc., with these cars. I can hardly believe I found a Left Coast dealer willing to GMID. I am in MT., so emissions are not too big of a deal.
Thanks, Dick
Thanks, Dick
06-23-2006, 05:01 PM
#133
Get Some!
Painted Roof Adhesive Separation - Updated Bulletin
--------------------------------------------------------------------------------
Subject: 05112D - Customer Satisfaction Program
Painted Roof Adhesive Separation
Vehicle Population and Service Procedure Revised
Message #: WIR20060318
SERVICE AND PARTS OPERATIONS
DCS1613
URGENT - DISTRIBUTE IMMEDIATELY
Date: June 23, 2006
Subject: 05112D – Customer Satisfaction Program
Painted Roof Adhesive Separation
Vehicle Population and Service Procedure Revised
Models: 2005-2006 Chevrolet Corvette with Painted Roof
To: All Chevrolet Dealers
Attention: Service Manager, Parts Manager
and Warranty Administrator
Customer Satisfaction Program Bulletin 05112C was released on June 7, 2006 via GM Administrative Message WIR20060307.
This bulletin is being revised to include Z06 model vehicles. A new service procedure and labor time have also been added.
A copy of revised bulletin 05112D is attached below. Please review the new information immediately and discard all copies of bulletin 05112C.
The Service Information System (SI) version of this bulletin will be available on June 24, 2006.
GMVIS information for the additional vehicles will be available on June 24, 2006.
Click here for the bulletin:
http://temp.corvetteforum.net/c5/ken...onbulletin.pdf


 08-11-2006, 11:09 AM
#137
1st Gear

Member Since: Aug 2006
Posts: 1
Likes: 0
Received 0 Likes
on
0 Posts
Since finding Corvette Forum I am amazed at the number of C6 owners who have had problems with the C6 6 speed transmission and differential. First gear lockout started the day I drove the car off the dealers lot. Like many of you I also thought it was just me having to adapt to the car. Over about 6 months the problem got worse and eventually the rear end started making loud grinding noises while turning right or left. First gear lockout did not happen every time out but about 5% of the time. Considering the car only has 4500 miles, it was excessive. I spent the next three visits to my local dealer telling me there was no problems. Finally last month I convinced them there was a problem and it had become a safety issue.
Things to watch out for at your local dealer.
Make sure they a have a certified Corvette mechanic.
For differential noise or grinding, do not let them do the CHEVROLET recommened fix, which is drain fluid and replace with an additive. I insisted they replace the clutches and worn parts, they did not like it, but they did it.
After seventeen days in the shop and replacing a bent shifting rail, first gear and syncro upgrade and almost every part, I got the car back.
It now shifts smoother and easier, the differential noise is gone and now instead of first gear lockout I HAVE FIRST GEAR POP OUT. Now when this happens it will not go into first gear and stay, you have to go to fourth gear which is hard on the clutch. Since all new parts were installed the dealer does not want to address this problem, they will however since there is a seven year warranty on this car and chevrolet has now had it put on their lap.
I am sixty three year old, there is no reason why I should have to use all the little tricks I see descibed by the owners manual and others to drive and enjoy my car. I'll bet the new 06's are better and see no reason why Chevrolet can not replace defective units with new ones.
If not, they will get it back by way of the lemon law.
08-11-2006, 03:03 PM
#138
Team Owner

Originally Posted by JKRIT
Since finding Corvette Forum I am amazed at the number of C6 owners who have had problems with the C6 6 speed transmission and differential. First gear lockout started the day I drove the car off the dealers lot. Like many of you I also thought it was just me having to adapt to the car. Over about 6 months the problem got worse and eventually the rear end started making loud grinding noises while turning right or left. First gear lockout did not happen every time out but about 5% of the time. Considering the car only has 4500 miles, it was excessive. I spent the next three visits to my local dealer telling me there was no problems. Finally last month I convinced them there was a problem and it had become a safety issue.
Things to watch out for at your local dealer.
Make sure they a have a certified Corvette mechanic.
For differential noise or grinding, do not let them do the CHEVROLET recommened fix, which is drain fluid and replace with an additive. I insisted they replace the clutches and worn parts, they did not like it, but they did it.
After seventeen days in the shop and replacing a bent shifting rail, first gear and syncro upgrade and almost every part, I got the car back.
It now shifts smoother and easier, the differential noise is gone and now instead of first gear lockout I HAVE FIRST GEAR POP OUT. Now when this happens it will not go into first gear and stay, you have to go to fourth gear which is hard on the clutch. Since all new parts were installed the dealer does not want to address this problem, they will however since there is a seven year warranty on this car and chevrolet has now had it put on their lap.
I am sixty three year old, there is no reason why I should have to use all the little tricks I see descibed by the owners manual and others to drive and enjoy my car. I'll bet the new 06's are better and see no reason why Chevrolet can not replace defective units with new ones.
If not, they will get it back by way of the lemon law.
Things to watch out for at your local dealer.
Make sure they a have a certified Corvette mechanic.
For differential noise or grinding, do not let them do the CHEVROLET recommened fix, which is drain fluid and replace with an additive. I insisted they replace the clutches and worn parts, they did not like it, but they did it.
After seventeen days in the shop and replacing a bent shifting rail, first gear and syncro upgrade and almost every part, I got the car back.
It now shifts smoother and easier, the differential noise is gone and now instead of first gear lockout I HAVE FIRST GEAR POP OUT. Now when this happens it will not go into first gear and stay, you have to go to fourth gear which is hard on the clutch. Since all new parts were installed the dealer does not want to address this problem, they will however since there is a seven year warranty on this car and chevrolet has now had it put on their lap.
I am sixty three year old, there is no reason why I should have to use all the little tricks I see descibed by the owners manual and others to drive and enjoy my car. I'll bet the new 06's are better and see no reason why Chevrolet can not replace defective units with new ones.
If not, they will get it back by way of the lemon law.
09-23-2006, 12:31 PM
#139
Get Some!
DIY – Rear Axle / Differential oil change, with pics – for FAQ
http://forums.corvetteforum.com/show....php?t=1497063
http://forums.corvetteforum.com/show....php?t=1497063
Originally Posted by Vet
DIY: Changing the oil in a base C6 rear axle / differential
Overall it’s very easy, a DIY is not even really necessary, but if it’s your first time, this will at least give you an idea of what to expect. This DIY is for base C6s only. Z06s have differential coolers (base C6's do not) and require a bit more effort. Z06s and export vehicles have different axle oil capacities than the base C6 as well.
First, if possible, run the car a while to get the axle oil warm. I ran the car about 40 miles. When I got back, the axle case was quite hot to the touch. Even after 20 minutes or so, the mufflers were cool but the axle case was still hot. With this in mind, it is probably a good idea to wait a bit (maybe a half hour) until the exhaust system cools down so you do not severely burn yourself… the axle will still be warm.
You’ll need to get the car up off the ground a bit as in photos, but keep car LEVEL. First choice would be to use a real lift. Second choice, back the car up on Race Ramps and then jack the front end in order to level the car. Last choice (most laborious), jack the car from both front and rear.

Since you need to access the rear axle from the rear, you cannot block the rear with a jack. I had initially tried to use my 4-point jack system, but was not able to access the axle plugs with the rear jack and cross member in the way. I had to add stands under the rear puck locations and then remove the rear jack and cross member. I then added two extra screw jacks under the rear “preferred” jacking locations for extra support and safety. This worked out fine. But next time I think I’ll try backing up on ramps… would be easier.
The axle case has two plugs that must be removed… a fill plug and drain plug. The fill plug is on the rear vertical side of the case, the drain plug is on the bottom horizontal side of the case. Both plugs exist on the right half of the case (passenger side). Both plugs are identical in size / type.


Put some cardboard down on the floor and have some rags on hand as you will inevitably spill / splash some oil. Place a drain pan directly under the drain and fill plugs.
Clean the areas around both plugs. Using a 3/8” drive swivel arm socket wrench and 10mm allen socket of about 1 – ¾” total length (as shown), loosen and remove the fill plug. There are different ways of accessing this plug but the photos show one method that seems to work well and is easy. Note in the photos that the socket wrench handle extends down through the middle of the aluminum cross member. Some oil may start to drip out. If the plug should be tight, use a piece of pipe over your socket handle for leverage. Both my plugs did not require much effort to loosen… pipe was not needed.


Next, loosen and remove the drain plug. The oil will come blasting out and may splash in the pan so shield your face. Allow the axle to drain for a while. Mine was still dripping 12 hours later.
Clean the drain plug and area around the drain hole and install drain plug. Torque to 35 Nm or 26 lb/ft. I chose to torque by hand… basically just got it nice and snug. Do not overtighten. You could get a torque wrench on the drain plug easily if you wanted, but not on the fill plug. If you are not sure about the torque “feel”, use a torque wrench on the drain plug in order to get a good “feel” for what it should be, then do your best to apply that same “feel” to the fill plug using your regular socket wrench.
Time to refill the axle. Read the latest GM TSB regarding rear axle chatter to determine which GM gear oil you should be using. In sum, if you are experiencing chatter and your clutch packs / plates have NOT yet been changed, use GM part # 89021669 (non-synthetic) gear oil and 4 oz of GM part # 01052358 friction modifier additive - this is different than what the shop manual calls for. If you are not experiencing chatter, or if your clutch packs have just been changed, use GM part # 12378261 synthetic gear oil and 4 oz of the same additive described above - this IS what the shop manual calls for.
I used the non-synthetic oil below due to a cold chatter problem.

The manual calls for 1.69 quarts (54 ounces) of fluid. The non-synthetic GM gear oil recommended by the Chevrolet TSB for chatter conditions prior to clutch pack change comes in 23 ounce bottles (pictured below). The additive comes in a 4 ounce bottle. You will need a minimum of three 23oz bottles of gear oil, and one full 4 oz bottle of additive, but have at least four bottles of gear oil on hand, reasons below. To be super safe, you may want to have additional bottles of gear oil and additive on hand in case you spill… you’ll most likely be changing the axle oil again anyway, so may as well stock up in advance.
Since you will not be able to get the oil bottles higher than the fill hole, you must pump or squeeze the oil up into the hole.
The GM oil bottles come with extra pointed nozzle caps and a short piece of clear tubing. I found this set up to be too short and too small a diameter, plus after a while the nozzle gets oily and the hose starts slipping off the nozzle no matter what you do. One solution is to buy an aftermarket fill tube at the local auto store. The product I found (at Pep Boys) is made by Hopkins Manufacturing, called a “FloTool”… it threads right onto the GM oil bottles and has a 12” long section of clear tubing attached… twice as long and larger diameter than what you get with the GM oil bottle. This FloTool fit really nice and made the oil fill a breeze.

Insert the tubing into the fill hole of the axle holding the gear oil bottle up between the mufflers and squeeze the bottle. You will see the oil flow through the tube and into the axle. One headache though is that you can only get about half the contents of the bottle into the axle even if you squeeze / crush the bottle as hard as you can… you can only squeeze about 14 oz out of that 23 oz bottle at once… so you have to refill the bottle and do it again about 5 or more times. This is the main reason to have at least 4 bottles of gear oil on hand… because you can never get ALL the gear oil out of the bottle when just squeezing the bottle. I guess you’d need a pump of some type to really empty the entire bottle into the axle... but not necessary because whatever oil does not make it into the axle can be saved for the next fluid change.

Note: I am holding the bottle upside down in the photo – was just posing in that shot – bottle nozzle should be as low as you can get it with relation to the rest of the bottle.
I started by putting about 10 ounces of oil in the axle. I then added the entire 4 oz bottle of additive to a bottle of gear oil that had about 13 ounces left in it… shook it well… then added as much of this mix as possible to the axle. Then just kept refilling this SAME bottle with gear oil, shaking and adding it to the axle until oil started dripping out of the axle oil fill hole. I then allowed the oil to drip out for a bit to make sure the axle was not overfull. Reinstall fill plug. Again, make sure car is level.
The problem with doing the above is that I may not have gotten 100% of the additive into the axle on this fill since some may have been left in the gear oil bottle. This is because it is impossible to completely empty the gear oil bottle into the axle. Since more and more gear oil was added to that one bottle, I pretty much flushed almost all the additive out of that bottle and into the axle, but still… to really make sure to get the entire 4 oz of additive into the axle, it would be best to just add it directly without pre-mixing. I will probably try this next time. The additive bottle comes with a squirt tip so you might just be able to squirt the additive directly into the axle from the additive bottle without any adapters, hoses, etc. But not sure… have yet to try it.
Though the manual calls for 1.69 quarts (54 ounces), it seems that my axle took a bit more than this… closer to about 62 ounces or so (or 1.94 quarts), estimated. In any case, just make sure to have at least 64 ounces of oil on hand, in addition to the 4 oz of additive. Remember too, you will drip / spill some… and some will remain in your FloTool, etc.
I installed the plugs without any sealer or Teflon, etc… so far no leaks. The plugs seem to have some type of thin gasket / washer attached so they may not need help in any case. If help IS needed, a SMALL amount of silicon sealer on the threads would probably do the trick… but be sparing because otherwise when you go to remove the plugs next time, you’ll have a bunch of silicon sealer debri in the holes, makes a mess and could find it’s way into the axle.

Above is just one way to change the rear axle oil on a C6. If anyone has any other tips, tricks etc, please add to this thread. Also, I must thank the forum and its members for much of the info in this DIY post!
Overall it’s very easy, a DIY is not even really necessary, but if it’s your first time, this will at least give you an idea of what to expect. This DIY is for base C6s only. Z06s have differential coolers (base C6's do not) and require a bit more effort. Z06s and export vehicles have different axle oil capacities than the base C6 as well.
First, if possible, run the car a while to get the axle oil warm. I ran the car about 40 miles. When I got back, the axle case was quite hot to the touch. Even after 20 minutes or so, the mufflers were cool but the axle case was still hot. With this in mind, it is probably a good idea to wait a bit (maybe a half hour) until the exhaust system cools down so you do not severely burn yourself… the axle will still be warm.
You’ll need to get the car up off the ground a bit as in photos, but keep car LEVEL. First choice would be to use a real lift. Second choice, back the car up on Race Ramps and then jack the front end in order to level the car. Last choice (most laborious), jack the car from both front and rear.
Since you need to access the rear axle from the rear, you cannot block the rear with a jack. I had initially tried to use my 4-point jack system, but was not able to access the axle plugs with the rear jack and cross member in the way. I had to add stands under the rear puck locations and then remove the rear jack and cross member. I then added two extra screw jacks under the rear “preferred” jacking locations for extra support and safety. This worked out fine. But next time I think I’ll try backing up on ramps… would be easier.
The axle case has two plugs that must be removed… a fill plug and drain plug. The fill plug is on the rear vertical side of the case, the drain plug is on the bottom horizontal side of the case. Both plugs exist on the right half of the case (passenger side). Both plugs are identical in size / type.
Put some cardboard down on the floor and have some rags on hand as you will inevitably spill / splash some oil. Place a drain pan directly under the drain and fill plugs.
Clean the areas around both plugs. Using a 3/8” drive swivel arm socket wrench and 10mm allen socket of about 1 – ¾” total length (as shown), loosen and remove the fill plug. There are different ways of accessing this plug but the photos show one method that seems to work well and is easy. Note in the photos that the socket wrench handle extends down through the middle of the aluminum cross member. Some oil may start to drip out. If the plug should be tight, use a piece of pipe over your socket handle for leverage. Both my plugs did not require much effort to loosen… pipe was not needed.
Next, loosen and remove the drain plug. The oil will come blasting out and may splash in the pan so shield your face. Allow the axle to drain for a while. Mine was still dripping 12 hours later.
Clean the drain plug and area around the drain hole and install drain plug. Torque to 35 Nm or 26 lb/ft. I chose to torque by hand… basically just got it nice and snug. Do not overtighten. You could get a torque wrench on the drain plug easily if you wanted, but not on the fill plug. If you are not sure about the torque “feel”, use a torque wrench on the drain plug in order to get a good “feel” for what it should be, then do your best to apply that same “feel” to the fill plug using your regular socket wrench.
Time to refill the axle. Read the latest GM TSB regarding rear axle chatter to determine which GM gear oil you should be using. In sum, if you are experiencing chatter and your clutch packs / plates have NOT yet been changed, use GM part # 89021669 (non-synthetic) gear oil and 4 oz of GM part # 01052358 friction modifier additive - this is different than what the shop manual calls for. If you are not experiencing chatter, or if your clutch packs have just been changed, use GM part # 12378261 synthetic gear oil and 4 oz of the same additive described above - this IS what the shop manual calls for.
I used the non-synthetic oil below due to a cold chatter problem.
The manual calls for 1.69 quarts (54 ounces) of fluid. The non-synthetic GM gear oil recommended by the Chevrolet TSB for chatter conditions prior to clutch pack change comes in 23 ounce bottles (pictured below). The additive comes in a 4 ounce bottle. You will need a minimum of three 23oz bottles of gear oil, and one full 4 oz bottle of additive, but have at least four bottles of gear oil on hand, reasons below. To be super safe, you may want to have additional bottles of gear oil and additive on hand in case you spill… you’ll most likely be changing the axle oil again anyway, so may as well stock up in advance.
Since you will not be able to get the oil bottles higher than the fill hole, you must pump or squeeze the oil up into the hole.
The GM oil bottles come with extra pointed nozzle caps and a short piece of clear tubing. I found this set up to be too short and too small a diameter, plus after a while the nozzle gets oily and the hose starts slipping off the nozzle no matter what you do. One solution is to buy an aftermarket fill tube at the local auto store. The product I found (at Pep Boys) is made by Hopkins Manufacturing, called a “FloTool”… it threads right onto the GM oil bottles and has a 12” long section of clear tubing attached… twice as long and larger diameter than what you get with the GM oil bottle. This FloTool fit really nice and made the oil fill a breeze.
Insert the tubing into the fill hole of the axle holding the gear oil bottle up between the mufflers and squeeze the bottle. You will see the oil flow through the tube and into the axle. One headache though is that you can only get about half the contents of the bottle into the axle even if you squeeze / crush the bottle as hard as you can… you can only squeeze about 14 oz out of that 23 oz bottle at once… so you have to refill the bottle and do it again about 5 or more times. This is the main reason to have at least 4 bottles of gear oil on hand… because you can never get ALL the gear oil out of the bottle when just squeezing the bottle. I guess you’d need a pump of some type to really empty the entire bottle into the axle... but not necessary because whatever oil does not make it into the axle can be saved for the next fluid change.
Note: I am holding the bottle upside down in the photo – was just posing in that shot – bottle nozzle should be as low as you can get it with relation to the rest of the bottle.
I started by putting about 10 ounces of oil in the axle. I then added the entire 4 oz bottle of additive to a bottle of gear oil that had about 13 ounces left in it… shook it well… then added as much of this mix as possible to the axle. Then just kept refilling this SAME bottle with gear oil, shaking and adding it to the axle until oil started dripping out of the axle oil fill hole. I then allowed the oil to drip out for a bit to make sure the axle was not overfull. Reinstall fill plug. Again, make sure car is level.
The problem with doing the above is that I may not have gotten 100% of the additive into the axle on this fill since some may have been left in the gear oil bottle. This is because it is impossible to completely empty the gear oil bottle into the axle. Since more and more gear oil was added to that one bottle, I pretty much flushed almost all the additive out of that bottle and into the axle, but still… to really make sure to get the entire 4 oz of additive into the axle, it would be best to just add it directly without pre-mixing. I will probably try this next time. The additive bottle comes with a squirt tip so you might just be able to squirt the additive directly into the axle from the additive bottle without any adapters, hoses, etc. But not sure… have yet to try it.
Though the manual calls for 1.69 quarts (54 ounces), it seems that my axle took a bit more than this… closer to about 62 ounces or so (or 1.94 quarts), estimated. In any case, just make sure to have at least 64 ounces of oil on hand, in addition to the 4 oz of additive. Remember too, you will drip / spill some… and some will remain in your FloTool, etc.
I installed the plugs without any sealer or Teflon, etc… so far no leaks. The plugs seem to have some type of thin gasket / washer attached so they may not need help in any case. If help IS needed, a SMALL amount of silicon sealer on the threads would probably do the trick… but be sparing because otherwise when you go to remove the plugs next time, you’ll have a bunch of silicon sealer debri in the holes, makes a mess and could find it’s way into the axle.
Above is just one way to change the rear axle oil on a C6. If anyone has any other tips, tricks etc, please add to this thread. Also, I must thank the forum and its members for much of the info in this DIY post!
Originally Posted by Vet
Updated - latest TSB - 9/08/06
Just for quick reference, here’s the most recent axle chatter TSB:
Subject: Rear Axle Chatter Shudder on Turns - keywords bind differential #PIP3559A - (09/08/2006)
Models: 1999-2007 Chevrolet Corvette
2004-2006 Cadillac XLR
2006-2007 Cadillac XLR-V
------------------------------------------
This PI is being superseded to update recommendations, models and years.
Please discard PIP3559.
------------------------------------------
The following diagnosis might be helpful if the vehicle exhibits the symptom(s) described in this PI.
Condition/Concern:
Rear axle chatter or shudder on turns on Chevrolet Corvette and Cadillac XLR.
Recommendation/Instructions:
If this is the first complaint for this condition flush and fill the rear axle with mineral based lubricant P/N 89021669 (in Canada 89021670) gear lube and 4 ounces of the friction modifier additive P/N 01052358 (in Canada 992694).
If this is a repeat complaint or the condition persists after the flush and fill, replace the right and left rear axle clutch packs following published service procedures.
After clutch pack replacement use 1.6 l (1.69 qt) synthetic axle lubricant GM P/N 12378261 (Canadian P/N 10953455). and 4 ounces of the friction modifier additive P/N 01052358 (in Canada 992694).
Note: 2006 Z06 equipped vehicles require 2.55 l (2.70 qt) synthetic axle lubricant GM P/N 12378261 (Canadian P/N 10953455) and approximately 190 ml (6.4 oz) limited-slip differential lubricant additive GM P/N 1052358 (Canadian P/N 992694).
Note 2: Export vehicles use 2.01 l (2.12 qt) synthetic axle lubricant GM P/N 12378261 (Canadian P/N 10953455) and approximately 150 ml (5.1 oz) limited-slip differential lubricant additive GM P/N 1052358 (Canadian P/N 992694).
Once the axle fluid has been changed the car must be driven in 8 - 10 SLOW figure eights to work the fluid between the clutch plates.
Note 3: PRIOR TO INSTALLING THE FRICTION MODIFIER ADDITIVE FOR EITHER OF THE ABOVE REPAIRS THE BOTTLE MUST BE SHAKEN VIGOROUSLY FOR AT LEAST 1 MINUTE TO MIX THE ADDITIVE THOROUGHLY.
---------------------------
Originally Posted by Vet
A few other bits of interesting info:
*Member vetteshop stated: “…in the past,I have replaced a bunch of clutch packs in the C5's, they have the same issue. Upon inspection of the removed clutch packs, they do not fail, they look brand new with no evidence of wear or damage. The issue seems to be a varnish buildup on the plates that causes binding, resulting in the noise when turning. This is why replacing the fluid (with new additive) may only temporarily cure the problem. The problem is the design of the rear differential. Caprice's and Camaro's with posi rears have had the same issue for years. The difference on the Corvette is that there is not a cover that you can remove to clean the clutch packs, such as every other conventional posi rear end. The only way to clean the clutch packs is to remove the rear from the vehicle and completely disassemble it. One may as well install new clutch packs after going through all that trouble…”
*Member calemasters stated: “…Original axle clutch plates were fiber. New plates are carbon… I believe BG production changed to the carbon plates in late December of 2005… I spoke to one of the Getrag engineers (he used to be on this board) but he was not clear to why the grind chatter occurred with the fiber plates. Just that the carbon plates fix this condition…”
*Memeber mbonness put up this interesting poll regarding axle chatter and build date: http://forums.corvetteforum.com/show...ight=axle+poll
---
10-06-2006, 09:41 PM
#140
Burning Brakes
First time user, so I hope this gets out properly. I have a '05 C6 Z51 & I'm looking to upgrade wheels & tires. The Z06 repro rims in chrome would do it.
Problem is evryone selling them has different answer on whats the best fit.
I'm simply looking to get the most meat under the car. 18x9.5 w/ 265 or 285/35s up front, 19x10 or 11 w/ 295/30 or 305/30s. Whats fits w/o going outside the fender wells? Any pics?
Problem is evryone selling them has different answer on whats the best fit.
I'm simply looking to get the most meat under the car. 18x9.5 w/ 265 or 285/35s up front, 19x10 or 11 w/ 295/30 or 305/30s. Whats fits w/o going outside the fender wells? Any pics?