Oil and Water separator
 09-10-2010, 06:03 PM
#1

I am going to do my own body work (seams and partial fender replacement) and paint the whole car. I am buying a 60 gallon compressor from Home Depot. My question is what oil and water separator should I buy. I would like a pretty good one even though it is for hobby use. I painted a VW 15 years ago without one and had nothing but water come out of the gun.
 09-13-2010, 12:37 PM
#3
Advanced

Member Since: Aug 2009
Location: ashland ky
Posts: 87
Likes: 0
Received 0 Likes
on
0 Posts
My dad picked up a water separator from harbor freight and we have been using it for years without any issues.
I know harbor freight is sort of an iffy place to buy stuff, but either we got lucky or its just one of those things they sell that's not a bad deal.
I know harbor freight is sort of an iffy place to buy stuff, but either we got lucky or its just one of those things they sell that's not a bad deal.
09-13-2010, 03:12 PM
#5
Pro


I'm doing the same thing but using a 110v oil-less compressor.
Because you have a compressor with oil in the pump, you need some kind of oil coalescing filter to keep oil away from your spray gun. Here's an example:
http://www.handsontools.com/Motor-Gu...er_p_4284.html
I have the HF desiccant dryer that is filled with 2.2 pounds of silica gel and it works just fine. One $5 package fills the tank and it lasts me five months of daily use in humid South Florida.
http://www.harborfreight.com/desicca...yer-97686.html
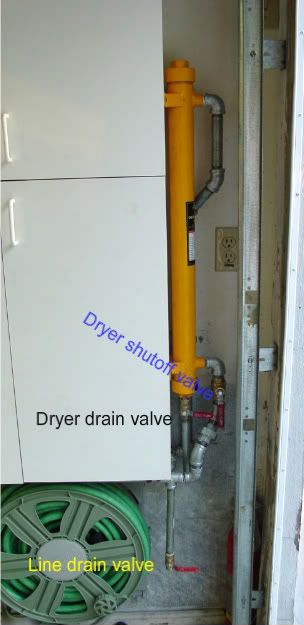
You need to have at least 25-feet of metal pipe between the compressor and the dryer. You can use copper, black or galvanized but you should de-grease both the line and the dryer before you run the air. There also needs to be a tee with a section of pipe hanging down to collect the water that condenses in the pipe. On my setup I ran the pipe under some cabinets and it runs 17 feet, makes a u, heads back 10 feet and makes another u and 10 feet before it goes into the bottom of the desiccant tank.
If you run the pipe up and down the wall, you'll need a tee at the bottom of each section.
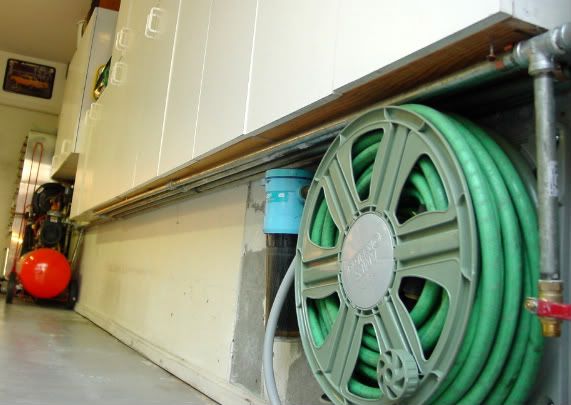
The dryer comes with a pipe and valve to drain condensation from the bottom of the dryer and if you want to be able to replace the silica gel without de-pressurizing the system, you might want to include a shutoff at the dryer as I did here.
Because you have a compressor with oil in the pump, you need some kind of oil coalescing filter to keep oil away from your spray gun. Here's an example:
http://www.handsontools.com/Motor-Gu...er_p_4284.html
I have the HF desiccant dryer that is filled with 2.2 pounds of silica gel and it works just fine. One $5 package fills the tank and it lasts me five months of daily use in humid South Florida.
http://www.harborfreight.com/desicca...yer-97686.html
You need to have at least 25-feet of metal pipe between the compressor and the dryer. You can use copper, black or galvanized but you should de-grease both the line and the dryer before you run the air. There also needs to be a tee with a section of pipe hanging down to collect the water that condenses in the pipe. On my setup I ran the pipe under some cabinets and it runs 17 feet, makes a u, heads back 10 feet and makes another u and 10 feet before it goes into the bottom of the desiccant tank.
If you run the pipe up and down the wall, you'll need a tee at the bottom of each section.
The dryer comes with a pipe and valve to drain condensation from the bottom of the dryer and if you want to be able to replace the silica gel without de-pressurizing the system, you might want to include a shutoff at the dryer as I did here.
09-13-2010, 06:44 PM
#6
Race Director


I am going to do my own body work (seams and partial fender replacement) and paint the whole car. I am buying a 60 gallon compressor from Home Depot. My question is what oil and water separator should I buy. I would like a pretty good one even though it is for hobby use. I painted a VW 15 years ago without one and had nothing but water come out of the gun.
One thing that you need to remember...when air compressors have small storage tanks. The air compressor will turn on more often....thus creating more heat. You must take this into account when selecting a good drier system. Or the drier system you choose will not be able to handle the excessive heat from the compressor due to it running a lot...especially when you are using high volume air tools or a spray gun.
Selecting a good spot for installing your compressor is important also. Stuffing inside a closet to keep it out of the way and keep the noise down so something I would advise against.
And last but not least: An easy check to see if your air system has moisture/oil contamination is by using a air pencil blower...and shooting a stream of compressed air onto a mirror. If it fogs up...you still have a moisture problem. If you get oil...well that is self-explanatory.
"DUB"
11-23-2010, 12:50 AM
#7

I went the harbor frieght route, they also have a small separator the screws to the air inlet on your gun that will catch whatever makes it past the regulator, $5.00 cheap insurance
11-23-2010, 06:20 PM
#8
Race Director
"DUB"
11-23-2010, 06:44 PM
#9
didnt say to use it as the 'only' protection, but if he's using the harbor frieght products, and possibly a hvlp spray gun where steady low pressure work well, any extra protection is good. somthing that would really help would be to make sure to drain the water from the bottom of the compressor. I've seen guys spend money for seperators , not drain the compressor and then wonder why their seperator, 'that piece of junk', 'still doesnt work, when the poor thing is over loaded with the garbage in the tank
Last edited by oldalaskaman; 11-23-2010 at 06:57 PM. Reason: more info
11-24-2010, 11:39 AM
#10
Pro
Tank draining is critical, especially for an oil-less 5 horse. I changed the drain valve to a 1/4-inch 1/4-turn valve to make it easier to drain.
I tried the small desiccant cartridge but in South Florida they are a waste of money. I took one out of its packaging, removed the plug from one end and screwed it onto the gun. I then removed the plug from the other end and screwed on a quick connect. Didn't hook up the air hose for about ten minutes while I was mixing and straining the paint (I know -- I'm slow). When I went to hook up the line, the desiccant was already turning pink.
Here's the economic view. Motor Guard cartridge on the right was in the $5 range (two-pack for about $10 plus shipping). Kilo of desiccant on the left from Harbor Freight was also in the $5 range ($4.99 plus tax). The cartridge might be useful in dry climates but South Florida is like living underwater so they are almost useless.
Unfortunately the $40 Harbor Freight dryer has no sight glass so you can't tell if the silica gel is saturated without opening the tank, which exposes it to the humidity. I checked the desiccant after five months of regular use and half the kilo had turned pink. When I am ready to paint the car, a fresh kilo of silica gel will be cheap insurance. Of course I can save some of the $5 by heating the pink silica gel in a 200 degree oven for eight or ten hours (or until it turns dark blue).
11-25-2010, 09:17 AM
#12
Race Director
didnt say to use it as the 'only' protection, but if he's using the harbor frieght products, and possibly a hvlp spray gun where steady low pressure work well, any extra protection is good. somthing that would really help would be to make sure to drain the water from the bottom of the compressor. I've seen guys spend money for seperators , not drain the compressor and then wonder why their seperator, 'that piece of junk', 'still doesnt work, when the poor thing is over loaded with the garbage in the tank
For those who care to know:
A HVLP gun requires a different fitting in the gun which allows more air volume....NOT pressure....and it is NOT the same type of fitting that you use on your other air tools. This higher volume is what gets effected when you attach a filter ball on the gun, or one of those air adjusting gauges. And this higher than "normal" volume of air is what will cause your air compressor to run like a lot....thus creating more heat and moisture. HV ( high volume) is dealing with the air volume and NOT paint volume. And the LP ( low pressure) is how the gun drops the pressure at the air cap...even though it has 35-45 psi of air pressure coming into the gun. This is why checking your air pressure at the air cap is recommended by many paint product information sheets you get from the paint manufacturer.
"DUB"
11-25-2010, 03:52 PM
#14
Race Director
I have been doing Corvette restoration for so long....that many of the "previous procedures" that worked for me many years ago...do not work as well as some may think now due to technology in the spray equipment being used along with paint manufacturers designing paint differently than that of the "good 'ol lacquer" days. SO...when I read something that I know will work for the "do-it-yourselfer"...I try to elaborate a bit on what "should" be done or not done. This is to try to head any problems "off at the pass"... because I have encountered so many problems...in the past and even currently...that I figure....information is KEY in regards to having a paint job come out correctly the first time....or at least as best as possible under spraying conditions at the time of shooting the color/clear.
BUT one thing is CLEAR...( and I am sure that all painters agree)...OIL and MOISTURE in your compressed air is a PROBLEM that should be rectified immediately.
"DUB"
11-26-2010, 07:22 AM
#15
Pro
For those who care to know:
A HVLP gun requires a different fitting in the gun which allows more air volume....NOT pressure....and it is NOT the same type of fitting that you use on your other air tools. This higher volume is what gets effected when you attach a filter ball on the gun, or one of those air adjusting gauges. And this higher than "normal" volume of air is what will cause your air compressor to run like a lot....thus creating more heat and moisture. HV ( high volume) is dealing with the air volume and NOT paint volume. And the LP ( low pressure) is how the gun drops the pressure at the air cap...even though it has 35-45 psi of air pressure coming into the gun. This is why checking your air pressure at the air cap is recommended by many paint product information sheets you get from the paint manufacturer.
"DUB"
I do care and appreciate the advice.
I switched the main connections on my air supply to the higher volume fittings. Also bought a new 50-foot long 1/2-inch diameter air hose with the bigger fittings just for the spray gun (Iwata LPH400 Silver cap). Rather than spend the money on all new couplers for my air tools and my collection of hoses, I made a couple of adapters. Picture shows the size difference, with HVLP fittings on the left.
I run full 100-120 psi through the hose and adjust the pressure at the gun. I tested the system by adjusting pressure to 35psi at the gun and then holding the trigger open for 15 minutes. The compressor ran continuously but the pressure never dropped below 35psi (tank gauge dropped to 60psi and held there). I chose 15-minutes because that's about how long it takes to spray a liter of paint (my biggest cup).
I have the Iwata gauge/regulator attached to the gun inlet but I would much rather use a cap gauge and set the gun properly to 10psi. Unfortunately I can't find anyone on the Internet who sells them. Lots of line gauges but no cap gauges.
11-26-2010, 08:23 PM
#16
Race Director
Bob,
I wish I knew where to get ( if they offer it) an air cap gauge...for measuring/adjusting your air cap pressure. I know Sata offers them...but unless you actually call Iwata and see if it is something offered...I do not know what else to do.
Seems that you have spent the time in checking your air compressor and air volume issues...so you do not get in the middle of a paint job and have a problem. Way to go!!! Somebody who is trying to stay one step ahead. "Others" should take note that it is not as easy as you might think.... because ASSUMPTION is the MOTHER of ALL MESS-UP's.
"DUB"
11-26-2010, 09:00 PM
#17
Pro
Bob,
I wish I knew where to get ( if they offer it) an air cap gauge...for measuring/adjusting your air cap pressure. I know Sata offers them...but unless you actually call Iwata and see if it is something offered...I do not know what else to do.
Seems that you have spent the time in checking your air compressor and air volume issues...so you do not get in the middle of a paint job and have a problem. Way to go!!! Somebody who is trying to stay one step ahead. "Others" should take note that it is not as easy as you might think.... because ASSUMPTION is the MOTHER of ALL MESS-UP's.
"DUB"
I wish I knew where to get ( if they offer it) an air cap gauge...for measuring/adjusting your air cap pressure. I know Sata offers them...but unless you actually call Iwata and see if it is something offered...I do not know what else to do.
Seems that you have spent the time in checking your air compressor and air volume issues...so you do not get in the middle of a paint job and have a problem. Way to go!!! Somebody who is trying to stay one step ahead. "Others" should take note that it is not as easy as you might think.... because ASSUMPTION is the MOTHER of ALL MESS-UP's.
"DUB"
Iwata has them in their catalog (with no picture) and one shop in NJ sold them a while back but no longer carries them. I'm going to start by using the gauge at the gun and work the pressure down until I get that cigar-shaped test pattern. Then I'll take the gauge off and adjust the pressure with the gun adjustment. Mostly I need to practice.
I was really leery of spending the money for the Iwata but it's amazing -- even a putz like me can lay down some really smooth coats of paint.
I try to avoid as many potential disasters as possible. The one I know is going to bite me is the compressor. It's 13 years old and I've done my best to break it. The start capacitor on the motor died and I didn't have it in me to trash the whole compressor. Fixed the motor and now the regulator has a slight leak so I'll have to fix that. I just know it's going to die half-way through a basecoat session. I want a 5hp 60-gallon horizontal because it fits the space in my garage perfectly. Eaton sells one for $1,000 but that doesn't include wiring a 220 outlet (main box has a damaged slot so it has to be replaced just to get back the slot -- I've worked around it with a couple of doubler 15-amp breakers). Spending that much money when my compressor is still working doesn't help the "it'll be a lot less expensive if I paint it myself" argument. An $800 US General vertical means pouring a slab outside and building an enclosure -- and a trip to the ER when I tip that top-heavy sucker over on myself.
Of course, I could always tell my wife that because I don't have a decent compressor I'll have to spend more time in 'her' house. She really likes having me retired -- to the garage.
12-10-2010, 05:36 PM
#18
Drifting


ok a few misc thoughts on this topic.
1. every time you reduce preassure you drop the temp of the air in the line the more you reduce the P the larger the drop in temp. why do we care? we care because of dew point (moisture in the air that stays in the air is not a problem it is the water that condensates out of the air that spits out on your nice wet paint at F^@#s up the works). so it is best to reduce P just before a seperator (not dessicant dryer) then run the seperated air thru the D dryer and then to the gun, a HVLP will have another P reduction at the gun but you do not want to be hauling around a seperator with water sloshing around in it at the gun so reduce the P as much as possable at the wall and run as low of P in the line from the wall as you can stand and dry it as much as possable before hand.
2. cooling the air before the first P reduction (with or without a refrigerating cooler) also helps and is more efficent at getting the most out of your cooling setup (in my case 40 feet of 3/4 copper with several drip legs). I'm a big fan of the HF store so Im running a P regulater followed by a good quality A/W sep. followed by the HF Desc. dryer followed by a Toilet paper type filter then to my lines to the regulator at the gun.
3. the trick on this is getting the P correct in the lines so that you have consistant P at the gun and have the lowest P reduction at the gun to reduce condensation in the air at the gun.
just trial and error on my part and lots of reading.
