Could someone help me with a little body work?
 12-10-2008, 10:15 PM
#1
Burning Brakes

Thread Starter
Member Since: Jan 2007
Location: Port Clinton Ohio
Posts: 1,164
Likes: 0
Received 1 Like
on
1 Post
St. Jude Donor '08-'09-'10-'11-'12-'13
Well, I am not a body man and could use a little help. When I bought my car 2 years ago, there was a crack in the right front wheel well. Today I decided it was time to attempt a repair. I am trying to do as much of the work as possible on the car but I have never tried anything like this before. Any suggestions would be greatly appreciated. If someone had step-by-step pictures of a similar repair, that would be awesome.
Thanks
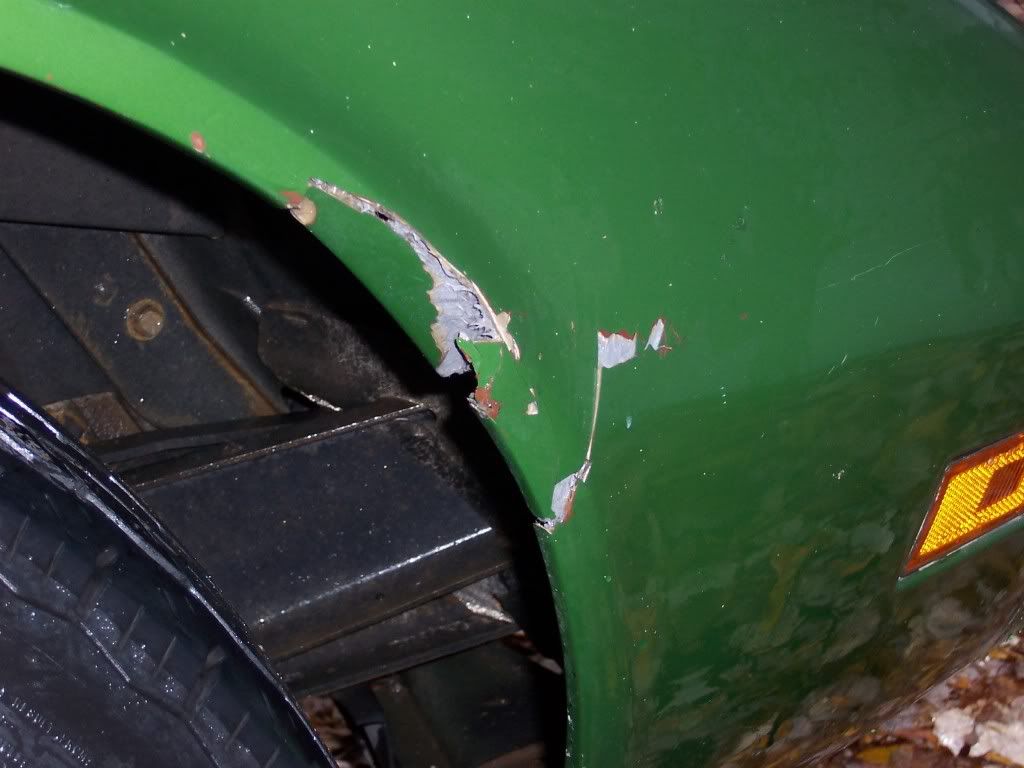
This is what I am dealing with. This was a picture taken when I picked the car up two years ago.
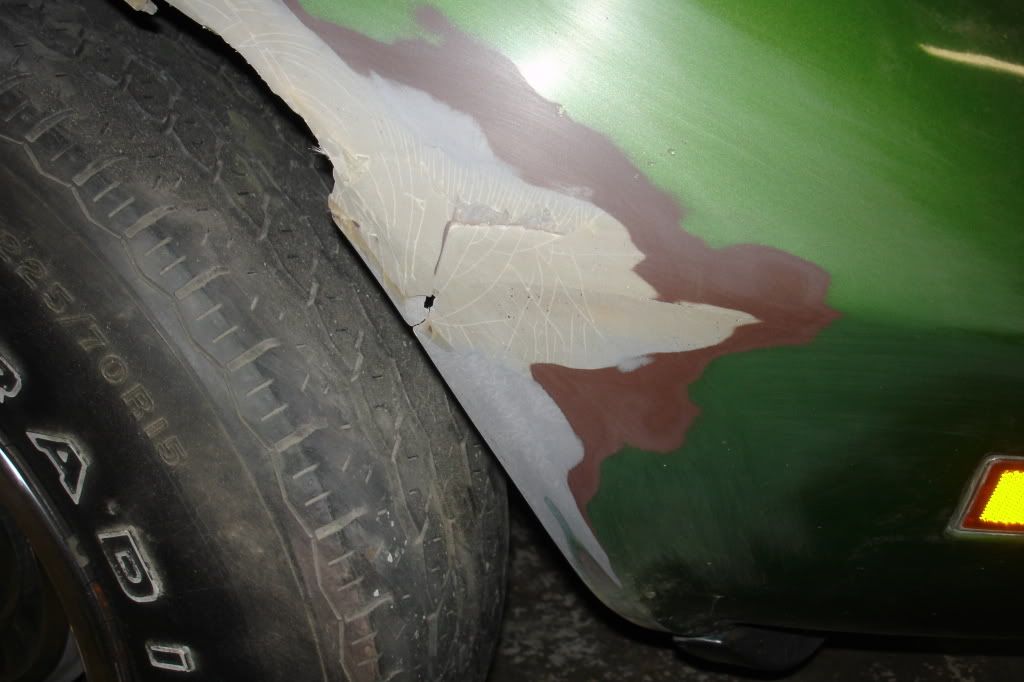
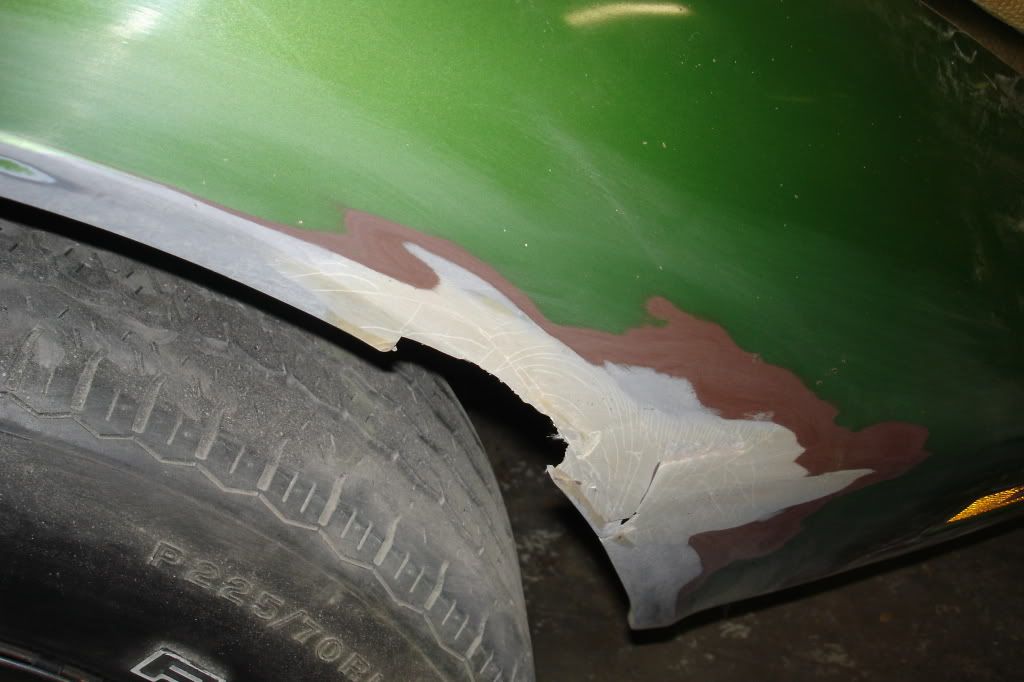
This is today after sanding. Looks like it was repaired once before. I assume my first step will be to get all of the pink filler off. Where do I go from there? Thanks
Thanks
This is what I am dealing with. This was a picture taken when I picked the car up two years ago.
This is today after sanding. Looks like it was repaired once before. I assume my first step will be to get all of the pink filler off. Where do I go from there? Thanks
 12-11-2008, 03:08 AM
#2

Not at all trying to be a wise-***, but if you are unfamiliar with fiberglass work, the best thing might be to leave this to a professional. Looking at your photos, its not going to be an easy task. You will have to remove all that dead area where the spider cracks still are, and maybe even more than that. This will leave you a relatively large, relatively complex hole to fill, for a first go at learning fiberglass work.
12-11-2008, 11:01 AM
#3
Team Owner


Member Since: Jun 2000
Location: Southbound
Posts: 38,928
Likes: 0
Received 1,470 Likes
on
1,249 Posts
Cruise-In II Veteran

Your damage is repairable. Have you worked with laying up fiberglass? Do you have a warm place to make these repairs?

12-11-2008, 01:25 PM
#4
Burning Brakes
Thread Starter
Member Since: Jan 2007
Location: Port Clinton Ohio
Posts: 1,164
Likes: 0
Received 1 Like
on
1 Post
St. Jude Donor '08-'09-'10-'11-'12-'13
I have done a couple of small repairs to my jet skis and used glass mat and resin to modify the front bumper cover on this car for a better fit. In both cases I was adding layers to the glass that was already there. I haven't ever replaced missing material like this.
There is a natural gas furnace in the garage. We keep it at about 50 degrees all winter. I turn it up a bit when I'm working out there.
There is a natural gas furnace in the garage. We keep it at about 50 degrees all winter. I turn it up a bit when I'm working out there.
12-11-2008, 01:55 PM
#5
Burning Brakes

You are on the right track ... and I believe it's something a novice can do if you are the 'handyman type'. From your last post, you should try it.
The objective here is to do as much structural repair as possible from the backside of the fender.
Start by removing your tire and securing the car so you can safely work underneath the fender well.
Make sure you wear adequate eye and breathing protection equipment.
Use a Dremel tool (or similar) to thin the underside, and be sure to go far enough to remove the fiberglass to approx. 3 inches beyond the damage.
Also use a hand file or hacksaw blade to cut a 'V' on the finish side everywhere that you have found cracks.
Wipe all surface with acetone.
Let's digress ... I've done this type of repair a few times as a novice. There are experts on this Forum that do this type of work every day. So before we go any further with a repair, I'd like to see more comments on the prep work that I've described above, and perhaps some enhancements, alternatives, and/or improvements.
You can also let us know if you have decided to do this repair yourself.
12-11-2008, 03:25 PM
#6
Le Mans Master


Member Since: Jul 2006
Location: charlotte north carolina
Posts: 8,117
Likes: 0
Received 100 Likes
on
92 Posts

do as 70yellow mentioned about building the material on the under side first, but before you do anything, make sure the fender is fiberglass, not scm. the beauty of this type of work is that more material can always be added or removed until the job suits you.
go for it!
go for it!
12-11-2008, 03:56 PM
#8
Burning Brakes
Thread Starter
Member Since: Jan 2007
Location: Port Clinton Ohio
Posts: 1,164
Likes: 0
Received 1 Like
on
1 Post
St. Jude Donor '08-'09-'10-'11-'12-'13
Thanks for the reply. I would like to try to do this myself. Part of the fun of owning an old car is learning how to work on it. I've done almost all of the work on it so far. That included master cylinder, calipers, carpet, bumper cover, dewitts radiator, poly bushings, tie rod ends, ball joints, trailing arm bushings, and a new GMPP crate motor. The only things I had to have professionally done are rebuilding the transmission, trailing arms and new u-joints in the drive shafts (could have done this myself but got it done for free). Oh and Lars rebuilt the distributor. The mechanical work on the car is pretty much done. Now it's time for the body. This is the only damage in the fiberglass. After this is repaired, I'm going to hand sand the whole thing. Then I will take it to a professional to get the body straight and paint it.
The spider cracks that you see in the picture are in the layer of body filler that was used when it was repaired once before. The fiberglass around the damaged area looks pretty good.
The spider cracks that you see in the picture are in the layer of body filler that was used when it was repaired once before. The fiberglass around the damaged area looks pretty good.
12-11-2008, 04:05 PM
#9
Burning Brakes
Thread Starter
Member Since: Jan 2007
Location: Port Clinton Ohio
Posts: 1,164
Likes: 0
Received 1 Like
on
1 Post
St. Jude Donor '08-'09-'10-'11-'12-'13
do as 70yellow mentioned about building the material on the under side first, but before you do anything, make sure the fender is fiberglass, not scm. the beauty of this type of work is that more material can always be added or removed until the job suits you.
go for it!
go for it!
So, you first clean up the inside of the fender at least 3" away from any damage. Then lay a couple of layers of mat on the inside first. Then build up the outside once those first layers dry? Is that correct?
I want to remove all of the cracked filler before I do anything else. I will probably do that tonight.
12-11-2008, 04:12 PM
#10
I'll chime in a little more now that I see that this is not the OPs first time at any type of fiberglass repair.
The challenge is going to be getting the lines right where it transitions to the edge of the fender well. That is, sanding the new glass into the correct shape of the lip around the fender edge. You might want to come up with a sanding block that is remotely shaped like the area you are working, vs just a plain old sanding block. For this area wrap your sandpaper around, something like say, a cigarette lighter, or something, whatever, that has about the same radius as the concave portion to get that part right. Then use a flat block on the actual edge of the fender well.
As far as prep I would add to remove paint as much as mentioned above me- what you are looking for here is "dead fiberglass". This is fiberglass that has delaminated from the impact that caused this, but is still laying in place and hasn't lifted (yet). The fiberglass will look lighter in color in such an area compared to the surrounding area. A bit hard to explain if you dont know what you are looking for but I think you will be able to tell, or I can try to elaborate more later.
From my experience I dont think it matters much which side you start rebuilding from. The goal is to have both sides look perfect when you're done, right? I think what I would do is cut me a cardboard template bigger than the area to be replaced that I could tape up on the inside of the fender. Maybe cover it with some mold release wax so I could get it back out. Then I would lay up a couple layers from the outside to get my rough shape started, with a good bond to the existing glass. Then I'd remove the cardboard, come on the inside (yeah, I'd get the wheel and anything else out of the way first) and back fill from there to get the inside looking halfway straight. Then back to the outside, building up layers in the parts that come out low from how imperfect this is going to be at the beginning. You can use quite small pieces to fill in areas, you dont have to lay a whole sheet for each application. You can also lay a whole sheet with a few small pieces under it in a couple of areas to make things start to come out level. Try to work all the air bubbles out as you do this, or they will be a pain in the *** later as you sand to shape. Layers laid up within 24 hours of each other are considered still chemically active enough to bond to each other. After that you must sand/grind your existing work (wipe away sanding dust with acetone) to facilitate a mechanical bond instead. This is a loose guide, and in case of doubt, I would sand/grind to provide the best bond. You will probably be doing quite a bit of this anyways to get your shape to come together.
I think the only thing left to add is that as also stated above you can add and remove material at will as you get closer and closer to the desired result. Good glass work takes time. One of those right angle grinders with the 2 inch sanding pad will be useful as you begin to rough your shape in, go to hand sanding as you start to get close.
Last edited by Droshki; 12-11-2008 at 06:24 PM.
12-11-2008, 04:19 PM
#11
SMC stands for "sheet molded compound" or something. The glass is basically chopped up, wet and put into a mold, and put under pressure to form the part. Here is a resin designed for use with SMC http://www.evercoat.com/productDetail.aspx?pID=16
I dont know what your car is made of. I think the important part is not the fact that it's molded, but the type of resin that is used- polyester, vinylester, epoxy, etc.... I think SMC used vinylester, but dont quote me on that one. Google is your friend
Also when you buy the resin, make sure that you get the activator for the temperature you will be working in. Fast activator for cold climate, slow activator for warm climate. Mix into the resin WELL. Think thats good enough? Mix some more. Might want to mix up a small batch first to check your proportions. It's always harder to get it to "kick" in the time frame you want, with the colder weather.
Also....a good way to wet out your glass pieces is to , after cutting to the shape you want, lay them out on some ordinary newspaper (a bit thick so it doesn't bleed through to whatever is underneath it), then wet it out with a paintbrush. Carefully (surgical gloves are nice here) you can lift it up and place it onto the work. Then roll it out. I would try to find a really small roller for the area you are going to be working. A large one will be useless.
Oh, and acetone is the chemical of choice for cleanup. Heed above warning about open flames.
Last edited by Droshki; 12-11-2008 at 07:10 PM.
12-11-2008, 06:30 PM
#12
After your glass work is complete, skim over the area with a fairing compund. This is like bondo, but find a lightweight product. Not bondo. Fairing compound. Your goal will to be to cover the entire area, and then sand 95% of it back off. Dont see the pinholes and the scratches from the sandpaper? You will when you spray paint if you skip this step.
12-11-2008, 06:46 PM
#14
Burning Brakes
I thought I saw fiberglass cloth strands in the pic of the damaged area, so I didn't mention smc. Perhaps someone can tell you what to look for to identify smc. There are many other threads on this subject, so do a search to find those details.
If you choose fiberglass resin for your repair, you can use saran wrap over the layup work to keep it from dripping off until it sets. I've read here about using other stuff to keep the resin in place on non-horizontal surfaces, but I don't recall what others recommended.
My preference is Bondo Fiberglass Resin Jelly. It's the consistency of peanut butter, and does not move off the cloth at all. I also use 'spun' cloth instead of 'woven' cloth ... spun cloth is a little thicker, heavier, and will result in a stronger repair.
Remember ... the hardener for the Jelly activates at 55 degrees F, so if you need to gain time to get your batch of resin applied, have all of your tools ready, mix quickly, cut and fit your cloth in advance, and work in a cool place. Then warm it up to cure. The jelly is sandable in about 20 minutes.
Good luck.
Last edited by 70Yellowbird; 12-12-2008 at 01:10 AM.
12-11-2008, 07:14 PM
#16
Race Director

First, just clean the underside of the fender with gasoline, kerosine, lacquer thinner, or acetone to get the undercoating and road grime off. Finish by spraying with starter fluid, throttle body cleaner, or any spray that does not leave residue. Do an area much bigger than your anticipated repair and let the fluids drip into a large cookie sheet or similar. Take the appropriate steps when using these flammable solvents.
Next, grind the front side bondo and cracks completely out to a feather to remove all the bondo and go thru all the cracks. On the cracks you can leave up to 1/8" gap when you grind thru. Use 20, 30 or 40 grit. The more rough the disc the better.
Wipe back side with acetone or laquer thinner or alcohol.
Then get some aluminum duct tape as used for a/c ductwork. The good real stuff is much thicker than the Homey Depot junk.
Using a bondo squeege apply it to the underside of the fender under the repair making sure it is tight. This tape is heavy and sticky enough to form a mold for you. Layer it up on the underside if you want it stiffer and/or thicker.
The using whatever speed epoxy is appropriate for your temperature and epoxy compatable mat, do the outside of the fender first probably in at least 2 layers, not stopping between layers. Important to not let the layers cure or harden.
After the outside has hardened, remove all the a/c tape on the underside.
Then using a small right angled air grinder with the same 20 grit discs, grind the underside of the fender to an area about 1" past the new glass that you put in the front. Light should show thru the new stuff easily to guide you. Then put 1 or 2 layers on the underside, same stuff. Have all your matt cut roughly to size before you mix resin.
After all has cured, you can carefully grind or sand to shape staring with 100 grit to the outside contours and also to shape the underside. Use the color of the original fender to guide how much you sand. Don't sand too deep. Ideally, you want to use NO filler when done, so be carefull with your grinding/sanding. Go up to 320 to prep for primer.
Whether this is SMC (which it is) or not, is a moot point. Epoxy resin is the best to use on any type of glass and has over 10x the adhesion properties of the other kinds of resins. Epoxy is the best to use on ANY composite.
From your pics, it looks like they used bondo instead of glass for strength.
The key to making this a simple job is to use the A/C tape as a mold.
On the bright side, if you screw up, just start over again and grind out your screwups. Glass is very forgiving.
I don't have them handy, but I can post some pics of the tape used as a form etc tomorrow evening.
12-11-2008, 07:21 PM
#17
Drifting

There are 2 ways to fix this, build your own with fiberglass mat as mentioned above or cut out the damaged area and section in a matching piece from a new or used fender.
If I was doing this repair, I would section it especially since it has been repaired previously. The section repair will be simpler to do, the body lines and inner lip will be more accurate and the end repair will be stronger. If you build your own repair, all of the damaged area has to go and you will spend countless hours filling and sanding and using more product to duplicate the flare radius, inner lip and wheel opening radius than if you section it.
Your fender is SMC (light gray color) so what ever route you take, you will need to use epoxy resin not polyester resin and use adhesives and fillers intended for SMC.
You will really need to wait until spring, so that the body temperature can be maintained and the materials can cure correctly without turning the heat on and off.
12-11-2008, 07:30 PM
#18
Burning Brakes
Thread Starter
Member Since: Jan 2007
Location: Port Clinton Ohio
Posts: 1,164
Likes: 0
Received 1 Like
on
1 Post
St. Jude Donor '08-'09-'10-'11-'12-'13
Thanks for the advice everyone. 
As soon as I get the kids to bed, i'm going to go out and work on grinding the bondo off and may start cleaning up the back side of the fender if I have time.
As soon as I get the kids to bed, i'm going to go out and work on grinding the bondo off and may start cleaning up the back side of the fender if I have time.
12-11-2008, 08:50 PM
#19
Burning Brakes
This past summer, I talked to a guy that does a lot of fiberglass repair work on jet skis ... he told me he uses baby powder (talcum powder) to thicken his resin, and warned me that the color of the layup wasn't very pretty, but does get covered with paint.
12-11-2008, 10:07 PM
#20
This is good info ... Thanks.
This past summer, I talked to a guy that does a lot of fiberglass repair work on jet skis ... he told me he uses baby powder (talcum powder) to thicken his resin, and warned me that the color of the layup wasn't very pretty, but does get covered with paint.
This past summer, I talked to a guy that does a lot of fiberglass repair work on jet skis ... he told me he uses baby powder (talcum powder) to thicken his resin, and warned me that the color of the layup wasn't very pretty, but does get covered with paint.
Good tip about the metal foil tape too- I never thought of that. I would still go for some mold release wax though to make sure it released clean.