
C6 Z Brake Bleeder Blew Out of Caliper On Track
 08-05-2011, 06:27 PM
#1
Pro

Thread Starter


I finally got a chance to take my C6 Z to the track and after about an hour of track time I took the car out of the pits and one of the bleeders blew out of the caliper leaving me with little to no braking!!!
I just refreshed the calipers w/ DRM pistons, DRM braided lines, Centric seals, fresh paint from Mike the Powder coater (Who did a great job) and Speed bleeders from "Speedbleeders.com". There is no way I over torque the bleeders and they are M10 x 1.0 bleeder thread which is what I show was the correct size.
My best guess is that they threads were fatigued due to usage over the years, and possible over torqued by the original owner. Then after being bead blasted and baked at Mikes they just did not have the tensile strength to hold the pressure. After closely inspecting several of the others are starting to leak and fear they are in the same boat.
Has anyone ever had this issue?
The following is the process I used to accurately install the Time-Serts to repair.
1. Remove the caliper from the car and remove the piston closest to the bleeder screw.
The piston can be easily removed by:
Take out the pads and pad retainer bolts (Caution the bolts often seize in place)
Remove the crossover tube
Insert a bleeder into the crossover tube hole and gently tighten
If on the inboard side use a M??x?.? bolt to close the brake line hole (Sorry can’t remember but believe it is a M12x1.0)
Using clamps hold the (2) pistons not being removed in place and a third as a stop to ensure the piston doesn’t shoot out
With an air hose that has a rubber tip gently pressurize the caliper through the stripped hole
Pull the dust boot with a medium flatblade by gently prying/twisting on the inner seat
Using a dull pick remove the piston seal
2. Drill the hole out by slowly increase in drill bit diameter until you step up to the supplied drill bit.
Use plenty of cutting oil to prevent binding and use the drill on the lowest speed
2. Counter bore / Back Cut the seat using plenty of oil
3. Thoroughly clean the hold and apply antiseize to the Tap and very gently start the tap checking for parallelism.
Due to the fact it is critical for the threads to be parallel to the seat of the bleeder the use of a tap guide is recommended but not necessary (PT# 30105)
After making the first cut, clean out the hole and retap by hand to ensure the threads were smoothly cut
Again Clean the hole before inserting the Time-Sert
4. Apply a generous amount of oil on the driver tool and smoothly thread into the tapped hole
Run the driver in once, remove and re-oil and then reinsert to ensure there is little resistance when turning to ensure it was thoroughly cold rolled.
5. Clean your new threads
6. Reinstall the piston and crossover pipe
Insert the piston seal and generously apply lube to the caliper bore
Lubricate the piston and gently push it into the piston bore by hand only half way
Slide the dust boot over the piston into place
Slide the piston in fully and ensure the dust boot is seated
7. Reinstall the pads bolts and bleed the caliper
8. After bleeding start the car and have a friend quickly and firmly depress the pedal while you watch for leaks
Corvette Z06 Kit
M10x1.0
PT# 1010
Suggested Insert
PT# 10106
6.2mm Long
Stainless Steel
http://www.timesert.com/html/mtrcsert.html
I found the best pricing and service from ToolsKwik
http://www.toolskwik.com/
Caliper Assembly Lube
http://store.zeckhausen.com/catalog/...oducts_id=2967
Zeckhausen Racing carries new seals, pad retaining bolts, Pad clips, Pads, Rotors…….
http://store.zeckhausen.com/catalog/...02_103_104_847
Last edited by dsddcd; 09-29-2011 at 02:04 PM.
 08-05-2011, 07:16 PM
#2
Le Mans Master

It may be the speedbleeders themselves as I have seen quite a few people have issues with them and then some have absolutely no issues. So before you go through pulling the calipers and resleeving I would try new bleeders. Personally I went to the track recently and one of my stock bleeder valves started seeping. Got a new one coming from RichieRichZ06 and will bleed the lines and install it.
08-05-2011, 08:49 PM
#3
Pro
Thread Starter
Yeah I think the sealer compound on the bleeder is too hard though I have not had a chance to investigate further.
Last edited by dsddcd; 08-05-2011 at 08:52 PM.

 08-06-2011, 01:37 PM
#5
Drifting

I replaced my bleeders on the front calipers with Speed Bleeders. At Road Atlanta last weekend, two leaked and ruined the caliper paint. Apparently, they have to be torqued to a specific and relatively high level. I've never considered torquing a bleed before. Guess it's time to by a 1/4 drive torque wrench.
Please PM me the contact info for powder coater.

Jim
Please PM me the contact info for powder coater.
Jim
08-06-2011, 05:14 PM
#6
Pro
Thread Starter
I replaced my bleeders on the front calipers with Speed Bleeders. At Road Atlanta last weekend, two leaked and ruined the caliper paint. Apparently, they have to be torqued to a specific and relatively high level. I've never considered torquing a bleed before. Guess it's time to by a 1/4 drive torque wrench.
Please PM me the contact info for powder coater.
Jim
Please PM me the contact info for powder coater.
Jim
As for the bleeders mine are the same, this is why I beleive the Speedbleeders has something to do with the problem, 3 out of 4 of the Speedbleeders were leaking where as the factory bleeders on the inside are all just fine. I will never use anything but the factory bleeders again of these calipers.
08-06-2011, 05:16 PM
#7
Pro
Thread Starter
08-06-2011, 07:06 PM
#8
Drifting


Wilwood sells an oversize bleeder that can be inslalled if the caliper is worth saving.
08-07-2011, 06:22 AM
#9
08-07-2011, 08:18 PM
#10
Pro
Thread Starter
Yes you are correct, there is a possiblity that the original owner may have over torqued but I still don't have any evidence to substaniate this and still believe that the bleeder it's self has something to do with the problem.
08-28-2011, 11:24 PM
#11
Pro
Thread Starter
Well I finally go some time to work on my brakes and I did find the issue.
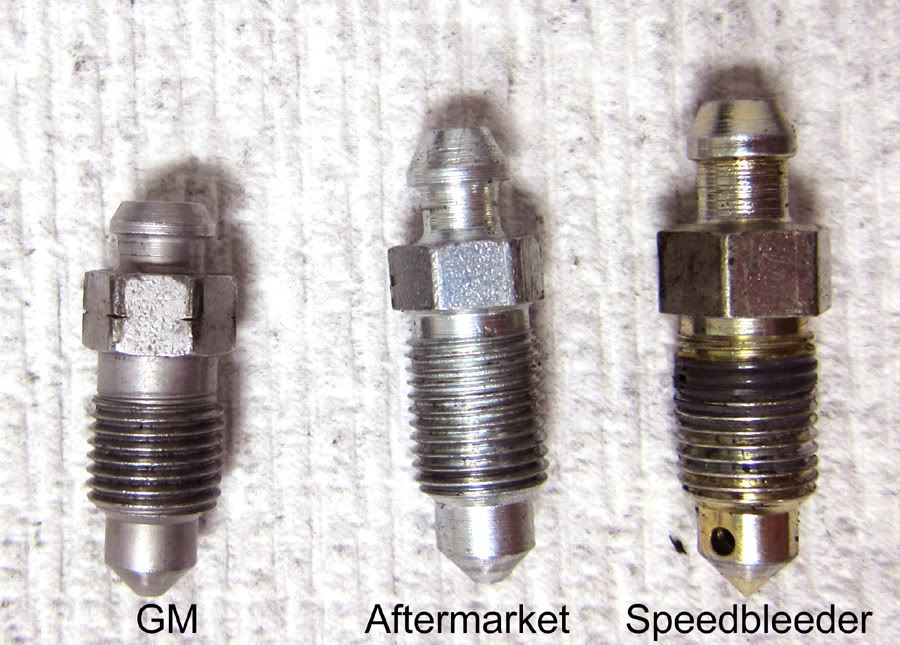
I ended up pulling all of the Speedbleeders out of the calipers and replacing with aftermarket bleeders from the local Napa and what do you know more issues (ordered the GM replacements but they did not ever make it). Just like the Speedbleeders they had little drips of fluid coming out. The difference is that the Speedbleeders has a sealing compound so I was unable to see any leaks until I got the brake hot on the track. When I saw the leaks I tightened the bleeders thinking they had loosened over the course of the day.
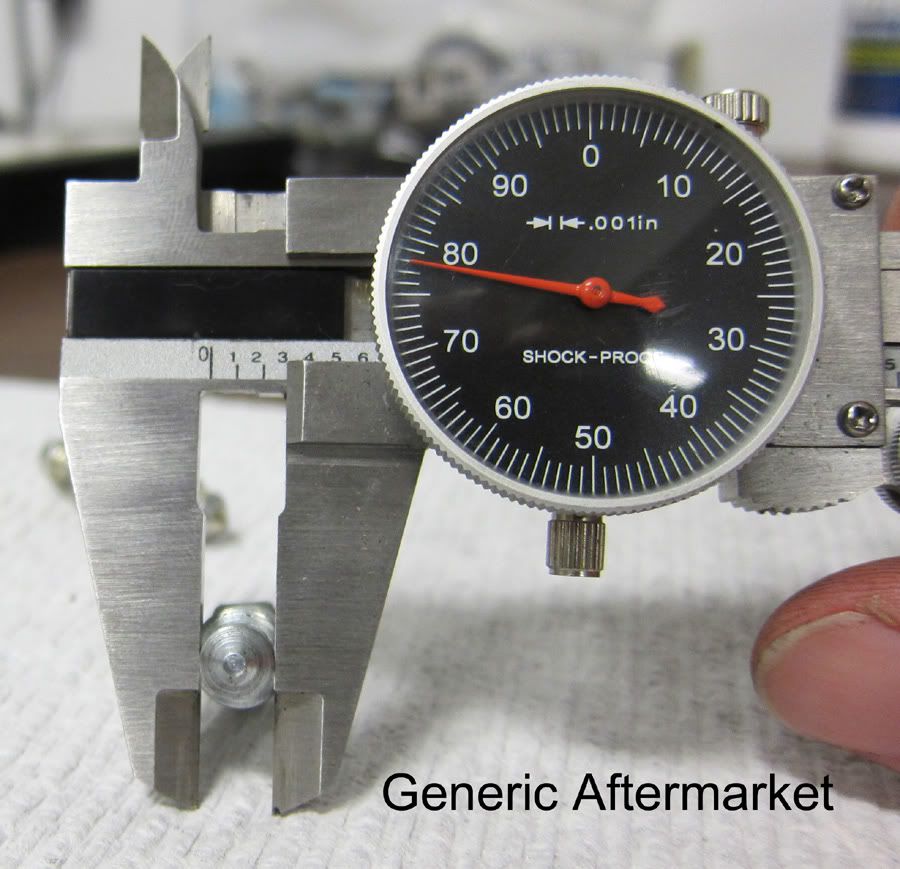
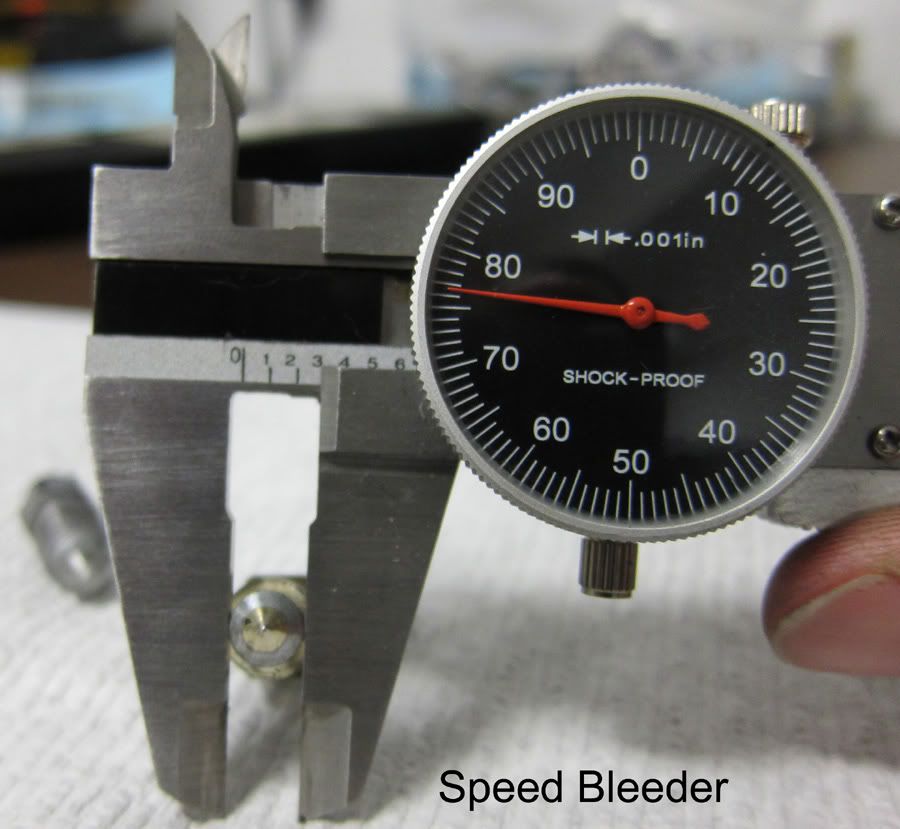
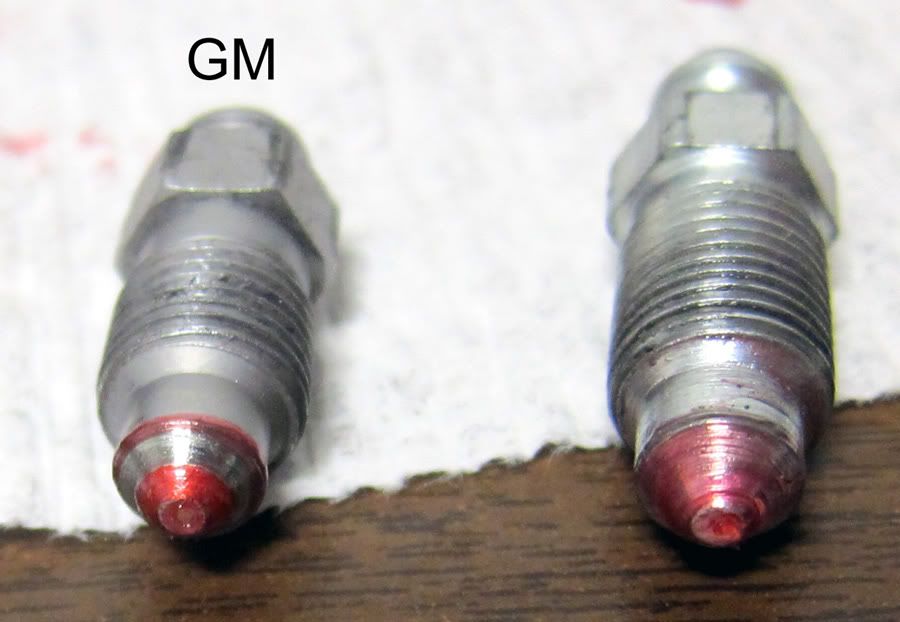
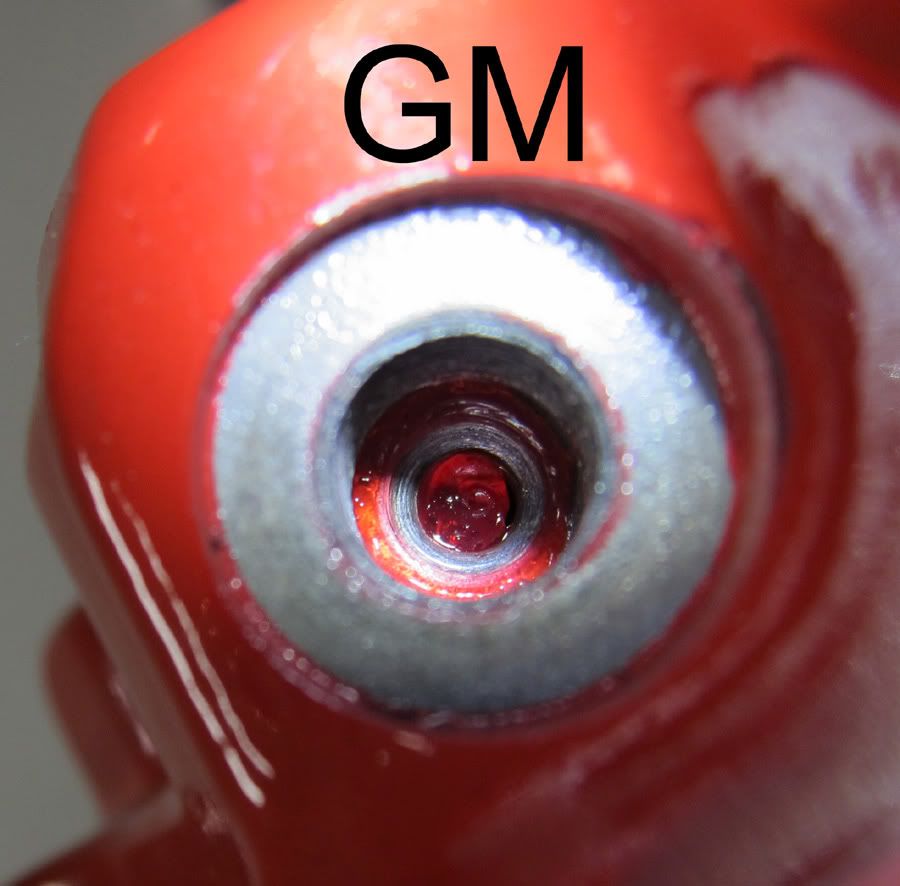
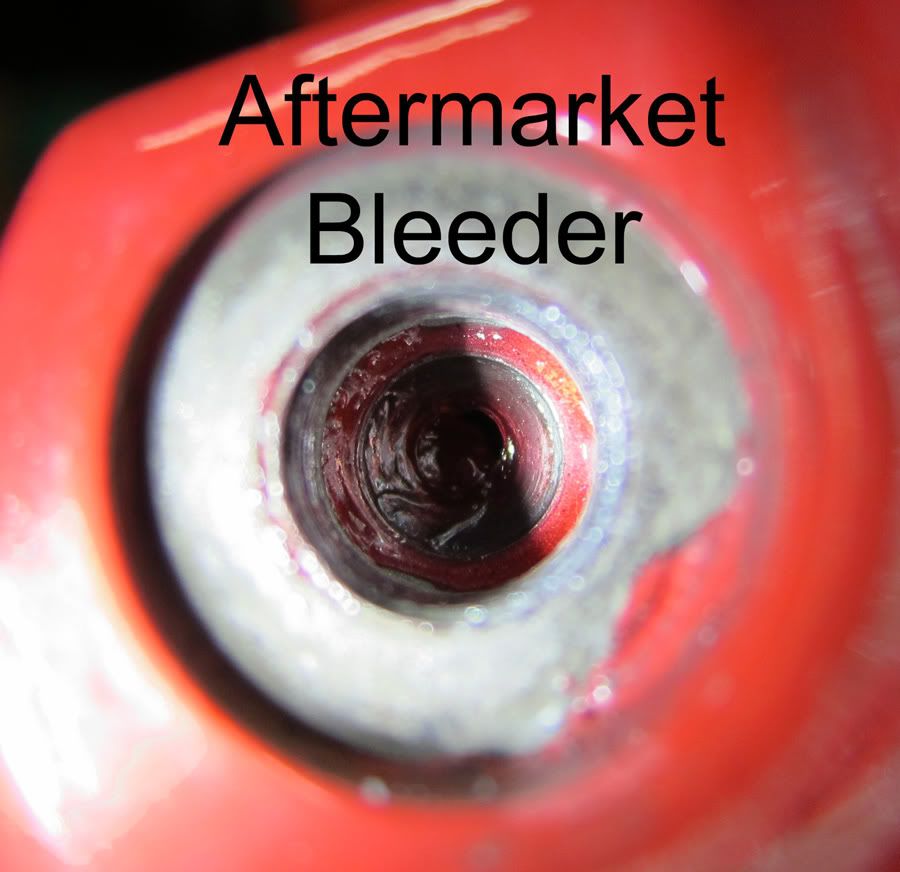
So, I did what I should have done on the front end and start testing. Long story short the aftermarkets, when properly torqued only seal on a very, very thin ring on the seat of the caliper. As you can imagine there is a lot more than thread pitch when it comes to making a bleeder. I am unsure at this time if the diameter of the lower portion of the bleeder is the issue or the angle of the sealing surface……… . It turns out that the Speed bleeders are not compatible with the factory calipers nor are many of the ones you pick up at the local parts store

I ended up pulling all of the Speedbleeders out of the calipers and replacing with aftermarket bleeders from the local Napa and what do you know more issues (ordered the GM replacements but they did not ever make it). Just like the Speedbleeders they had little drips of fluid coming out. The difference is that the Speedbleeders has a sealing compound so I was unable to see any leaks until I got the brake hot on the track. When I saw the leaks I tightened the bleeders thinking they had loosened over the course of the day.
So, I did what I should have done on the front end and start testing. Long story short the aftermarkets, when properly torqued only seal on a very, very thin ring on the seat of the caliper. As you can imagine there is a lot more than thread pitch when it comes to making a bleeder. I am unsure at this time if the diameter of the lower portion of the bleeder is the issue or the angle of the sealing surface……… . It turns out that the Speed bleeders are not compatible with the factory calipers nor are many of the ones you pick up at the local parts store
 08-29-2011, 09:10 AM
#13
Drifting
Scott,
I've had similar problems with leakage after replacing the OEM bleeders with Speed Bleeders. I initially replaced them because of a perceived problem with air getting into the caliper during bleeding. All that I had for replacements were Speed Bleeders so I used them, although, I don't use the actual speed bleeder function.
During a trip to RD ALT, they leaked a little and ruined the caliper paint. I pulled the wheels and although the bleeders were all tight, I tightened the them even more and did get the leaks to stop.
After RD ATL, I replaced the Speed Bleeders with the original OEM bleeders but could not get the OEMs to stop leaking and had to go back to the Speed Bleeders.
After considering your original post, the believe the problem is angle of the seat. I believe that when I tightened the Speed Bleeders to stop the leaks, I re-formed the seats in the caliper such that the OEM seat configuration will not longer seal.
Jim
08-29-2011, 10:16 AM
#14
Former Vendor

Someone correct me if I'm wrong on my numbers but I believe you'll find they are all 37 degree seats. The only difference is that once one set has been used a number of times it's dimpled or mated to the aluminum in that area. When you put in the new one that mating area takes some time to match up fully. My thoughts would be that the SB fittings have such a long pointy taper to allow them to be retro fit with success to just about any seat with some torque. (the barrel diameter won't have much effect)
Not sure what gains are going to be had with thread repair kits. The seal has nothing to do with the thread. Once the caliper is hit with the drill bit...you're committed to it. Even with fresh threads (after the full tear down and rebuild) you better have the same seat undamaged. *Or a shop capable of establishing the proper angled seat again a tad deeper. You get to all that...it's probably cheaper to replace the entire caliper.
Not sure what gains are going to be had with thread repair kits. The seal has nothing to do with the thread. Once the caliper is hit with the drill bit...you're committed to it. Even with fresh threads (after the full tear down and rebuild) you better have the same seat undamaged. *Or a shop capable of establishing the proper angled seat again a tad deeper. You get to all that...it's probably cheaper to replace the entire caliper.
Last edited by Todd TCE; 08-29-2011 at 10:20 AM.
 08-29-2011, 10:49 AM
#16

I think the speed bleeders are garbage. You can over torque them and and after so many bleeds, the hat that seals will fracture and you will loose your brakes, I know I have been there. Now we just do it the old way and have had zero issues in the brake bleed department.
08-29-2011, 11:24 AM
#17
Former Vendor

Its my humble opinion that the stock calipers are garbage for track use. Ive melted so many stock calipers, we dont even bother tracking stock Zs with out proper brake kits.
Now, if you have worn the calipers out to the point where they need seals and to be re-painted, they seats that the bleeders seal against are worn as well, not to mention, the threads are worn as well.
When tracking a car, brakes are not something that should be taken lightly. Buy new calipers, and replace them.
08-29-2011, 10:27 PM
#18
Pro
Thread Starter
Its my humble opinion that the stock calipers are garbage for track use. Ive melted so many stock calipers, we dont even bother tracking stock Zs with out proper brake kits.
Now, if you have worn the calipers out to the point where they need seals and to be re-painted, they seats that the bleeders seal against are worn as well, not to mention, the threads are worn as well.
When tracking a car, brakes are not something that should be taken lightly. Buy new calipers, and replace them.
Now, if you have worn the calipers out to the point where they need seals and to be re-painted, they seats that the bleeders seal against are worn as well, not to mention, the threads are worn as well.
When tracking a car, brakes are not something that should be taken lightly. Buy new calipers, and replace them.
On the other hand the PBR calipers are a fairly cheap aluminum casting and I believe they were really just a good alternative between track and street.
For my needs the factory brakes work good enough, and I have no reason to change them for the occasional track day. Though I would love to try out a set of Stoptech's, Brembo's, Wilwood, ZR1........
Now you are 100% correct, I would have been a lot better buying a complete new set of factory calipers as it would have been a hell of a lot easier and not much difference in cost.
Last edited by dsddcd; 08-30-2011 at 08:54 AM.
08-30-2011, 11:53 AM
#19
Former Vendor
You are exactly right, this where you would want to time the items out. Things just simply wear out, and you need to find how many miles/hours/tanks of fuel stuff lasts before you replace it 
Even on the stoptechs, we would replace the calipers once a season, seals every 3 races, and pistons as they needed replacement while we did seals.
Even on the stoptechs, we would replace the calipers once a season, seals every 3 races, and pistons as they needed replacement while we did seals.
09-29-2011, 02:05 PM
#20
Pro
Thread Starter
Added the below to the first post
The following is the process I used to accurately install the Time-Sert's
1. Remove the caliper from the car and remove the piston closest to the bleeder screw.
The piston can be easily removed by:
Take out the pads and pad retainer bolts (Caution the bolts often seize in place)
Remove the crossover tube
Insert a bleeder into the crossover tube hole and gently tighten
If on the inboard side use a M??x?.? bolt to close the brake line hole (Sorry can’t remember but believe it is a M12x1.0)
Using clamps hold the (2) pistons not being removed in place and a third as a stop to ensure the piston doesn’t shoot out
With an air hose that has a rubber tip gently pressurize the caliper through the stripped hole
Pull the dust boot with a medium flatblade by gently prying/twisting on the inner seat
Using a dull pick remove the piston seal
2. Drill the hole out by slowly increase in drill bit diameter until you step up to the supplied drill bit.
Use plenty of cutting oil to prevent binding and use the drill on the lowest speed
2. Counter bore / Back Cut the seat using plenty of oil
3. Thoroughly clean the hold and apply antiseize to the Tap and very gently start the tap checking for parallelism.
Due to the fact it is critical for the threads to be parallel to the seat of the bleeder the use of a tap guide is recommended but not necessary (PT# 30105)
After making the first cut, clean out the hole and retap by hand to ensure the threads were smoothly cut
Again Clean the hole before inserting the Time-Sert
4. Apply a generous amount of oil on the driver tool and smoothly thread into the tapped hole
Run the driver in once, remove and re-oil and then reinsert to ensure there is little resistance when turning to ensure it was thoroughly cold rolled.
5. Clean your new threads
6. Reinstall the piston and crossover pipe
Insert the piston seal and generously apply lube to the caliper bore
Lubricate the piston and gently push it into the piston bore by hand only half way
Slide the dust boot over the piston into place
Slide the piston in fully and ensure the dust boot is seated
7. Reinstall the pads bolts and bleed the caliper
8. After bleeding start the car and have a friend quickly and firmly depress the pedal while you watch for leaks
Corvette Z06 Kit
M10x1.0
PT# 1010
Suggested Insert
PT# 10106
6.2mm Long
Stainless Steel
http://www.timesert.com/html/mtrcsert.html
I found the best pricing and service from ToolsKwik
http://www.toolskwik.com/
Caliper Assembly Lube
http://store.zeckhausen.com/catalog/...oducts_id=2967
Zeckhausen Racing carries new seals, pad retaining bolts, Pad clips, Pads, Rotors…….
http://store.zeckhausen.com/catalog/...02_103_104_847