How to and review: Lake Country glass polishing kit (remove wiper scratches)
 12-10-2008, 10:59 AM
#1
Former Vendor
Thread Starter

Member Since: Feb 2006
Location: Orlando/Oviedo FL
Posts: 1,943
Likes: 0
Received 2 Likes
on
2 Posts
One of my biggest fears has always been scratching(wiper-tracks or hazing) my windshield by using the wipers on a dirty surface. Quite frankly, up until two days ago I have never been able to effectively eliminate the tracking from glass. That is until I used the Lake Country Glass Polishing Kit. My wife�s vehicle was particularly bad and was to the point that driving at night was becoming difficultfor me. She had apparently adjusted to not being able to see, which no matter how hard she convinced me never let me feel safe about her driving.
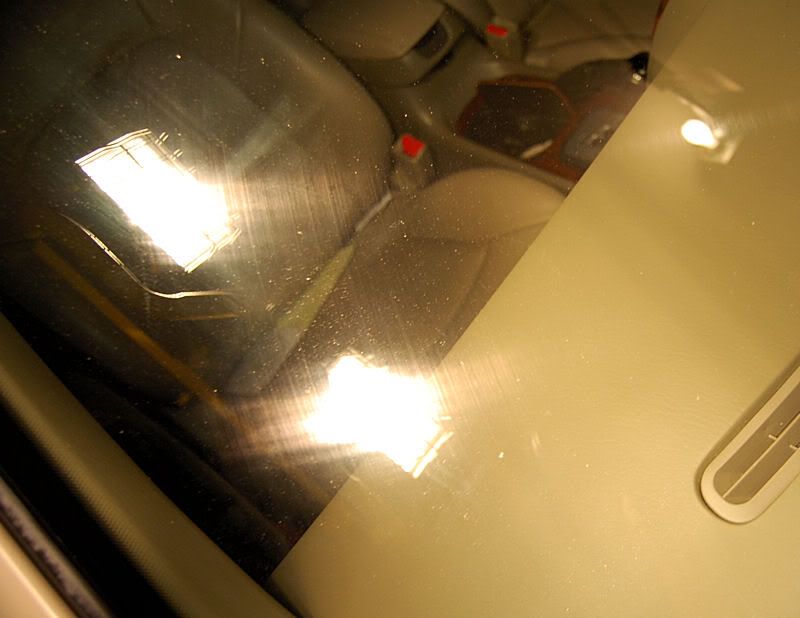
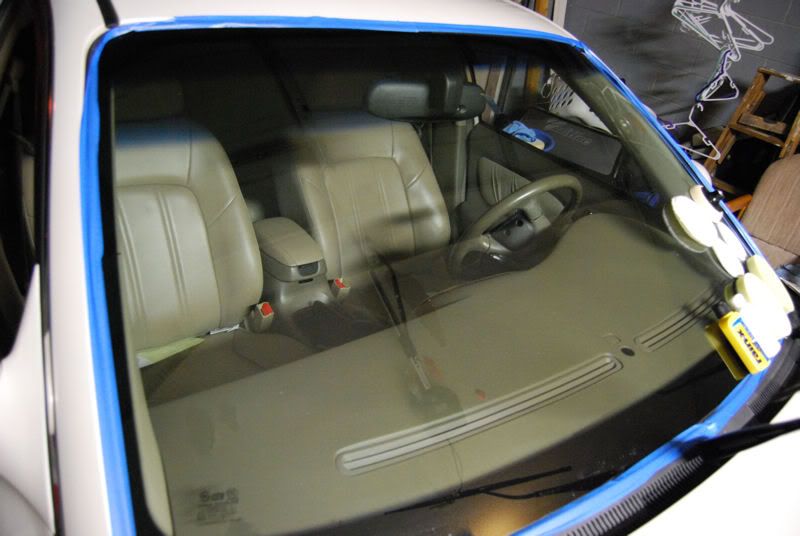
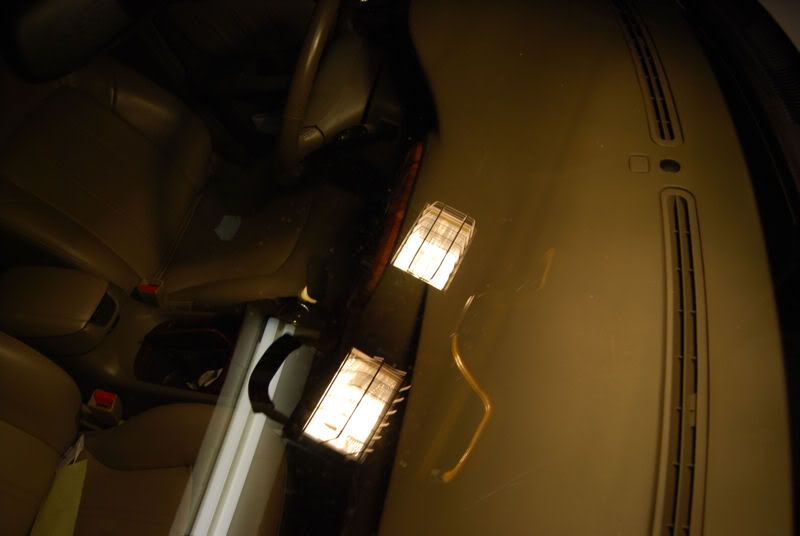
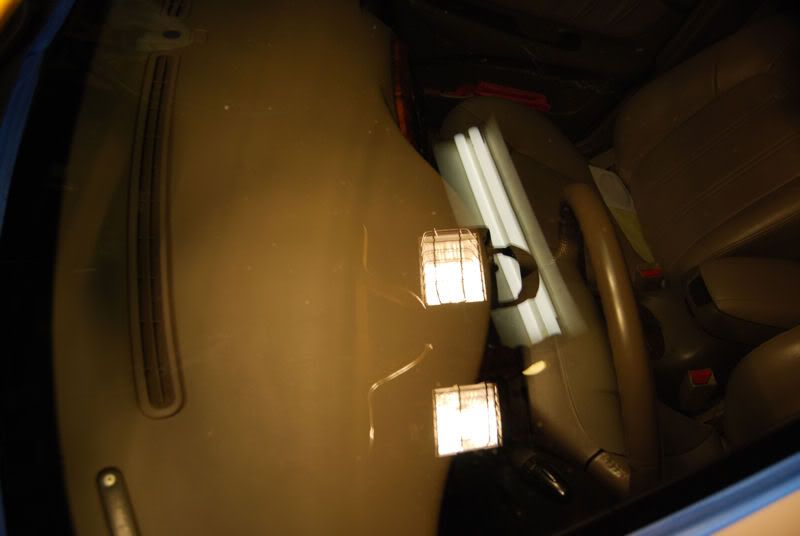
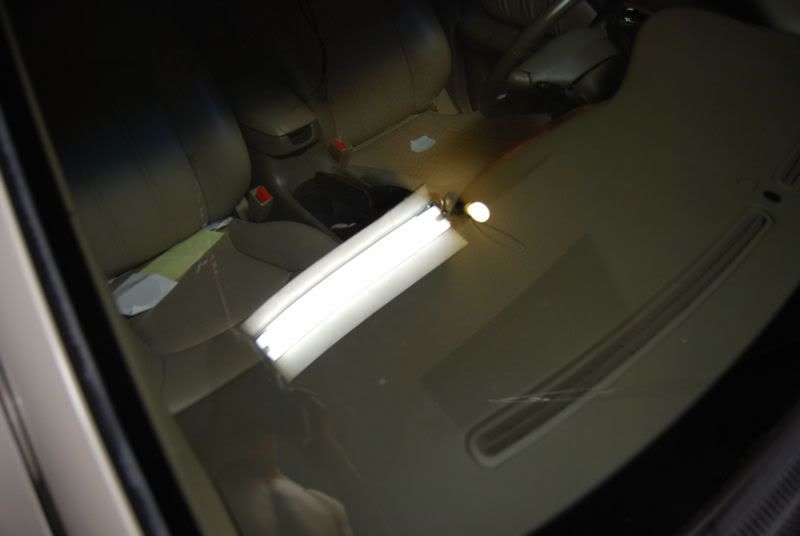
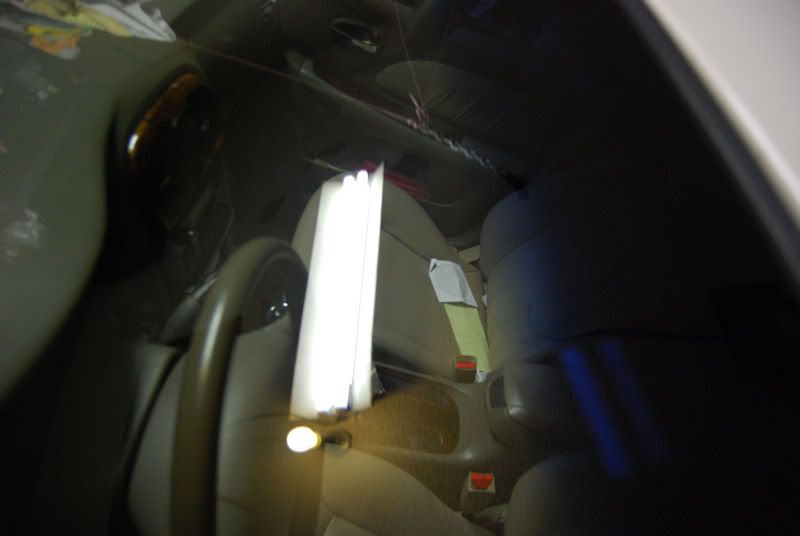
The scratching on the windshield of my wife's Hyundia Sonata was so bad in places that I could feel a texture with my finger nail.
Even in incandescent light scratches and haze are clearly visible.

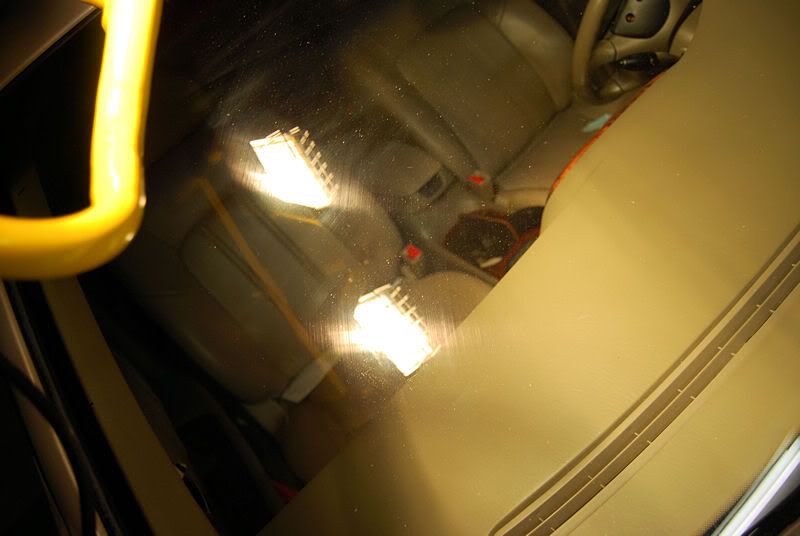
Under 500w halogen lighting the damage to the windshield is even more visible (my wife claims to be able to see through this with no problem!).
I remembered seeing on Lake Country�s website that they offered a glass polishing kit and found one for sale at properautocare.com. When the box arrived I opened it and read through the directions, which I didn�t find easy to understand. A quick call to Lake Country quickly cleared up any questions (as typical their customer service is outstanding!) I had and provided very clear directions on how to use the product.
Given that I did not find the instructions helpful, I have merged them with my conversation and experience to provide a review and hopefully instructions so that anybody with basic rotary experience can replicate my excellent experience with this kit.
Manufacturer�s Claims (from Lake Country�s website)
GPS PRO
Glass Polishing System
�Polish and restore automotive glass and other glass surfaces
�Machine powered system restores clarity by removing wiper tracks, light scratches
and other minor defects
�For use on: Windshields and Automotive Glass; most other glass surfaces
�For use with rotary buffers or D.A. machines
�Contains materials to polish and seal approximately 7,200 square inches
NOTE: The kit from Lake Country contains an adapter for use on a Porter Cable. CMA offers two separate kits (on for DA�s or one for Rotaries). Given that glass is often much harder then paint, I elected to select a rotary kit.
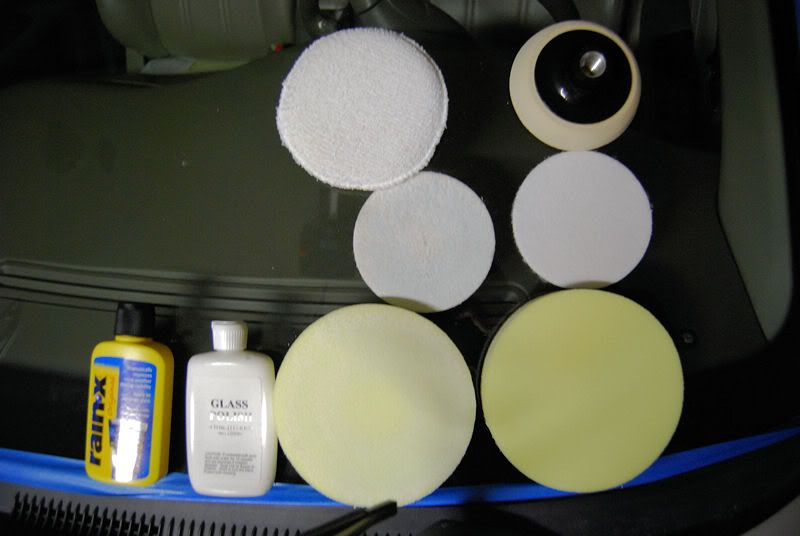
Contained in the kit
- 4 oz of glass polish (cernium oxide)
- Rain x
- 2 felt cutting disks (used for removing deeper damage and heavy scratches
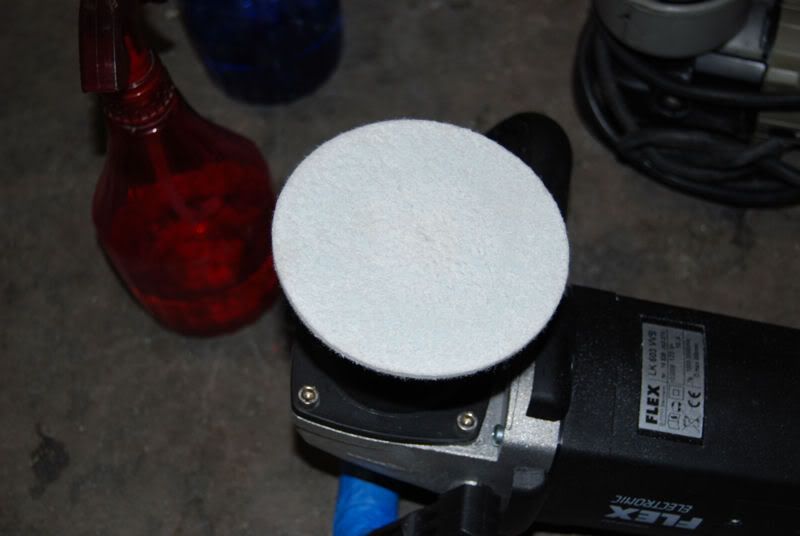
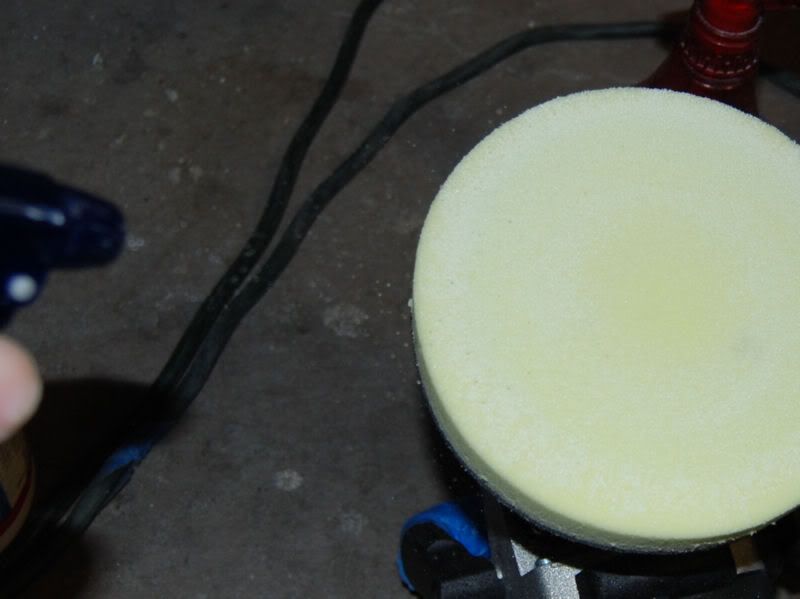
- 2 yellow foam pads (used for removing light marring, calcium deposits, and polishing the glass to high gloss, these pads are significantly different then the yellow foam used on paint)
- 3.5 inch backing plate
- terry cloth applicator
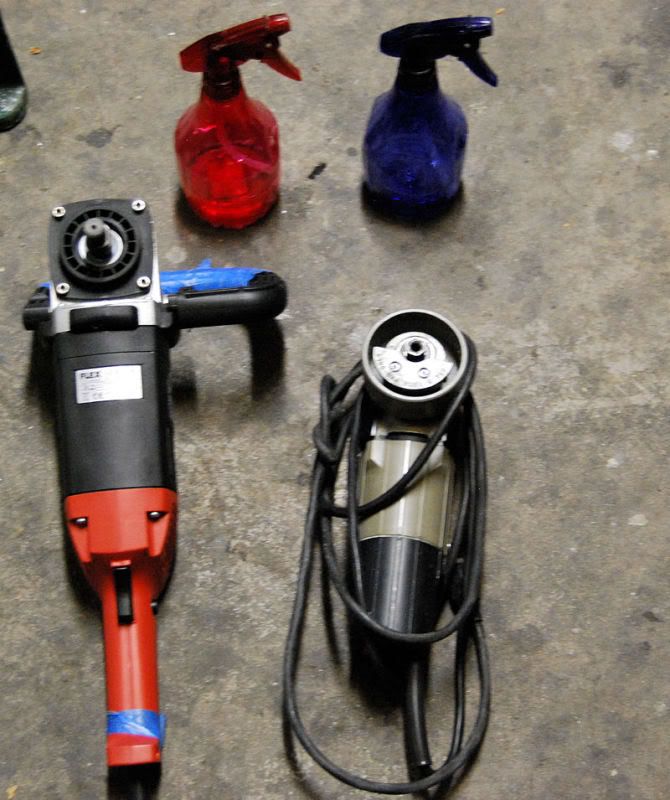
Additional products needed
- Polishing machine (either a rotary or orbital PC style)
- Isopropyl Alcohol
- Water
- Assorted microfiber towels
To begin�.
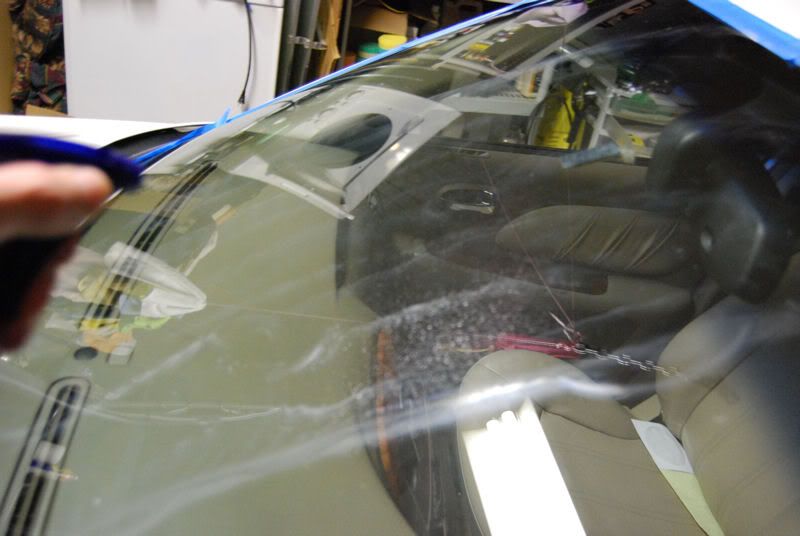
Similar to removing swirl marks and damage from the paint, removing scratches and wiper damage from the glass requires �re-leveling� the surface.
1) Thoroughly clean the glass surface using alcohol (or window cleaner) and remove all dirt, bug splatter, film, and chemicals. Contaminated glass may benefit from a couple minutes with a clay bar. We do not want a particulate remaining on the paint as it can become trapped between the pad and glass and cause more scratching.
2) Tape plastic trim and rubber seals around the perimeter of the glass.
3) Apply supplied backing plate to the rotary (or Porter Cable).
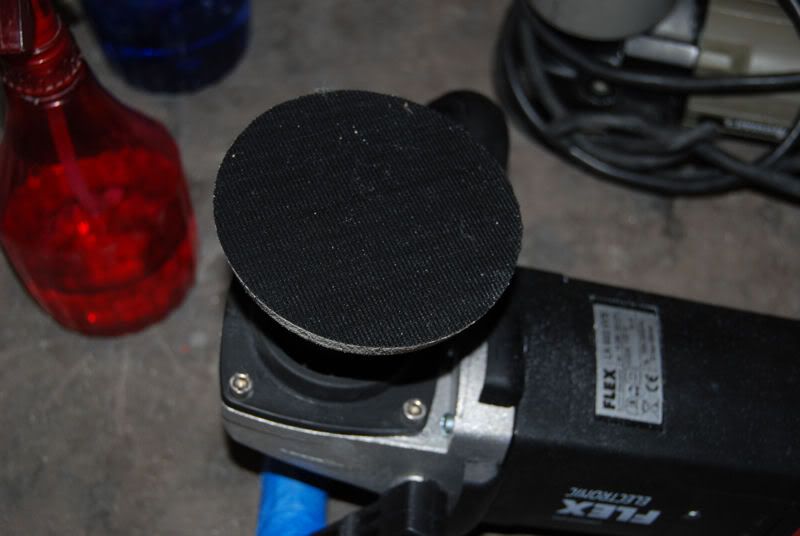
The defects on my wife�s glass could be felt my finger nail, they where deep and would require heavy cutting. I elected to start with the more aggressive, thin felt pad. Hook and loop backing means you simply press it against the backing plate (felt side up) to attach it to the machine.
4) Lightly mist the area to be polished with water (one light spray) and draw two thin beads of product on the glass (using the supplied glass polish).
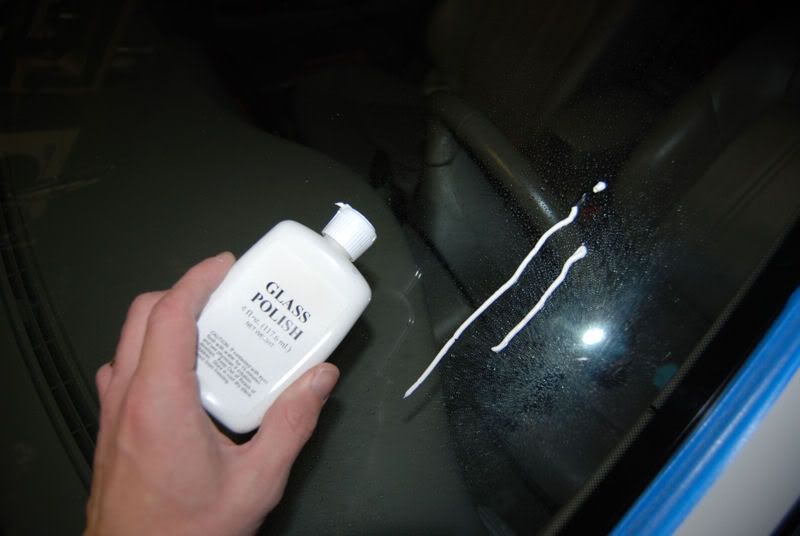
5) Spread the polish over the working section.
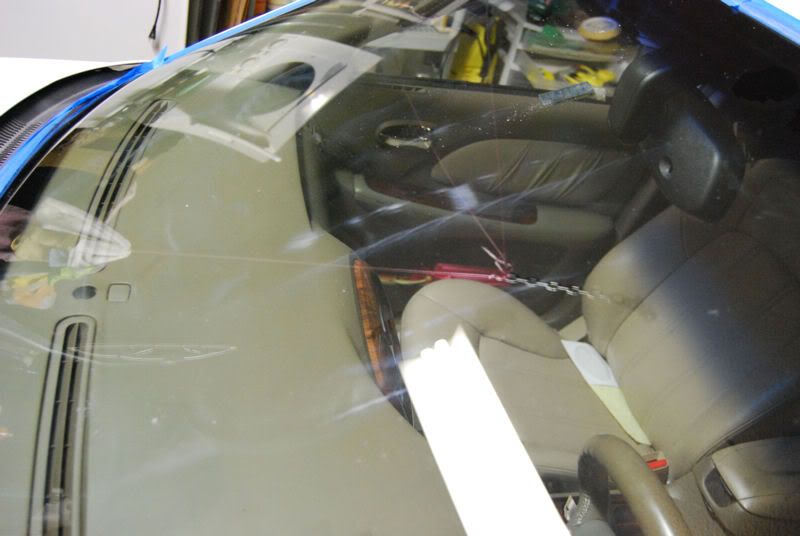
Now we are ready to begin polishing the glass.
To polish the glass�
NOTES: Modern automotive windshields contain a thin plastic sheet between two layers of glass (interior and exterior). The polishing process itself will transfer heat to the glass. If the windshield becomes to hot the plastic sheeting can warp leading to distortion. Removing defects from glass requires a lot of pressure which can build heat in a hurry. Stop to check the surface temperature of the paint occasionally by placing your hand on the surface. If it is hot to the touch, mist the area with water to cool it, before continuing.
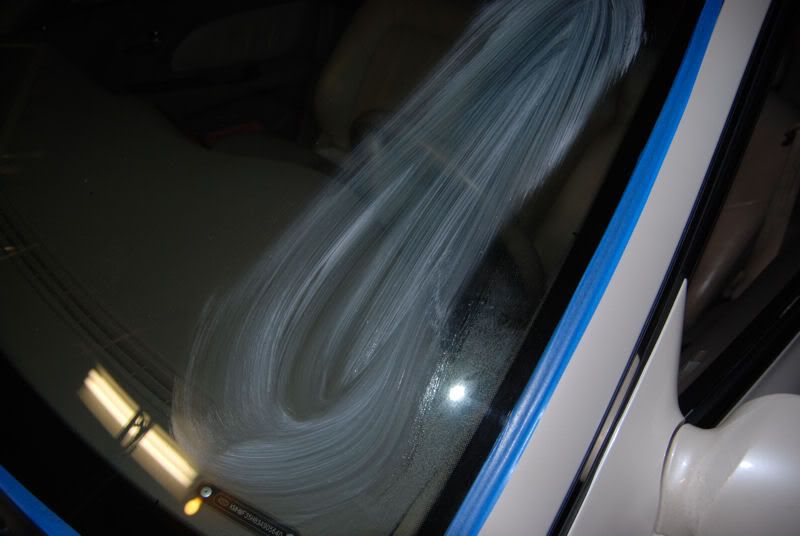
6) Work the polish with slow arm speed and significant pressure (roughly 20lbs of down force). On a rotary polisher you will set the RPM between 1000-1500 rpm, on a Porter Cable aim for about 4000 OPM. Work a small section, roughly 1.5� x 1.5�. Keep constant pressure and polish over the section until it begins to flash off.
7) inspect the surface, if more polishing is required (scratching still visible), mist the area with water and continue polishing.
NOTE: Water is used for several reasons when polishing glass. One is to remove the heat buildup and the second is to work the polish longer. Cerium Oxide is a very hard abrasive and will often can take several minutes to break down. Too much water on the surface while polishing can greatly increase the time needed to remove the defects as well as cause splatter. Try to keep the consistency as thick as possible for maximum action, only adding water when necessary.
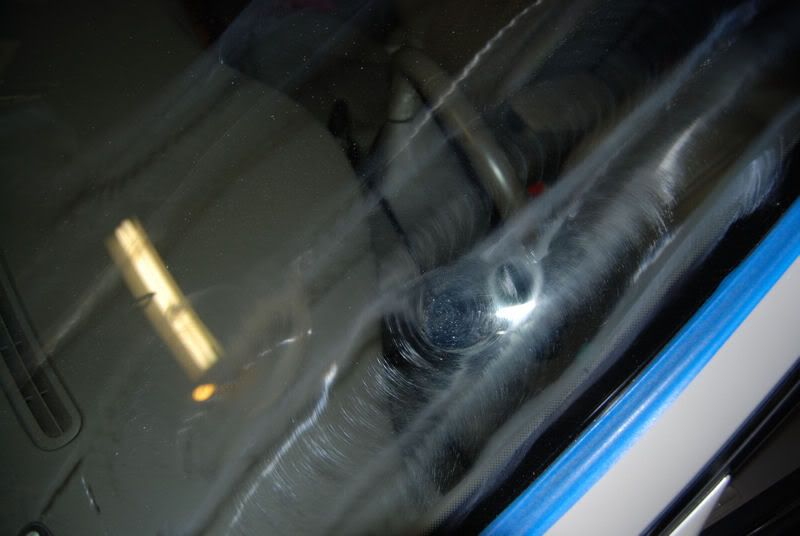
8) Once all the defects have been removed, mist the area lightly and polish with no pressure to fully break down the abrasives.

Remove the exhausted residue from the section before moving on to the next section. It may have caked on the surface. Window cleaner or IPA will quickly remove the residue. Be patience as it may take several minutes per section to fully remove the damage.
9) Repeat steps over areas needing to be corrected. I highly recommend cleaning the pad after each section. As the pad cakes with polish residue it becomes less efficient and takes more time to polish each section. Simply mist the pad with water and turn the machine on. Use a microfiber towel and press it against the rotating pad until clean.
10) With the deeper defects removed it is time to refine the surface by switching pads. The yellow pad supplied in the kit is different the yellow pad that Lake Country makes for paint use. It is very stiff and has no pours. Give the pad a light spray of water to prime it.
11) Since the goal is the refinement of the surface after compounding we can work a larger section (roughly � the windshield) with less pressure. Draw two thin beads on the glass.

12) Work the polish with low rpm (1000) and medium pressure (10 lbs) in overlapping cross hatch pattern until the polish is nearly opaque and has flashed.
13) Lightly mist the section with water and continue
14) Work the polish until fully broken down in this manor. It should leave a barely visible film on the glass surface.
15) Repeat for all sections
NOTE: The yellow polishing pad CAN be used for deeper damage removal by using more pressure and slower arm speed, working smaller sections. It will not remove the damage as quickly however.
16) After polishing the entire windshield spray with glass cleaner or alcohol to remove any stubborn residue.
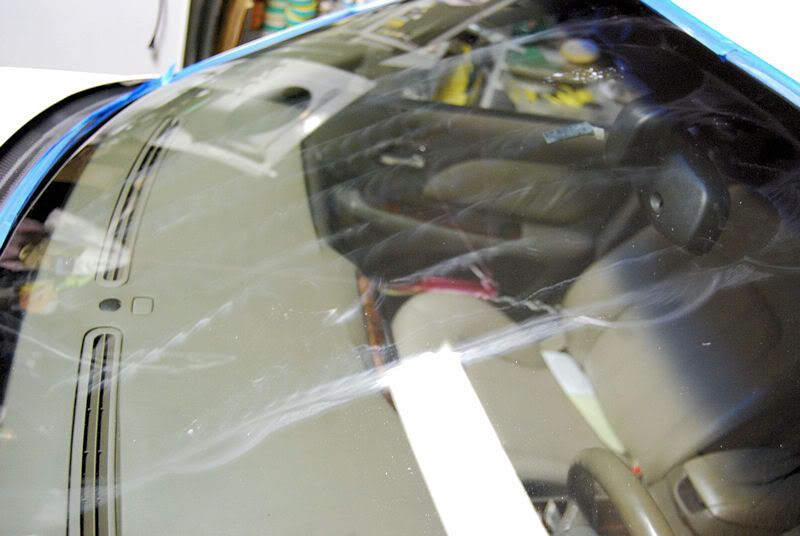
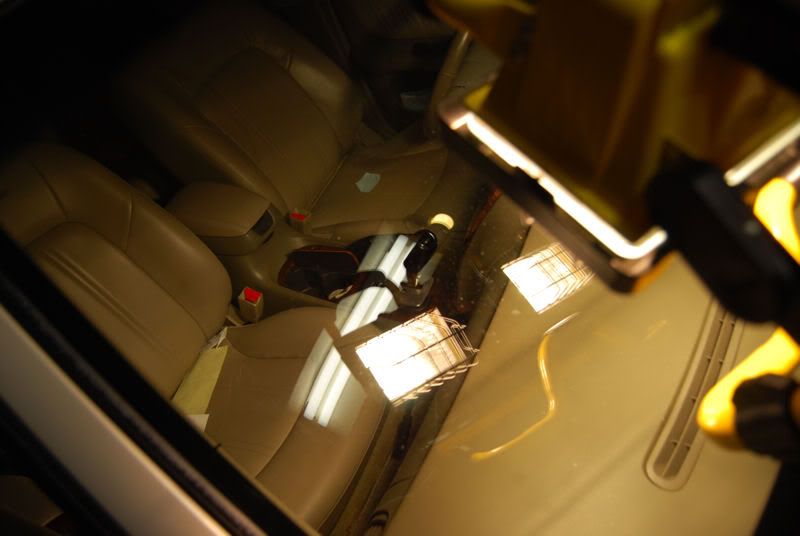
Result pictures.
50/50 Shot of the deep scratches and their removal.
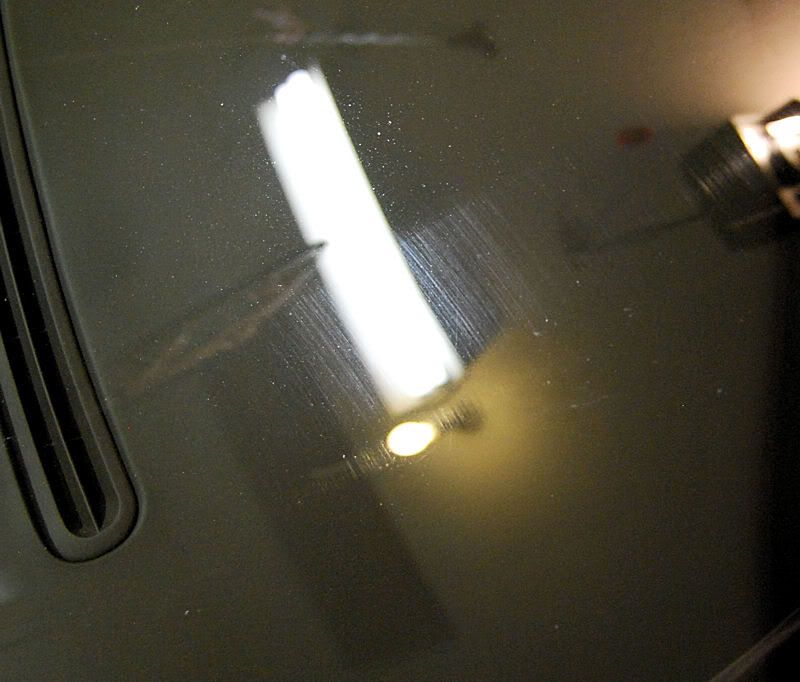
Before pictures.
After pictures.
Quick Review:
Pro�s: Effectively removes deep damage from glass, restoring a crystal like clarity to the windshield. Greatly improves vision.
Con�s: Glass polishing requires down force and a lot of it. It can be exhausting after a while. Also the supplied instructions are not the greatest.
Conclusion: I love this kit. Instead of products that claim to use wax that doesn�t exist or exist for 14 months in the desert, these products simply do what they say. There is a slightly learning curve although anybody with rotary experience will catch on fairly quickly. In the end it is a must have kit.
The scratching on the windshield of my wife's Hyundia Sonata was so bad in places that I could feel a texture with my finger nail.
Even in incandescent light scratches and haze are clearly visible.
Under 500w halogen lighting the damage to the windshield is even more visible (my wife claims to be able to see through this with no problem!).
I remembered seeing on Lake Country�s website that they offered a glass polishing kit and found one for sale at properautocare.com. When the box arrived I opened it and read through the directions, which I didn�t find easy to understand. A quick call to Lake Country quickly cleared up any questions (as typical their customer service is outstanding!) I had and provided very clear directions on how to use the product.
Given that I did not find the instructions helpful, I have merged them with my conversation and experience to provide a review and hopefully instructions so that anybody with basic rotary experience can replicate my excellent experience with this kit.
Manufacturer�s Claims (from Lake Country�s website)
GPS PRO
Glass Polishing System
�Polish and restore automotive glass and other glass surfaces
�Machine powered system restores clarity by removing wiper tracks, light scratches
and other minor defects
�For use on: Windshields and Automotive Glass; most other glass surfaces
�For use with rotary buffers or D.A. machines
�Contains materials to polish and seal approximately 7,200 square inches
NOTE: The kit from Lake Country contains an adapter for use on a Porter Cable. CMA offers two separate kits (on for DA�s or one for Rotaries). Given that glass is often much harder then paint, I elected to select a rotary kit.
Contained in the kit
- 4 oz of glass polish (cernium oxide)
- Rain x
- 2 felt cutting disks (used for removing deeper damage and heavy scratches
- 2 yellow foam pads (used for removing light marring, calcium deposits, and polishing the glass to high gloss, these pads are significantly different then the yellow foam used on paint)
- 3.5 inch backing plate
- terry cloth applicator
Additional products needed
- Polishing machine (either a rotary or orbital PC style)
- Isopropyl Alcohol
- Water
- Assorted microfiber towels
To begin�.
Similar to removing swirl marks and damage from the paint, removing scratches and wiper damage from the glass requires �re-leveling� the surface.
1) Thoroughly clean the glass surface using alcohol (or window cleaner) and remove all dirt, bug splatter, film, and chemicals. Contaminated glass may benefit from a couple minutes with a clay bar. We do not want a particulate remaining on the paint as it can become trapped between the pad and glass and cause more scratching.
2) Tape plastic trim and rubber seals around the perimeter of the glass.
3) Apply supplied backing plate to the rotary (or Porter Cable).
The defects on my wife�s glass could be felt my finger nail, they where deep and would require heavy cutting. I elected to start with the more aggressive, thin felt pad. Hook and loop backing means you simply press it against the backing plate (felt side up) to attach it to the machine.
4) Lightly mist the area to be polished with water (one light spray) and draw two thin beads of product on the glass (using the supplied glass polish).
5) Spread the polish over the working section.
Now we are ready to begin polishing the glass.
To polish the glass�
NOTES: Modern automotive windshields contain a thin plastic sheet between two layers of glass (interior and exterior). The polishing process itself will transfer heat to the glass. If the windshield becomes to hot the plastic sheeting can warp leading to distortion. Removing defects from glass requires a lot of pressure which can build heat in a hurry. Stop to check the surface temperature of the paint occasionally by placing your hand on the surface. If it is hot to the touch, mist the area with water to cool it, before continuing.
6) Work the polish with slow arm speed and significant pressure (roughly 20lbs of down force). On a rotary polisher you will set the RPM between 1000-1500 rpm, on a Porter Cable aim for about 4000 OPM. Work a small section, roughly 1.5� x 1.5�. Keep constant pressure and polish over the section until it begins to flash off.
7) inspect the surface, if more polishing is required (scratching still visible), mist the area with water and continue polishing.
NOTE: Water is used for several reasons when polishing glass. One is to remove the heat buildup and the second is to work the polish longer. Cerium Oxide is a very hard abrasive and will often can take several minutes to break down. Too much water on the surface while polishing can greatly increase the time needed to remove the defects as well as cause splatter. Try to keep the consistency as thick as possible for maximum action, only adding water when necessary.
8) Once all the defects have been removed, mist the area lightly and polish with no pressure to fully break down the abrasives.
Remove the exhausted residue from the section before moving on to the next section. It may have caked on the surface. Window cleaner or IPA will quickly remove the residue. Be patience as it may take several minutes per section to fully remove the damage.
9) Repeat steps over areas needing to be corrected. I highly recommend cleaning the pad after each section. As the pad cakes with polish residue it becomes less efficient and takes more time to polish each section. Simply mist the pad with water and turn the machine on. Use a microfiber towel and press it against the rotating pad until clean.
10) With the deeper defects removed it is time to refine the surface by switching pads. The yellow pad supplied in the kit is different the yellow pad that Lake Country makes for paint use. It is very stiff and has no pours. Give the pad a light spray of water to prime it.
11) Since the goal is the refinement of the surface after compounding we can work a larger section (roughly � the windshield) with less pressure. Draw two thin beads on the glass.
12) Work the polish with low rpm (1000) and medium pressure (10 lbs) in overlapping cross hatch pattern until the polish is nearly opaque and has flashed.
13) Lightly mist the section with water and continue
14) Work the polish until fully broken down in this manor. It should leave a barely visible film on the glass surface.
15) Repeat for all sections
NOTE: The yellow polishing pad CAN be used for deeper damage removal by using more pressure and slower arm speed, working smaller sections. It will not remove the damage as quickly however.
16) After polishing the entire windshield spray with glass cleaner or alcohol to remove any stubborn residue.
Result pictures.
50/50 Shot of the deep scratches and their removal.
Before pictures.
After pictures.
Quick Review:
Pro�s: Effectively removes deep damage from glass, restoring a crystal like clarity to the windshield. Greatly improves vision.
Con�s: Glass polishing requires down force and a lot of it. It can be exhausting after a while. Also the supplied instructions are not the greatest.
Conclusion: I love this kit. Instead of products that claim to use wax that doesn�t exist or exist for 14 months in the desert, these products simply do what they say. There is a slightly learning curve although anybody with rotary experience will catch on fairly quickly. In the end it is a must have kit.
 12-10-2008, 11:15 AM
#2

Great write-up, Todd! A lot of people had trouble with this kit hazing glass, and as you mentioned, it can take a long time to break the polish down. For those reading, keep this in mind and choose your machine accordingly!
If anyone is interested in purchasing the kit, we have it for $39.99 and are currently running a 20% off promotion! http://www.autogeek.net/lc-pro-glass-kit.html
If anyone is interested in purchasing the kit, we have it for $39.99 and are currently running a 20% off promotion! http://www.autogeek.net/lc-pro-glass-kit.html
12-10-2008, 11:41 AM
#3
Race Director


Member Since: Oct 2004
Location: Cape Cod, Mass.
Posts: 18,782
Received 4,580 Likes
on
2,167 Posts
2023 C3 of the Year Finalist - Unmodified
2021 C8 of the Year Finalist Unmodified
2020 Corvette of the Year Finalist (performance mods)
2019 C1 of Year Winner (performance mods)
2017 Corvette of the Year Finalist
2016 C2 of Year
2015 C3 of Year Finalist

Nice write-up on a fix for glass that is not practiced by many  . My 65's glass has had two wiper marks staring me in the face for many years. It's the original windshield so I want to keep it. This sounds like a great kit. Will it also help with the small dots from sand etc hitting the w/s?
. My 65's glass has had two wiper marks staring me in the face for many years. It's the original windshield so I want to keep it. This sounds like a great kit. Will it also help with the small dots from sand etc hitting the w/s?
12-10-2008, 12:12 PM
#4
Former Vendor
Thread Starter
Member Since: Feb 2006
Location: Orlando/Oviedo FL
Posts: 1,943
Likes: 0
Received 2 Likes
on
2 Posts
Great write-up, Todd! A lot of people had trouble with this kit hazing glass, and as you mentioned, it can take a long time to break the polish down. For those reading, keep this in mind and choose your machine accordingly!
If anyone is interested in purchasing the kit, we have it for $39.99 and are currently running a 20% off promotion! http://www.autogeek.net/lc-pro-glass-kit.html
If anyone is interested in purchasing the kit, we have it for $39.99 and are currently running a 20% off promotion! http://www.autogeek.net/lc-pro-glass-kit.html
The trick (with polishing glass) is to use firm pressure. I was exhausted after finishing. I had to stop several times half way through a section to shake my arms out...
Keep an eye on surface tempature and spray water after the polish 'pastes' to keep it working. I found it pretty easy to use (just exhausting)
12-10-2008, 12:15 PM
#5
Former Vendor
Thread Starter
Member Since: Feb 2006
Location: Orlando/Oviedo FL
Posts: 1,943
Likes: 0
Received 2 Likes
on
2 Posts
Nice write-up on a fix for glass that is not practiced by many . My 65's glass has had two wiper marks staring me in the face for many years. It's the original windshield so I want to keep it. This sounds like a great kit. Will it also help with the small dots from sand etc hitting the w/s?
. My 65's glass has had two wiper marks staring me in the face for many years. It's the original windshield so I want to keep it. This sounds like a great kit. Will it also help with the small dots from sand etc hitting the w/s?I 'could' reduce pitting and sand abrasion but you would likely remove so much glass to do this that you have distortion problems.
12-10-2008, 12:47 PM
#6
Race Director
Member Since: Oct 2004
Location: Cape Cod, Mass.
Posts: 18,782
Received 4,580 Likes
on
2,167 Posts
2023 C3 of the Year Finalist - Unmodified
2021 C8 of the Year Finalist Unmodified
2020 Corvette of the Year Finalist (performance mods)
2019 C1 of Year Winner (performance mods)
2017 Corvette of the Year Finalist
2016 C2 of Year
2015 C3 of Year Finalist
A couple things that I would caution against. If I was doing an older car (is your Vette a roadster?) I would use slightly more RPM and less pressure, only because the glass on your car is irreplaceable. With a roadster I would fearful of flexing the glass and shattering it with excessive pressure.
I 'could' reduce pitting and sand abrasion but you would likely remove so much glass to do this that you have distortion problems.
I 'could' reduce pitting and sand abrasion but you would likely remove so much glass to do this that you have distortion problems.
 More RPM's and less pressure sounds good. The pitting isn't very deep but deep enough to cause me problems if I got greedy. It's just a sore spot. I did a frame off resto on this car and didn't do the w/s.
12-10-2008, 03:25 PM
More RPM's and less pressure sounds good. The pitting isn't very deep but deep enough to cause me problems if I got greedy. It's just a sore spot. I did a frame off resto on this car and didn't do the w/s.
12-10-2008, 03:25 PM
#7
Burning Brakes

Great write up! A couple of years ago I googled for days reading up on polishing windshields. After all that reading, the search then went to looking for a supplier of cernium oxide. The page I had bookmarked is no longer valid. And I need it as my vette has a deep gouge from the wiper. A small stone must have been trapped. I don't know when it happened, but a single pass did it. I have eyed the glass kits on Autogeek. If I buy the glas kit then I might as well as buy the Flex. And if I'm buying those two things, I might as well as buy....x, y, & z too.
That's the thing that scares me about the geek. My list is so huge ($$$) I'm afraid to press send. When the cost of maintaining a cars appearence approaches the cost of the car, should I not just buy another car? One to drive and one to stare at? Kindred to the guy who had his car detailed and was so enamored with it that he stopped driving it, but sat staring at it while enjoying a glass of wine.
That's the thing that scares me about the geek. My list is so huge ($$$) I'm afraid to press send. When the cost of maintaining a cars appearence approaches the cost of the car, should I not just buy another car? One to drive and one to stare at? Kindred to the guy who had his car detailed and was so enamored with it that he stopped driving it, but sat staring at it while enjoying a glass of wine.
12-10-2008, 03:33 PM
#8
Team Owner


Member Since: Jun 2004
Location: Houston Texas
Posts: 96,211
Received 75 Likes
on
61 Posts
St. Jude Donor '09
Thanks for taking the time to do an excellent write up like that with pictures that aid in understanding the process.....
I've got a windsheild that needs some attention and your tips here will help me a lot Todd........
Keep them coming.....

I've got a windsheild that needs some attention and your tips here will help me a lot Todd........
Keep them coming.....
12-10-2008, 04:12 PM
#9
Advanced

Member Since: Dec 2007
Location: Seagrove NC
Posts: 96
Likes: 0
Received 0 Likes
on
0 Posts
TH0001,
Would you use this kit on the windows and rear glass of a C6? I know you wouldn't want to use it on the transparent top. I have the Lake country glass pad but haven't used it yet. Do you think it would work with Duragloss Nu-glass? Thanks.
Would you use this kit on the windows and rear glass of a C6? I know you wouldn't want to use it on the transparent top. I have the Lake country glass pad but haven't used it yet. Do you think it would work with Duragloss Nu-glass? Thanks.
12-10-2008, 05:17 PM
#10
Le Mans Master

I've been looking for something like this for my 68 GTO. I restored the car about ten years ago and foolishly put the original windshield back in. I'll never make that mistake again. Now that it's in and leak free I am hesitant to have it replaced.
It is fine during the day, but gets a little rough during night driving with the oncoming headlights.
If anyone uses this kit on an "older" windshield please post the results.
It is fine during the day, but gets a little rough during night driving with the oncoming headlights.
If anyone uses this kit on an "older" windshield please post the results.
12-12-2008, 12:25 PM
#12
Former Vendor
Thread Starter
Member Since: Feb 2006
Location: Orlando/Oviedo FL
Posts: 1,943
Likes: 0
Received 2 Likes
on
2 Posts
Can it work? Sure, do I think you will get true, professional results from it? Probably not, but it wouldn't hurt. Duragloss and Zaino do great for removing water spots and calcium deposits, but don't (can't) much for actually leveling the glass.
I've been looking for something like this for my 68 GTO. I restored the car about ten years ago and foolishly put the original windshield back in. I'll never make that mistake again. Now that it's in and leak free I am hesitant to have it replaced.
It is fine during the day, but gets a little rough during night driving with the oncoming headlights.
If anyone uses this kit on an "older" windshield please post the results.
It is fine during the day, but gets a little rough during night driving with the oncoming headlights.
If anyone uses this kit on an "older" windshield please post the results.
12-12-2008, 08:55 PM
#13
Melting Slicks

Member Since: Dec 2006
Location: Orange County California
Posts: 2,249
Received 90 Likes
on
71 Posts
Great write-up, Todd! A lot of people had trouble with this kit hazing glass, and as you mentioned, it can take a long time to break the polish down. For those reading, keep this in mind and choose your machine accordingly!
If anyone is interested in purchasing the kit, we have it for $39.99 and are currently running a 20% off promotion! http://www.autogeek.net/lc-pro-glass-kit.html
If anyone is interested in purchasing the kit, we have it for $39.99 and are currently running a 20% off promotion! http://www.autogeek.net/lc-pro-glass-kit.html
Is there a coupon code?
02-21-2009, 11:40 PM
#18
Burning Brakes
Member Since: Jul 2007
Location: Eau Claire Wisconsin
Posts: 751
Likes: 0
Received 0 Likes
on
0 Posts

Bump for a great write up Todd. I have tried a few different products for glass correction and all have been pretty grim.
The driver side window on my 94 has some bad vertical scratches that I will try this product on. Thanks again Todd!!!
The driver side window on my 94 has some bad vertical scratches that I will try this product on. Thanks again Todd!!!
03-05-2009, 09:29 PM
#19
Race Director
I went ahead and picked this kit up from autogeek. Following your directions to step 9, I'm still left with those tiny little knicks from really smally road debris (80k miles) Was this kit designed to remove those? Should I be applying more pressure? Any suggestions? Thanks!
03-06-2009, 08:55 AM
#20
Burning Brakes
I went ahead and picked this kit up from autogeek. Following your directions to step 9, I'm still left with those tiny little knicks from really smally road debris (80k miles) Was this kit designed to remove those? Should I be applying more pressure? Any suggestions? Thanks!