

 02-19-2015, 01:49 PM
Last edit by: IB Advertising
See related guides and technical advice from our community experts:
Browse all: Brake How-Tos
- How to Bleed Brake System/Change Brake Fluid
Step by step instructions for do-it-yourselfers.
Browse all: Brake How-Tos

How-To: Bleed Brake System / Change Brake Fluid (Manual & Pressure) + Specs
06-15-2014, 12:35 AM
#1
Tech Contributor
Thread Starter
Member Since: Jan 2006
Location: Saint Louis MO
Posts: 4,761
Likes: 0
Received 218 Likes
on
110 Posts
St. Jude Donor '14-'15
The following How-To covers the process of Brake Bleeding (using both manual and pressure methods) and includes specifications, etc. required to complete the procedure.
These How-To guides are neither endorsed by or property of Corvette Forum or myself in any way/shape/form. All liability stemming from any actions taken in relation to these guides is solely placed upon the user.
We hope you will find these guides useful.
These How-To guides are neither endorsed by or property of Corvette Forum or myself in any way/shape/form. All liability stemming from any actions taken in relation to these guides is solely placed upon the user.
We hope you will find these guides useful.

The following users liked this post:
redman76 (12-29-2017)
The following users liked this post:
Matthew McCarthy (10-13-2017)
 02-24-2015, 03:44 PM
#7

The following How-To covers the process of Brake Bleeding (using both manual and pressure methods) and includes specifications, etc. required to complete the procedure.
These How-To guides are neither endorsed by or property of Corvette Forum or myself in any way/shape/form. All liability stemming from any actions taken in relation to these guides is solely placed upon the user.
We hope you will find these guides useful.
These How-To guides are neither endorsed by or property of Corvette Forum or myself in any way/shape/form. All liability stemming from any actions taken in relation to these guides is solely placed upon the user.
We hope you will find these guides useful.
02-25-2015, 07:31 PM
#8
Tech Contributor
Thread Starter
Member Since: Jan 2006
Location: Saint Louis MO
Posts: 4,761
Likes: 0
Received 218 Likes
on
110 Posts
St. Jude Donor '14-'15
In the instructions, you will see that the scan tool is required to cycle the BPMV.
It can be done without this, but obviously the tool makes it easier.
It can be done without this, but obviously the tool makes it easier.
03-17-2015, 05:28 PM
#9
Instructor

Great info- after reading PRESSURE Bleed a few times and filtering out what not applicable to a basic DOT3- DOT4 swap for track prep- this is what I took away along with some info from other posts;
C7 Hydraulic Brake System Bleeding (PRESSURE)-Bleeding the complete Brake Hydraulic System
Track prep Dot 3 to Dot 4 with Motiv Power Bleeder/ MVP-1118 adaptor & 1 liter Motul 600
� Check adaptor cap seal MVP-1118 prior to bleeding/filling system
1. Ignition off & cool brakes � apply the brakes 3-5 times, or until pedal effort increases significantly. In order to deplete brake booster power reserve.
2. Place clean cloth beneath master cylinder & clean around the reservoir cap.
3. Fill master cylinder to maximum-full level if needed.
4. Fill the brake pressure bleeder with DOT 4 brake fluid.
5. Install adapter cap MVP-1118 on master cylinder
11. Fill the master cylinder reservoir to the maximum full level
12. Press and release brakes � observe firmness
13. Turn ignition on with engine off. Check if brake warning light remains illuminated.
14. For FIRST time swap out only- Without ABS Scan Tool- drive and engage ABS system to flush BPMV of DOT 3. **After ABS engagement a few times perform final flush with MOTUL.
The only thing that surprised me was "The Assistant" on the brake pedalas that seems the typical manual method vs Pressure. I did my prior 370Z with pressure bleeder and never had an assistant and workd OK.
C7 Hydraulic Brake System Bleeding (PRESSURE)-Bleeding the complete Brake Hydraulic System
Track prep Dot 3 to Dot 4 with Motiv Power Bleeder/ MVP-1118 adaptor & 1 liter Motul 600
� Check adaptor cap seal MVP-1118 prior to bleeding/filling system
1. Ignition off & cool brakes � apply the brakes 3-5 times, or until pedal effort increases significantly. In order to deplete brake booster power reserve.
2. Place clean cloth beneath master cylinder & clean around the reservoir cap.
3. Fill master cylinder to maximum-full level if needed.
4. Fill the brake pressure bleeder with DOT 4 brake fluid.
5. Install adapter cap MVP-1118 on master cylinder
a.Charge the brake pressure bleeder air tank to 25-30 PSI or as recommended by Motiv
b.Open pressure bleeder fluid tank valve to allow pressurized brake fluid to enter the brake hydraulic system- Wait 30 seconds inspect for any system leaks
6. Install a box-end wrench (11 mm) onto RIGHT REAR wheel hydraulic IN-Board bleeder valvea.Install transparent hose over end of the bleeder valve.
b.Submerge the open end of hose in a transparent container partially filled- clean DOT4
7. Have an assistant slowly press the brake pedal fully and MAINTAIN steady pressure on the brake pedal.a.Loosen the valve to flush system- start with the IN BOARD bleeder valve first
8. TIGHTEN the wheel bleeder valve, and then have assistant slowly release the brake pedal. a.REPEAT above steps 7& 8 as needed to flush out all DOT 3 ( I use a �tracer� ATE Blue DOT 4 first time swap to flush DOT 3 and then flush with Motul**- mark transparent container with fluid levels per circuit for future reference once thru replacement]
b.Repeat ~ 1 or 2 for OUTBOARD bleeder valve- small local volume
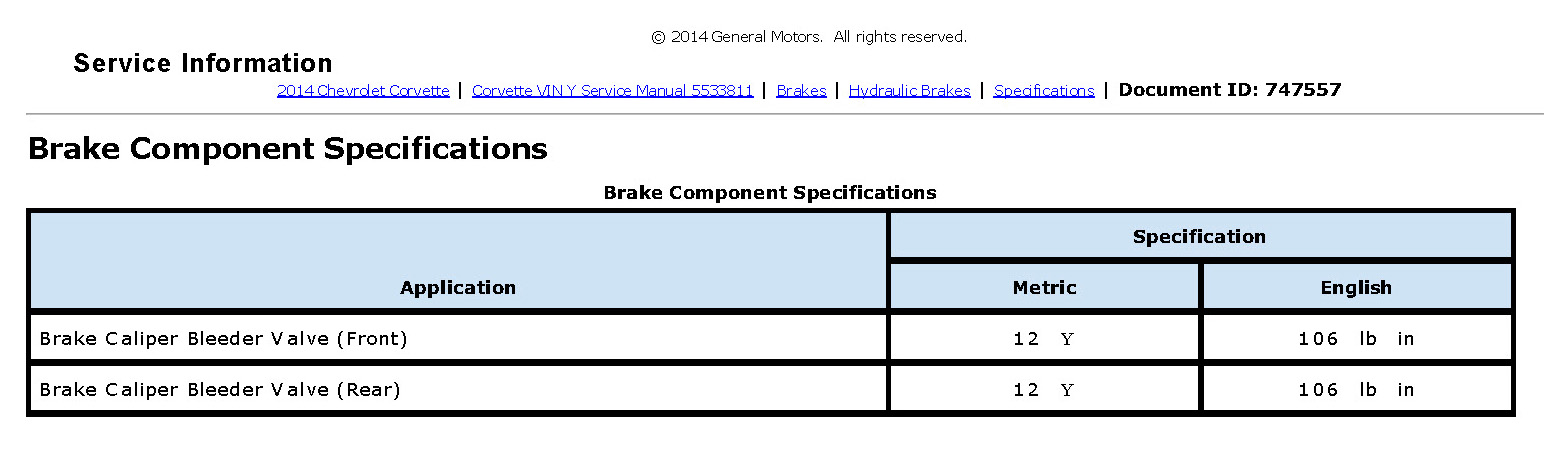
9. Tighten BOTH RIGHT REAR bleeder valves to spec- 106 lb in (8.8 lb ft) , clean nipple & install dust capsa.Install a proper box-end wrench (11 mm) onto LEFT REAR- follow above process
b.Install a proper box-end wrench (11 mm) onto RIGHT FRONT- follow above process
c.Install a proper box-end wrench (11 mm) onto LEFT FRONT- follow above process
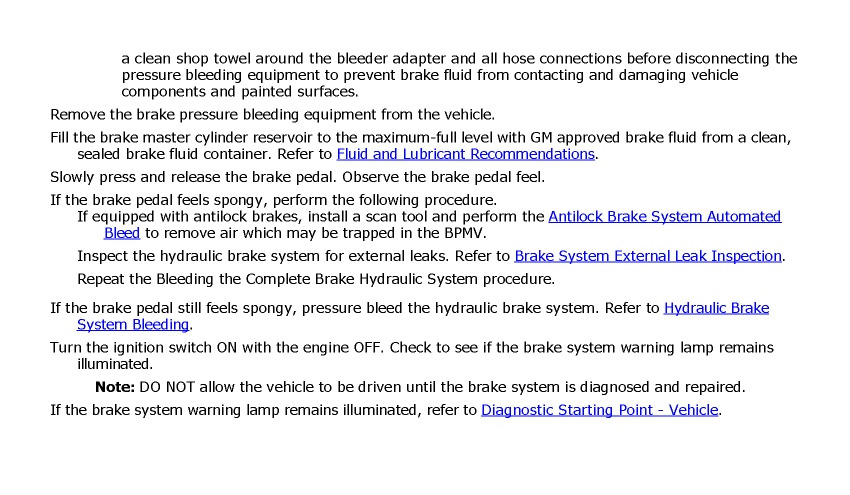
10. Close the brake bleeder pressure tank valve. Note brake reservoir may have residual pressure- wrap with clean shop towel around bleeder adaptor cap when removing.11. Fill the master cylinder reservoir to the maximum full level
12. Press and release brakes � observe firmness
13. Turn ignition on with engine off. Check if brake warning light remains illuminated.
14. For FIRST time swap out only- Without ABS Scan Tool- drive and engage ABS system to flush BPMV of DOT 3. **After ABS engagement a few times perform final flush with MOTUL.
The only thing that surprised me was "The Assistant" on the brake pedalas that seems the typical manual method vs Pressure. I did my prior 370Z with pressure bleeder and never had an assistant and workd OK.
The following 2 users liked this post by 15C7Z51:
cjatrains (08-07-2021),
Steve Thomton (07-11-2019)
04-15-2015, 12:56 AM
#11
Safety Car


Can I get a brake pressure bleeder from auto zone, etc? Think I am going to put dot 4 in for my track day.
04-15-2015, 12:55 PM
#13
Safety Car
I'm looking for something like this. Has anyone used this or something similar? Do I need to get a different cap? Looks like I need to get a catch bottle separate.
04-15-2015, 05:48 PM
#14
Safety Car
I'm looking for something like this. Has anyone used this or something similar? Do I need to get a different cap? Looks like I need to get a catch bottle separate.
Amazon.com: Motive Products 101 Brake System Power Bleeder: Automotive
Amazon.com: Motive Products 101 Brake System Power Bleeder: Automotive
Have one for my C7, it screws on the reservoir.
04-16-2015, 12:12 AM
#15
Safety Car
04-23-2015, 02:51 PM
#16
Safety Car
Looking at my Z51 with standard wheels, the bleeder screws are accessible even with connecting tubing.
Is it possible to bleed the brakes without removing the wheels?
Is it possible to bleed the brakes without removing the wheels?
04-23-2015, 06:13 PM
#17
I'm Batman..
Pro Mechanic

Member Since: Apr 2014
Location: Lehigh Acres FL
Posts: 6,130
Received 908 Likes
on
561 Posts
Tech Contributor

Yes, but highly recommend you do not do that. If by some chance brake fluid spills out of the bleeder and gets on the wheel, it will eat right through the paint and/or protective coating.
04-23-2015, 08:31 PM
#18
Safety Car
I forgot how dangerous brake fluid is to coated surfaces, especially paint & wheel finish.
04-30-2015, 05:26 PM
#19
Safety Car
b.Submerge the open end of hose in a transparent container partially filled- clean DOT4
06-10-2015, 05:28 PM
#20

Great info- after reading PRESSURE Bleed a few times and filtering out what not applicable to a basic DOT3- DOT4 swap for track prep- this is what I took away along with some info from other posts;
C7 Hydraulic Brake System Bleeding (PRESSURE)-Bleeding the complete Brake Hydraulic System
Track prep Dot 3 to Dot 4 with Motiv Power Bleeder/ MVP-1118 adaptor & 1 liter Motul 600
� Check adaptor cap seal MVP-1118 prior to bleeding/filling system
1. Ignition off & cool brakes � apply the brakes 3-5 times, or until pedal effort increases significantly. In order to deplete brake booster power reserve.
2. Place clean cloth beneath master cylinder & clean around the reservoir cap.
3. Fill master cylinder to maximum-full level if needed.
4. Fill the brake pressure bleeder with DOT 4 brake fluid.
5. Install adapter cap MVP-1118 on master cylinder
11. Fill the master cylinder reservoir to the maximum full level
12. Press and release brakes � observe firmness
13. Turn ignition on with engine off. Check if brake warning light remains illuminated.
14. For FIRST time swap out only- Without ABS Scan Tool- drive and engage ABS system to flush BPMV of DOT 3. **After ABS engagement a few times perform final flush with MOTUL.
The only thing that surprised me was "The Assistant" on the brake pedalas that seems the typical manual method vs Pressure. I did my prior 370Z with pressure bleeder and never had an assistant and workd OK.
C7 Hydraulic Brake System Bleeding (PRESSURE)-Bleeding the complete Brake Hydraulic System
Track prep Dot 3 to Dot 4 with Motiv Power Bleeder/ MVP-1118 adaptor & 1 liter Motul 600
� Check adaptor cap seal MVP-1118 prior to bleeding/filling system
1. Ignition off & cool brakes � apply the brakes 3-5 times, or until pedal effort increases significantly. In order to deplete brake booster power reserve.
2. Place clean cloth beneath master cylinder & clean around the reservoir cap.
3. Fill master cylinder to maximum-full level if needed.
4. Fill the brake pressure bleeder with DOT 4 brake fluid.
5. Install adapter cap MVP-1118 on master cylinder
a.Charge the brake pressure bleeder air tank to 25-30 PSI or as recommended by Motiv
b.Open pressure bleeder fluid tank valve to allow pressurized brake fluid to enter the brake hydraulic system- Wait 30 seconds inspect for any system leaks
6. Install a box-end wrench (11 mm) onto RIGHT REAR wheel hydraulic IN-Board bleeder valvea.Install transparent hose over end of the bleeder valve.
b.Submerge the open end of hose in a transparent container partially filled- clean DOT4
7. Have an assistant slowly press the brake pedal fully and MAINTAIN steady pressure on the brake pedal.a.Loosen the valve to flush system- start with the IN BOARD bleeder valve first
8. TIGHTEN the wheel bleeder valve, and then have assistant slowly release the brake pedal. a.REPEAT above steps 7& 8 as needed to flush out all DOT 3 ( I use a �tracer� ATE Blue DOT 4 first time swap to flush DOT 3 and then flush with Motul**- mark transparent container with fluid levels per circuit for future reference once thru replacement]
b.Repeat ~ 1 or 2 for OUTBOARD bleeder valve- small local volume
9. Tighten BOTH RIGHT REAR bleeder valves to spec- 106 lb in (8.8 lb ft) , clean nipple & install dust capsa.Install a proper box-end wrench (11 mm) onto LEFT REAR- follow above process
b.Install a proper box-end wrench (11 mm) onto RIGHT FRONT- follow above process
c.Install a proper box-end wrench (11 mm) onto LEFT FRONT- follow above process
10. Close the brake bleeder pressure tank valve. Note brake reservoir may have residual pressure- wrap with clean shop towel around bleeder adaptor cap when removing.11. Fill the master cylinder reservoir to the maximum full level
12. Press and release brakes � observe firmness
13. Turn ignition on with engine off. Check if brake warning light remains illuminated.
14. For FIRST time swap out only- Without ABS Scan Tool- drive and engage ABS system to flush BPMV of DOT 3. **After ABS engagement a few times perform final flush with MOTUL.
The only thing that surprised me was "The Assistant" on the brake pedalas that seems the typical manual method vs Pressure. I did my prior 370Z with pressure bleeder and never had an assistant and workd OK.
