When you click on links to various merchants on this site and make a purchase, this can result in this site earning a commission. Affiliate programs and affiliations include, but are not limited to, the eBay Partner Network.
OEM's on my car were rubber. Gene's part numbers are OEM, and likely they are not lubed when installed at the factory. As I mentioned, do it the expedient way , or do it the better way. Your car.
modshack,
any suggestion on lube, brand, where to find? I am having trouble typing this sentence
I used Advanced Auto Parts #2 Extreme Pressure Lithium Grease (water INsoluable). Someone recommend White Lithium but that's water soluble so I went with this stuff based on some recommendations.
That being said, the car handles amazingly better now in cornering. This is how the car should have come from the factory. A perfect blend between every day comfort and sporty driving.
It was an easy install, but make sure you know which way the bar needs to be oriented. I wasted a lot of time trying to get the bar in and out because of the existing wires, connectors, etc. Fishing the bars in and out, especially in the front, sucked. My car was on low profile ramps. I think a lift would have helped quite a bit.
Thank you for all of the orders. We are trying to keep up with demand but it still takes us about 5-7 business days to get a kit together. Please see the link to order, send us an email or give us a call!
__________________ Phone: 484-334-8833 Owner of CULTRAG Performance
Those of you from the old C6 days know this was a desirable mod. The Base C7, not having a rear bar stock requires a few more hardware bits, but nothing expensive or tricky. The (Z51) mount points are on the car so this upgrade is very easy. While I'm not the first to do this, I contacted Gene gene@gmpartshouse.com at GM partshouse and requested he put together a kit for me. Gene's pretty much the parts expert here, and he quickly put the list together, I gave him the Go, and a week later I had the parts on my bench. Cost was around $275 + whatever shipping to you is.
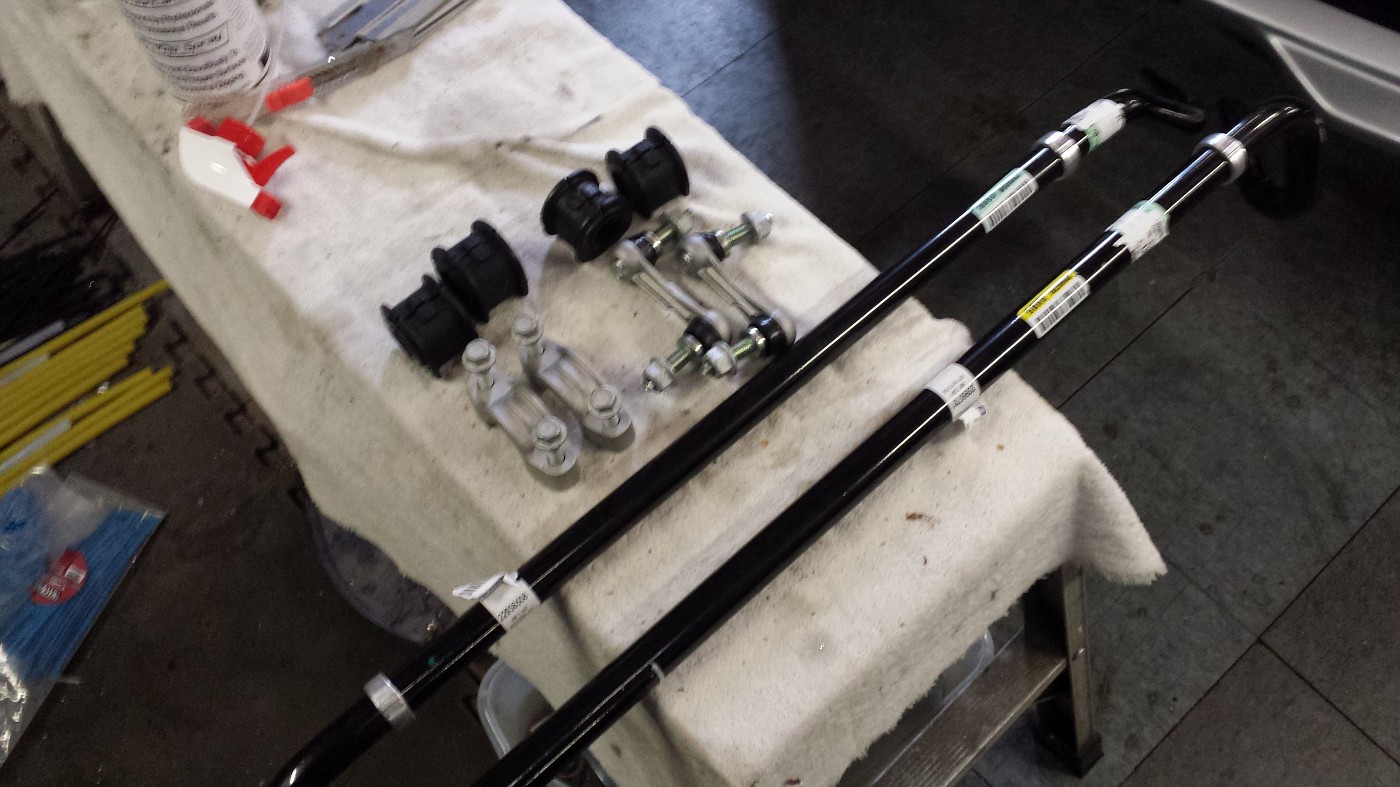
Here are the parts:
2 Z51 bars, bushings (now Poly instead of the OEM soft rubber), Droplinks for the rear, 2 clamps, 4 bolts and 4 nuts.
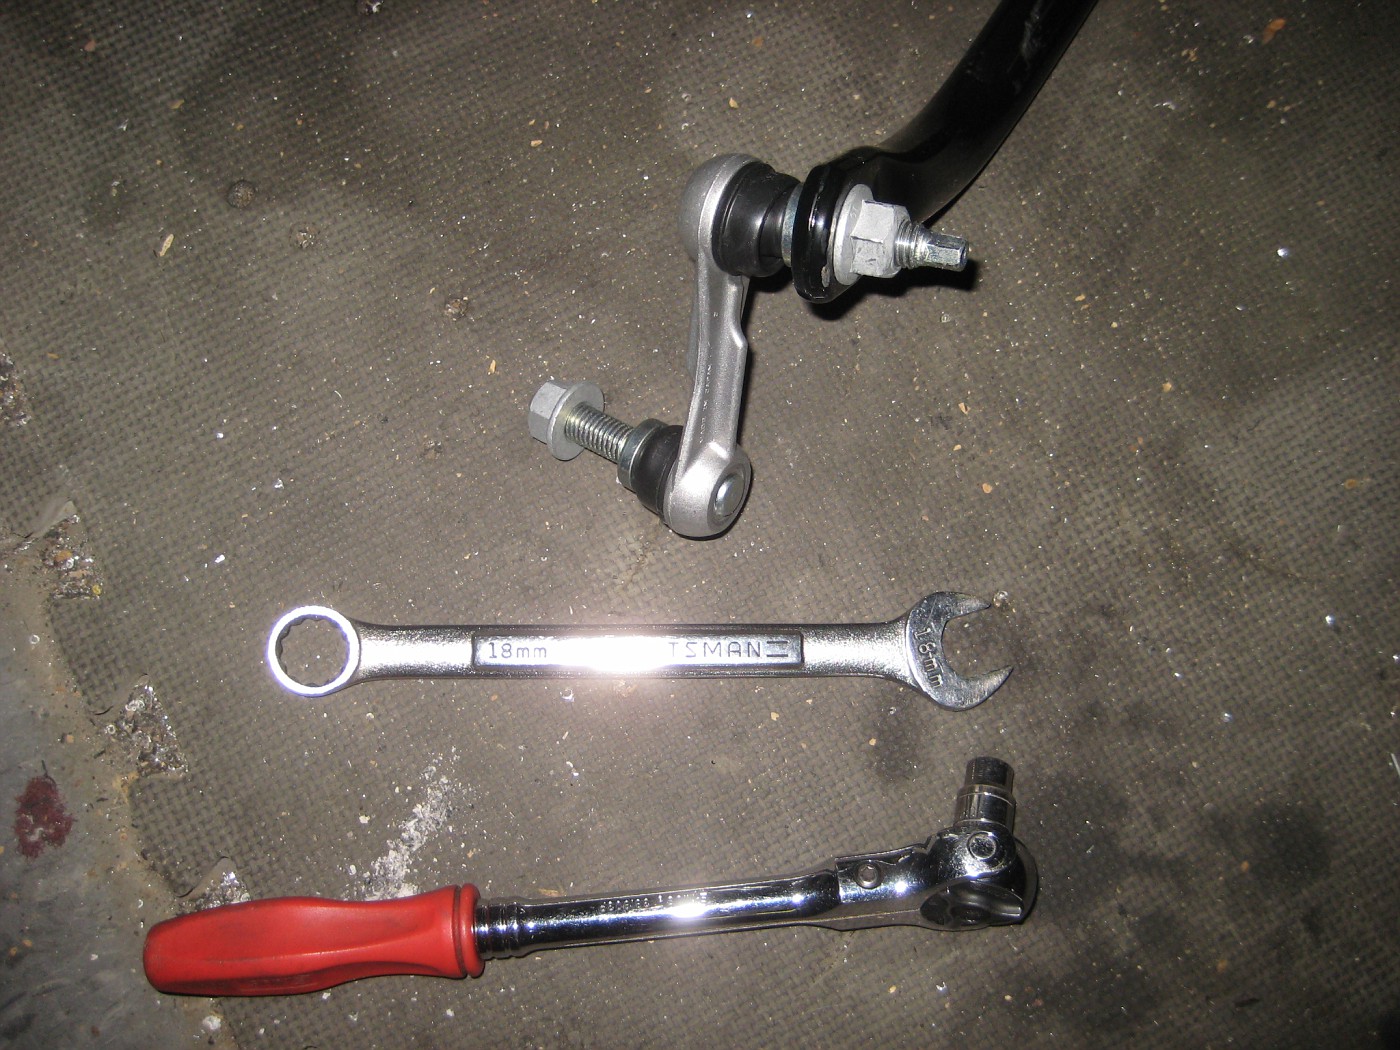
First step is to mount the drop links to the rear bar. Note the Nuts are interference types, so you'll need an 8mm socket to keep the joint from spinning, and an 18mm wrench to tighten the nuts:
It is an easy job to mount the rear bar into position. Use the new clamps, and bushings. Lube before assembing. Attach the drop links to the Lower control arm and you're done. a 20 minute job
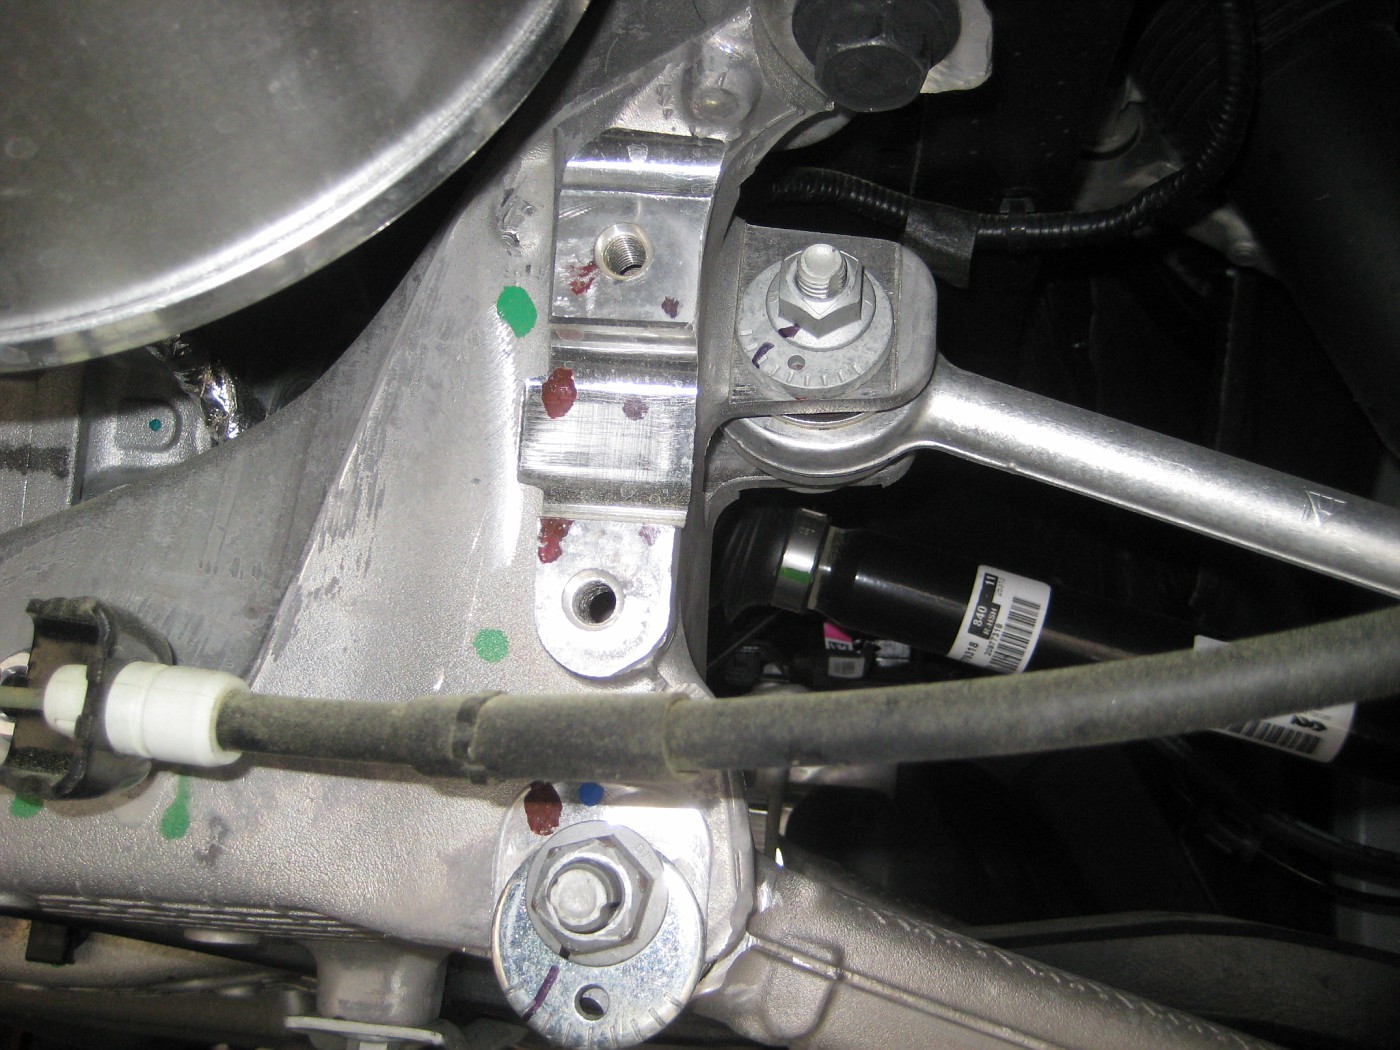
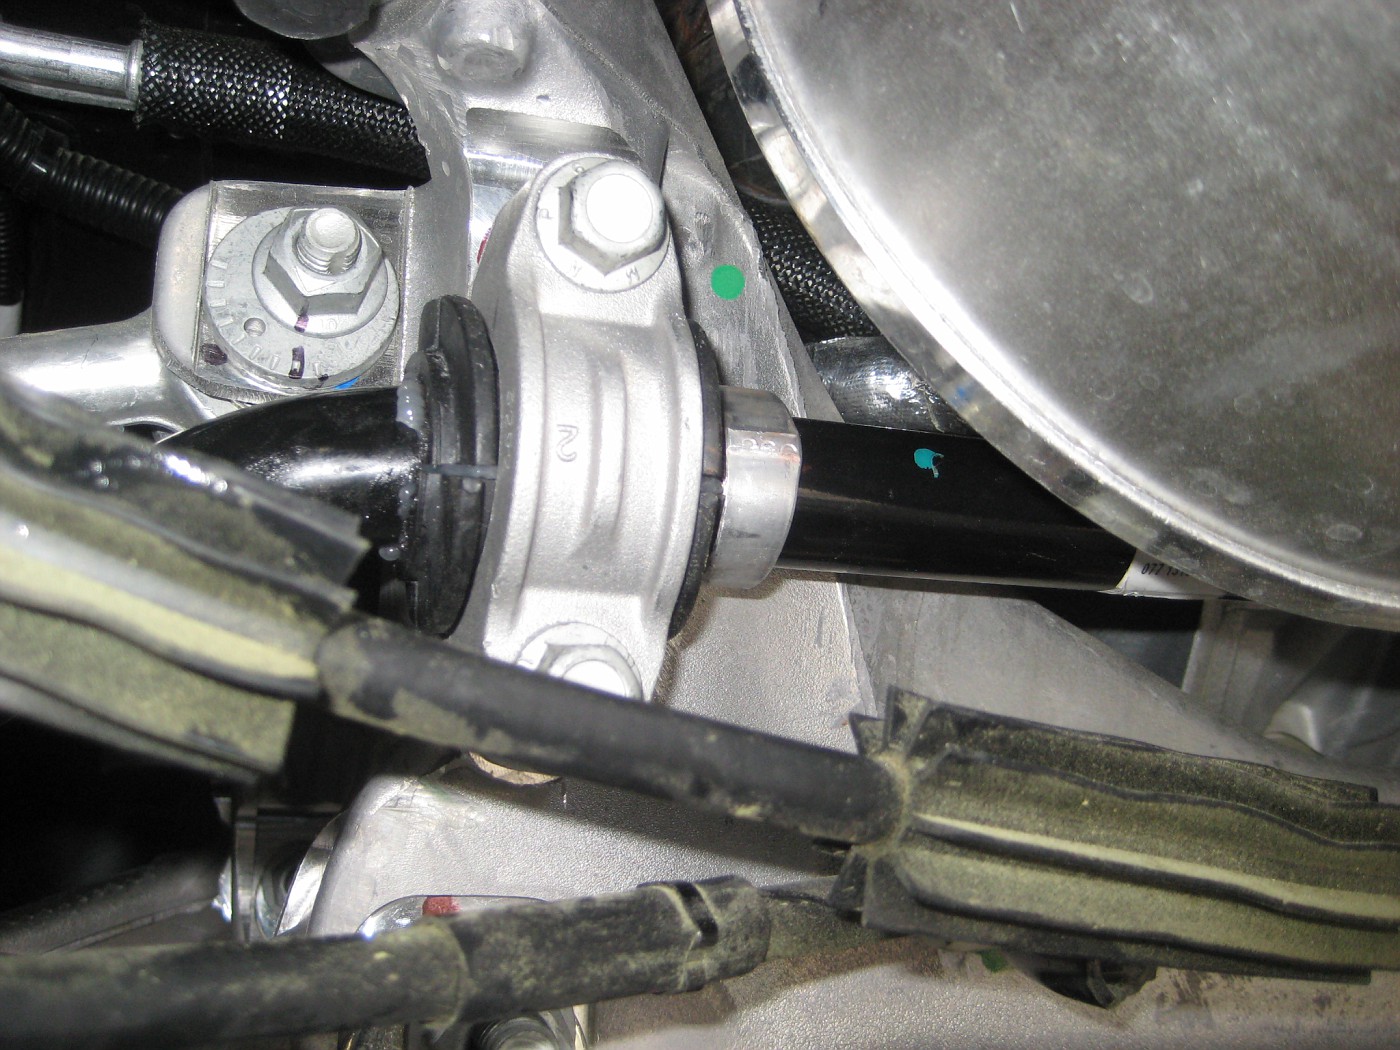
Existing mount points:
Bar and droplink positioning:
Clamps on, tighten these and droplinks and Done.
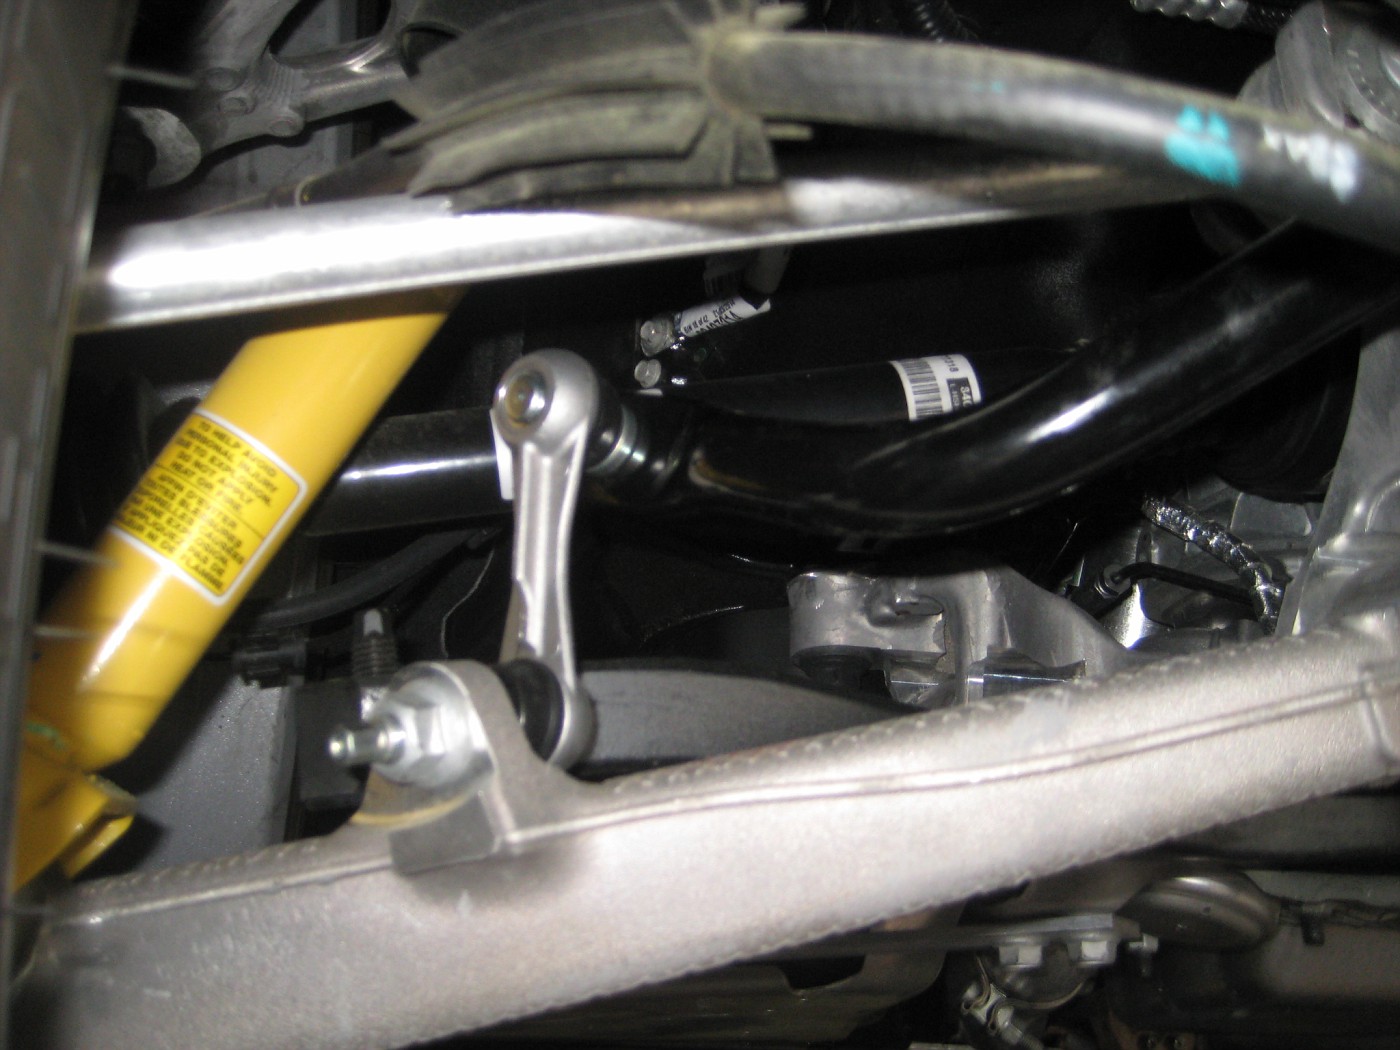
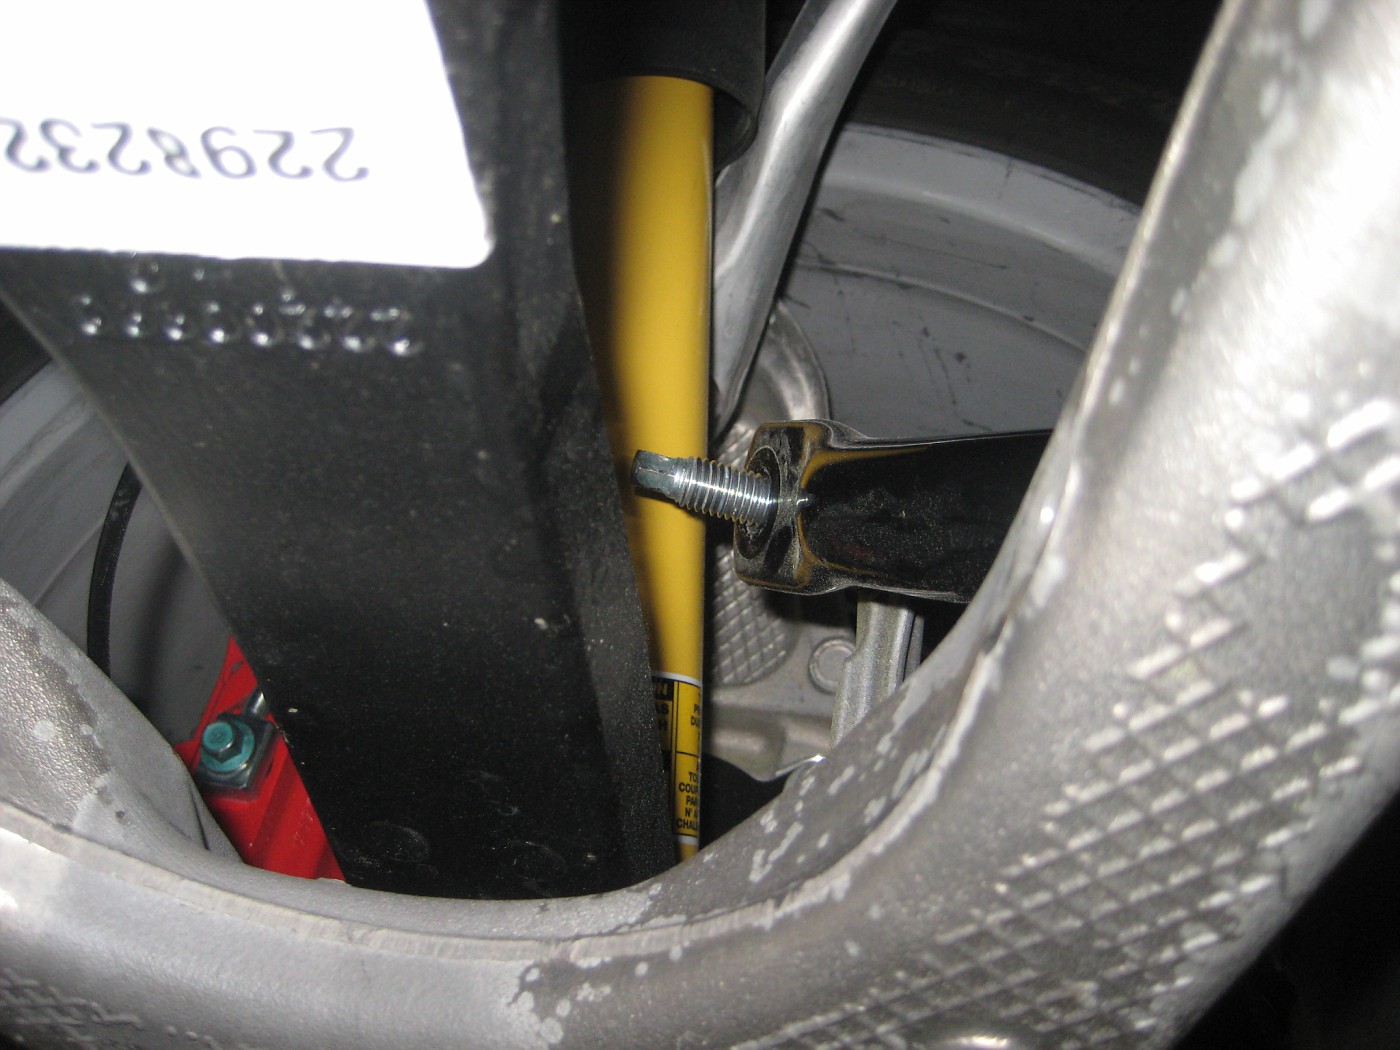
The front is a simple remove and replace but a little more awkward to work on. Remove the top drop link nut:
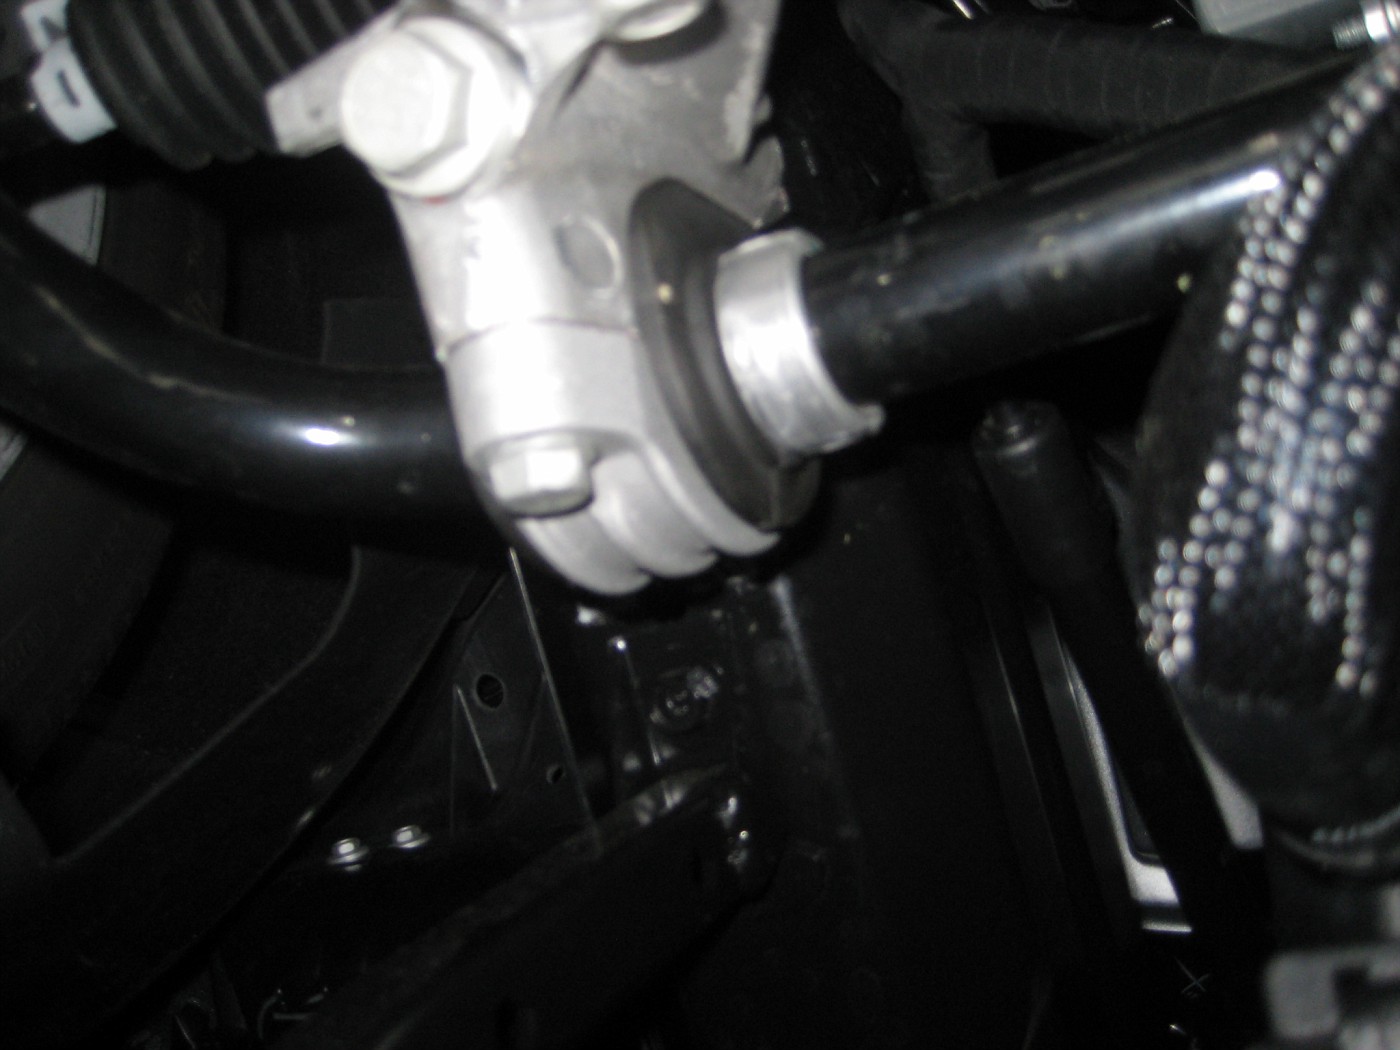
Remove the clamps and fish out the bar. Lube new bushings and reverse this operation.
This completes the swap.
Everyone likes stats so here they are.
Front stock bar 7.85 lbs, 26.2mm (hollow)
Z51 bar 7.95 lbs, 28mm (hollow)
Rear Z51 6.9 lbs, 26.5mm (hollow) + 2.2 for new hardware.
Rear stock None
Net increase in weight 9.2lbs
Driving impressions: I ordered a base car for a variety of reasons. I did this in 2008 as well and was very happy with how the car turned out with a minimal investment. The C7 does not disappoint. We know it handles great, but it wallows a bit, particularly in the rear on undulating turns. The Z51 bar ties everything together nicely. No body roll, tied down feeling in the rear, and a big increase in confidence when pushing the car. No change in overall ride quality, though a little stiffer when traversing uneven surfaces. It is uncanny as you can literally feel all 4 corners of the car working. This I mean in a good way!. Overall this will probably be the best $300 you can spend on your base car if you put any value on handling. Everyone knows how good the Z51 is. Build yourself a Z25.5 for a few bucks, while retaining the ride quality and comfort you currently enjoy. Gene is geared up on these. Shoot him an email to order.
Steve
Steve,
Great write up just a few quick questions?
Did you reuse the 4 bolts on the front clamps?
Did you raise the front or just drive on ramps?
And how hard was it to fish the bar around the one hose in the way?
Steve,
Great write up just a few quick questions?
Did you reuse the 4 bolts on the front clamps?
Did you raise the front or just drive on ramps?
And how hard was it to fish the bar around the one hose in the way?
Thanks!,
Yes...re-used front bolts
I have a lift, but ramps should be fine
Not hard....Ramp height should be sufficient to maneuver it out of there..
Those of you from the old C6 days know this was a desirable mod. The Base C7, not having a rear bar stock requires a few more hardware bits, but nothing expensive or tricky. The (Z51) mount points are on the car so this upgrade is very easy. While I'm not the first to do this, I contacted Gene gene@gmpartshouse.com at GM partshouse and requested he put together a kit for me. Gene's pretty much the parts expert here, and he quickly put the list together, I gave him the Go, and a week later I had the parts on my bench. Cost was around $275 + whatever shipping to you is.
Here are the parts:
2 Z51 bars, bushings (now Poly instead of the OEM soft rubber), Droplinks for the rear, 2 clamps, 4 bolts and 4 nuts.
First step is to mount the drop links to the rear bar. Note the Nuts are interference types, so you'll need an 8mm socket to keep the joint from spinning, and an 18mm wrench to tighten the nuts:
It is an easy job to mount the rear bar into position. Use the new clamps, and bushings. Lube before assembing. Attach the drop links to the Lower control arm and you're done. a 20 minute job
Existing mount points:
Bar and droplink positioning:
Clamps on, tighten these and droplinks and Done.
The front is a simple remove and replace but a little more awkward to work on. Remove the top drop link nut:
Remove the clamps and fish out the bar. Lube new bushings and reverse this operation.
This completes the swap.
Everyone likes stats so here they are.
Front stock bar 7.85 lbs, 26.2mm (hollow)
Z51 bar 7.95 lbs, 28mm (hollow)
Rear Z51 6.9 lbs, 26.5mm (hollow) + 2.2 for new hardware.
Rear stock None
Net increase in weight 9.2lbs
Driving impressions: I ordered a base car for a variety of reasons. I did this in 2008 as well and was very happy with how the car turned out with a minimal investment. The C7 does not disappoint. We know it handles great, but it wallows a bit, particularly in the rear on undulating turns. The Z51 bar ties everything together nicely. No body roll, tied down feeling in the rear, and a big increase in confidence when pushing the car. No change in overall ride quality, though a little stiffer when traversing uneven surfaces. It is uncanny as you can literally feel all 4 corners of the car working. This I mean in a good way!. Overall this will probably be the best $300 you can spend on your base car if you put any value on handling. Everyone knows how good the Z51 is. Build yourself a Z25.5 for a few bucks, while retaining the ride quality and comfort you currently enjoy. Gene is geared up on these. Shoot him an email to order.
Steve
One thing needed and missed is the 4 bolts that hold the bar to the clamp. They are TTY bolts and should not be reused. They stretch on the first use and are weaker on the second use. No reason to save a few bucks and cheap out. I found out the hard way tried to re use and the bolt snapped. Very soft going in should have known. I'm sure some will say no big deal re use. Dumb move to save a few $ when they could snap under spirited driving.
Just did my install this weekend. A couple notes: One, take a picture of the orientation of the front before u remove it. Getting the bar in and out is a pita. Doing it twice is even worse. Second, DEF buy four new bolts for the front clamps. I was all done just tightening up those bolts and snapped one. I am driving around with only one bolt on that side until a new one gets in and will have to unbolt everything and remount with new bolts after fishing out that broken one. Giant pita. Costs 14 bucks more for new bolts and well worth it. And FYI, even driving carefully since installing it feels much more direct on turn in now. Love it!
Just did my install this weekend. A couple notes: One, take a picture of the orientation of the front before u remove it. Getting the bar in and out is a pita. Doing it twice is even worse. Second, DEF buy four new bolts for the front clamps. I was all done just tightening up those bolts and snapped one. I am driving around with only one bolt on that side until a new one gets in and will have to unbolt everything and remount with new bolts after fishing out that broken one. Giant pita. Costs 14 bucks more for new bolts and well worth it. And FYI, even driving carefully since installing it feels much more direct on turn in now. Love it!
Did you use a torque wrench with the proper torque specs when you tightened it? I did, and did not have a problem with the bolts at all..
Nope. Didn't. The official specs specifically say only to use new bolts however. All caps NEW. I'm sure if I had used the torque wrench maybe it wouldn't have snapped but by hand how much above spec do you think I could have gone and would it have snapped while driving aggressively? I'm not criticizing those who reused them, and I wouldn't take it off and redo it if I already had mounted with the old ones, but having done it once I'd say its a no brainier to get the 4 new bolts and just take that risk out of the equation, no?
Nope. Didn't. The official specs specifically say only to use new bolts however. All caps NEW. I'm sure if I had used the torque wrench maybe it wouldn't have snapped but by hand how much above spec do you think I could have gone and would it have snapped while driving aggressively? I'm not criticizing those who reused them, and I wouldn't take it off and redo it if I already had mounted with the old ones, but having done it once I'd say its a no brainier to get the 4 new bolts and just take that risk out of the equation, no?
Did you use a torque wrench with the proper torque specs when you tightened it? I did, and did not have a problem with the bolts at all..
I used a torque wrench and it broke long before it was at spec. If you look up TTY bolts there is now way you would used them. If I were you I would order the 4 bolts and carefully remove yours and replace. The ones you are riding around with are weak and may snap on their own. Again, I am sure someone here will say no big deal. They are the same types you see as techs at dealers. They think engineered bolts are all the same. Nope
To make sure our customers are satisfied and do not have problems with the bolts or have to run to try and find bolts we have added the front bolts to the kit now. The kit is now $296.66 + shipping. You can order it at the following link. http://store.gmpartshouse.com/parts/...&siteid=214638
Gene, what about for those of that have outstanding orders? Will they ship with the bolts?
I ordered over Labor Day weekend, and haven't received tracking information, so I assume my kit has not shipped.
Originally Posted by Gene Culley
To make sure our customers are satisfied and do not have problems with the bolts or have to run to try and find bolts we have added the front bolts to the kit now. The kit is now $296.66 + shipping. You can order it at the following link. http://store.gmpartshouse.com/parts/...&siteid=214638
Gene...I ordered the kit late last week. I'm not sure if that was before or after the new bolts were included in the kit. If not, I will be needing the bolts too. Thanks, Bill Rose
If you did not pay $296.66 + shipping for the kit then they are not included. You're more than welcome to add and pay for the extra bolts as everyone who is now getting them is paying an increased cost as well.
Gene, what about for those of that have outstanding orders? Will they ship with the bolts?
I ordered over Labor Day weekend, and haven't received tracking information, so I assume my kit has not shipped.
Originally Posted by Gene Culley
If you did not pay $296.66 + shipping for the kit then they are not included. You're more than welcome to add and pay for the extra bolts as everyone who is now getting them is paying an increased cost as well.
Gene, what will it take to get the four bolts separately? I still have not received my kit, so hopefully I can get you to add them. I am certainly willing to pay the difference.
If you did not pay $296.66 + shipping for the kit then they are not included. You're more than welcome to add and pay for the extra bolts as everyone who is now getting them is paying an increased cost as well.
Gene,
I just ordered a set that you had on ebay. Will it come with the extra bolts too? It was a little more $299 plus shipping...

 07-21-2014, 09:24 AM