
Radiator Fins / Damage
 03-16-2014, 06:37 PM
#1
Tech Contributor
Thread Starter
Member Since: Jan 2006
Location: Saint Louis MO
Posts: 4,761
Likes: 0
Received 219 Likes
on
110 Posts
St. Jude Donor '14-'15
Alright... this is one of those posts that none of us ever want to make...
I will go into how NOT to do this in my install thread, but I'm going to ask this separately in a new thread to get honest opinions from other Corvette owners.
Let me start by saying that this is the essence of DIY - we're (for better or worse) learning as we go along. Strangely enough, this was the correct way according to the service manual - I guess they have air guns that are more shallow...
The balancer bolt is torqued to somewhere in the 250ft/lb area. An air impact wrench made quick work of this. Let's pause here.
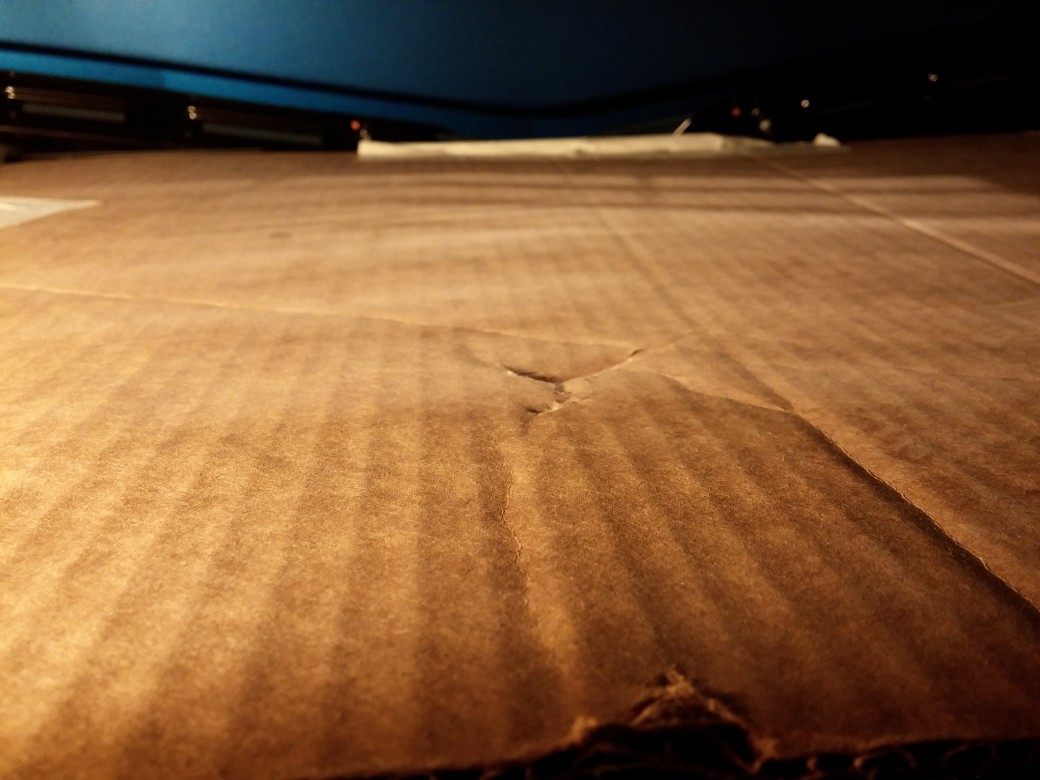
The space in between the radiator and the balancer bolt is limited. Very limited. So, as another member suggested, I laid a thick piece of cardboard over the radiator and taped it into place.
Back to taking out the balancer bolt... once it had a good snap, I let off the trigger, however, the anvil didn't stop in time before the gun was pushed back into the cardboard (and to my horror, the radiator). The rear of the gun is curved and smooth - no edges. It was pushed in at a constant rate and not struck, so this is about the best-case scenario for these types of injuries.
I took time (about an hour) straightening out fins (no, they're never going to be pretty again period) and such, but my worry is with the two channels.
Can anyone take a good look at these and give me an opinion?
I just bought a professional-level pressure tester, but I can't get to that until I have the entire cooling system (hoses, etc) back together again.
It's just been one of those days where my heart has sunken into the pit of my stomach. Please no "you're an idiot" responses... I took what I considered to be the proper precautions, but an accident ended up causing this fallout.
Thanks, all.
Attachment 48373452
Attachment 48373454
Attachment 48373455
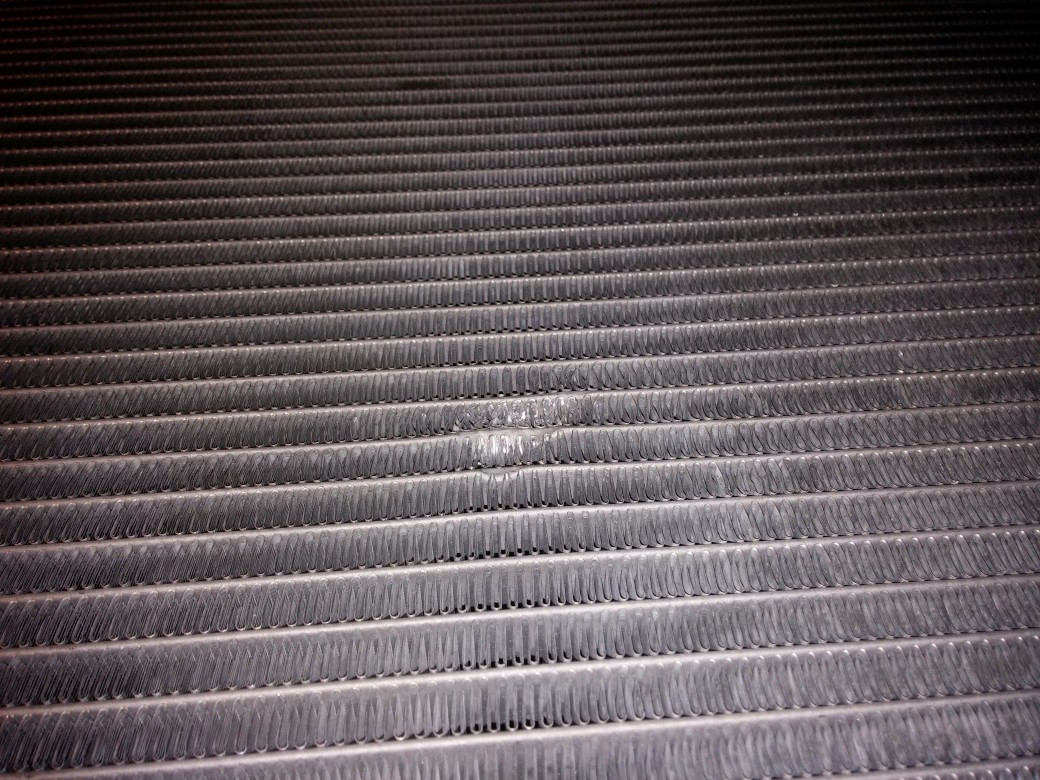

Attachment 48373458
I will go into how NOT to do this in my install thread, but I'm going to ask this separately in a new thread to get honest opinions from other Corvette owners.
Let me start by saying that this is the essence of DIY - we're (for better or worse) learning as we go along. Strangely enough, this was the correct way according to the service manual - I guess they have air guns that are more shallow...
The balancer bolt is torqued to somewhere in the 250ft/lb area. An air impact wrench made quick work of this. Let's pause here.
The space in between the radiator and the balancer bolt is limited. Very limited. So, as another member suggested, I laid a thick piece of cardboard over the radiator and taped it into place.
Back to taking out the balancer bolt... once it had a good snap, I let off the trigger, however, the anvil didn't stop in time before the gun was pushed back into the cardboard (and to my horror, the radiator). The rear of the gun is curved and smooth - no edges. It was pushed in at a constant rate and not struck, so this is about the best-case scenario for these types of injuries.
I took time (about an hour) straightening out fins (no, they're never going to be pretty again period) and such, but my worry is with the two channels.
Can anyone take a good look at these and give me an opinion?
I just bought a professional-level pressure tester, but I can't get to that until I have the entire cooling system (hoses, etc) back together again.
It's just been one of those days where my heart has sunken into the pit of my stomach. Please no "you're an idiot" responses... I took what I considered to be the proper precautions, but an accident ended up causing this fallout.
Thanks, all.
Attachment 48373452
Attachment 48373454
Attachment 48373455
Attachment 48373458
 03-16-2014, 06:41 PM
#2
Team Owner


As long as it isn't leaking that is nothing. In 6 months there will probably be more junk/crap/bugs/dust/oil/rocks/etc that bugger it up than that.
03-16-2014, 06:53 PM
#3
Racer


Ask your local air conditioning guy if he has any fin combs he uses to straighten out damage to fins on cooling coils and condensers. Not sure how effective they'll be on this type of fin but they may help some.
 03-16-2014, 07:15 PM
#5

I wouldn't worry. Bugs and other small projectiles will probably leave worse spots over a year of normal driving. From your thread title I was expecting to see carnage but that is very minor.
You have now lost about 1/100 of 1 percent of your radiator's total heat rejection capacity
You have now lost about 1/100 of 1 percent of your radiator's total heat rejection capacity
03-16-2014, 07:38 PM
#6

Theta,
Sorry I didn't mean to laugh when I saw this because something like this has happened to every single gearhead in the history of gearheads!
If it were me, I'd remove the radiator and have it pressure tested by a local shop since it's probably a couple of bolts and rubber isolators from removal anyways. The Chevy dealer may even be able to do this. The fins don't matter but it looks like the water "channel" is slightly crushed. It would be a shame to be running the engine hot on boost and the radiator starts pissing all over your brand new supercharger setup. Unlike the Porsche part prices I'm used to, a new Chevy radiator may not be too expensive either. just saying'.
Mental note: remove radiator when I install mine.
03-16-2014, 08:08 PM
#7
Tech Contributor
Thread Starter
Member Since: Jan 2006
Location: Saint Louis MO
Posts: 4,761
Likes: 0
Received 219 Likes
on
110 Posts
St. Jude Donor '14-'15
Thank you for all the replies, guys!
I know it didn't look too terribly serious, but it still really pissed me off, and I wanted to seek out some guidance and/or opinions from you all
I have the pressure tester that I'll be using once the system is back together. Any idea what our pressure runs? I'm looking in the service manual, but it's a needle in a haystack.
Here's the rub! The condenser and radiator are essentially together as one unit. To remove the radiator, you must remove the evap hoses and discharge the AC system. How do I know? 1) The service manual, and unfortunately 2) cranking off a bolt that I thought was to the radiator that turned out to be an AC pressure line... Got green crap all over my face (glasses on, thankfully). Probably R134a.
So... that was actually my very first to-do. After all, having the radiator out would have saved my neck for an hour trying to straighten the fans. Just turned out to be wayyy too much work, and then I would have needed to go to the dealer and have them re-do the entire compressor system.
...
Side note, after letting a 2-second burst of pressure out of the evap/condenser hose, what should I do? Just have them check the pressure next time I'm in the shop? It's probably nothing to get excited over, but I just thought I'd ask.
I know it didn't look too terribly serious, but it still really pissed me off, and I wanted to seek out some guidance and/or opinions from you all
I have the pressure tester that I'll be using once the system is back together. Any idea what our pressure runs? I'm looking in the service manual, but it's a needle in a haystack.
Theta,
Sorry I didn't mean to laugh when I saw this because something like this has happened to every single gearhead in the history of gearheads!
If it were me, I'd remove the radiator and have it pressure tested by a local shop since it's probably a couple of bolts and rubber isolators from removal anyways. The Chevy dealer may even be able to do this. The fins don't matter but it looks like the water "channel" is slightly crushed. It would be a shame to be running the engine hot on boost and the radiator starts pissing all over your brand new supercharger setup. Unlike the Porsche part prices I'm used to, a new Chevy radiator may not be too expensive either. just saying'.
Mental note: remove radiator when I install mine.
Sorry I didn't mean to laugh when I saw this because something like this has happened to every single gearhead in the history of gearheads!
If it were me, I'd remove the radiator and have it pressure tested by a local shop since it's probably a couple of bolts and rubber isolators from removal anyways. The Chevy dealer may even be able to do this. The fins don't matter but it looks like the water "channel" is slightly crushed. It would be a shame to be running the engine hot on boost and the radiator starts pissing all over your brand new supercharger setup. Unlike the Porsche part prices I'm used to, a new Chevy radiator may not be too expensive either. just saying'.
Mental note: remove radiator when I install mine.
So... that was actually my very first to-do. After all, having the radiator out would have saved my neck for an hour trying to straighten the fans. Just turned out to be wayyy too much work, and then I would have needed to go to the dealer and have them re-do the entire compressor system.
...
Side note, after letting a 2-second burst of pressure out of the evap/condenser hose, what should I do? Just have them check the pressure next time I'm in the shop? It's probably nothing to get excited over, but I just thought I'd ask.
03-16-2014, 08:12 PM
#8
Tech Contributor
Thread Starter
Member Since: Jan 2006
Location: Saint Louis MO
Posts: 4,761
Likes: 0
Received 219 Likes
on
110 Posts
St. Jude Donor '14-'15
For reference, our radiator number on those little tools is #20.
03-16-2014, 08:19 PM
#9
Melting Slicks


Funny (not really) but this reminds me of when I was installing a Veraram cold air setup on my C6 Z06. I had to cut the radiator shroud and had it all cut out pretty nice. As I was trimming the last little bit with my dremel tool, I nicked the AC Condenser. Next thing I heard was a sssssssssss... Boy was I pissed off. Then to add insult to injury, in my frustration and haste, I succeeded in nicking the edge of the front fascia right next to the hood with the dremel. The nick was minor and a radiator repair shop was able to fix the condensor for $25. Fortunately it could have been worse.
03-16-2014, 08:23 PM
#10
Tech Contributor
Thread Starter
Member Since: Jan 2006
Location: Saint Louis MO
Posts: 4,761
Likes: 0
Received 219 Likes
on
110 Posts
St. Jude Donor '14-'15
Funny (not really) but this reminds me of when I was installing a Veraram cold air setup on my C6 Z06. I had to cut the radiator shroud and had it all cut out pretty nice. As I was trimming the last little bit with my dremel tool, I nicked the AC Condenser. Next thing I heard was a sssssssssss... Boy was I pissed off. Then to add insult to injury, in my frustration and haste, I succeeded in nicking the edge of the front fascia right next to the hood with the dremel. The nick was minor and a radiator repair shop was able to fix the condensor for $25. Fortunately it could have been worse.
I'm having one of those days where I'm not sure if I should go work on it anymore for fear of doing something else stupid, but stuff happens.
...
Thanks very much to those who PMed me as well - that was much appreciated.
 03-16-2014, 08:28 PM
#12
Tech Contributor
Thread Starter
Member Since: Jan 2006
Location: Saint Louis MO
Posts: 4,761
Likes: 0
Received 219 Likes
on
110 Posts
St. Jude Donor '14-'15
My exact thought when I unbolted the sucker and popped the two grommets on the bottom out was "are you g-d kidding me"?
Checked the service manual, and sure as s**t, it involves de-pressurizing the AC system, removing the condenser lines, removing the entire block unit, and then servicing the individual exchangers.
The only reason I didn't move forward with that is the fear of what it costs to have the dealer flush and re-charge the AC system.
I'm already a bit worried about the 2-second blow-off I had. That should just be fixable with a quick R134a blast, though. Of course, what do I know in that department? Zilch.
03-16-2014, 09:52 PM
#13
Instructor

Member Since: Nov 2013
Location: Milton ON
Posts: 138
Likes: 0
Received 0 Likes
on
0 Posts
My exact thought when I unbolted the sucker and popped the two grommets on the bottom out was "are you g-d kidding me"?
Checked the service manual, and sure as s**t, it involves de-pressurizing the AC system, removing the condenser lines, removing the entire block unit, and then servicing the individual exchangers.
The only reason I didn't move forward with that is the fear of what it costs to have the dealer flush and re-charge the AC system.
I'm already a bit worried about the 2-second blow-off I had. That should just be fixable with a quick R134a blast, though. Of course, what do I know in that department? Zilch.
Checked the service manual, and sure as s**t, it involves de-pressurizing the AC system, removing the condenser lines, removing the entire block unit, and then servicing the individual exchangers.
The only reason I didn't move forward with that is the fear of what it costs to have the dealer flush and re-charge the AC system.
I'm already a bit worried about the 2-second blow-off I had. That should just be fixable with a quick R134a blast, though. Of course, what do I know in that department? Zilch.
My background is refrigeration. Don't worry about the 2 second blast, likely was 1-2 ounces of refrigerant. When you get it all back together turn the A/C on high and recirculate and see if you get 55-60 degree air. If you do your dine, if not you'll need a top up.
As for the rad, don't do much with the fins, those ribbon fins are not like the ones used on commercial condensers, they are much thinner and once they start to pull off they're toast. From the picks the aluminum water channels look fine.
As for pressure testing, the rad cap should have the relief pressure. You should be able to test past that but I can't remember the percentage. Because the system is capable of boiling water and making steam, the pressure is very low (steam under any pressure is very dangerous).
Sorry that had to happen but it certainly is more cosmetic than anything else.
03-16-2014, 10:01 PM
#14
Tech Contributor
Thread Starter
Member Since: Jan 2006
Location: Saint Louis MO
Posts: 4,761
Likes: 0
Received 219 Likes
on
110 Posts
St. Jude Donor '14-'15
My background is refrigeration. Don't worry about the 2 second blast, likely was 1-2 ounces of refrigerant. When you get it all back together turn the A/C on high and recirculate and see if you get 55-60 degree air. If you do your dine, if not you'll need a top up.
As for the rad, don't do much with the fins, those ribbon fins are not like the ones used on commercial condensers, they are much thinner and once they start to pull off they're toast. From the picks the aluminum water channels look fine.
As for pressure testing, the rad cap should have the relief pressure. You should be able to test past that but I can't remember the percentage. Because the system is capable of boiling water and making steam, the pressure is very low (steam under any pressure is very dangerous).
Sorry that had to happen but it certainly is more cosmetic than anything else.
Glad to have knowledgeable folks to be able to rely on for things like this.
 03-16-2014, 10:35 PM
#15
Scraping the splitter.
It appears to be cosmetic with no damage to the tubes, I wouldn't worry about it.
Especially since the rad on a Corvette isn't really visible.
Years ago, I waited 6-weeks for a Nick Micale radiator for my Turbo Buick (he used a bigger core with the stock end tanks). The day it arrived, I installed it and managed to nick one of the tubes installing the fan shroud. As soon as it pressurized, it leaked. Anyway, if you're stressing out call it a night and go inside for a beer.
S.
03-16-2014, 11:15 PM
#16
Tech Contributor
Thread Starter
Member Since: Jan 2006
Location: Saint Louis MO
Posts: 4,761
Likes: 0
Received 219 Likes
on
110 Posts
St. Jude Donor '14-'15
Excellent advice, indeed!
I hopped back on the horse (mostly because I forgot to turn off my garage heaters) and will try to get at least a few more things done tonight with more pics, etc.
I was distracted for a few hours changing the oil on my wife's car (which is evil...).
The sooner I have the lower part of the kit together, the sooner I can pressure test it. Sounds overwhelmingly like I'm in good shape. In that case, I'll chalk it up to good luck and a learning experience. I'll be sure to note this for other users so they know to hold the anvil for sure when backing out that bolt.
It's mostly my fault for putting the 350ft/lb gun down after it couldn't budge it and reaching for the 700ft/lb gun that took 2 seconds (give or take).
03-17-2014, 11:43 AM
#17
Drifting


Like others have said I would not worry about it, it just looks cosmetic. On my motocross bikes the radiator fins get all masked up but have no cooling problems.
Now just don't do it again...
Now just don't do it again...
03-17-2014, 08:20 PM
#19
Tech Contributor
Thread Starter
Member Since: Jan 2006
Location: Saint Louis MO
Posts: 4,761
Likes: 0
Received 219 Likes
on
110 Posts
St. Jude Donor '14-'15
Had it been worse, that's exactly what I was planning on. I've not seen anything out there, but I was going to call LMR and see what they were using on the monster(s) there.
Still a giant pain to do the whole HVAC cooling system just to change the rad...
Still a giant pain to do the whole HVAC cooling system just to change the rad...
03-17-2014, 09:32 PM
#20

I guess I could be considered a so called expert, I am an owner and GM of an Aviation Repair Station and specialize in heat transfer items such as turbine engine oil coolers, piston engine coolers, and other air heat transfer equipment installed on aircraft that utilize similar design techniques. If the radiator isn't leaking, I would just let it ride. It appears the damaged tubes do not have sharp edges which would cause fatiguing and/or stress of the metal that could lead to premature failure. Like someone said prior, you have lost such a negligible amount of cooling capacity, you will never even notice the damage performance wise as it is more than likely within the margin of manufacturing deviation as designed. As someone else had suggested you could always pull it and have to pressure tested to assure the structural integrity but that is your call for added peace of mind.
Just my .02, your mileage may vary.
Just my .02, your mileage may vary.