
aFe Power Intake...some additional install information
 06-06-2014, 07:04 PM
#1
Tech Contributor
Thread Starter
Member Since: Aug 1999
Location: Should this thoughtful, valuable contribution meet with no acknowledgement or 'thanks' this post----
Posts: 16,382
Received 399 Likes
on
257 Posts

Installed the unit recently using the included instructions and the forum threads from other members. I took a few pics of some of the steps that I did not see elsewhere, and which may help others enjoy an easy install. If you have not installed yours yet, perhaps this thread will make things pleasant for you.
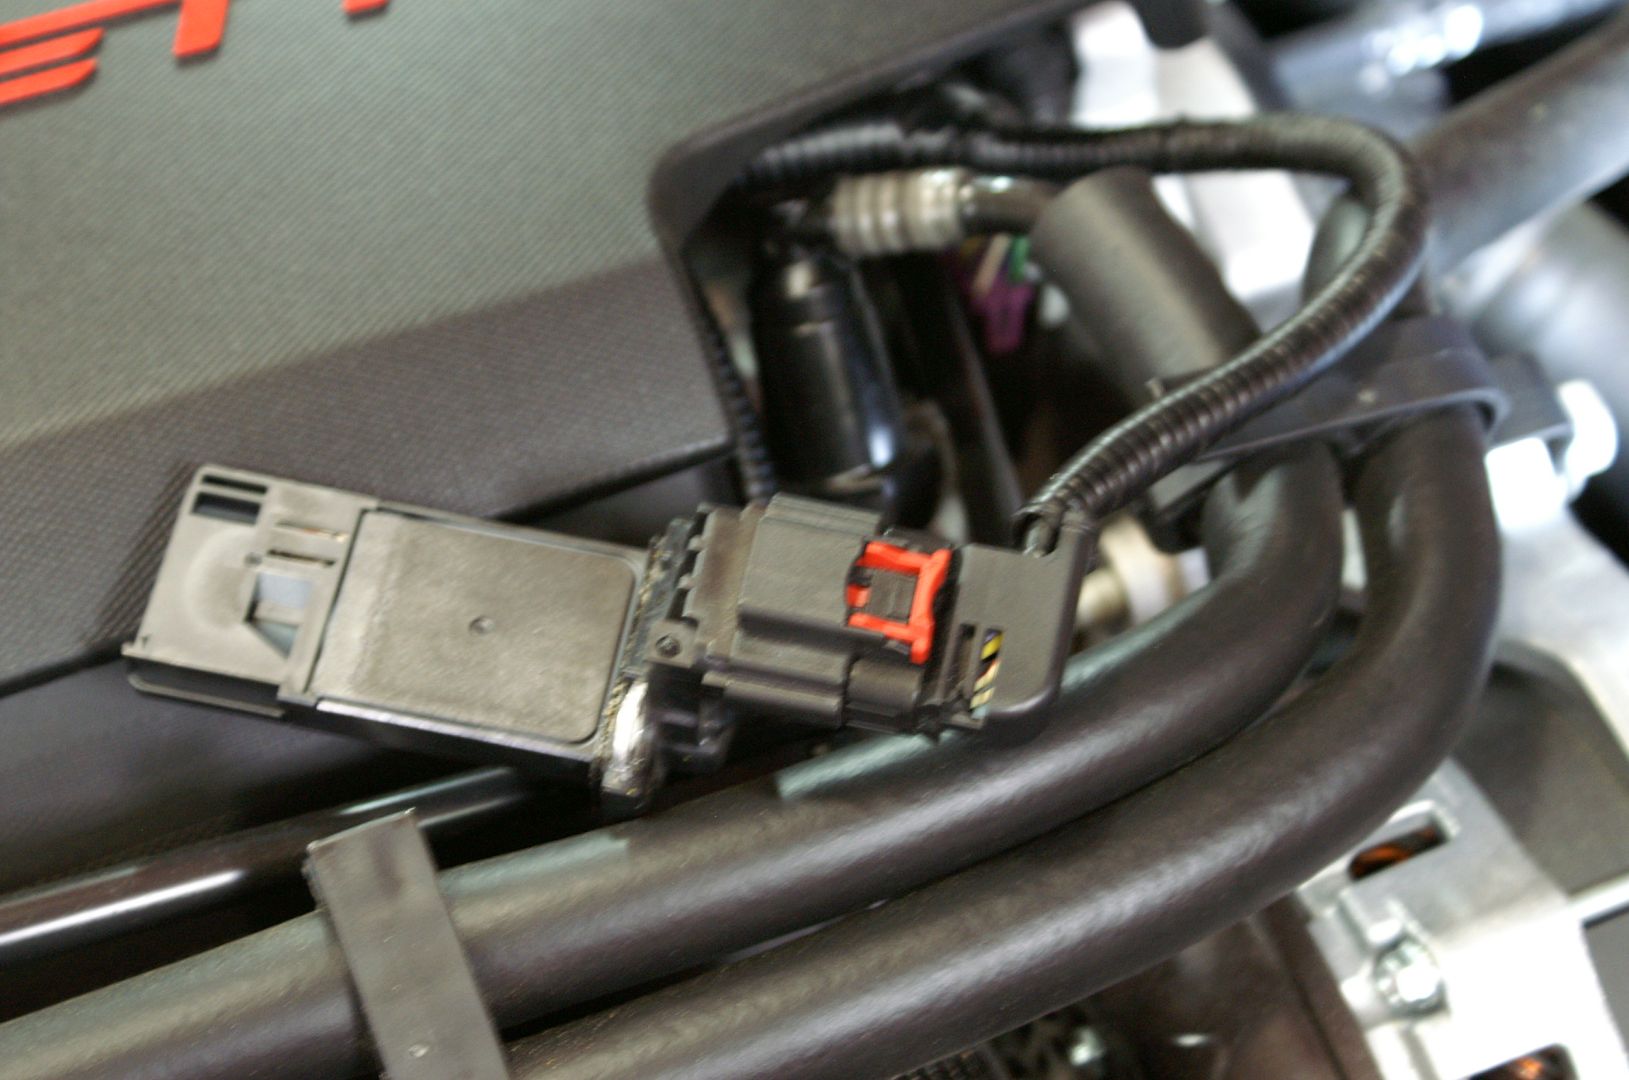
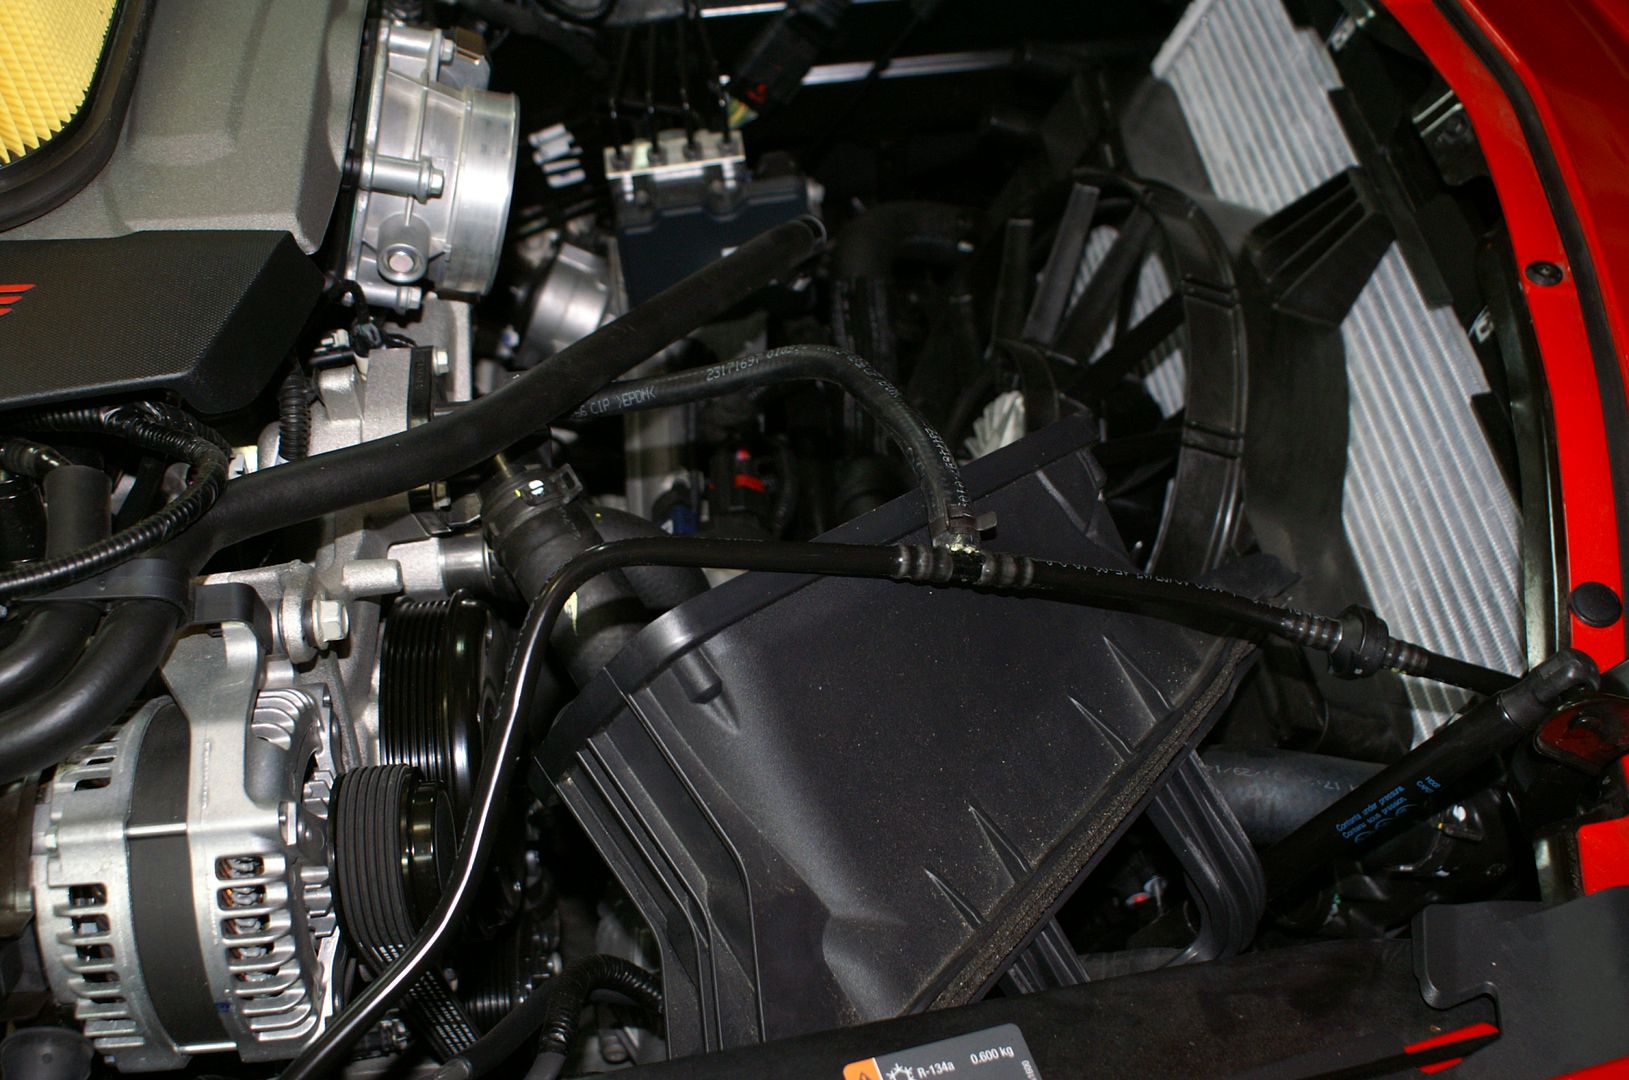
First off, the installation booklet is ok, but the blurry pictures, and some broad assumptions create a little confusion. For example, not everyone will know what a MAF sensor is or how to remove it. I actually removed the entire piece (2 small screws) because no amount of fiddling and pulling on the connector allowed me to separate the 2 pieces. I opted to remove the unit from the ductwork. If you do this, carefully lay the unit away from your work area (as shown) and do not touch any surfaces that enter the ducting. Just think of it as an alternate approach if you fear messing up an electrical connection.
----------------
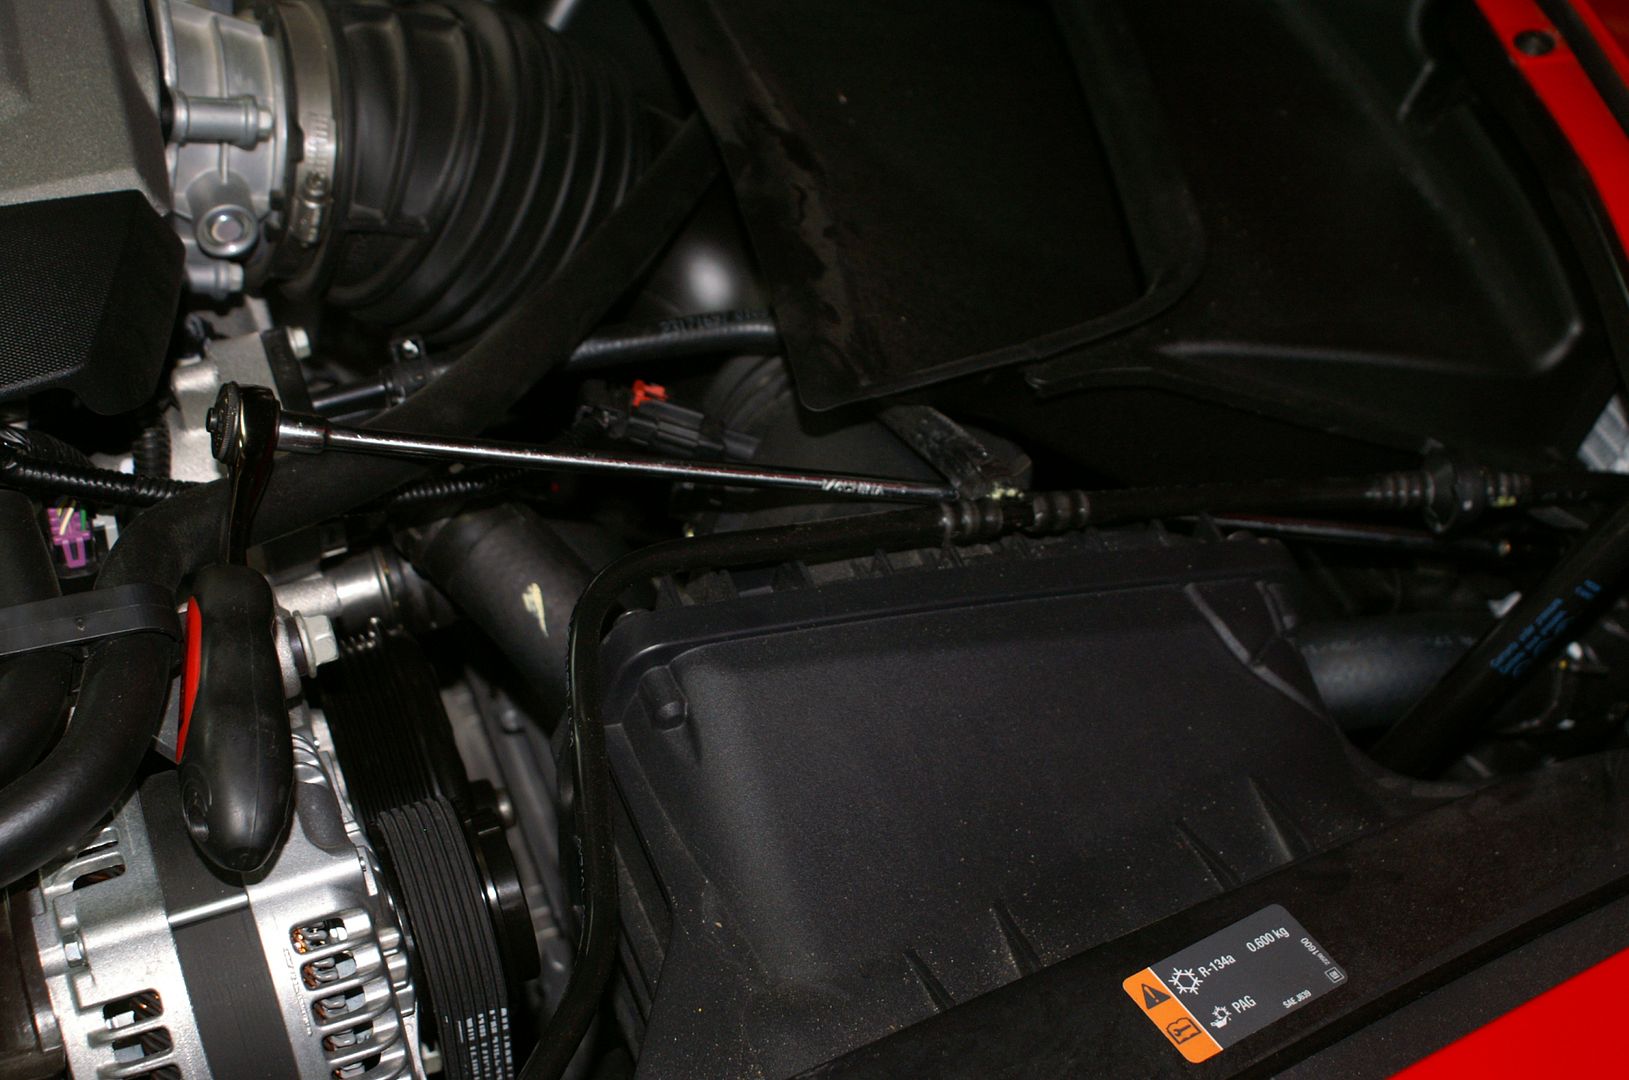
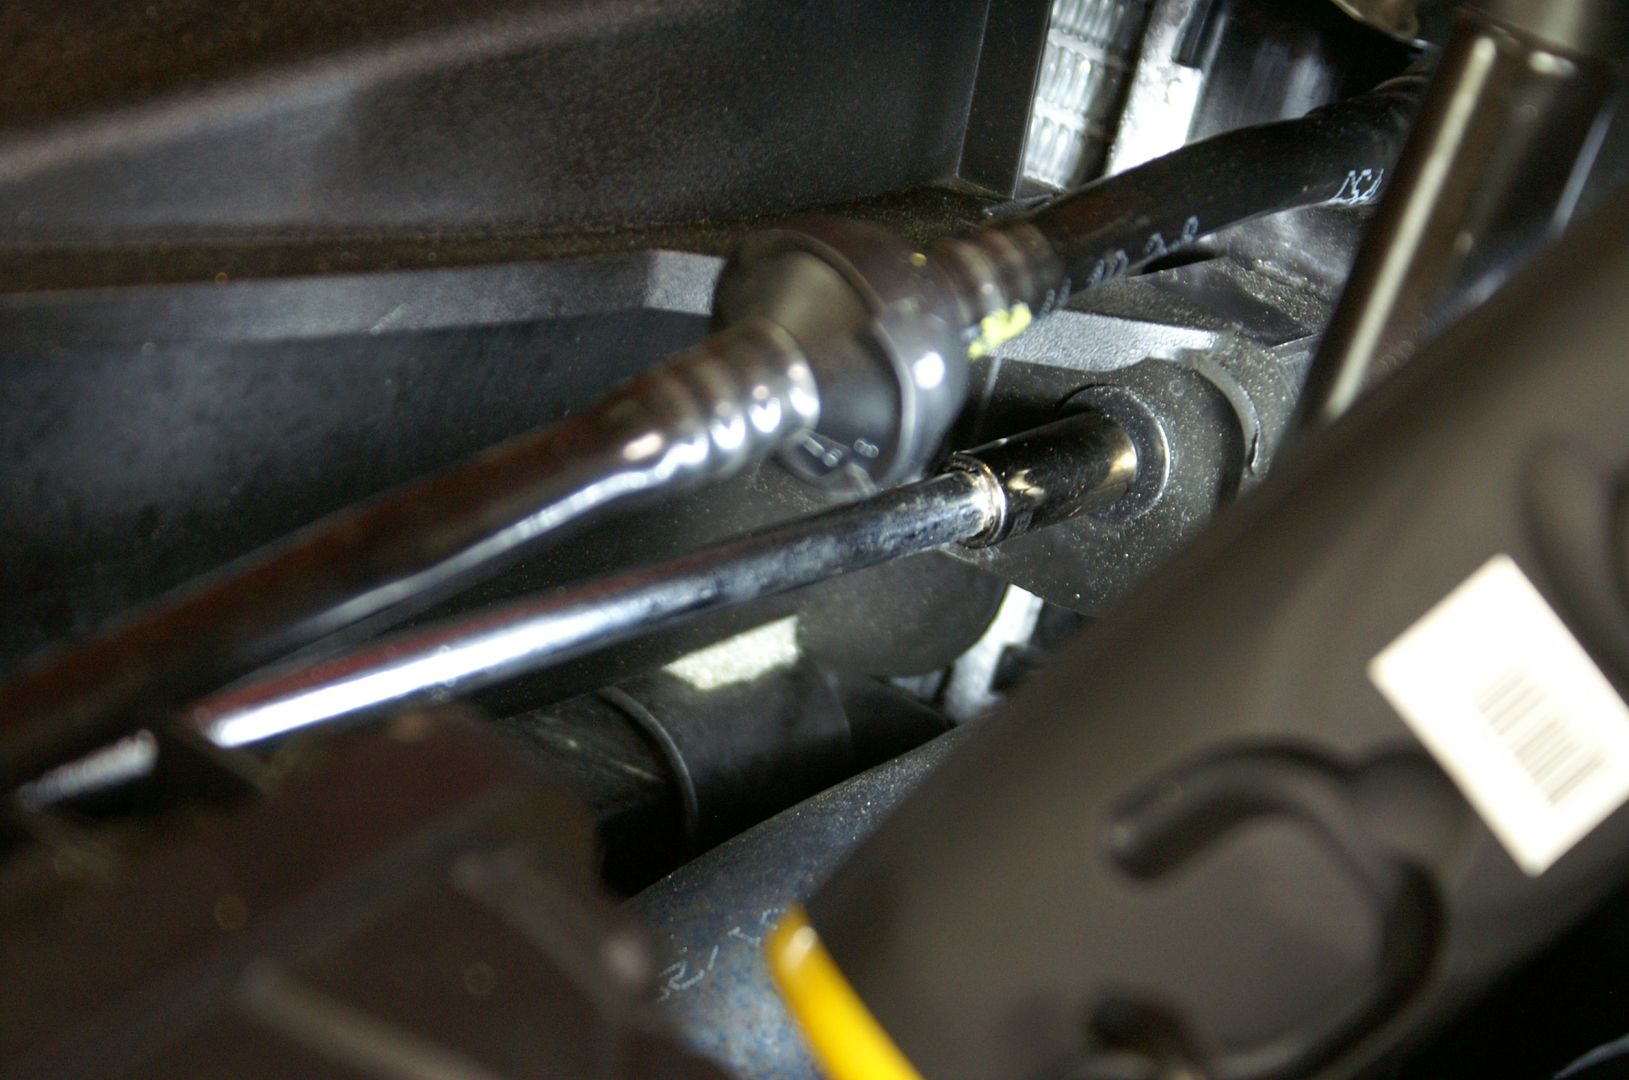
Next, others mentioned the 'hard-to-reach' screw head on the air inlet housing. Here is a method that worked for me..it requires a very long extension rod (18" or more), but makes the job very easy. Once you break the fastener loose, remove the ratchet from the extension, and simply spin it by hand while trapping the screw with your other hand. You do not want to lose it into the black hole below....be very careful not to let it get away from you.
close up detail...
------------------
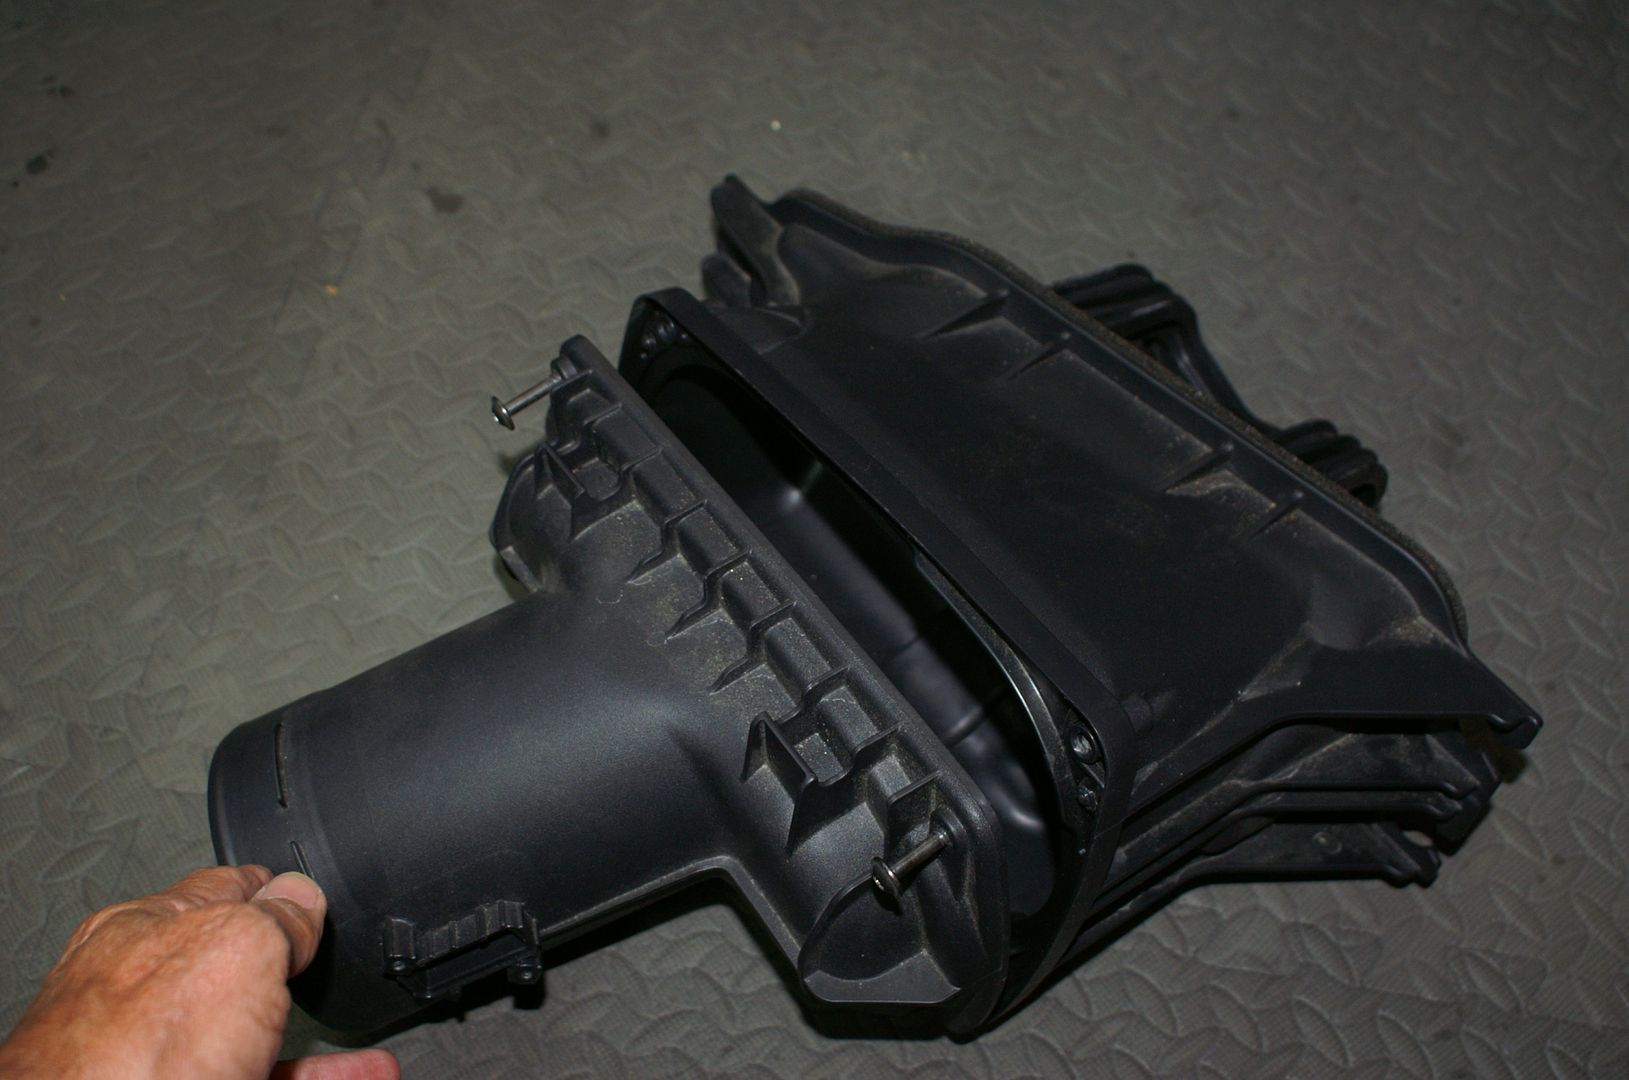
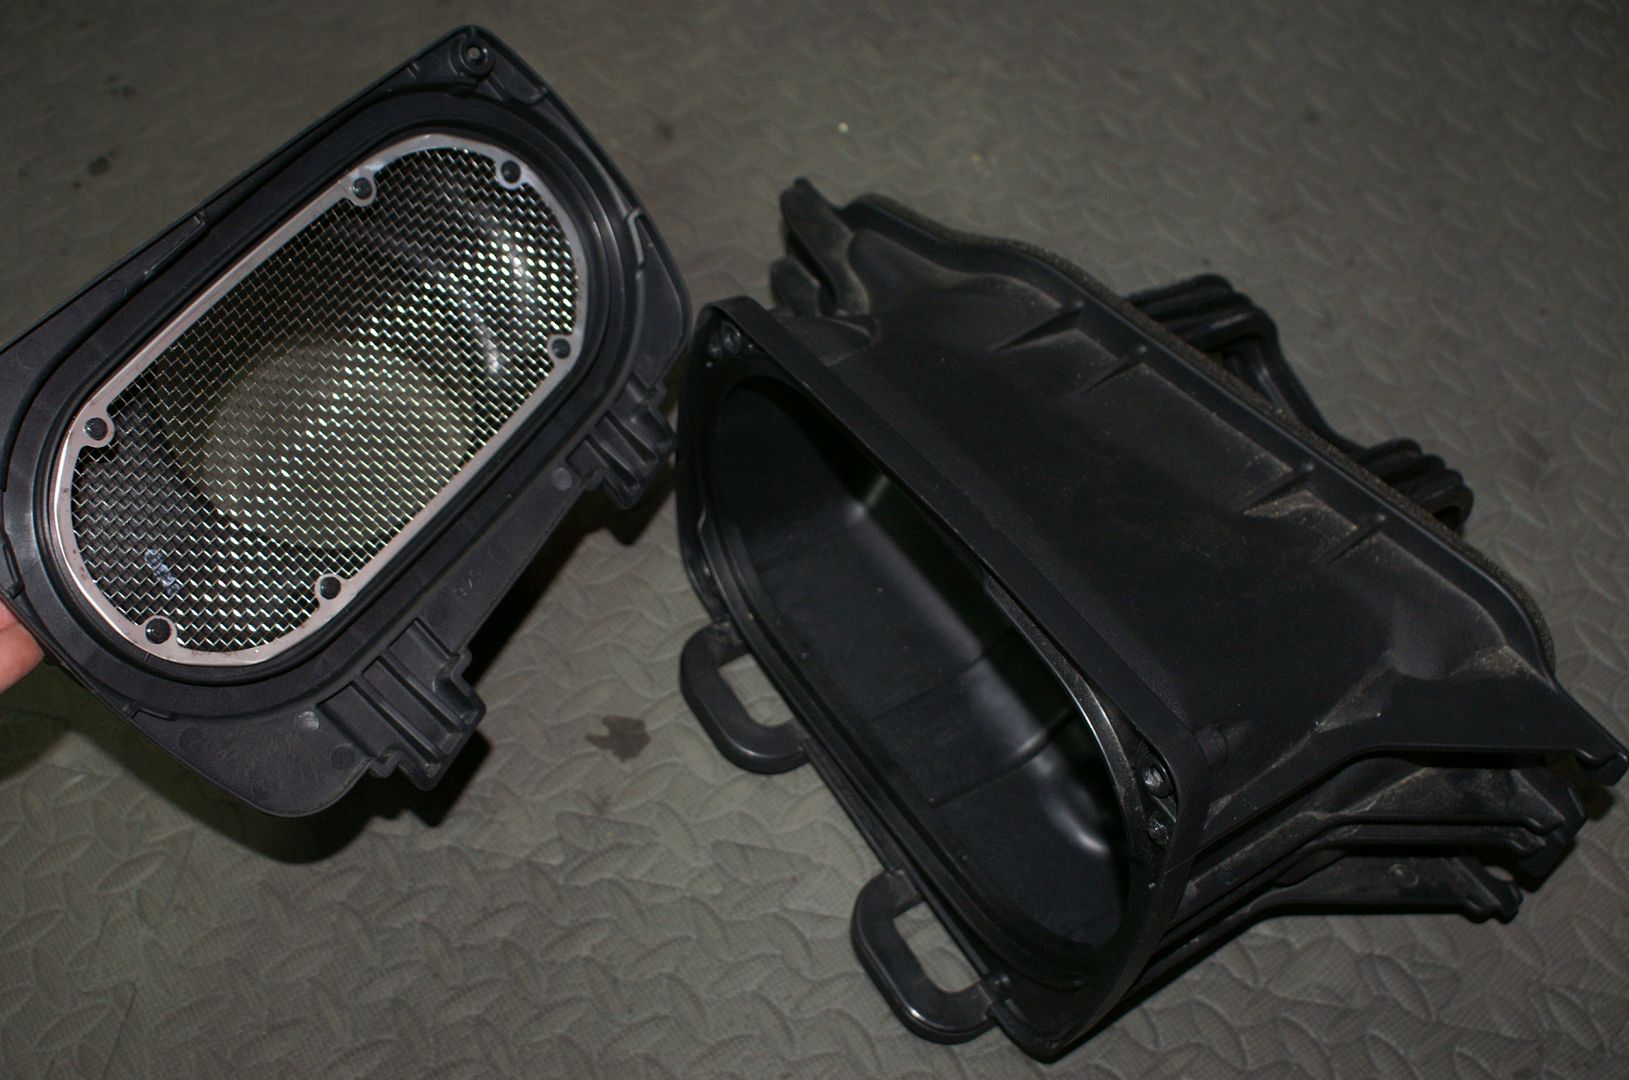
The stock unit is actually 2-part construction, however, this is not obvious when you are looking at it from above. When told to remove it from the engine bay it will not come out unless you separate the 2 components.
These 2 screws are hard to see initially...

The removal process forcing it away from you....it's a tight squeeze...
----------------
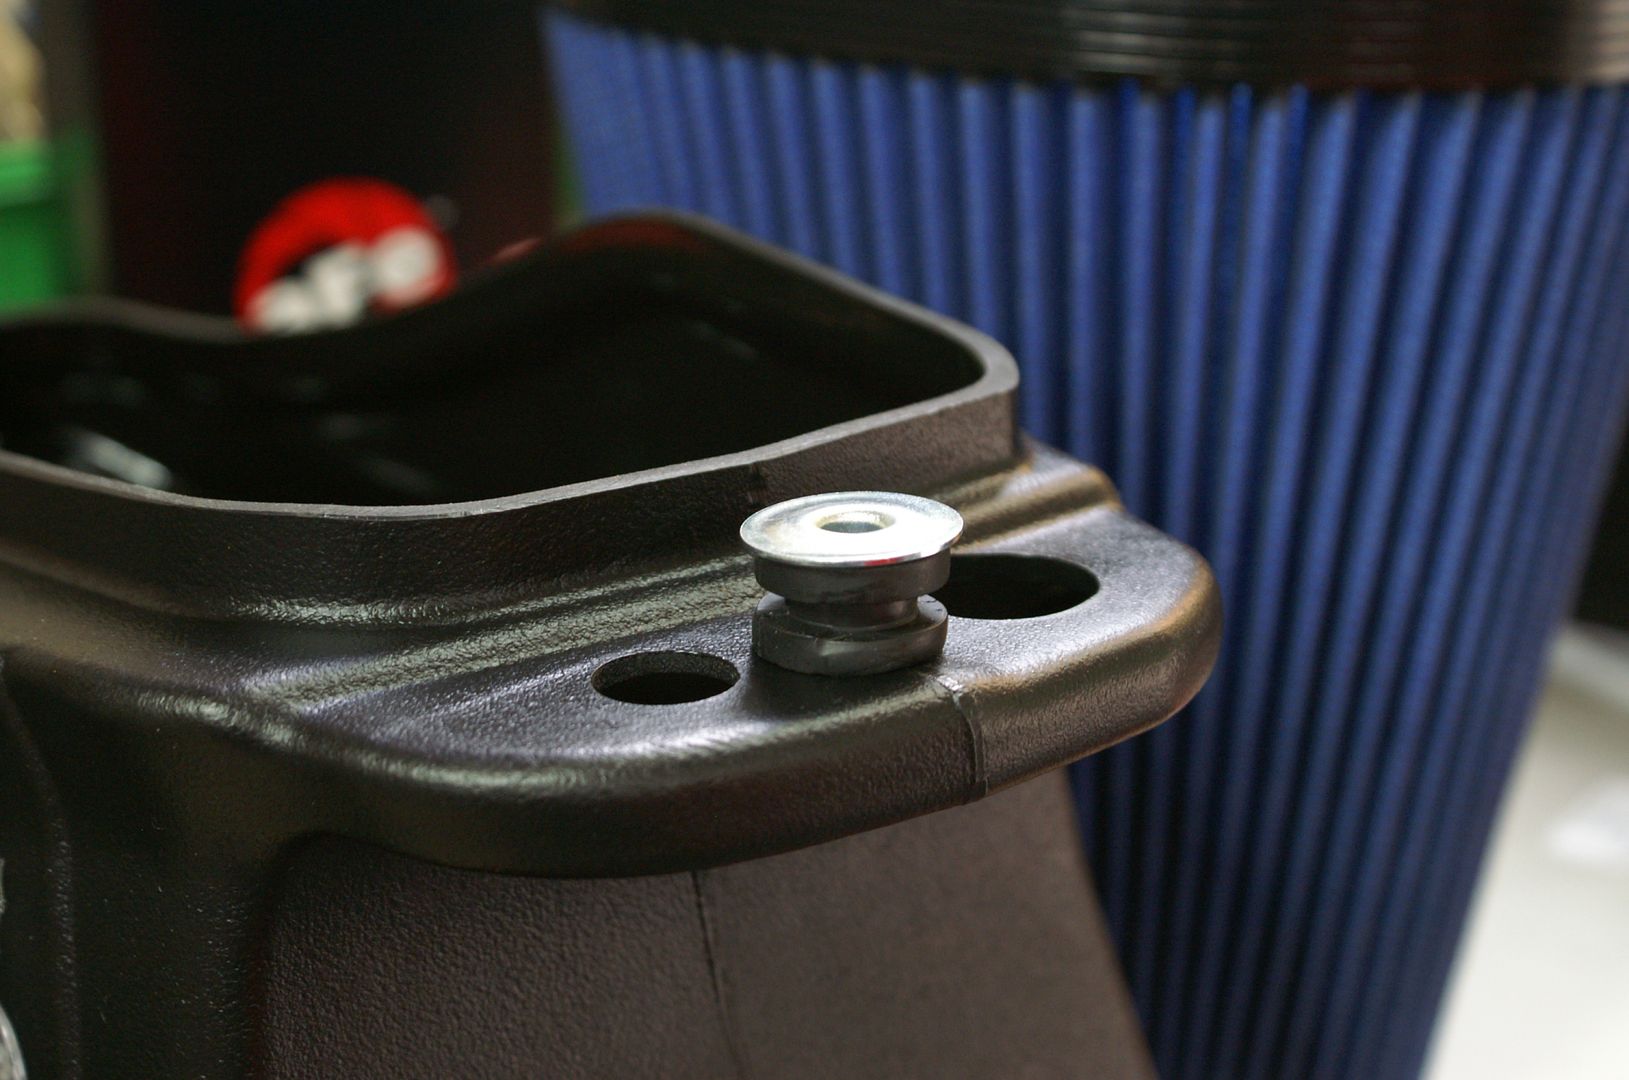
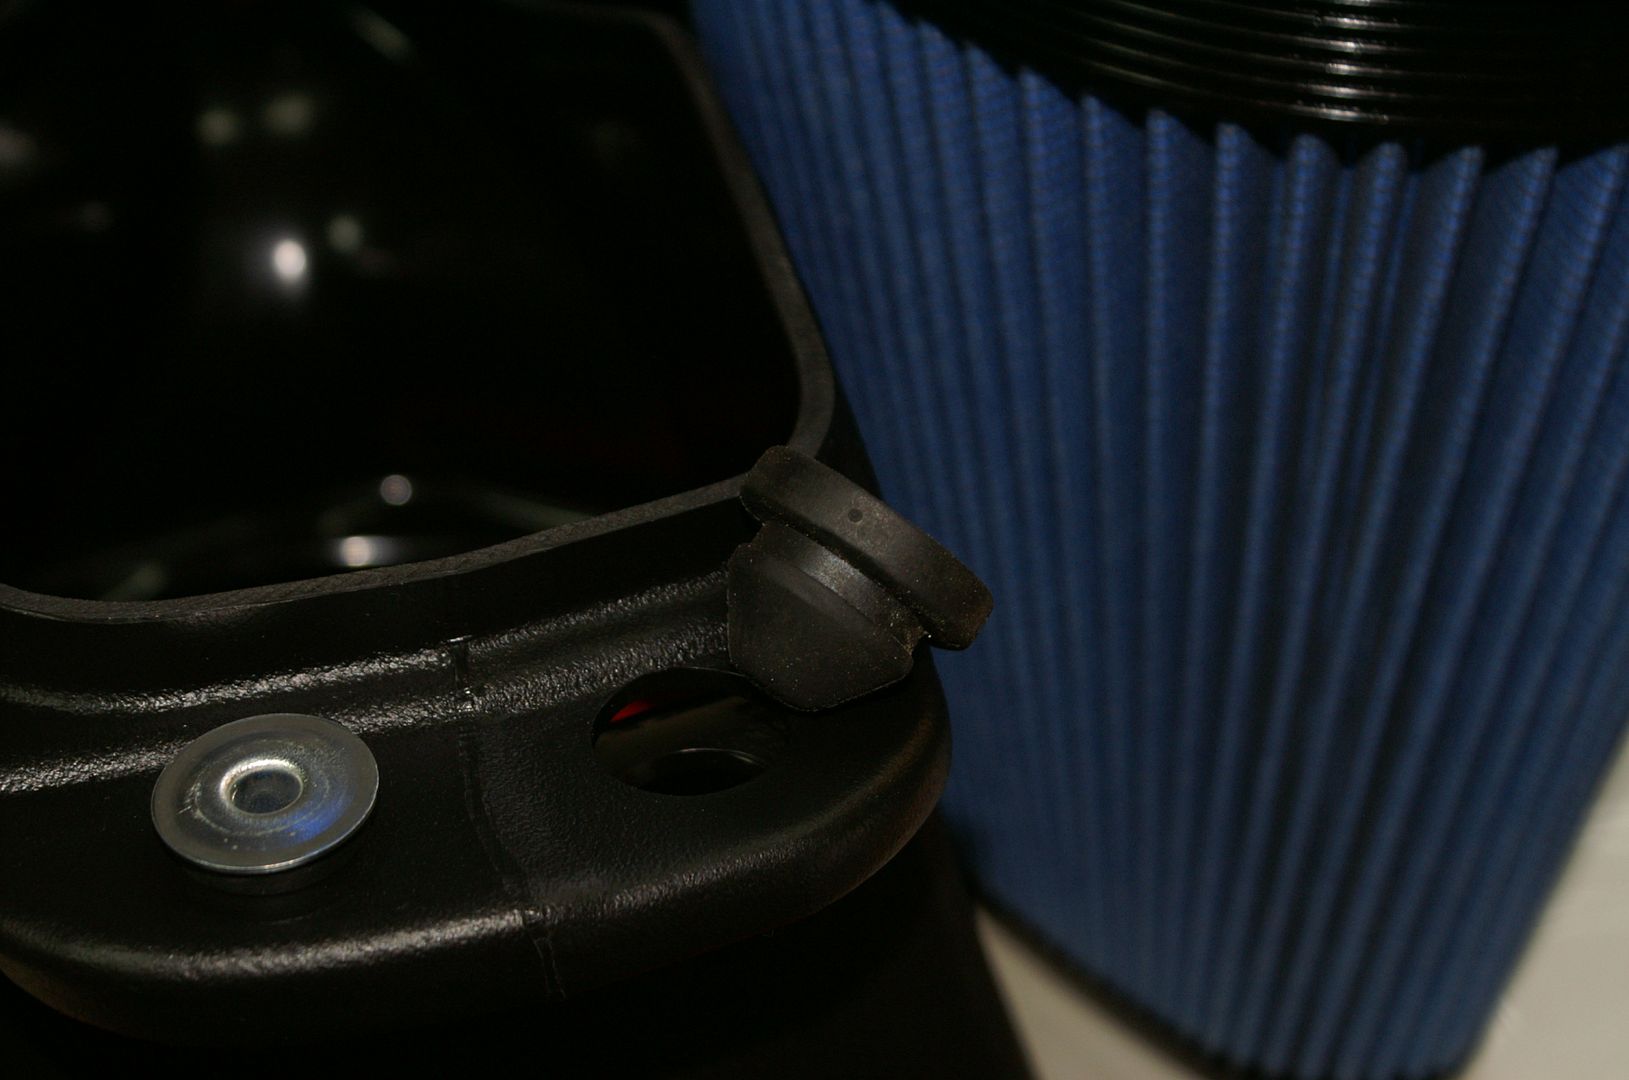
Regarding reusing the stock grommets, as instructed, this is what they look like, and here is the orientation for correct fitment to the aftermarket part.
....from the stock hardware...
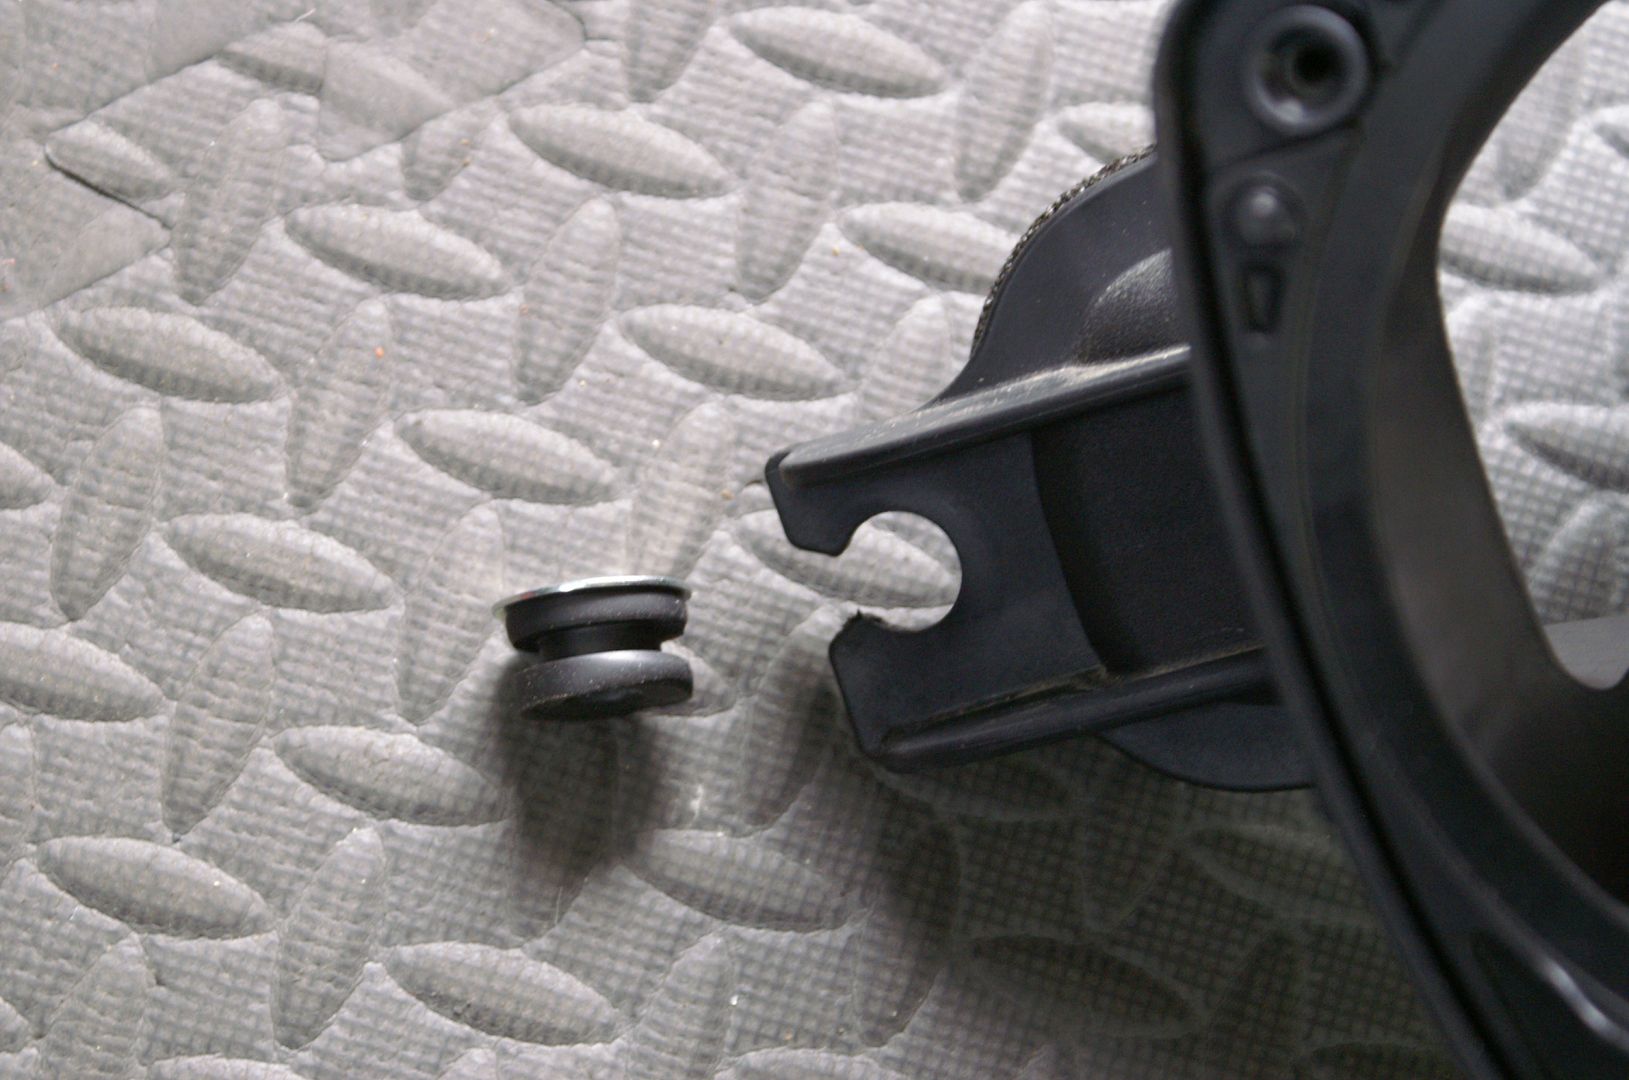
...into the new unit...note the orientation...once removed from the stock hardware it is easy to get confused as to the direction to install them...

---------------
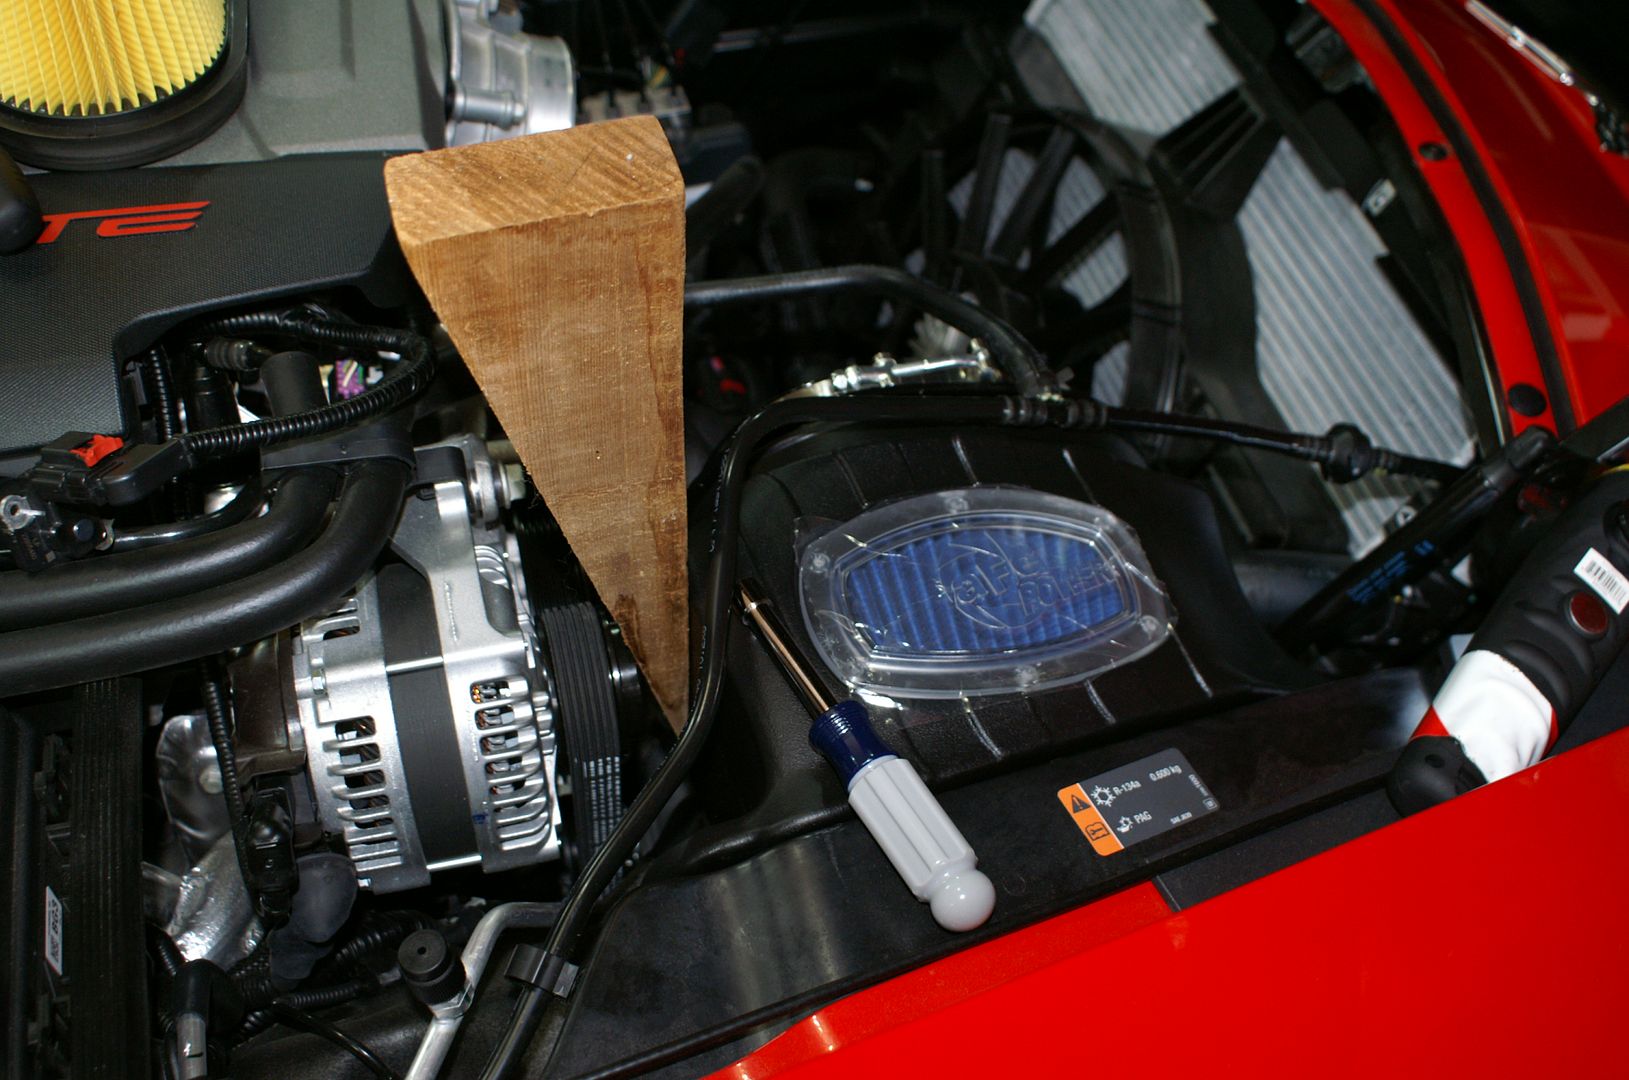
Next, the new intake's holes did not line up well with that of the car. I had to use a wedge to get the position right in order to run the 10mm fasteners down.
-------------------
Here's an interior break away view of the stock housing so you have an idea of how it is held together with only 2 screws...
--------------------
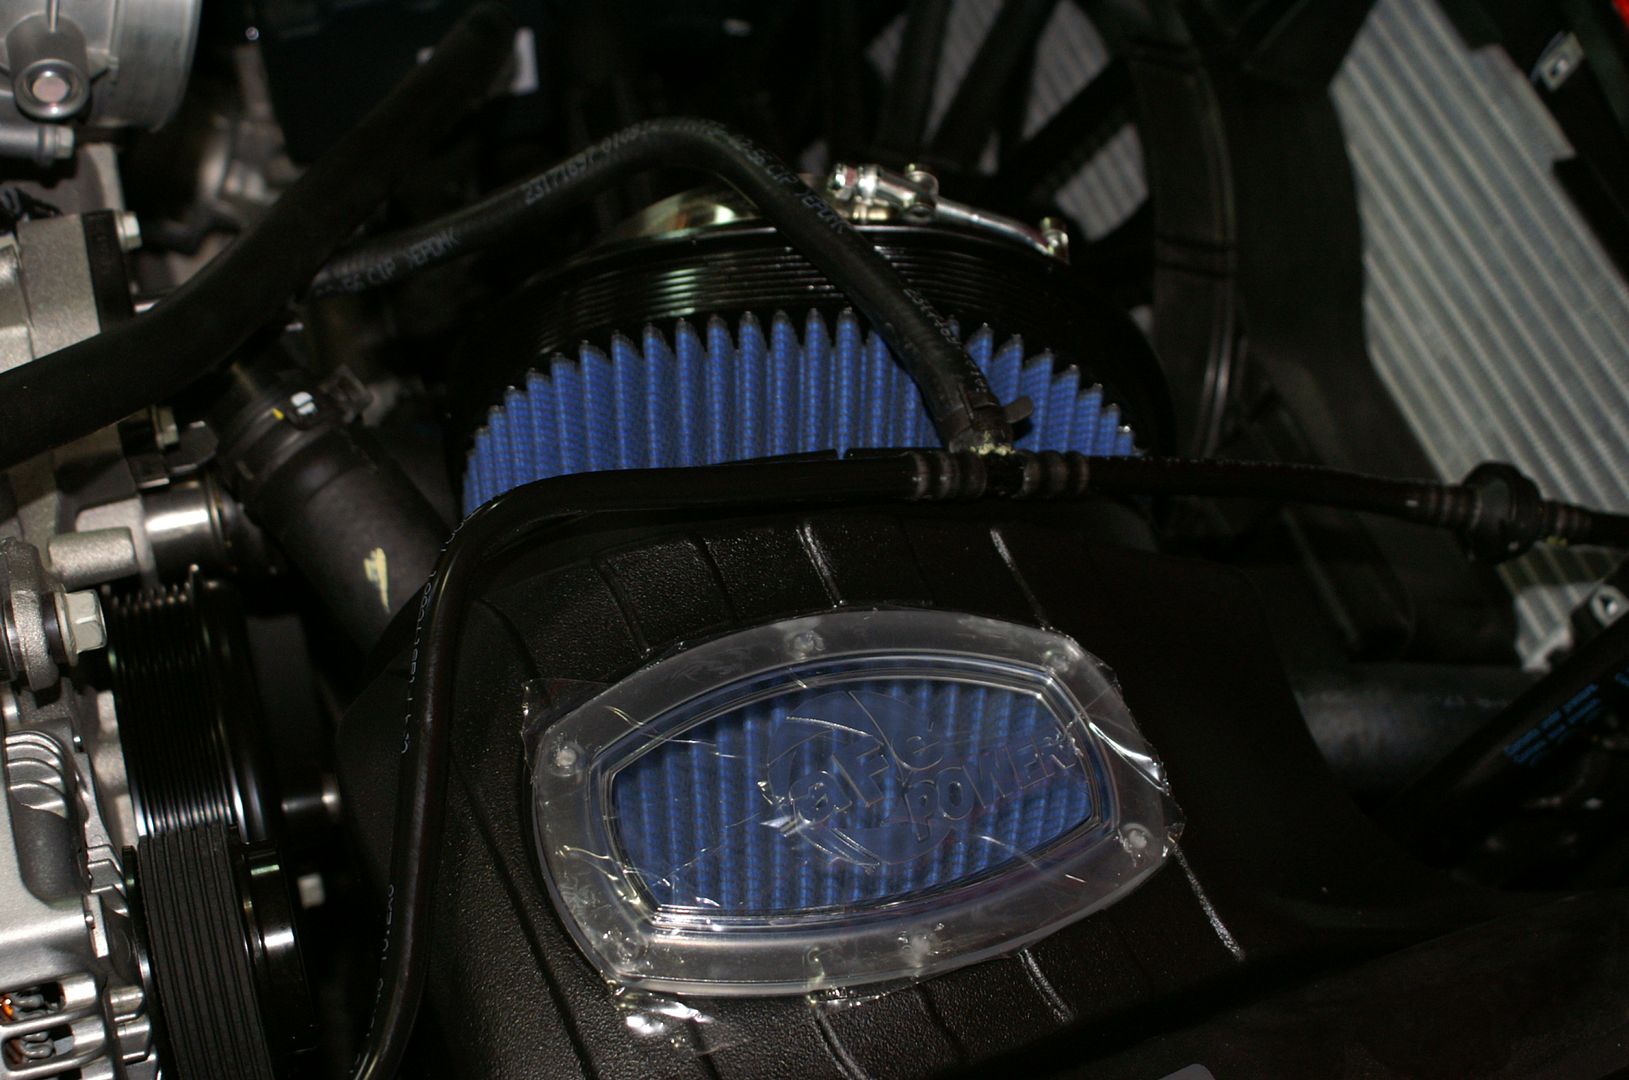
The instructions tell you to install the blue filter into the housing, then put the kit into the car. This is quite cumbersome....just screw the housing in first, then slide the filter in later.
-------------------
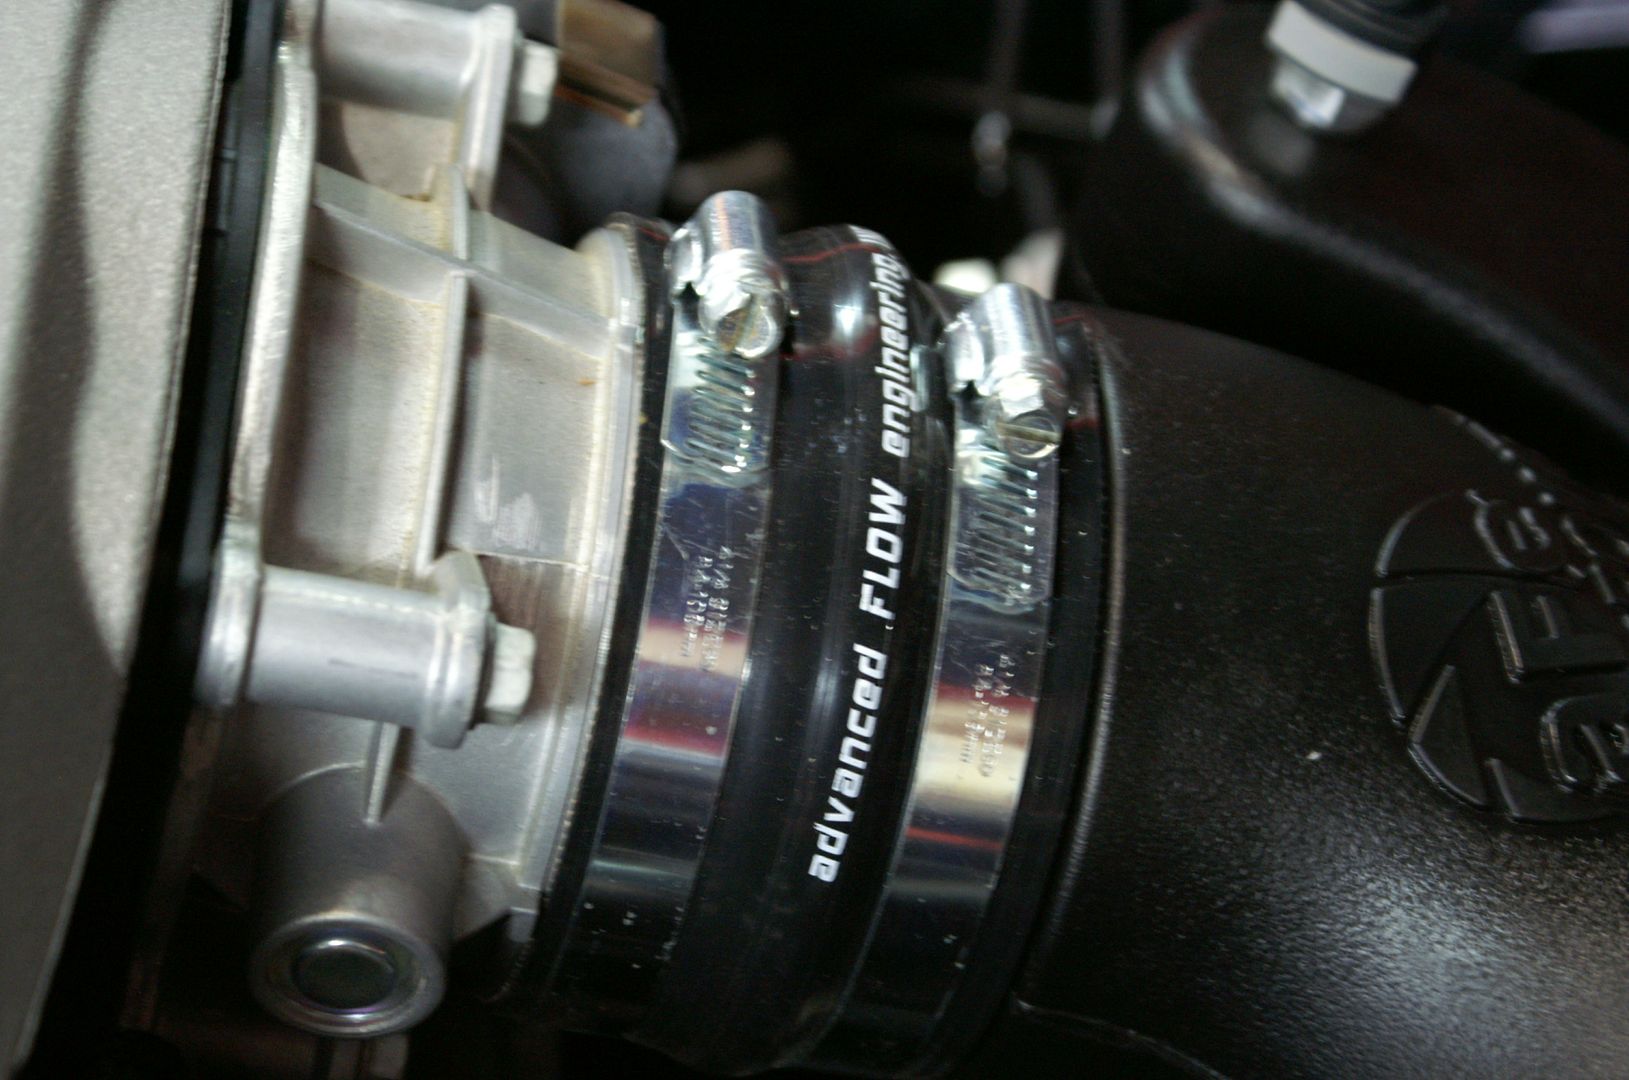
Finally, the clamps that were shipped with the intake did not allow tightening at all. Luckily I had a pair of regular screw clamps to use at this vital stage of the install. I suggest you check your included clamps before getting deep into the install.
...the unusable clamps...
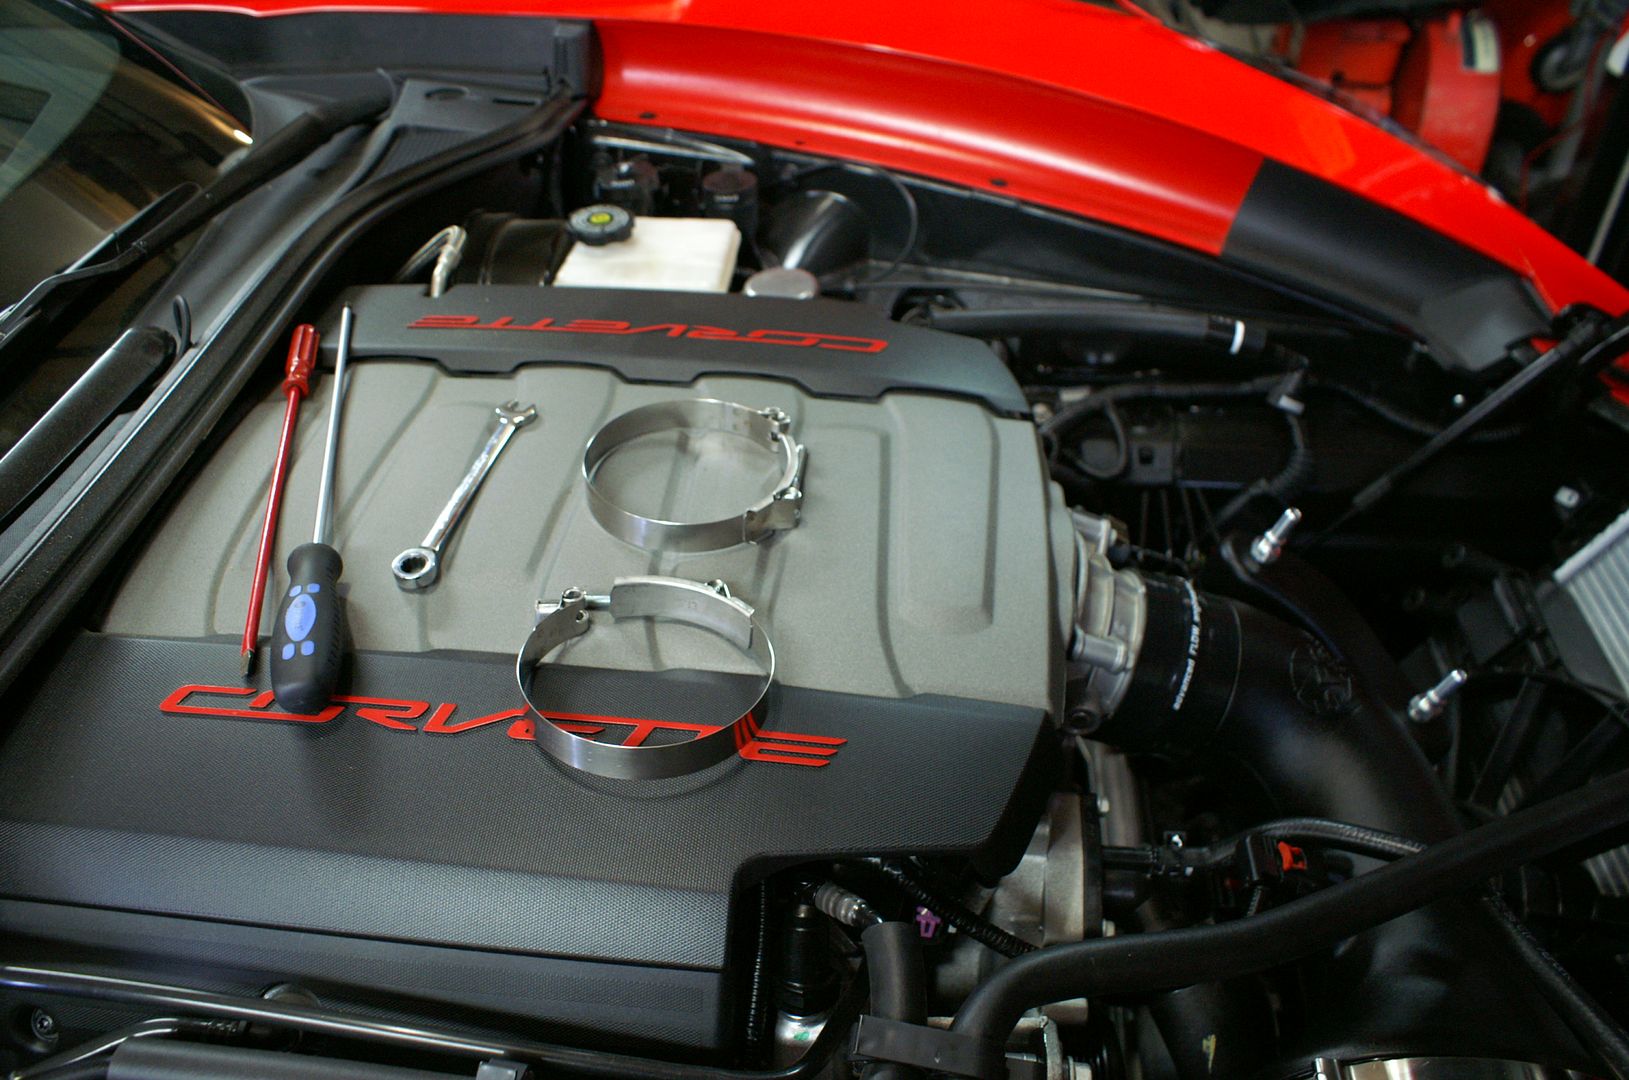
...the standard screw clamps...note this now: be sure to get the words on the coupler oriented as shown.
---------------------
I am very impressed with the engineering that went into the design of this intake. Clearly, these guys are not just some back alley shop...very professional approach. The car sounds good and no codes thrown.
First off, the installation booklet is ok, but the blurry pictures, and some broad assumptions create a little confusion. For example, not everyone will know what a MAF sensor is or how to remove it. I actually removed the entire piece (2 small screws) because no amount of fiddling and pulling on the connector allowed me to separate the 2 pieces. I opted to remove the unit from the ductwork. If you do this, carefully lay the unit away from your work area (as shown) and do not touch any surfaces that enter the ducting. Just think of it as an alternate approach if you fear messing up an electrical connection.

----------------
Next, others mentioned the 'hard-to-reach' screw head on the air inlet housing. Here is a method that worked for me..it requires a very long extension rod (18" or more), but makes the job very easy. Once you break the fastener loose, remove the ratchet from the extension, and simply spin it by hand while trapping the screw with your other hand. You do not want to lose it into the black hole below....be very careful not to let it get away from you.

close up detail...

------------------
The stock unit is actually 2-part construction, however, this is not obvious when you are looking at it from above. When told to remove it from the engine bay it will not come out unless you separate the 2 components.

These 2 screws are hard to see initially...

The removal process forcing it away from you....it's a tight squeeze...

----------------
Regarding reusing the stock grommets, as instructed, this is what they look like, and here is the orientation for correct fitment to the aftermarket part.
....from the stock hardware...

...into the new unit...note the orientation...once removed from the stock hardware it is easy to get confused as to the direction to install them...


---------------
Next, the new intake's holes did not line up well with that of the car. I had to use a wedge to get the position right in order to run the 10mm fasteners down.

-------------------
Here's an interior break away view of the stock housing so you have an idea of how it is held together with only 2 screws...

--------------------
The instructions tell you to install the blue filter into the housing, then put the kit into the car. This is quite cumbersome....just screw the housing in first, then slide the filter in later.

-------------------
Finally, the clamps that were shipped with the intake did not allow tightening at all. Luckily I had a pair of regular screw clamps to use at this vital stage of the install. I suggest you check your included clamps before getting deep into the install.
...the unusable clamps...

...the standard screw clamps...note this now: be sure to get the words on the coupler oriented as shown.

---------------------
I am very impressed with the engineering that went into the design of this intake. Clearly, these guys are not just some back alley shop...very professional approach. The car sounds good and no codes thrown.
 06-06-2014, 07:48 PM
#2
Melting Slicks


This is a great post! Thanks for taking the time to do this. I managed to get my stock unit out in one piece, but this write-up is sure to help a number of members.
06-06-2014, 08:14 PM
#3
Safety Car


allow me to add a little "Tech" to the tech contributors post:
1) The MAF plug is easy to disengage. Slide up the red "lock" piece a little, then press the tab that it had locked in position. Unplug the harness with the tab depressed.
Be careful with the red slide piece as you can pull it all the way out and drop it. Not a big deal if you do as the main tab still retains the plug in the MAF.
2) Like Doc, I removed the OEM box with no disassembly needed. You just need to fish it out around the hoses.
3) My clamps were fine. If you've never used T-Bolt clamps, they have a very fine adjustment range and take quite a few turns to tighten. No one else has reported any issues with this to my knowledge
Last edited by Modshack; 06-08-2014 at 09:29 AM.
06-06-2014, 10:24 PM
#4

T bolt clamps were the biggest pain for me. The one on the Throttle Body was extremely difficult to get on. I had to separate it and then use a channel lock to hold it together to get a bolt on it. Other than that the install was easy. No idea why you need that extension to get the screw out of the shroud. I used a 1/4 inch drive and a 3" extension and it was easy to get out.
Put the bolt closest to the front of the car on first not the one to the rear for the air filter and you will be good.
Put the bolt closest to the front of the car on first not the one to the rear for the air filter and you will be good.
06-07-2014, 12:04 AM
#5
Melting Slicks


This install is pretty straight forward for anyone that has worked on a car before, but I agree that the supplied pics and directions would be a little lacking in a few places for someone with less experience with car parts.


 06-08-2014, 04:24 AM
#9
Former Vendor

Installation instructions are always a potential failure in the eyes of the person installing it, especially if you're not the engineer developing the kit. I'm happy to take everyone's thoughts to the team for any adjustments or clarifications in the process.
No doubt we have passed by some "tweaks" or things we thought were obvious that were not explained in the install. It was designed to be as easy as possible, especially not swapping clamps to make things somehow easier. I'll refer to the install video, which while edited, was actually shot in one extremely long shot we cut to make it tolerable to watch on YouTube..
No doubt we have passed by some "tweaks" or things we thought were obvious that were not explained in the install. It was designed to be as easy as possible, especially not swapping clamps to make things somehow easier. I'll refer to the install video, which while edited, was actually shot in one extremely long shot we cut to make it tolerable to watch on YouTube..
Last edited by aFe POWER; 06-08-2014 at 04:29 AM.
 06-08-2014, 11:57 AM
#11
Tech Contributor
Thread Starter
Member Since: Aug 1999
Location: Should this thoughtful, valuable contribution meet with no acknowledgement or 'thanks' this post----
Posts: 16,382
Received 399 Likes
on
257 Posts
allow me to add a little "Tech" to the tech contributors post:
1) The MAF plug is easy to disengage. Slide up the red "lock" piece a little, then press the tab that it had locked in position. Unplug the harness with the tab depressed.
Be careful with the red slide piece as you can pull it all the way out and drop it. Not a big deal if you do as the main tab still retains the plug in the MAF.
2) Like Doc, I removed the OEM box with no disassembly needed. You just need to fish it out around the hoses.
3) My clamps were fine. If you've never used T-Bolt clamps, they have a very fine adjustment range and take quite a few turns to tighten. No one else has reported any issues with this to my knowledge
1) The MAF plug is easy to disengage. Slide up the red "lock" piece a little, then press the tab that it had locked in position. Unplug the harness with the tab depressed.
Be careful with the red slide piece as you can pull it all the way out and drop it. Not a big deal if you do as the main tab still retains the plug in the MAF.
2) Like Doc, I removed the OEM box with no disassembly needed. You just need to fish it out around the hoses.
3) My clamps were fine. If you've never used T-Bolt clamps, they have a very fine adjustment range and take quite a few turns to tighten. No one else has reported any issues with this to my knowledge
Interesting that some can remove the old box as an assembly...it may be that some cars have their hoses routed differently by a small amount, just enough to interfere. In my case I would have had to bend the heck out of some of that tubing and hosing. Not something anyone would recommend.
The clamps I received would have been great if they were of the proper diameter. As it was, there was no way to engage the travel screw...it was too short. In another thread there was some discussion about an alternate supplier of clamps, which ended up being ineffective....I think this is what happened in my case (and may happen to other forum members).
The MAF plug info you presented is just what was needed...instead of stating, 'remove the MAF sensor'...in the instructions. However, with my luck doing it as you described, I would have dropped something in the black hole beneath. LOL.
Again, the purpose of threads like this is to help others with their installations. We all come from different backgrounds, some skilled and others unskilled at this stuff. The C7 forum has seen a large number of new members, as you may have noticed when looking at the member join dates. This group may benefit the most from concepts that are common place to those of us who've been around here much longer.

Finally, I was not aware of the video at the time I did the job.
Last edited by $$$frumnuttin'; 06-08-2014 at 12:01 PM.
