
[Z06] DIY head replacement adventure - '06 Z06
 04-03-2013, 02:40 PM
#1
Racer

Thread Starter
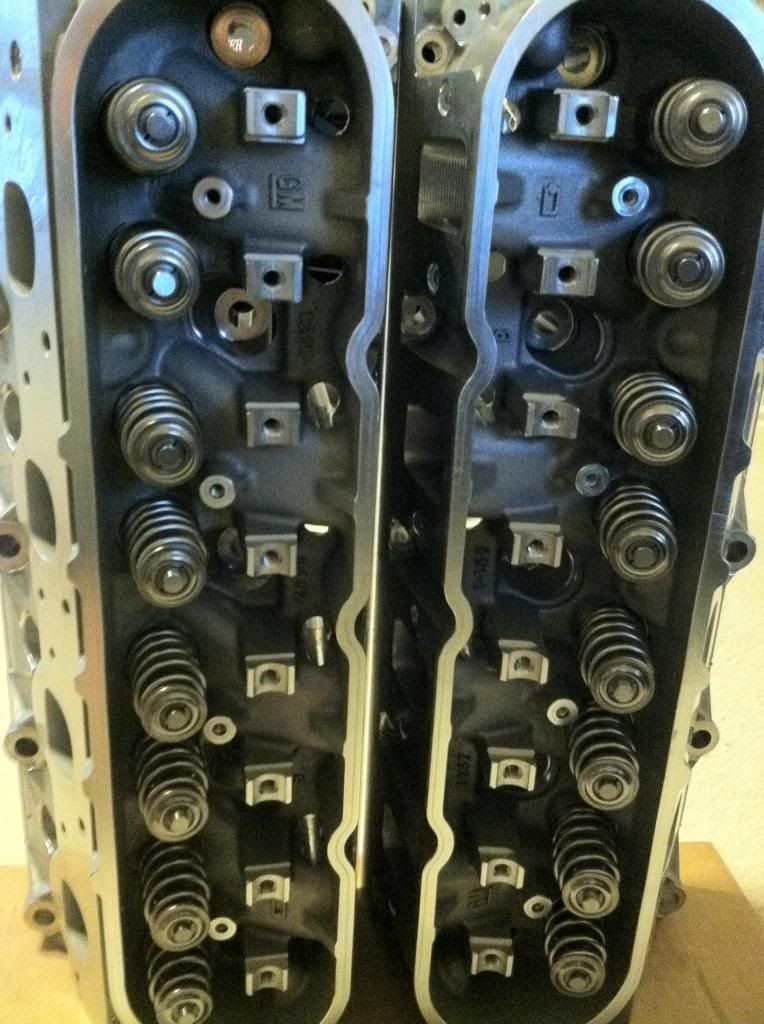
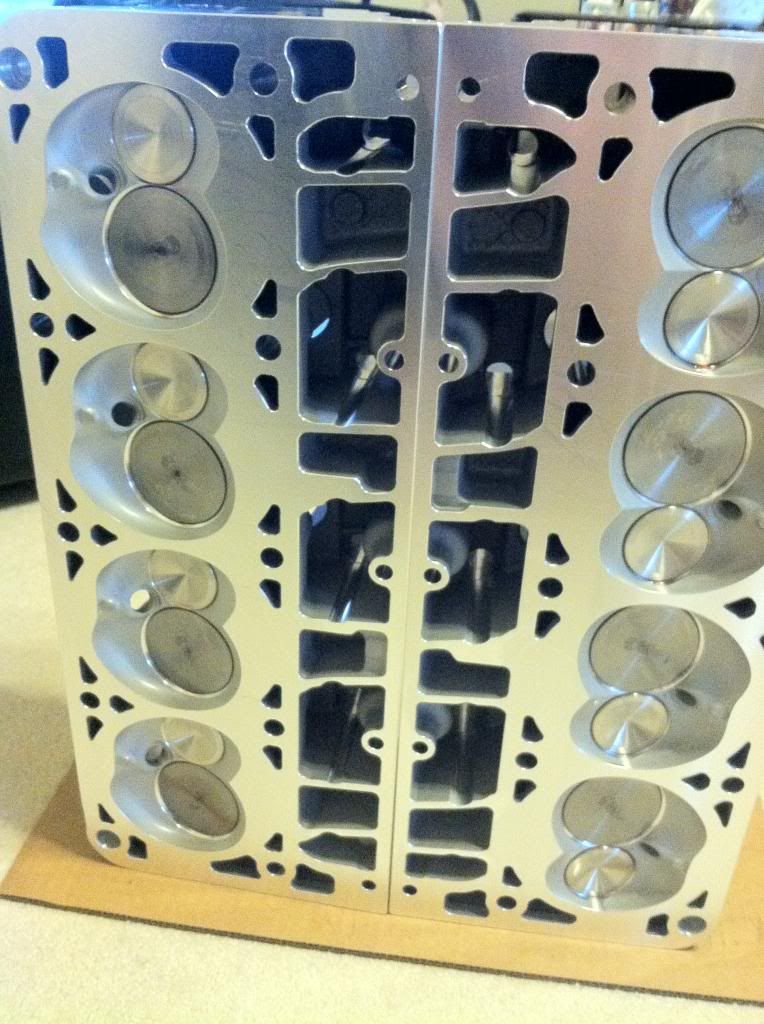
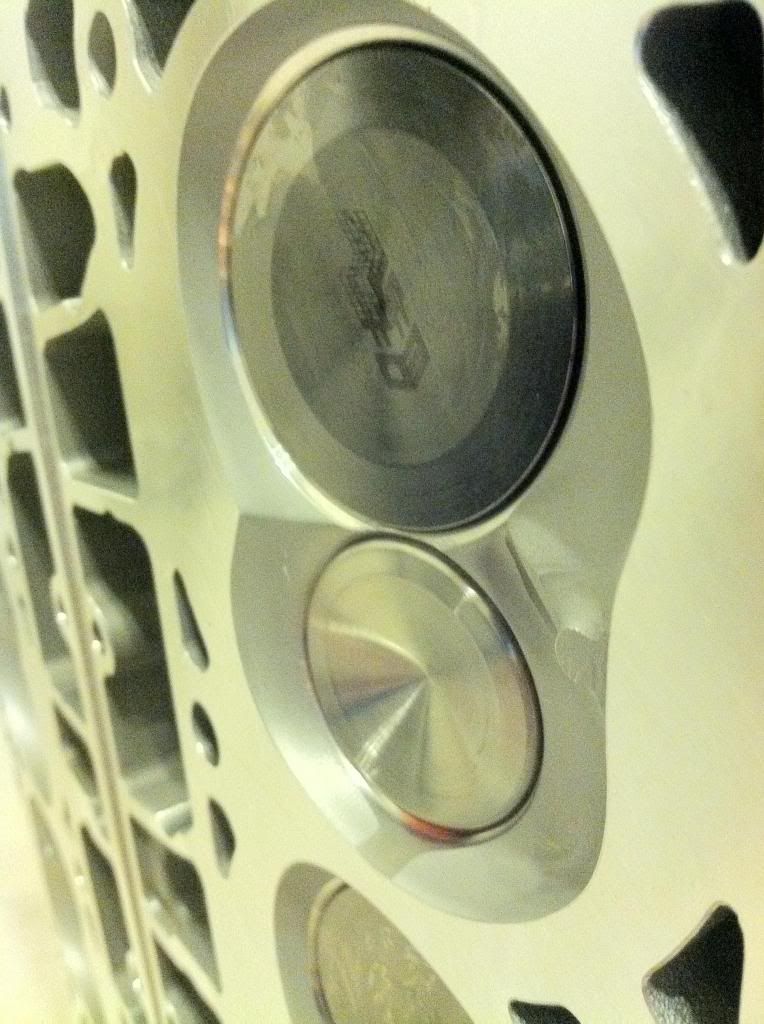
So with 26,000 miles and exhaust valve guide play that was near the limit (.032"), I had AI do a valve job, install new guides, stainless steel exhaust valves, and springs. The heads were milled 0.010".
After a month, I got my reworked heads and they looked good. I installed them per jeffreystar's DIY LS7 Headswap, using the old plugs, new headgaskets, new ARP head bolts, and new OEM spark plug cables.
I started the car and it seemed to run fine (for about 20 seconds before I shut it off). I used the simple method of reinstalling the valvetrain (just torquing to 22ftlbs), so took the valvecovers off and checked the torque again (none were lose).
I started it again and started the coolant fill procedure. It got up to about 225 degrees when I started hearing knocking.
I let it cool down for an hour and started it up again and completed filling the coolant. After about 5 minutes and revving the engine a few times, I could hear knocking again, so I shut it off.
It probably ran a total of 1 minute while making a knocking sound. The sound was distinctively coming from the rear of the engine on the passenger side.
Thinking that carbon deposits were causing knocking (detonation), I replaced the stock OEM plugs (which had a bit of carbon on them) with NGK TR6iX's. I also didn't completely clean the carbon from the tops of the pistons when it was disassembled (which I regret), so I used a can of seafoam - half in the intake and half in the gas tank.
When adding seafoam through the brake booster tube in other cars, the car would eventually stall and shut off, though not with the Z06: it just increased the RPM and not shut off, so I had to do it manually. After waiting 20 minutes and restarting it, I didn't get the normal white seafoam smoke, so I believe most of it just shot out through the exhaust when I was adding it.
Since adding the NGK plugs and my attempt at seafoam, there's been no knocking, but the valvetrain sounds louder than normal. I'm also getting an engine code that I plan to have checked today.
So, what do you think? How bad can a minute worth of detonation affect an LS7? Or was I hearing something else? And is there anything that I obviously missed when doing the swap (I have no idea since it is my first time doing this).
Hopefully the loudness of the new valvetrain is just in my head and the engine code won't be a serious issue. I'll bring the car to RPT to get a tune, but want to make sure it is in good functioning condition before I drive it too far from home.
I'll keep you updated
---------------
Update 1:
Engine error codes: oxygen sensor. It was unplugged, so I plugged it back in. The computer detects no other problems.
It drives fine and I've revved it up to about 5500rpm so far with no issues, though the valvetrain still sounds louder than normal.
---------------
Update 2:
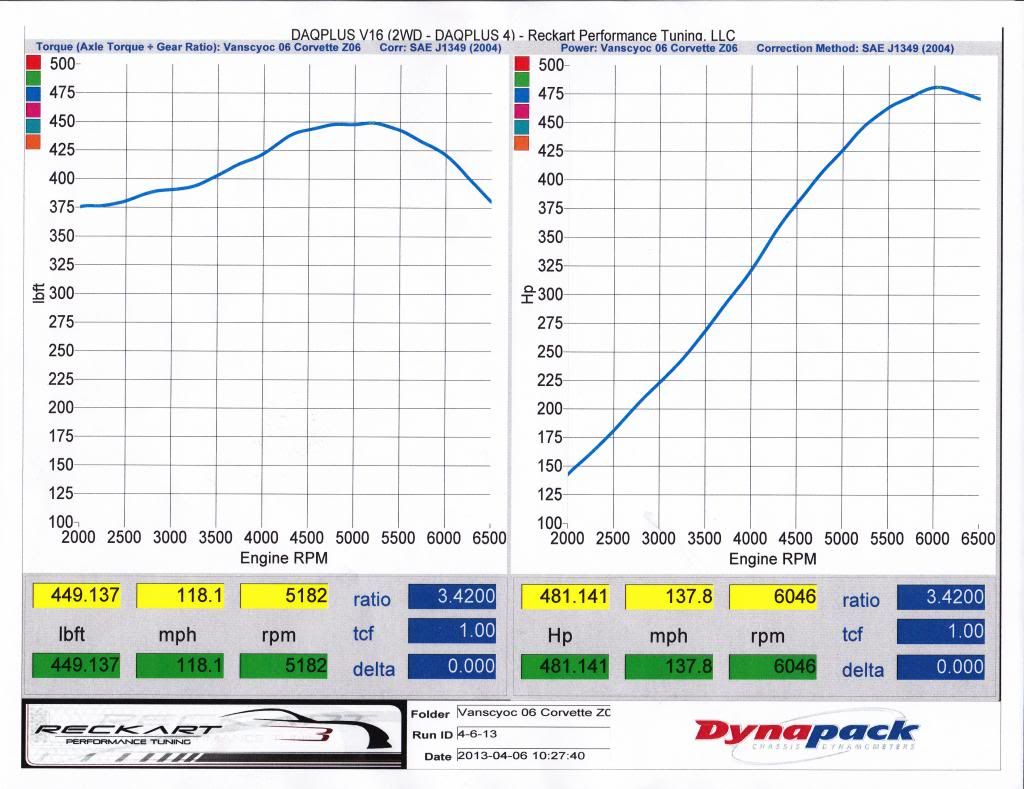
Everything's working great and I've had the car tuned by Brian at RPT (Reckart Performance Tuning). Brian didn't think anything sounded unusual, so it all must just be in my head
The car is making 481hp/449tq. The only engine mods are a vararam intake and the heads reworked by AI (Advanced Induction).
The total cost for everything was $2044 plus my time. And besides the head work, much of this is optional:
$110 Shipping Heads (to and from AI)
$495 Advanced Inducation LS7 Rebuild Cylinder Head Package
$230 Manley Xh-428 Sainless Exhaust Valves
$250 CHE Bronze Guides
$195 PSI LS1511 Beehive Springs
$61 GM LS7 Head Gaskets
$105 ARP 134-3610 Head Bolts
$22 GM 12602540 Steam/Freeze plugs
$72 89018058 AC Delco OEM Plug Wires
$30 Coolant
$64 NGK TR6IX Spark Plugs
$10 Seafoam
$400 Intake/Heads dyno tune by Reckart
Pictures:
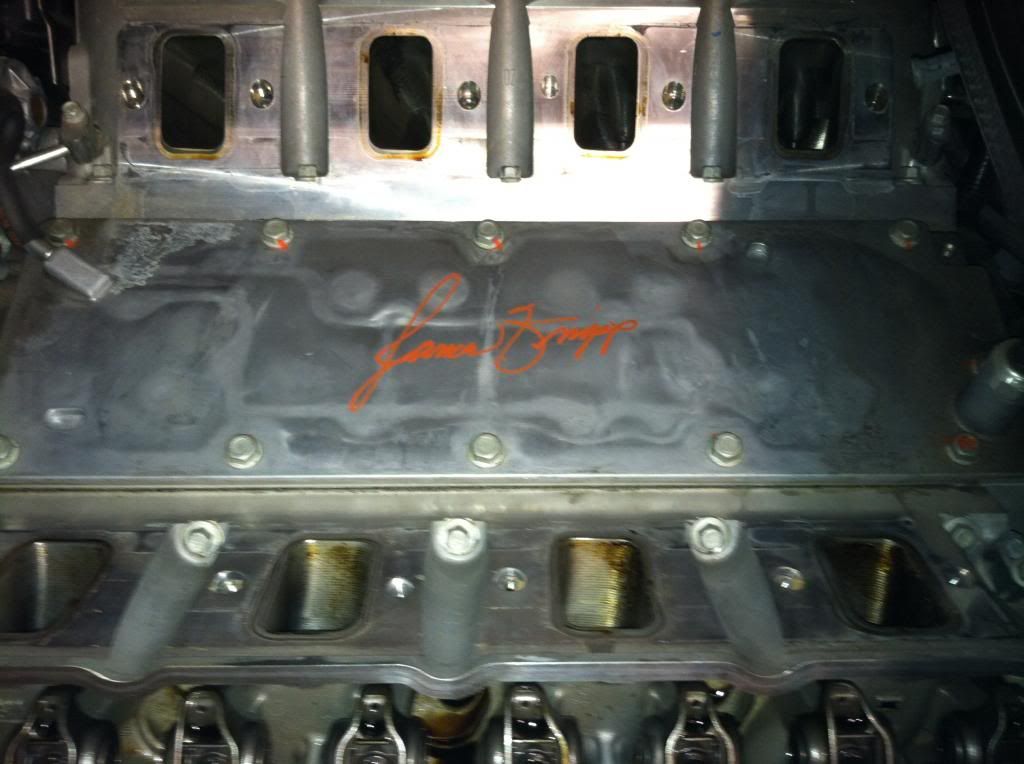
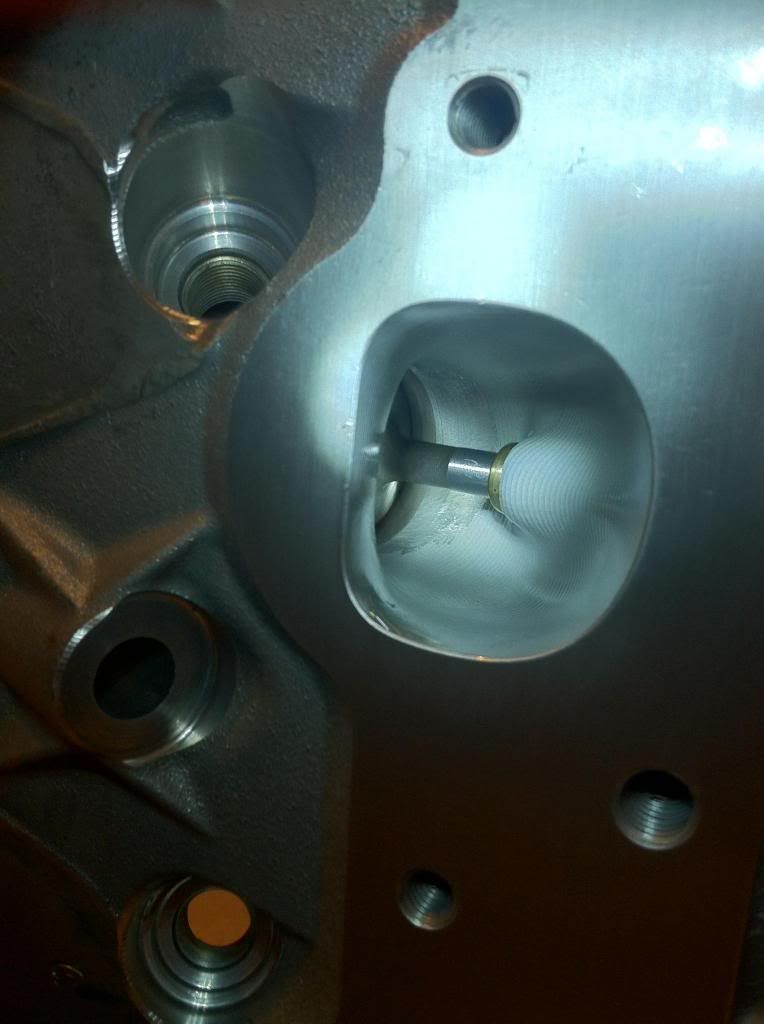
Taking apart engine (Built by James Knipp):
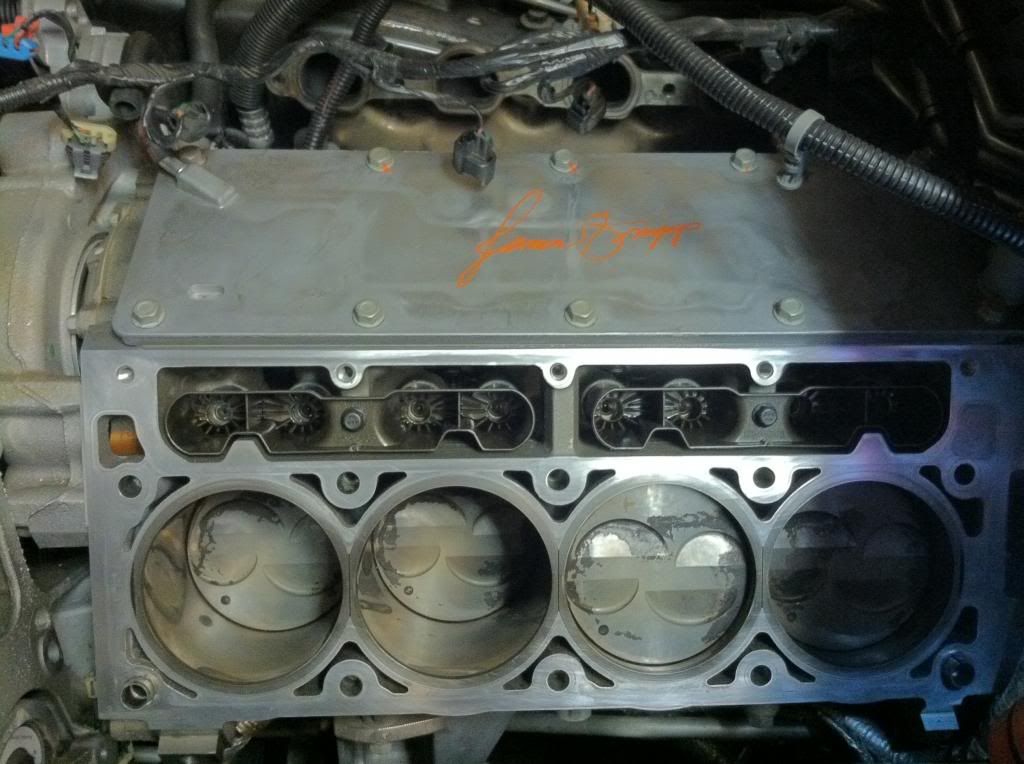
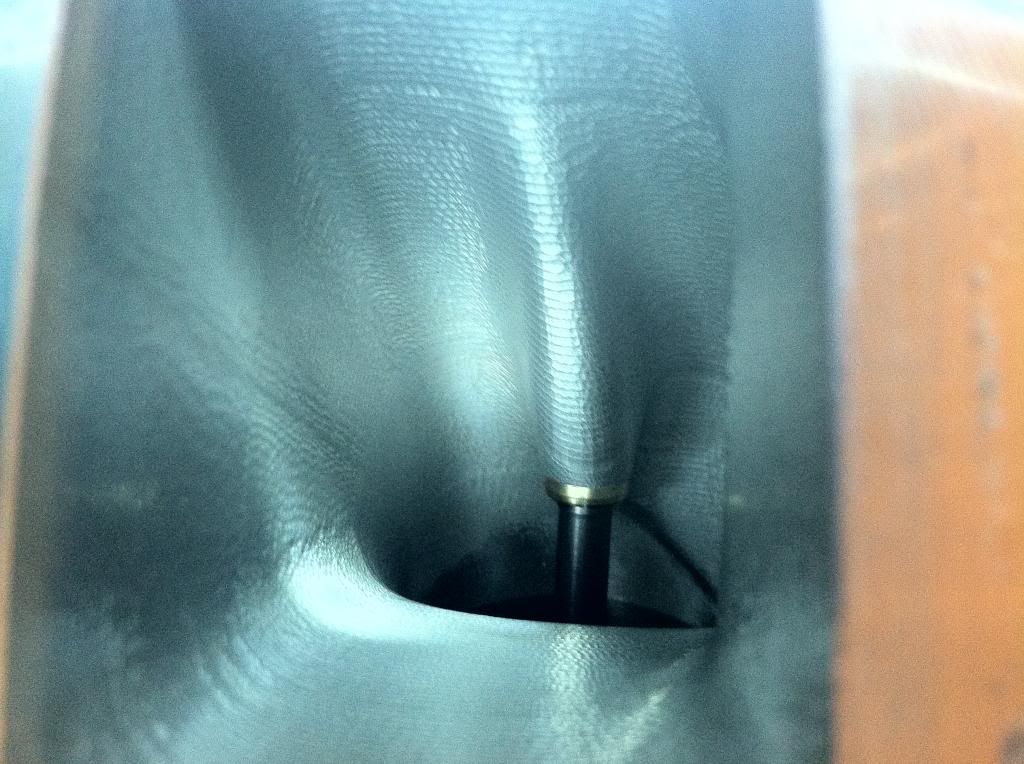
Right before I put the new heads back on:
Reworked heads:
Dyno:
Exterior:
After a month, I got my reworked heads and they looked good. I installed them per jeffreystar's DIY LS7 Headswap, using the old plugs, new headgaskets, new ARP head bolts, and new OEM spark plug cables.
I started the car and it seemed to run fine (for about 20 seconds before I shut it off). I used the simple method of reinstalling the valvetrain (just torquing to 22ftlbs), so took the valvecovers off and checked the torque again (none were lose).
I started it again and started the coolant fill procedure. It got up to about 225 degrees when I started hearing knocking.
I let it cool down for an hour and started it up again and completed filling the coolant. After about 5 minutes and revving the engine a few times, I could hear knocking again, so I shut it off.
It probably ran a total of 1 minute while making a knocking sound. The sound was distinctively coming from the rear of the engine on the passenger side.
Thinking that carbon deposits were causing knocking (detonation), I replaced the stock OEM plugs (which had a bit of carbon on them) with NGK TR6iX's. I also didn't completely clean the carbon from the tops of the pistons when it was disassembled (which I regret), so I used a can of seafoam - half in the intake and half in the gas tank.
When adding seafoam through the brake booster tube in other cars, the car would eventually stall and shut off, though not with the Z06: it just increased the RPM and not shut off, so I had to do it manually. After waiting 20 minutes and restarting it, I didn't get the normal white seafoam smoke, so I believe most of it just shot out through the exhaust when I was adding it.
Since adding the NGK plugs and my attempt at seafoam, there's been no knocking, but the valvetrain sounds louder than normal. I'm also getting an engine code that I plan to have checked today.
So, what do you think? How bad can a minute worth of detonation affect an LS7? Or was I hearing something else? And is there anything that I obviously missed when doing the swap (I have no idea since it is my first time doing this).
Hopefully the loudness of the new valvetrain is just in my head and the engine code won't be a serious issue. I'll bring the car to RPT to get a tune, but want to make sure it is in good functioning condition before I drive it too far from home.
I'll keep you updated
---------------
Update 1:
Engine error codes: oxygen sensor. It was unplugged, so I plugged it back in. The computer detects no other problems.
It drives fine and I've revved it up to about 5500rpm so far with no issues, though the valvetrain still sounds louder than normal.
---------------
Update 2:
Everything's working great and I've had the car tuned by Brian at RPT (Reckart Performance Tuning). Brian didn't think anything sounded unusual, so it all must just be in my head
The car is making 481hp/449tq. The only engine mods are a vararam intake and the heads reworked by AI (Advanced Induction).
The total cost for everything was $2044 plus my time. And besides the head work, much of this is optional:
$110 Shipping Heads (to and from AI)
$495 Advanced Inducation LS7 Rebuild Cylinder Head Package
$230 Manley Xh-428 Sainless Exhaust Valves
$250 CHE Bronze Guides
$195 PSI LS1511 Beehive Springs
$61 GM LS7 Head Gaskets
$105 ARP 134-3610 Head Bolts
$22 GM 12602540 Steam/Freeze plugs
$72 89018058 AC Delco OEM Plug Wires
$30 Coolant
$64 NGK TR6IX Spark Plugs
$10 Seafoam
$400 Intake/Heads dyno tune by Reckart
Pictures:
Taking apart engine (Built by James Knipp):
Right before I put the new heads back on:
Reworked heads:
Dyno:
Exterior:
Last edited by LMBTom; 04-06-2013 at 04:05 PM.
 04-03-2013, 03:01 PM
#2


So with 26,000 miles and exhaust valve guide play that was near the limit (.032"), I had AI do a valve job, install new guides, stainless steel exhaust valves, and springs. The heads were milled 0.010".
After a month, I got my reworked heads and they looked good. I installed them per jeffreystar's DIY LS7 Headswap, using the old plugs, new headgaskets, new ARP head bolts, and new OEM spark plug cables.
I started the car and it seemed to run fine (for about 20 seconds before I shut it off). I used the simple method of reinstalling the valvetrain (just torquing to 22ftlbs), so took the valvecovers off and checked the torque again (none were lose).
I started it again and started the coolant fill procedure. It got up to about 225 degrees when I started hearing knocking.
I let it cool down for an hour and started it up again and completed filling the coolant. After about 5 minutes and revving the engine a few times, I could hear knocking again, so I shut it off.
It probably ran a total of 1 minute while making a knocking sound. The sound was distinctively coming from the rear of the engine on the passenger side.
Thinking that carbon deposits were causing knocking (detonation), I replaced the stock OEM plugs (which had a bit of carbon on them) with NGK TR6iX's. I also didn't completely clean the carbon from the tops of the pistons when it was disassembled (which I regret), so I used a can of seafoam - half in the intake and half in the gas tank.
When adding seafoam through the brake booster tube in other cars, the car would eventually stall and shut off, though not with the Z06: it just increased the RPM and not shut off, so I had to do it manually. After waiting 20 minutes and restarting it, I didn't get the normal white seafoam smoke, so I believe most of it just shot out through the exhaust when I was adding it.
Since adding the NGK plugs and my attempt at seafoam, there's been no knocking, but the valvetrain sounds louder than normal. I'm also getting an engine code that I plan to have checked today.
So, what do you think? How bad can a minute worth of detonation affect an LS7? Or was I hearing something else? And is there anything that I obviously missed when doing the swap (I have no idea since it is my first time doing this).
Hopefully the loudness of the new valvetrain is just in my head and the engine code won't be a serious issue. I'll bring the car to RPT to get a tune, but want to make sure it is in good functioning condition before I drive it too far from home.
I'll keep you updated
What did you run it after changing the plugs, but before putting the sea foam into it?
Let us know what the code is when you find out.
04-03-2013, 03:20 PM
#3
Team Owner


I can't imagine how you would get detonation by just running your engine at a fast idle with no load.
04-03-2013, 08:07 PM
#4
Racer
Thread Starter
The engine error codes were all about the driver side oxygen sensor. I checked it out and it was unplugged. So there's now no problems as far as the computer is concerned.
It idles and drives fine (had it up to 5500rpm) and I'm not noticing any lack of power, so everything seems fine. I'll see if I can get a tune from RPT soon.
The drivetrain still seems louder than normal, though this may be normal with the headwork that was done.
I have a few pictures of my reworked heads that I'll upload later. I'll also detail the total cost in case others want to try to DIY.
04-03-2013, 08:14 PM
#5
Racer
Thread Starter
After I heard it knocking the 2nd time, I changed the plugs and seafoamed immediately afterwards (using the new plugs). I would have preferred not to do so, but didn't want to take any chances with carbon on the old plugs possibly causing detonation.
I may never know what that knocking sound actually was, though hopefully I won't find out later down the road.
 04-03-2013, 08:58 PM
#7
The engine error codes were all about the driver side oxygen sensor. I checked it out and it was unplugged. So there's now no problems as far as the computer is concerned.
It idles and drives fine (had it up to 5500rpm) and I'm not noticing any lack of power, so everything seems fine. I'll see if I can get a tune from RPT soon.
The drivetrain still seems louder than normal, though this may be normal with the headwork that was done.
I have a few pictures of my reworked heads that I'll upload later. I'll also detail the total cost in case others want to try to DIY.
It idles and drives fine (had it up to 5500rpm) and I'm not noticing any lack of power, so everything seems fine. I'll see if I can get a tune from RPT soon.
The drivetrain still seems louder than normal, though this may be normal with the headwork that was done.
I have a few pictures of my reworked heads that I'll upload later. I'll also detail the total cost in case others want to try to DIY.

 Good news .


 04-06-2013, 04:10 PM
#9
Racer
Thread Starter
And everything is back together and working great. I added update 2 to the main post.
And after thinking more about that knocking when I first put it together, I'm wondering if a loose spark plug cable could have caused the knocking sound: for example if the air/fuel mixture didn't combust until the exhaust valve opened and it hit the hot headers... Does that happen?
04-06-2013, 05:45 PM
#10
Race Director

Good to see you got everything sorted out . Your stock pushrods should be fine , that little milling is basically just a resurface , my heads got the same and I was told stock push rods are fine .
04-06-2013, 09:19 PM
#14


I'd also at least use the count-the-turn method on the rocker arm bolt to make sure the pushrod preload was in the ballpark (should be less than 2 turns and more than 1, from no pushrod play to 22 ft lbs). Possibly reground valve seats, new valves, could be easy for the proper preload to have changed by .050 depending on how well the head work was done.
You double-checked to make sure all the intake valve lash caps are present?
.
Last edited by Mark2009; 04-06-2013 at 09:23 PM.
04-06-2013, 10:04 PM
#15
I'd get a second opinion on running those 103 gram exhaust valves on a beehive spring before I ran it over 5500 RPM again
I'd also at least use the count-the-turn method on the rocker arm bolt to make sure the pushrod preload was in the ballpark (should be less than 2 turns and more than 1, from no pushrod play to 22 ft lbs). Possibly reground valve seats, new valves, could be easy for the proper preload to have changed by .050 depending on how well the head work was done.
You double-checked to make sure all the intake valve lash caps are present?
.
Those springs, with that valve would be a big concern for me.
04-08-2013, 12:02 AM
#16
Racer
Thread Starter
I'd get a second opinion on running those 103 gram exhaust valves on a beehive spring before I ran it over 5500 RPM again
I'd also at least use the count-the-turn method on the rocker arm bolt to make sure the pushrod preload was in the ballpark (should be less than 2 turns and more than 1, from no pushrod play to 22 ft lbs). Possibly reground valve seats, new valves, could be easy for the proper preload to have changed by .050 depending on how well the head work was done.
You double-checked to make sure all the intake valve lash caps are present?
.
I'd also at least use the count-the-turn method on the rocker arm bolt to make sure the pushrod preload was in the ballpark (should be less than 2 turns and more than 1, from no pushrod play to 22 ft lbs). Possibly reground valve seats, new valves, could be easy for the proper preload to have changed by .050 depending on how well the head work was done.
You double-checked to make sure all the intake valve lash caps are present?
.
All of the intake valve lash caps are in place. I'll check the preload next time I have the valve covers off.
04-08-2013, 01:22 PM
#17
Burning Brakes

Hey guys, just thought I'd let you know I got a tool from a company that helps you do the valve lashes pretty easily. It's just a vinyl magnetic strip with graphics that shows each valve to adjust. Pretty cool and cheap. After I replaced the OEM rockers with Comp Cams 1.85:1 rollers in my C6, I used this to adjust all the valve lashes where the engine started up quickly and ran smoothly with no noise whatsoever.....no readjustments were necessary.
.
.
Anyway, just thought I'd mention that to you and any others looking to make valve lash adjustments.
.
.
Anyway, just thought I'd mention that to you and any others looking to make valve lash adjustments.
Last edited by Tact; 04-08-2013 at 03:29 PM. Reason: Website link not allowed
04-08-2013, 05:54 PM
#18
The OEM spring seats at 101 lbs.
On the LS1511 spring, installing with a higher lift cam requires a higher installed height which gives less seat pressure which may not be enough for a heavy valve... but with the stock cam you have more room (less lift) to shim for higher seat pressure (as noted above, up to 1.750" max). Very interesting... now I'm curious as to what height AI set the springs

________________________________________ _____________________
1. http://www.psisprings.com/index.php?...ask=view&id=17
2. http://www.briantooleyracing.com/660...l-springs.html
04-08-2013, 06:52 PM
#19
I'm curious to know how AI came to this conclusion and if 7300 is max stability or if there is headroom above that engine speed. The 1511 is a great spring and I would expect to see an improvement over oem, with ti retainers. 7300 seams a bit optomistic though.
04-08-2013, 07:09 PM
#20
My take on looking at the pics is that they used the OEM retainers.