
2005 LS2 to LS3 dry sump DIY
 05-13-2012, 03:10 PM
#1
Track Junky
Thread Starter

LS2 to LS3 Dry sump DIY
Let me start by saying there are many ways to skin a cat, this is just one. If anybody knows of an easier or more efficient way to do something, please chime in. I didn’t get too many good pics but I’ll insert some when appropriate. Also, I won’t bother with the side projects such as removing the steering rack, removing the motor, removing the drivetrain as they have already been documented elsewhere.
Big thanks to jimmyb496, sammy burks, Justin at GM Parts House, Justin and Joe at Caspers Electronics and a few others I can't immediately think of for helping me along.
To start, here are a couple differences I have found between the 2005 LS2 and replacement 2012 dry sump LS3:
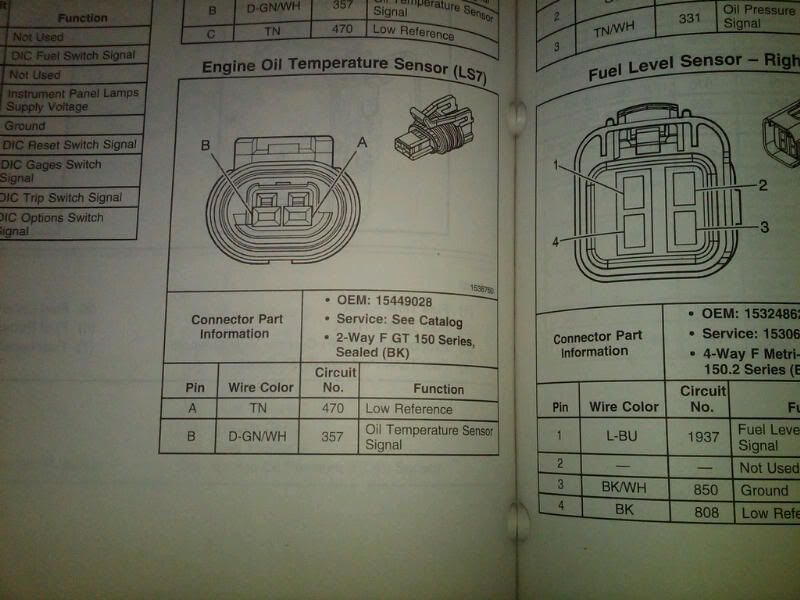
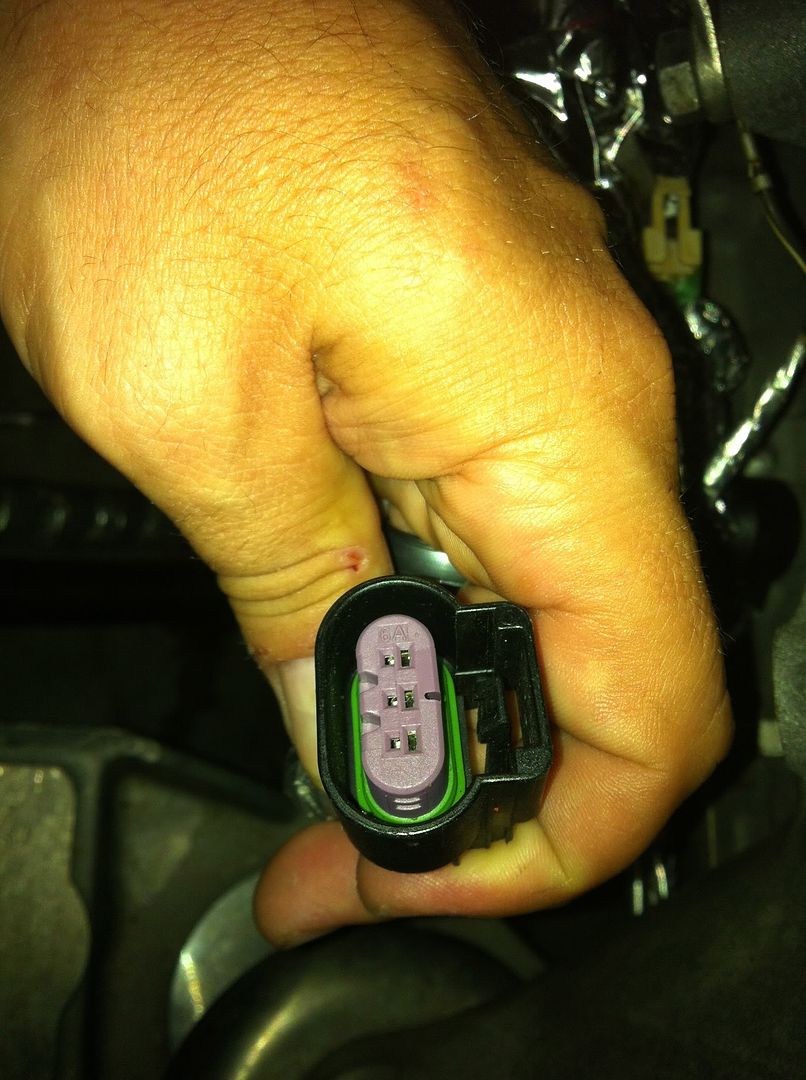
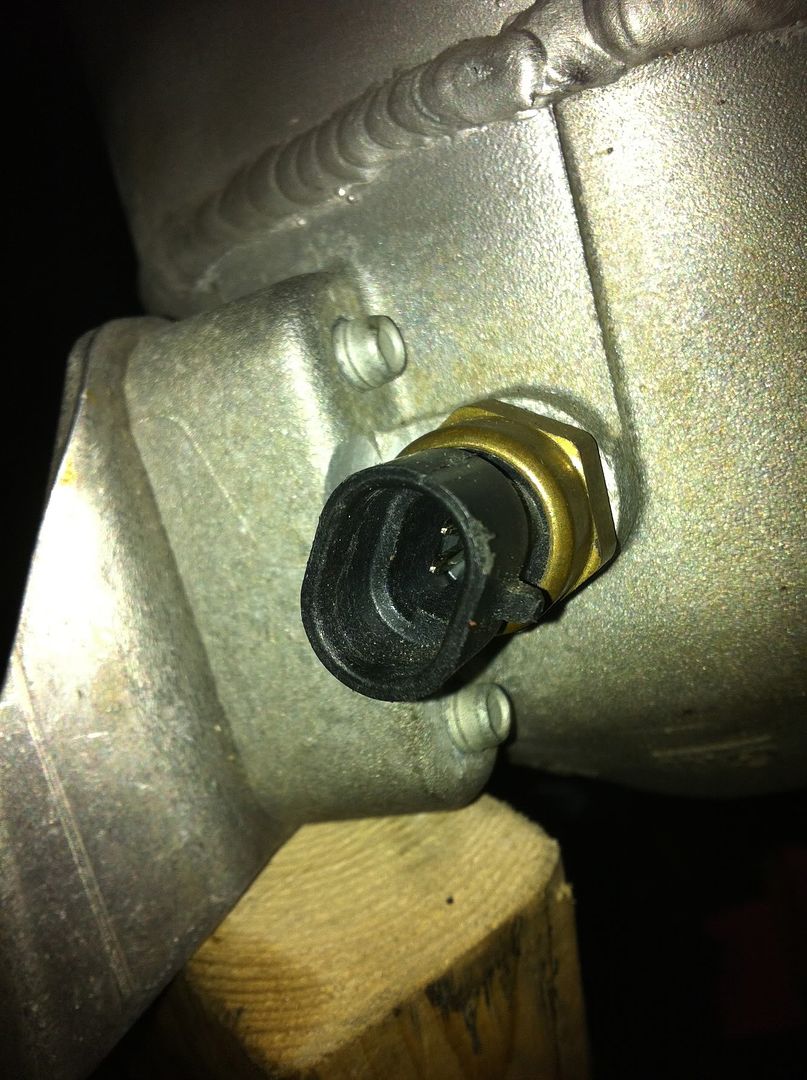
1. Oil temp/level sensor in LS2 is a 3 prong plug, LS3 dry sump has only a 2 prong oil temp sensor only. Caspers is currently working on an adapter harness for me. I asked them to make a specific part number for me when complete to others can order. Harness will be 48” long, but really only needs to be 40-42” Engine harness side will be female type 3-way F GT 150 series, sealed. Dry sump sensor side is male type 2-way F GT 150 series, sealed. Pinouts as follows. A pin on harness side is abandoned (Oil level). B pin on harness side to B pin on tank side. C pin on harness side to A pin on tank side. Supporting pics below.

Existing LS2 harness:
LS3 dry sump sensor:
2. The 2012 821 series heads have the machine work for the rear coolant plugs but no hole. The plugs aren’t needed.
3. The external oil cooler line bracket near the driver motor mount does not clear the block and can’t be used.
4. The MAP sensor is 2 bar, part number 12591290. LS2 is physically smaller and cannot be used. MAP sensor bolt part number 11562253. You will also need a wiring harness adapter since the connectors are different. Katech sells a pigtail for this, part number KAT-5185, $33.95. Can be found here:
http://store.katechengines.com/map-a...bosch-p67.aspx
5. Cam sensor harness bracket is not used. It is replaced by the Lingenfelter wiring harness.
6. There is no threaded hole for the tranny cooler lines on the passenger side of block near motor mount.
7. Belts are different. AC belt part number 12635224, Serp belt part number 12636226. Most likely due to the larger crank snout and oil pump setup.
8. MAF sensor bolts part number 11589093, need qty 2.
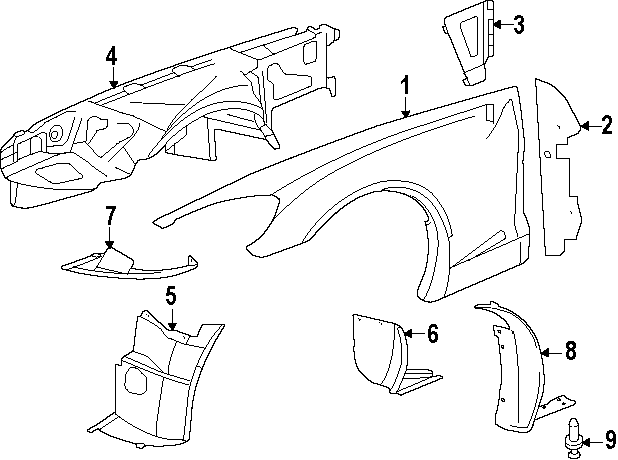
9. Need new passenger fender liner to clear oil tank and lines. Not sure yet if is a direct replacement or will need to use half of exiting mated to half of new part. GS pass inner fender liner part number 20882668. Here's a pic from GM Parts House, I ordered #6 for the passenger side:
10. LS2 (silver blade) and LS3 (gold blade) seem to be different in terms of the direction the blade opens and the working internals. Could not keep the car running at first with gold blade TB and LS3 MAF, swapped back to silver blade TB and LS2 MAF and it purred like a kitten. I'm sticking to the LS2 TB and will tune for the LS3 MAF on the dyno.
11. Left front inner fender liner. Stock one isn't shaped to accommodate the oil tank and lines. But a GS inner fender liner, part number 20882665 ($25.79 at GM Parts House) and marry the outer edge of the stock piece to the entire GS fender liner. It will take some creativity cutting and bonding, but as long as it holds the majority of the elements out you will be fine.
Regarding the oil tank installation:
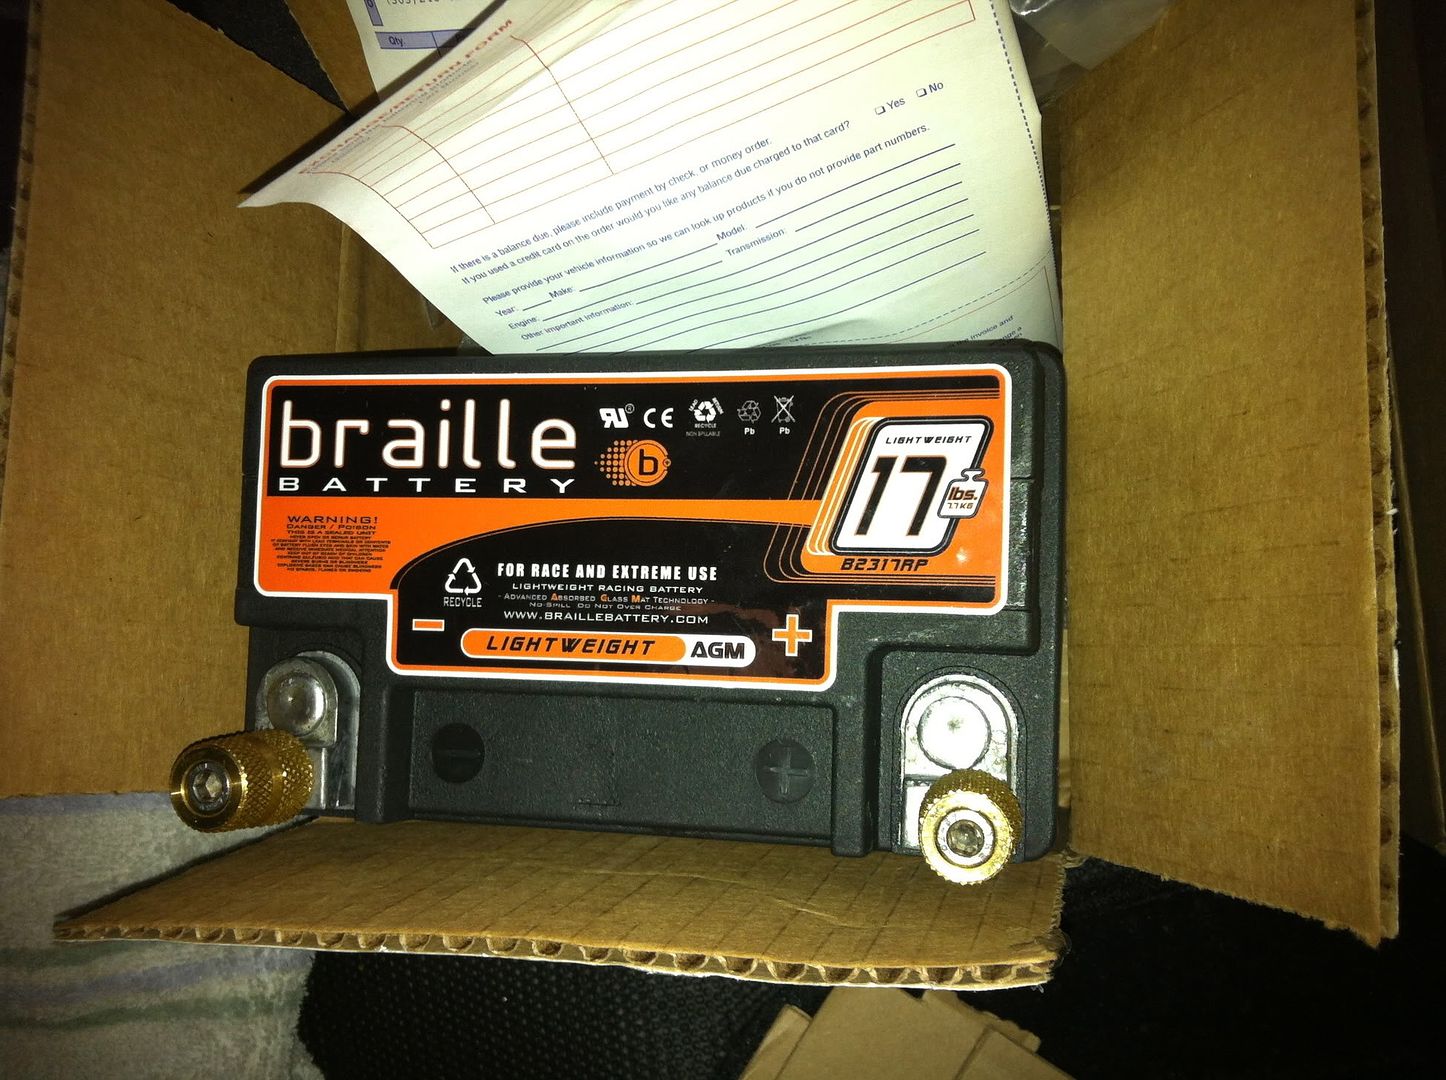
• Will need to move battery to trunk. Many write-ups on this. U sued a braile battery and 2 gage welding line. Grounded in rear where muffler bracket goes, removed that bracket to avoid any potential issues.
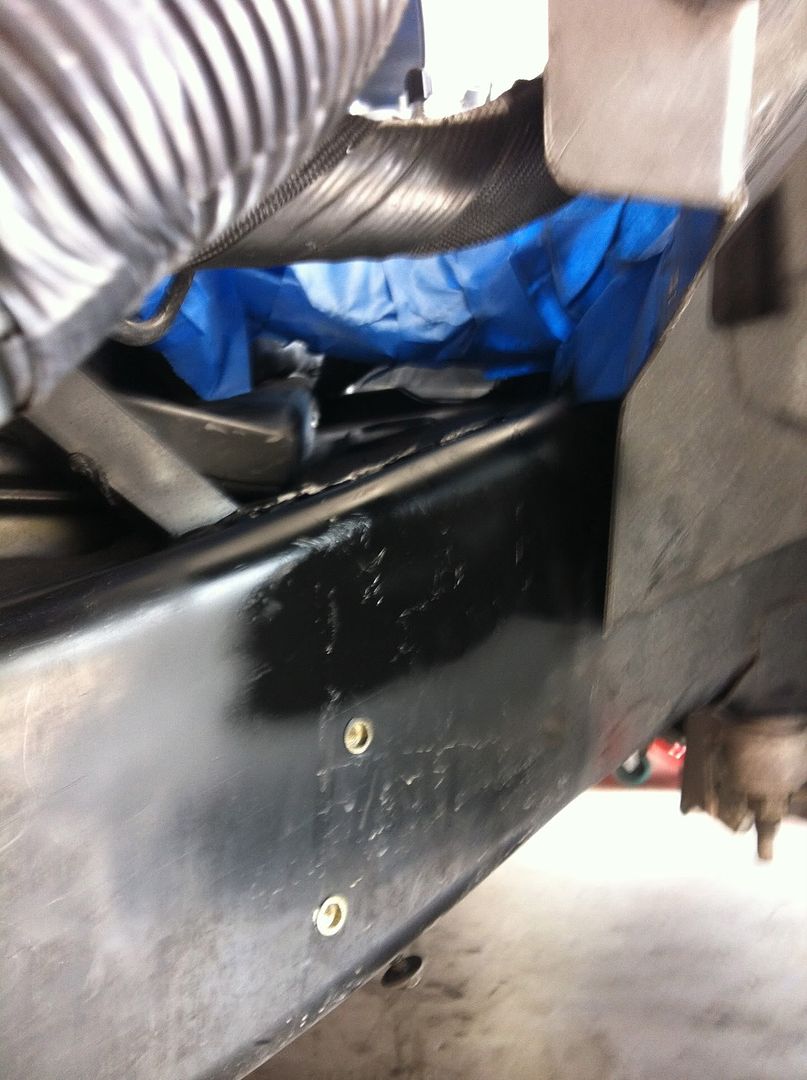
• Will need to install 2 threaded inserts (rivet nuts) for lower tank mounting. U used 5/16’-18 from fastenall. Use the tool, it’s a real b!tch trying to do it without. Inserts sit about 1.25” inboard of the old ECU mounting location. You will have to test fit yourself to get the lines as far away from the headers as possible. Not much room to work as the front cradle is nearby.
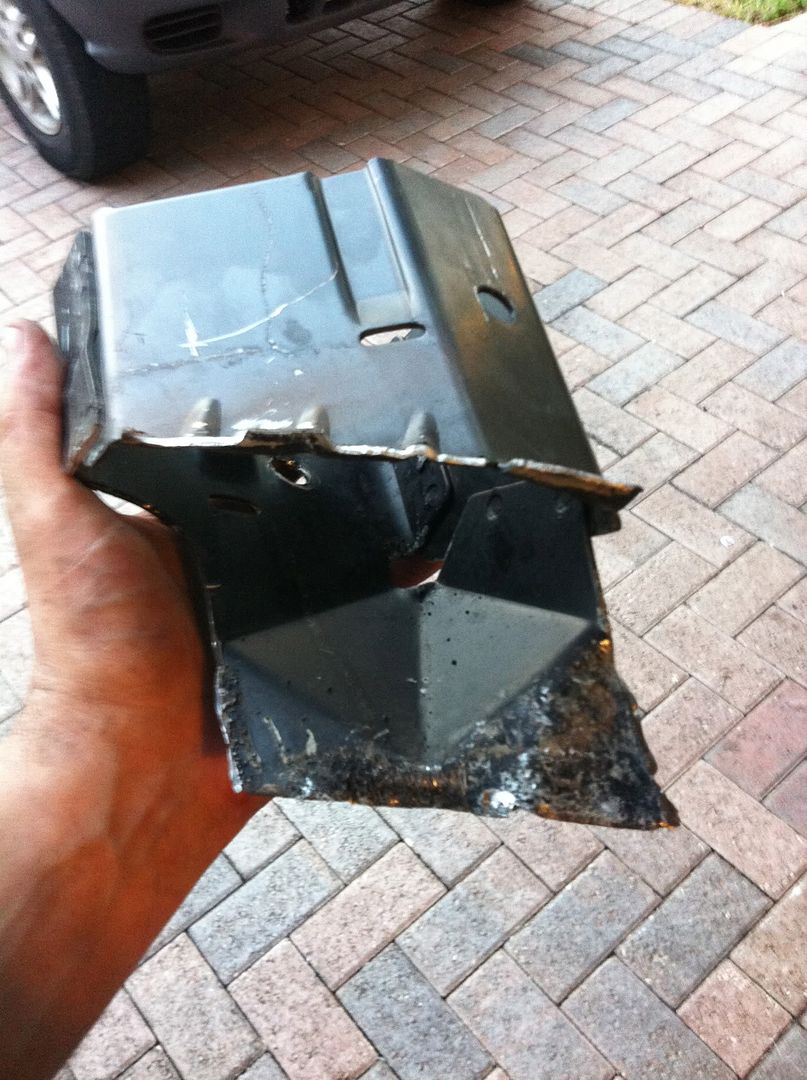
• The battery tray will need to be removed. Simple, it’s only (4) 13mm bolts
• Sheet metal tray holder needs to be cut off and ground flush with frame. A dremel and big a$$ chisel works to get it removed and grinder will get it all fluch. Remember to paint all exposed metal.
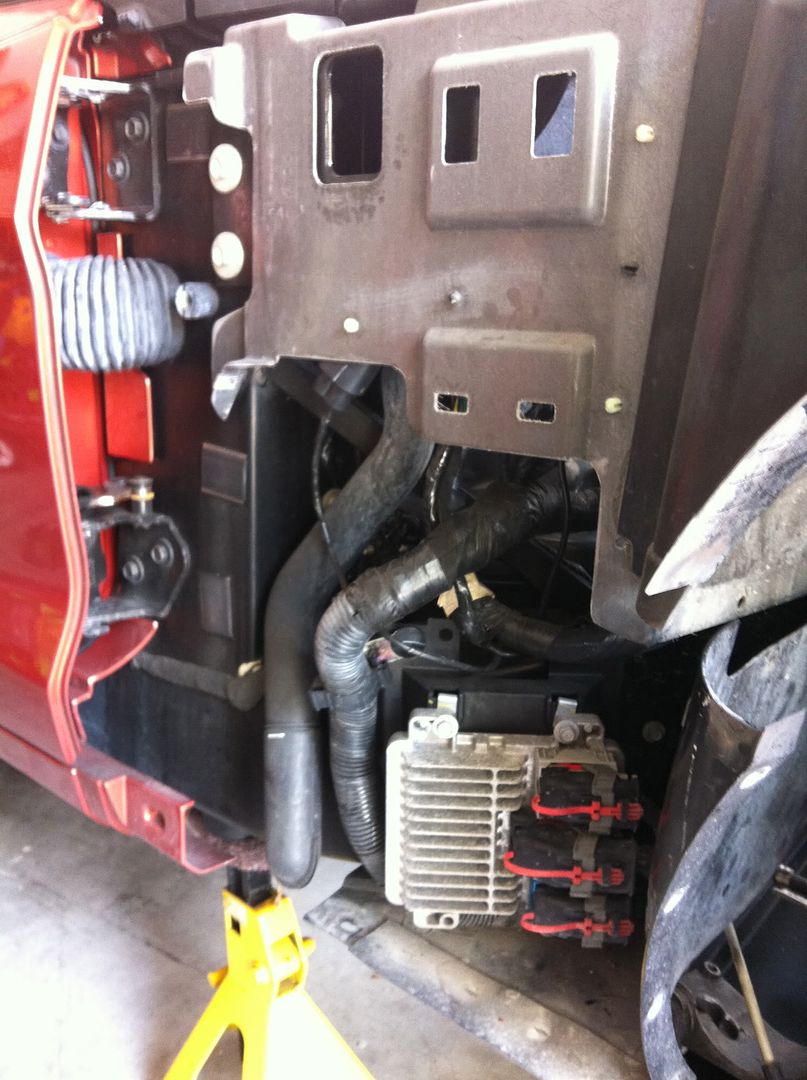
• ECU needs to be relocated to fiberglass up high. You can only get 3 mounting bolts in there. I used red Loctite to ensure it will say put. First pic is existing setup, second is finished product.
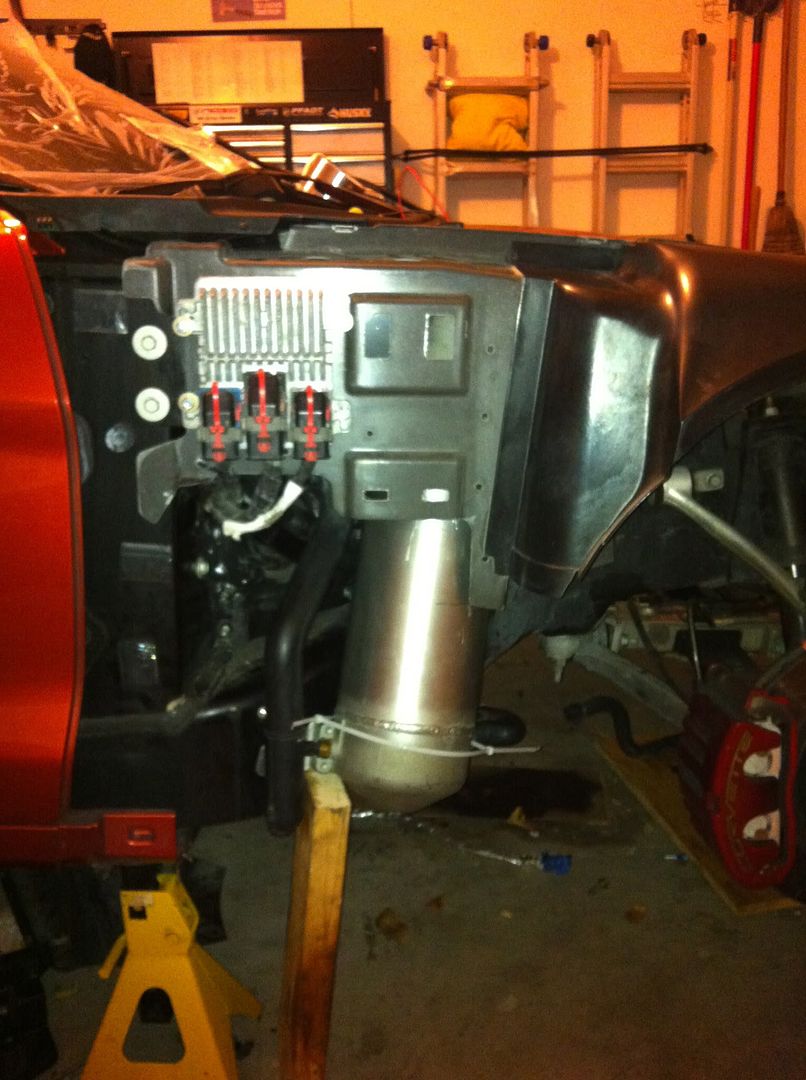
• You will have to get creative re-routing the wiring harnesses. I tried to heat wrap as much as I could to avoid a hot oil tank (up to 300F) touching the engine harness.
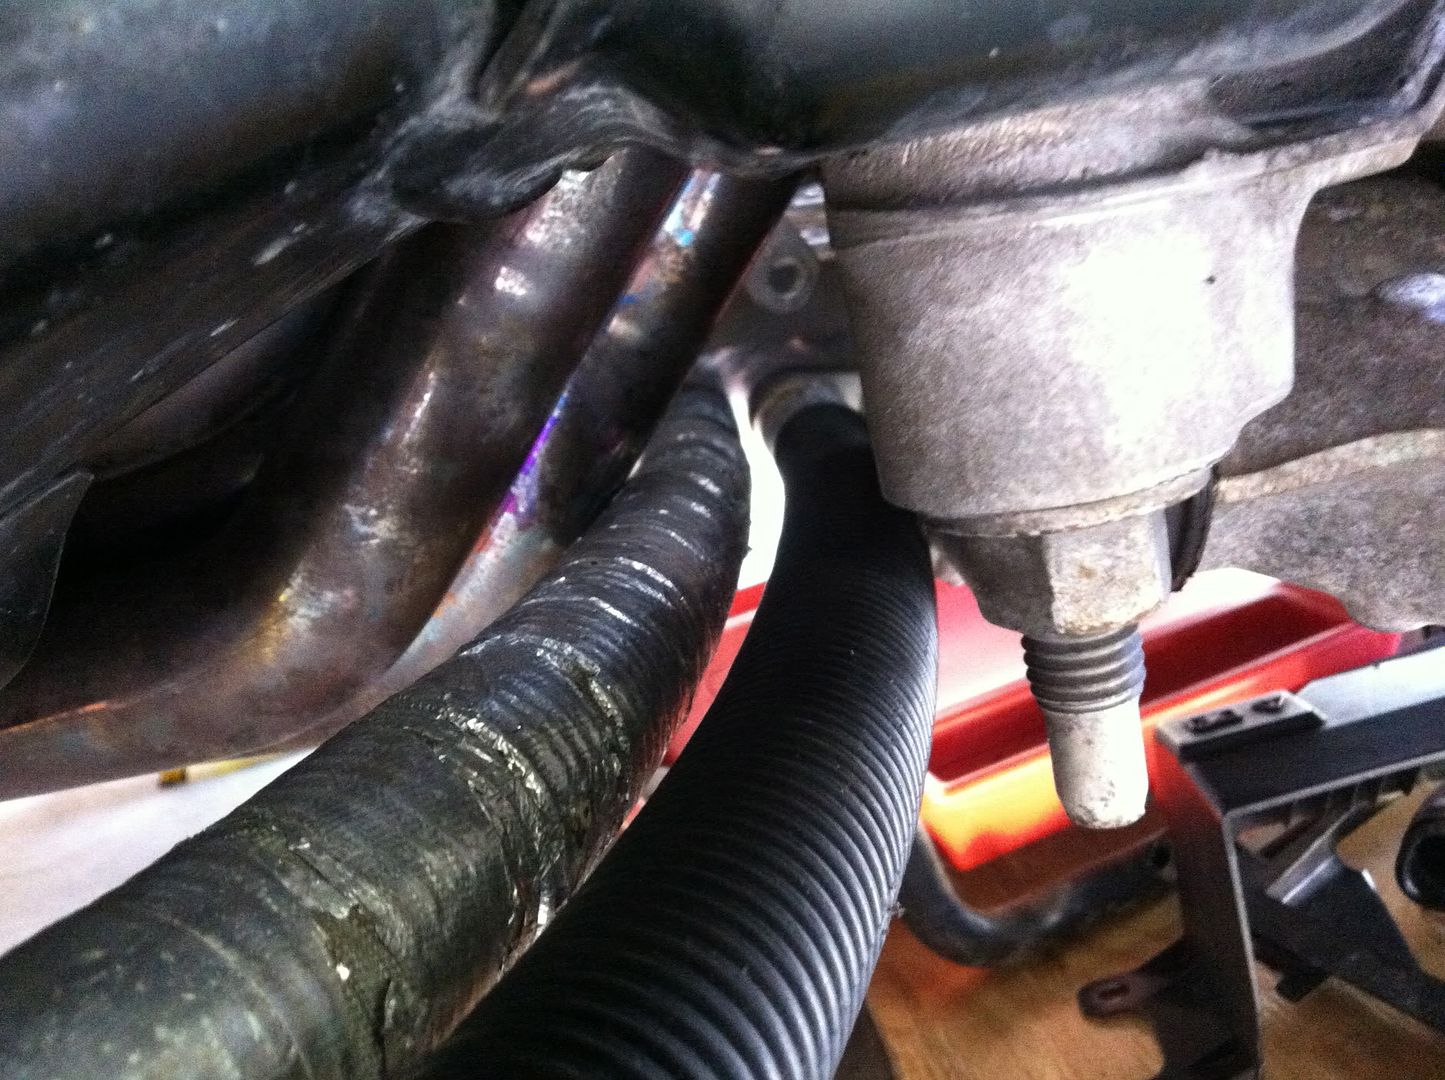
• Oil lines will need to be heat wrapped as they come within �” of the headers. Here's a pic of when I tried to use the old ECU rivet nuts. Interference fit - OOPS! That forced me to use new rivet nuts and a new mounting location.
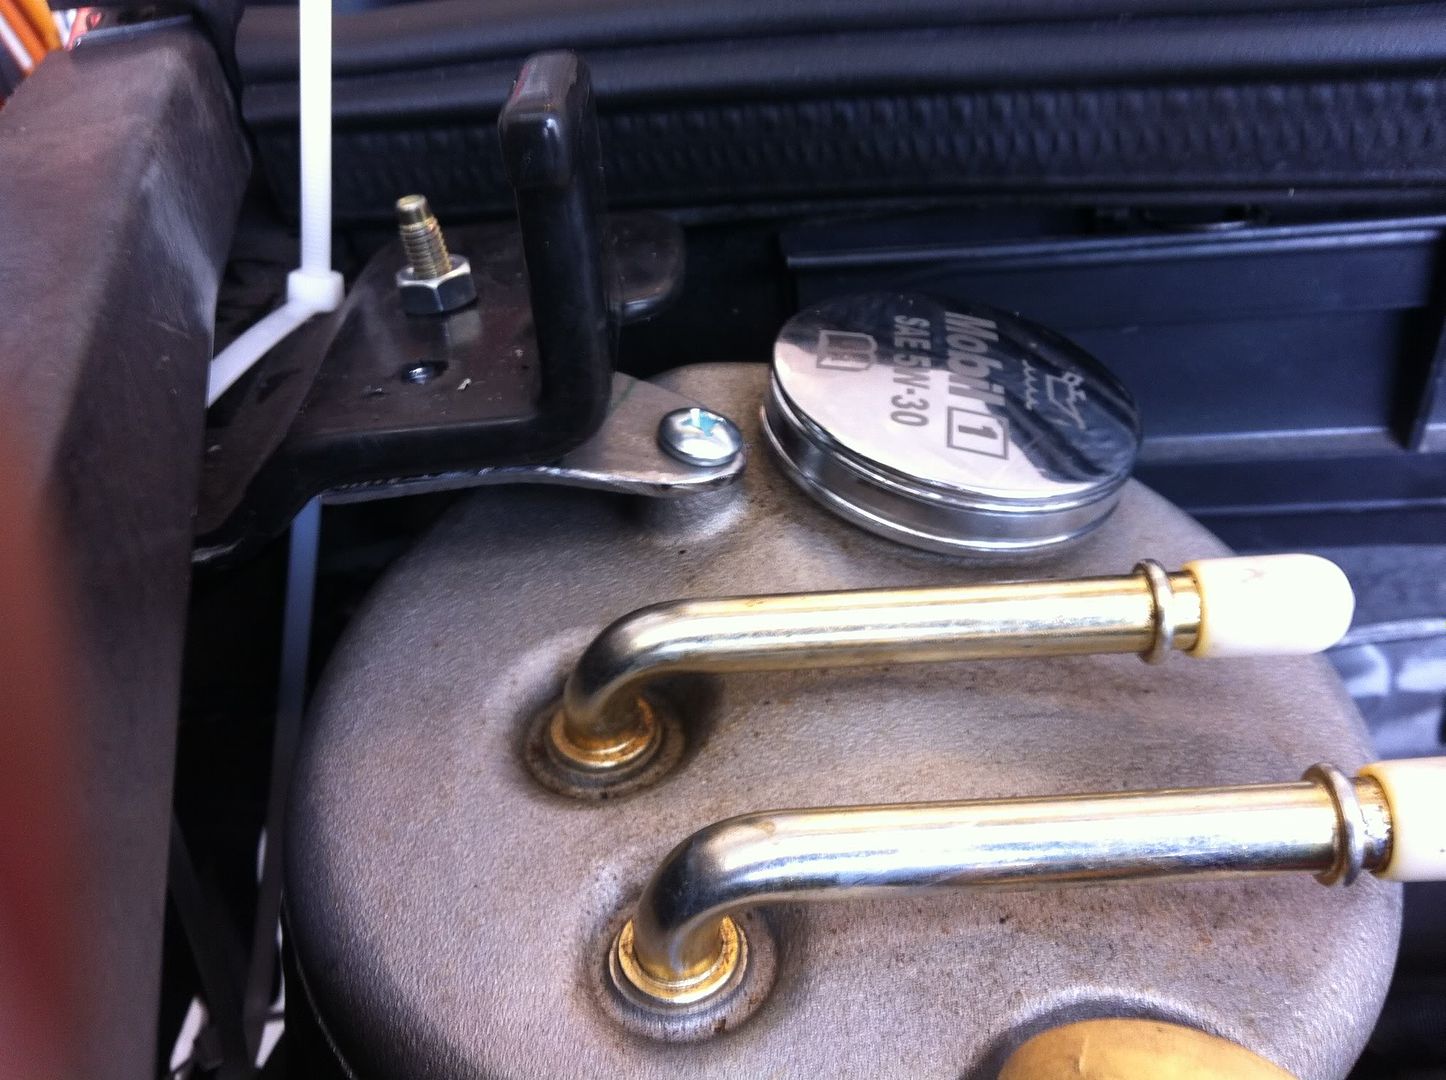
• A metal bracket will have to be made to support the top of the oil tank. I made one from 1/8” x 3” steel plate and bolted to hood receiver bracket.
• I put a strip of foam between oil tank and frame to prevent direct metal to metal contact.
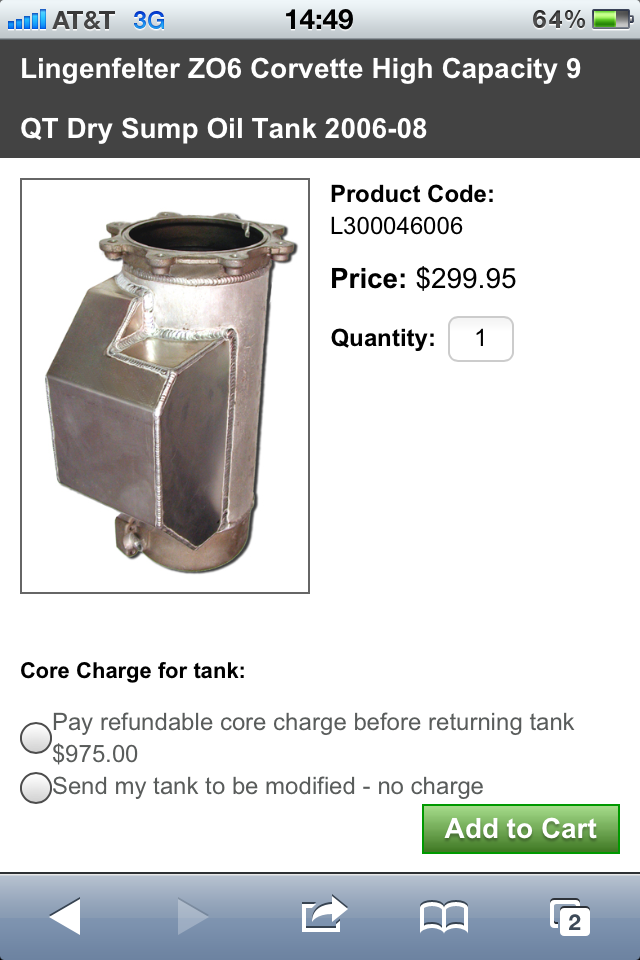
• I also upgraded to the LPE style tank ($299) with Avaid baffle, part number 110-51007 ($249). The Z06 crowd speaks highly of them. Hopefully this combo will prevent oil puking into the intake on the track. The LPE tank was a snug fit as about 1/2" of fiberglass needed to be trimmed to accommodate the larger tank.
GM original 2010+ oil tank:

LPE upgraded tank:
Avaid also makes a windage tray for the oil pan priced at $249.50. I plan on upgrading to that eventually. Here's the website:
http://www.aviaid.com/shopsite_sc/st...9-dry-sump.htm
Motor install is pretty straightforward, plenty of write-ups on that. I installed Hinson Poly motor mounts while I had the chance. Make sure to heat wrap EVERYTHING while the old motor is out as this will be one of the few chances you will have direct access to just about everything in the engine bay. For the 2005 motor, you will need the Lingenfeter conversion box (about $350 if I remember correctly) which takes the 58 tooth reluctor tooth signal in and converts to a 24 tooth signal out (what the ECU is expecting). Can be found here:
http://www.lingenfelter.com/mm5/merc...ow=&range_high
Here is a link to the installation instructions:
http://www.lingenfelter.com/sites/li...ons%20v1.5.pdf
As of now, I haven’t started the car yet but several others say is works like a champ. Due to wire lengths, I mounted on the cabin filter cover and routes all cam sensor wired around the back of the motor and followed the eisting harness. The crank side was routed down along existing wiring and all of it was heat wrapped. Black ground tapped into an existing ground location on the frame behind the fuse box and the switched power tapped into fuse #12 (injectors).
I will edit as I have more time. This will be a work in progress for a couple weeks until the car is done.
Let me start by saying there are many ways to skin a cat, this is just one. If anybody knows of an easier or more efficient way to do something, please chime in. I didn’t get too many good pics but I’ll insert some when appropriate. Also, I won’t bother with the side projects such as removing the steering rack, removing the motor, removing the drivetrain as they have already been documented elsewhere.
Big thanks to jimmyb496, sammy burks, Justin at GM Parts House, Justin and Joe at Caspers Electronics and a few others I can't immediately think of for helping me along.
To start, here are a couple differences I have found between the 2005 LS2 and replacement 2012 dry sump LS3:
1. Oil temp/level sensor in LS2 is a 3 prong plug, LS3 dry sump has only a 2 prong oil temp sensor only. Caspers is currently working on an adapter harness for me. I asked them to make a specific part number for me when complete to others can order. Harness will be 48” long, but really only needs to be 40-42” Engine harness side will be female type 3-way F GT 150 series, sealed. Dry sump sensor side is male type 2-way F GT 150 series, sealed. Pinouts as follows. A pin on harness side is abandoned (Oil level). B pin on harness side to B pin on tank side. C pin on harness side to A pin on tank side. Supporting pics below.
Existing LS2 harness:
LS3 dry sump sensor:
2. The 2012 821 series heads have the machine work for the rear coolant plugs but no hole. The plugs aren’t needed.
3. The external oil cooler line bracket near the driver motor mount does not clear the block and can’t be used.
4. The MAP sensor is 2 bar, part number 12591290. LS2 is physically smaller and cannot be used. MAP sensor bolt part number 11562253. You will also need a wiring harness adapter since the connectors are different. Katech sells a pigtail for this, part number KAT-5185, $33.95. Can be found here:
http://store.katechengines.com/map-a...bosch-p67.aspx
5. Cam sensor harness bracket is not used. It is replaced by the Lingenfelter wiring harness.
6. There is no threaded hole for the tranny cooler lines on the passenger side of block near motor mount.
7. Belts are different. AC belt part number 12635224, Serp belt part number 12636226. Most likely due to the larger crank snout and oil pump setup.
8. MAF sensor bolts part number 11589093, need qty 2.
9. Need new passenger fender liner to clear oil tank and lines. Not sure yet if is a direct replacement or will need to use half of exiting mated to half of new part. GS pass inner fender liner part number 20882668. Here's a pic from GM Parts House, I ordered #6 for the passenger side:
10. LS2 (silver blade) and LS3 (gold blade) seem to be different in terms of the direction the blade opens and the working internals. Could not keep the car running at first with gold blade TB and LS3 MAF, swapped back to silver blade TB and LS2 MAF and it purred like a kitten. I'm sticking to the LS2 TB and will tune for the LS3 MAF on the dyno.
11. Left front inner fender liner. Stock one isn't shaped to accommodate the oil tank and lines. But a GS inner fender liner, part number 20882665 ($25.79 at GM Parts House) and marry the outer edge of the stock piece to the entire GS fender liner. It will take some creativity cutting and bonding, but as long as it holds the majority of the elements out you will be fine.
Regarding the oil tank installation:
• Will need to move battery to trunk. Many write-ups on this. U sued a braile battery and 2 gage welding line. Grounded in rear where muffler bracket goes, removed that bracket to avoid any potential issues.
• Will need to install 2 threaded inserts (rivet nuts) for lower tank mounting. U used 5/16’-18 from fastenall. Use the tool, it’s a real b!tch trying to do it without. Inserts sit about 1.25” inboard of the old ECU mounting location. You will have to test fit yourself to get the lines as far away from the headers as possible. Not much room to work as the front cradle is nearby.
• The battery tray will need to be removed. Simple, it’s only (4) 13mm bolts
• Sheet metal tray holder needs to be cut off and ground flush with frame. A dremel and big a$$ chisel works to get it removed and grinder will get it all fluch. Remember to paint all exposed metal.
• ECU needs to be relocated to fiberglass up high. You can only get 3 mounting bolts in there. I used red Loctite to ensure it will say put. First pic is existing setup, second is finished product.
• You will have to get creative re-routing the wiring harnesses. I tried to heat wrap as much as I could to avoid a hot oil tank (up to 300F) touching the engine harness.
• Oil lines will need to be heat wrapped as they come within �” of the headers. Here's a pic of when I tried to use the old ECU rivet nuts. Interference fit - OOPS! That forced me to use new rivet nuts and a new mounting location.
• A metal bracket will have to be made to support the top of the oil tank. I made one from 1/8” x 3” steel plate and bolted to hood receiver bracket.
• I put a strip of foam between oil tank and frame to prevent direct metal to metal contact.
• I also upgraded to the LPE style tank ($299) with Avaid baffle, part number 110-51007 ($249). The Z06 crowd speaks highly of them. Hopefully this combo will prevent oil puking into the intake on the track. The LPE tank was a snug fit as about 1/2" of fiberglass needed to be trimmed to accommodate the larger tank.
GM original 2010+ oil tank:
LPE upgraded tank:
Avaid also makes a windage tray for the oil pan priced at $249.50. I plan on upgrading to that eventually. Here's the website:
http://www.aviaid.com/shopsite_sc/st...9-dry-sump.htm
Motor install is pretty straightforward, plenty of write-ups on that. I installed Hinson Poly motor mounts while I had the chance. Make sure to heat wrap EVERYTHING while the old motor is out as this will be one of the few chances you will have direct access to just about everything in the engine bay. For the 2005 motor, you will need the Lingenfeter conversion box (about $350 if I remember correctly) which takes the 58 tooth reluctor tooth signal in and converts to a 24 tooth signal out (what the ECU is expecting). Can be found here:
http://www.lingenfelter.com/mm5/merc...ow=&range_high
Here is a link to the installation instructions:
http://www.lingenfelter.com/sites/li...ons%20v1.5.pdf
As of now, I haven’t started the car yet but several others say is works like a champ. Due to wire lengths, I mounted on the cabin filter cover and routes all cam sensor wired around the back of the motor and followed the eisting harness. The crank side was routed down along existing wiring and all of it was heat wrapped. Black ground tapped into an existing ground location on the frame behind the fuse box and the switched power tapped into fuse #12 (injectors).
I will edit as I have more time. This will be a work in progress for a couple weeks until the car is done.
Last edited by taken19; 05-24-2012 at 11:36 AM.


 05-13-2012, 06:32 PM
#4
Track Junky
Thread Starter
It's not hard, just time consuming. Like any project, if I did it again, it would take half the time. I did it to avoid buying another motor 6 months after buying Hoosiers...
05-13-2012, 06:33 PM
#5
Track Junky
Thread Starter

 05-14-2012, 07:27 AM
#7
Track Junky
Thread Starter
05-14-2012, 04:53 PM
#8
Track Junky
Thread Starter
Good info! I ran the cable thru the inside of the car, there is very little outside the cabin. I will keep a very close eye on it now that you mention this though. Thanks for the heads up. If needed, I will swap to marine grade cable.
05-15-2012, 11:09 AM
#9
Le Mans Master

Member Since: May 2011
Location: Tampa FL (formerly Justinjor)
Posts: 5,022
Likes: 0
Received 14 Likes
on
9 Posts
Tech Contributor
St. Jude Donor '11-'12-'13-'14

Those pics have to be photoshopped.
Since when does AT&T get a full 5 bars of service?
Great write-up Sean. I think you should post some more pics of that bracket you made for the top tank mount bolt. I have the pictures on my phone if you need them.
Since when does AT&T get a full 5 bars of service?
Great write-up Sean. I think you should post some more pics of that bracket you made for the top tank mount bolt. I have the pictures on my phone if you need them.
05-15-2012, 11:39 AM
#10


If you want to re-do the battery wire in the future knukonceptz has great wire. I've used it on my last few audio installs and it's very flexible and has a ton of wire in there, not just thicker insulation like some cheaper wire.
And this project is very involved! But it should help with oil starvation when pushing it on some sticky tires!
And this project is very involved! But it should help with oil starvation when pushing it on some sticky tires!
05-15-2012, 11:39 AM
#11
If you want to re-do the battery wire in the future knukonceptz has great wire. I've used it on my last few audio installs and it's very flexible and has a ton of wire in there, not just thicker insulation like some cheaper wire.
And this project is very involved! But it should help with oil starvation when pushing it on some sticky tires!
And this project is very involved! But it should help with oil starvation when pushing it on some sticky tires!
05-15-2012, 11:46 AM
#12
Track Junky
Thread Starter
Yeah, I must have deleted those pics after I sent them to you. Please post if you have time.

 05-15-2012, 12:29 PM
#14
Track Junky
Thread Starter
If you want to re-do the battery wire in the future knukonceptz has great wire. I've used it on my last few audio installs and it's very flexible and has a ton of wire in there, not just thicker insulation like some cheaper wire.
And this project is very involved! But it should help with oil starvation when pushing it on some sticky tires!
And this project is very involved! But it should help with oil starvation when pushing it on some sticky tires!
 05-15-2012, 12:31 PM
#15
Track Junky
Thread Starter
05-17-2012, 10:54 AM
#16
Melting Slicks

If you want to make the oil temperature/level harness yourself, you can probably get the parts from Mouser.
I did a quick look and found both plugs listed in the manual above on Mouser's website:
LS2 Female Plug. I believe that the male counterpart is P/N: 15326813 found here.
LS7 Female Plug.
Granted, you may not want to make them yourself... but it's certainly an option if you wanted to go that route.
Mark
05-17-2012, 03:52 PM
#17
Track Junky
Thread Starter
If you want to make the oil temperature/level harness yourself, you can probably get the parts from Mouser.
I did a quick look and found both plugs listed in the manual above on Mouser's website:
LS2 Female Plug. I believe that the male counterpart is P/N: 15326813 found here.
LS7 Female Plug.
Granted, you may not want to make them yourself... but it's certainly an option if you wanted to go that route.
Mark
I did a quick look and found both plugs listed in the manual above on Mouser's website:
LS2 Female Plug. I believe that the male counterpart is P/N: 15326813 found here.
LS7 Female Plug.
Granted, you may not want to make them yourself... but it's certainly an option if you wanted to go that route.
Mark
I saw that as well but thought it was easier if Caspers handled it for me. After 2 months of picking at this motor, I'm getting tired!
05-19-2012, 08:44 AM
#18
Track Junky
Thread Starter
Quick update... Got car started but won't stay running. No codes, probably TB related. Custom oil temp harness works well. Looking for an LS2 TB for a test run if anybody in south FL is willing to lend one for an hour or so. If it works, I will buy it.
More to come.
More to come.
05-20-2012, 03:59 PM
#19

Sean my car is up on jacks and we have pulled the drive train for some upgrade so if you need you can use my TB its a ls2 dont know if it will work for you but its on the car and will only take a few minute to remove...
Manny.
305-333-4445
PS great thread
Manny.
305-333-4445
PS great thread
05-20-2012, 05:23 PM
#20
Track Junky
Thread Starter
Thanks manny, I have a work buddy who is lending me his for a few minutes. Tonight should tell the rest of the story.
I will post results.
I will post results.