
Cheap "Man Switch" Mod
 03-20-2012, 11:10 PM
#1
Racer

Thread Starter

I've dabbled in electronics stuff and soldering a bit, so knowing that we can activate the butterfly in the NPP exhaust by just pulling the fuse, I followed a few other peoples' lead and made my own "Man Switch". Total cost was about $6 in parts and about 2 - 3 hours of my time.
Here is what you need:
1 - Inline fuse holder (I used the Bussmann from Advance Auto. Part num: BP/HHM)
1 - One slim rocker switch (I used the DPST switch from Radio Shack, part num: 275-015)
2 - Easy connect wire terminals to attach to the rocker switch. (If you don't know what these look like, ask the guys at Radio Shack)
6 feet of wire (slim gauge is fine, I had some laying around the house)
2 - 10 A fuses (I'll get to why you need 2 in a minute.)
1 - Soldering iron and solder
A few pieces of heat shrink electrical cover
Instructions
1. Take one of the 10 A fuses and using the soldering iron melt the plastic enough to pull the metal tips out. Separate the two tips so they aren't touching anymore.
2. Cut your 6 feet of wire into two equal length pieces and solder one end of one piece to one of the metal tips from the fuse. Cover with heat shrink to protect it. Attach one of the easy connect wire terminals to the other end of the wire.
3. Solder one end of the inline fuse holder to the other fuse tip. Cover with heat shrink electrical wrap to protect it. Solder the other end of the inline fuse holder to the other piece of wire. Use heat shrink to protect it. Attach the other easy connect wire terminal to the end of this wire.
4. Using another 10 A fuse as a template, lay the two fuse tips you just soldered on top of some electrical tape and create a new "fuse" by taping them in place.
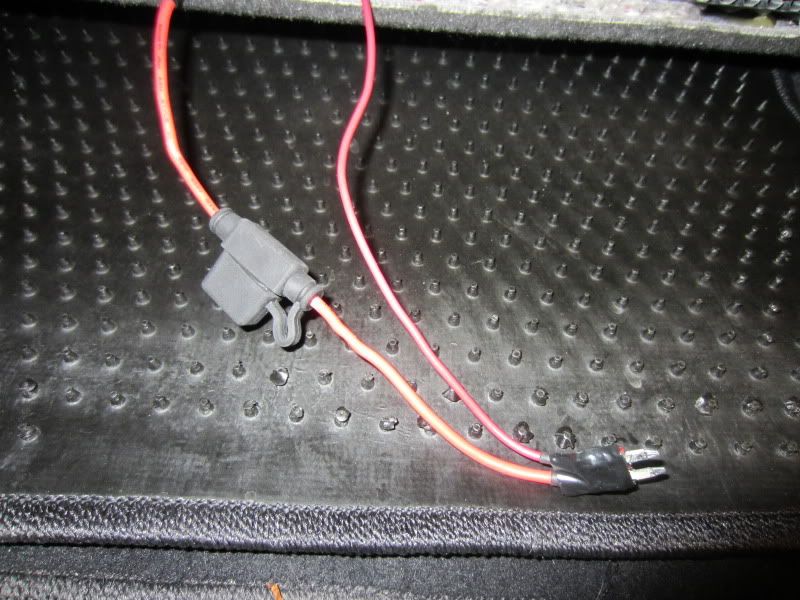
Your end product will look something like this:
5. Figure out where you want to put your switch. Some guys have put it in the spot where the cigarette adapter goes on the console. I put mine under the left side of the lower dash under the steering wheel so I could flick it with my left hand.
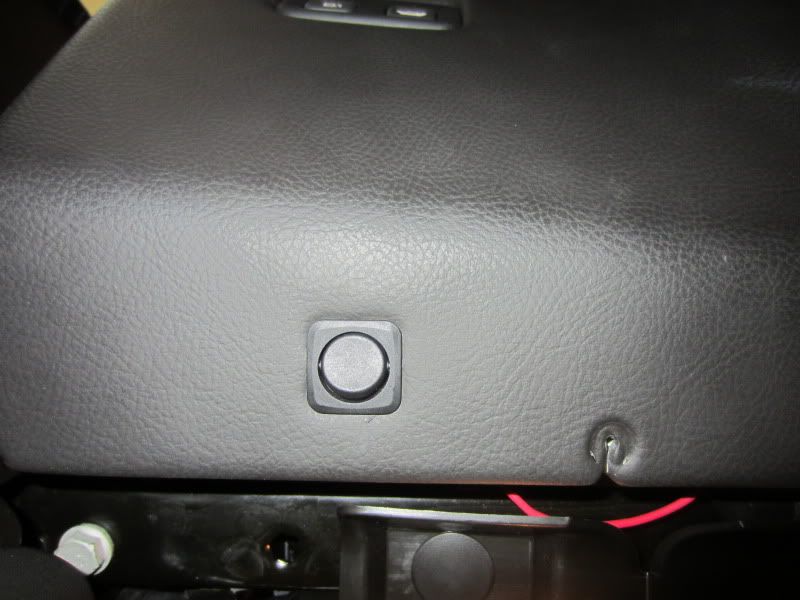
Here you can barely see it even from seat level. You cannot see it while sitting in normal driving position.
6. Drill a 3/4 inch whole for the rocker switch and attach the switch with the provided plastic nut.
7. Thread the wires behind the console in whatever fashion you see fit. I used a bolt grabber and pushed it through then grabbed the wires and pulled them to the rocker switch.
8. Plug the easy connect terminals into the rocker switch.
9. Install a new 10 A fuse into the fuse holder.
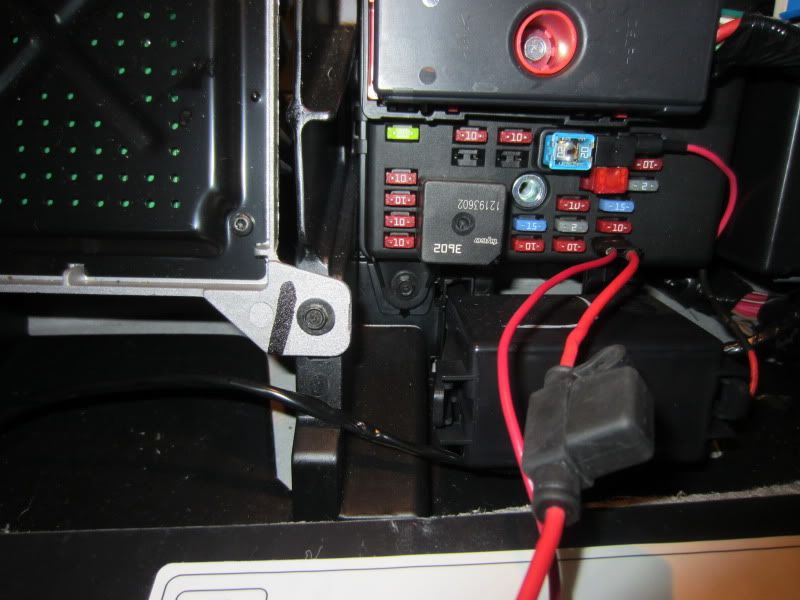
10. Plug in the home made fuse with attached wires into the spot where you originally pulled out the fuse. (Pay no attention to that other red wire on the top right, it has nothing to do with this mod.)
11. Start the car up and test the switch.
You'll notice there is a slight delay when going from loud to quiet, but from quiet to loud it's instant.
And there you have it guys. Now, obviously this isn't as cool as the remote options, BUT I have seen a similar manual switch selling for over $120, so save yourself the money for something that's a little harder to do on your own and do this mod. It's easy, cheap and you'll appreciate the intimate time with your Vette once your done. Let me know if you have any questions!
Here is what you need:
1 - Inline fuse holder (I used the Bussmann from Advance Auto. Part num: BP/HHM)
1 - One slim rocker switch (I used the DPST switch from Radio Shack, part num: 275-015)
2 - Easy connect wire terminals to attach to the rocker switch. (If you don't know what these look like, ask the guys at Radio Shack)
6 feet of wire (slim gauge is fine, I had some laying around the house)
2 - 10 A fuses (I'll get to why you need 2 in a minute.)
1 - Soldering iron and solder
A few pieces of heat shrink electrical cover
Instructions
1. Take one of the 10 A fuses and using the soldering iron melt the plastic enough to pull the metal tips out. Separate the two tips so they aren't touching anymore.
2. Cut your 6 feet of wire into two equal length pieces and solder one end of one piece to one of the metal tips from the fuse. Cover with heat shrink to protect it. Attach one of the easy connect wire terminals to the other end of the wire.
3. Solder one end of the inline fuse holder to the other fuse tip. Cover with heat shrink electrical wrap to protect it. Solder the other end of the inline fuse holder to the other piece of wire. Use heat shrink to protect it. Attach the other easy connect wire terminal to the end of this wire.
4. Using another 10 A fuse as a template, lay the two fuse tips you just soldered on top of some electrical tape and create a new "fuse" by taping them in place.
Your end product will look something like this:
5. Figure out where you want to put your switch. Some guys have put it in the spot where the cigarette adapter goes on the console. I put mine under the left side of the lower dash under the steering wheel so I could flick it with my left hand.
Here you can barely see it even from seat level. You cannot see it while sitting in normal driving position.
6. Drill a 3/4 inch whole for the rocker switch and attach the switch with the provided plastic nut.
7. Thread the wires behind the console in whatever fashion you see fit. I used a bolt grabber and pushed it through then grabbed the wires and pulled them to the rocker switch.
8. Plug the easy connect terminals into the rocker switch.
9. Install a new 10 A fuse into the fuse holder.
10. Plug in the home made fuse with attached wires into the spot where you originally pulled out the fuse. (Pay no attention to that other red wire on the top right, it has nothing to do with this mod.)
11. Start the car up and test the switch.
You'll notice there is a slight delay when going from loud to quiet, but from quiet to loud it's instant.
And there you have it guys. Now, obviously this isn't as cool as the remote options, BUT I have seen a similar manual switch selling for over $120, so save yourself the money for something that's a little harder to do on your own and do this mod. It's easy, cheap and you'll appreciate the intimate time with your Vette once your done. Let me know if you have any questions!
Last edited by Nate_M; 03-20-2012 at 11:18 PM.


 03-21-2012, 11:15 AM
#6
Team Owner

Luv these types of DIY projects that help people (like me) who don't know quite enough to design themselves. Saving this in case I decide to abandon my FOB's. Thanks for sharing. 
03-21-2012, 11:39 AM
#7


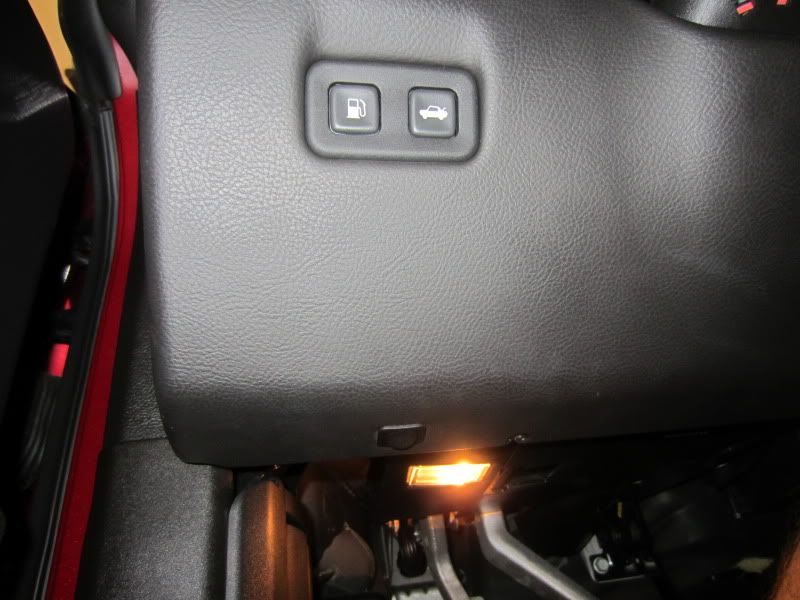
I installed exactly that switch a couple of weeks back, but to the right (pic below), since I prefer using the shifter hand. And since I don't have any other electrical mods, I used the seat heater circuit to power NPP (2nd pic), to avoid using a separate fuse holder and to modify a fuse like you did. But it's all just a matter of personal preference  . By the way, even though NPP is powered from a different circuit, it does open at 3,500 rpm just like stock. Wiring must go thru the ECU AFTER the fuse box, which is unusual. I initially thought valves would always stay closed when powered, but wasn't the case.
Oh, and 'man switch' is referred to the one on the shifter, not this one. You got my curiosity going, only to see this  . Just kidding man. It's good info nonetheless. Have a great day.

. By the way, even though NPP is powered from a different circuit, it does open at 3,500 rpm just like stock. Wiring must go thru the ECU AFTER the fuse box, which is unusual. I initially thought valves would always stay closed when powered, but wasn't the case. Oh, and 'man switch' is referred to the one on the shifter, not this one
. You got my curiosity going, only to see this . Just kidding man. It's good info nonetheless. Have a great day.
Last edited by JCtx; 04-10-2012 at 02:52 AM.
03-21-2012, 12:38 PM
#8
Racer
Thread Starter
I installed exactly that switch a couple of weeks back, but to the right (pic below), since I prefer using the shifter hand. And since I don't have any other electrical mods, I used the seat heater circuit to power NPP (2nd pic), to avoid using a separate fuse holder and to modify a fuse like you did. But it's all just a matter of personal preference . By the way, even though NPP is powered from a different circuit, it does open at 3,500 rpm just like stock. Wiring must go thru the ECU AFTER the fuse box, which is unusual. I initially thought valves would always stay closed when powered, but wasn't the case.
Oh, and 'man switch' is referred to the one on the shifter, not this one. You got my curiosity going, only to see this . Just kidding man. It's good info nonetheless. Have a great day.
. By the way, even though NPP is powered from a different circuit, it does open at 3,500 rpm just like stock. Wiring must go thru the ECU AFTER the fuse box, which is unusual. I initially thought valves would always stay closed when powered, but wasn't the case. Oh, and 'man switch' is referred to the one on the shifter, not this one
. You got my curiosity going, only to see this . Just kidding man. It's good info nonetheless. Have a great day.Just goes to show you guys, there is more than one way to skin a cat.
03-21-2012, 02:39 PM
#9
Safety Car


I did a very similar version of this mod a few years ago... the main difference being that I located the swithc inside of the glove compartment. There is a good spot just above the fob station. Makes the installation really easy because you only need a couple feet of wire and the glove box panel comes out with a few screws.
04-02-2012, 09:24 AM
#10
Instructor
Member Since: Mar 2012
Location: Oregon
Posts: 114
Likes: 0
Received 0 Likes
on
0 Posts
Nate, nice job. Is the switch you used a 3 pin? If so, which pins did you solder the two wires to?
Also, being an absolute wiring neophyte, why would you want to involve the seat heater fuse when this can all be done with the NPP fuse? And could you use just two blade connections on the end of the wires to plug the two wires into the NPP fuse socket? Is all you are doing by modifying the 10 amp fuse to to separate the two connections into the fuse socket?
I get my roadster in a week, and this is the first mod that I want to do. Sorry about the dumb questions, but wiring and electrical is like speaking Chinese to me, and I don't do that well either.....
04-02-2012, 11:03 AM
#11
Racer
Thread Starter
Thanks! My switch is actually a DPST (dual-pole-single-throw) switch, so it has 4 pins. Basically that means I can control two things with one switch. A SPST (single-pole-single-throw) switch will work just as well. You can always test which pins you need to attach your wires two by using a multi-meter. Just put it on resistance setting and check for continuity across the two pin. If it's zero, flip the switch and see if it goes to 1. If it does, those are the two pin you need. If it doesn't, check a different pin and repeat the process.
As for using the seat heater, it doesn't really matter. I chose not to because I already had something I was powering off of the seat heater (iPod connection). ELP chose to use the seat heater because he was able to use the tap as a clean power provider and then just run the one wire to the NPP circuit. Basically, it allows him to not have to make two wire terminals like I did.
As for the blade connections, mine were two thin so the fuse socket would grab them. I'm sure they make thicker ones out there that can be used, but I didn't want to have to buy them and I have dozens of 10 AMP fuses around from other projects so I just used the taps out of that instead. To answer your question, yes, all I was trying to do was seperate the two connectors AND made it easy to solder my wires onto them.
And no worries on asking the questions. To me, that's what a forum is all about so ask away! With electrical, just take your time and don't power everything up until you are 150 % sure it's right. That way you keep from electricuting yourself, or worse, frying your electrical system on that new ride!
As for using the seat heater, it doesn't really matter. I chose not to because I already had something I was powering off of the seat heater (iPod connection). ELP chose to use the seat heater because he was able to use the tap as a clean power provider and then just run the one wire to the NPP circuit. Basically, it allows him to not have to make two wire terminals like I did.
As for the blade connections, mine were two thin so the fuse socket would grab them. I'm sure they make thicker ones out there that can be used, but I didn't want to have to buy them and I have dozens of 10 AMP fuses around from other projects so I just used the taps out of that instead. To answer your question, yes, all I was trying to do was seperate the two connectors AND made it easy to solder my wires onto them.
And no worries on asking the questions. To me, that's what a forum is all about
so ask away! With electrical, just take your time and don't power everything up until you are 150 % sure it's right. That way you keep from electricuting yourself, or worse, frying your electrical system on that new ride!
 04-02-2012, 04:43 PM
#13
Racer
Thread Starter
04-02-2012, 05:21 PM
#14
Le Mans Master


Much better when one physical action maps to one operation, not two operations that are exactly opposite.
04-02-2012, 07:34 PM
#15
Instructor
Member Since: Mar 2012
Location: Oregon
Posts: 114
Likes: 0
Received 0 Likes
on
0 Posts
I think I'll stick with Nate's ideal Cooldog. I don't foresee turning the thing on and off so much I need to have a foot pedal.
Back to the install. So Nate, you are just using 2 of the 4 pins on your switch? Cant you just tell me which two you used? I'm getting the same switch, and I don't have a multi-meter.
Back to the install. So Nate, you are just using 2 of the 4 pins on your switch? Cant you just tell me which two you used? I'm getting the same switch, and I don't have a multi-meter.
04-03-2012, 07:38 PM
#16
Just get an SPST and it'd only have 2 terminals . Mine is an SPST with provision for an LED, so it has a 3rd terminal, but it's copper in color, so even a monkey can wire that one too . I liked that switch better for tactile feel. Just go to Radio Shack and pick the one you like best. Good luck.
. Mine is an SPST with provision for an LED, so it has a 3rd terminal, but it's copper in color, so even a monkey can wire that one too . I liked that switch better for tactile feel. Just go to Radio Shack and pick the one you like best. Good luck.
 04-04-2012, 09:31 AM
#18
Burning Brakes


Nice job. I don't see the difference between pushuing the button on a $100 remote and pushing the button on a $6.00 manual switch. You get the same result.
I have seat heat so by using an "Add-a-circuit" from the auto parts store connected to the seat heat fuse you can fuse the NPP and seat heat separately with the fuses at the fuse box. From the fuse box , to the switch, back to the fuse box at the right side (I think) of the NPP connector.

I have seat heat so by using an "Add-a-circuit" from the auto parts store connected to the seat heat fuse you can fuse the NPP and seat heat separately with the fuses at the fuse box. From the fuse box , to the switch, back to the fuse box at the right side (I think) of the NPP connector.

