
FLYCUTMONSTER: making big cams fit with optimum compression
 04-14-2008, 02:03 AM
#1
Tech Contributor
Thread Starter

Before getting into this write-up, I would like to ask each person reading to know a big part of my motivation is the St. Judes fundraising effort on this board. I dont think its much of a reach to understand why this cause is so important but unless you suffer such a painful loss as a result of a childnood destroyed by various illnesses I dont think you could see it from the point of view of it happening to your world. The loss of a child changes you forever and I will never be able to relay the pain associated with it. Take a moment and send 20 bucks to this charity. We have the means to send robots to mars so I believe we can beat cancer, sudden infant death, and form new medications.
I have a dream.....that one day it will say St Jude's Donor under everyone's name.
---------------Make a difference TODAY------------------
How to donate:
1) Personal checks, cashier checks, or money orders, made out to: St. Jude Children's Hospital and mailed to "pewter99,":
Robert Briggs
P.O. Box 17083
Clearwater Fl 33762
Please put your forum name on the memo line of the check
2) paypal: corvettes4stjude@aol.com
3) Go to:
https://waystohelp.stjude.org/sjVPor...9&programId=51
Follow promts, we get credit for this method.
OK, so in the midst of the header and gear wars, I figure its been long enough that we read the same non-sense so lets have another DIY tech thread involving real ways to make cars faster and an actual install with lots of music, grease, and torque wrenches clicking late into the night while the panzies dream about their gas mileage and low RPM’s on the hiway...a joke not a jab.
How to shove a big cam into a LS3 headed car that wont fit it with decent compression without having a piston hit a valve:
DISCLAIMER: This is not a begginer’s first project under the hood. It’s a look at what incredible tuners do to cars to make them run quick times and have awesome street manners with big cams and yet be safe running that big cam and not wreck an engine. When you go to a big name tuner, you should be aware that this type of mod takes experience, knowledge, and common sense too. If you don’t have all 3 of these things don’t try to duplicate what you see here. When you go for a 4x package at Cartek with a 3X cam, they build a high compression motor to smooth out the driveability with compression. That requires the heads to be milled, thinner gaskets and piston clearancing. Cartek does this for breakfast and its second nature and it takes time to learn to do it. Even the best of the best can mess up a measurement. Those companies back their work and what you get is a motor backed by a reputation. Louis at LG had spoken to me at length about this project and ones he is working on, and the thought and planning that goes into a package isn’t remedial nor is it based on your opinion of what he likes. Its based on absolutes and math. If you are an advanced mechanic and want to try such a project, do so with someone around that has done this before. I watched it done for years and messed up my share of practice pistons in dead engines before I was allowed to touch a good one.
PLEASE READ: I get frustrated when people ask me fitment questions about cams. This tech thread is about how you fly cut when a cam doesnt fit. It says nothing about how to check for a cam fitting. Without touching your engine and testing your actual car, no one is going to tell you what fits and what wont fit. The cam can be ground wrong, the heads could be milled if you werent the first owner....ect. Cam specs arent how you tell in a cam fits. You need to test it in person. Please dont PM me with cam specs and ask if the cam fits with xyz milling. You need to do that yourself. As a guide in the quintessential world, a 230XER intake lobe on a 114+1 with 8.7 DCR is the limit of what fits with flycutting. You can fit a bigger cam with less compression. A 234 cam and 8.3 DCR can fit. Its all a trade off. I didnt test every cam out there nor will I vouch that your cam was ground right. There is no way I want that responsibility.
Enjoy the thread and if you want input from me, its free. The piston you mess up isn’t. I post this info here to at a minimum, give people a working respect for what is involved and like a science channel show, you don’t have to be the best at something to have an interest in it. You will be amazed at what you can accomplish when pride is set aside and you are willing to ask a question. If anyone sees an error in this thread, it was typed at 2am and I welcome any opinions (rare), corrections, or comments that contribute to the topic. I actually did the work on this car and it works fine so dont argue personal values here. If you have tech info and want to share, by all means do so.
PERSONAL VALUES:
Which camp do you fall into:
1-Leave it stock, I came here to look for a new cheap wax to make my car shine.
2-Get a tiny cam so it doesn’t appear that you changed it.
3-Put the biggest cam you can get in it for a big dyno number without more compression so you dont have to fly-cut.
4-Get a small cam so you don’t have to worry about it hitting with milled heads.
5-Get the cam you want and put the dress back in the closet! Make it fit with heads milled, thinner gaskets, and I want the thing to shake with lots of low end TQ! Fly-cut mah sheeet.
6-Get a Ford.
WARNING: those who yap about warranties and can’t handle seeing a CHERRY bone stock Corvette with an EXTENDED WARRANTY get violated, better close this thread. Yes this violates the warranty.
Phil, the owner of the car is a Maryland married guy with an understanding wife that shares his values. She is happy with his hobbies and has a deep understanding of his need to tinker. He is a decent mechanic with the ability and comprehension level appropriate to this level of work. He was given a laundry list of disassembly for his car in preparation for me to install a head/cam package based on the LS3 head and a mid-sized cam which, with the static compression level needed for an 8.7 DCR requiring head milling and thinner gaskets. This made the cam not fit with the needed clearance on the intake valve side. He was in contact with me on the forum and wanted help with his project. Although I am listed as a forum tuner, I am not employed by anyone nor am I in the business of doing installs for money. I have to be a forum tuner in order to offer tuner services for auction to benefit St. Judes Hospital and save kids' lives. I was compensated for travel and expenses associated with prepping the LS3 cylinder heads with milling, port clean-up, and set-up. I traveled to his house for the install 230 miles away. I made a friend.
The H/C package will be another thread once more data is in one the finished project with the owner's input.
MAKING THE CAM FIT:
DEFINITION: FLYCUT / NOTCHING A PISTON- Cutting a space into a piston to allow for the intake valve which has a big cam lobe pushing it toward a piston to have more room without bumping into that piston.
Lets face it, the LS3 heads which are going to be on all GM creations are here to stay and they don’t have much clearance to start life out with. Getting a cam to raise the power is a dancing act between a decent compression w/small cam or a big over-cammed install lacking optimized compression. Valve drop using the stock gaskets is in the .170” territory and getting a big cam in there with both milling and thinner gaskets to get the compression up will not leave you with the required .080” intake and .100” exhaust clearance. The easy-fit line is in the 11.4:1cr range and a 224 cam. If you want a 228 to 238 intake duration cams for the 460 to 517rwhp we have seen from these heads, you will have to flycut if you want a real bootm end that these heads can extract if set-up right.
HOW TO FLYCUT
Flycutting is a simple operation when you know what you’re doing. For those that want to try this type of DIY project themselves, I will give it a 9 out of 10 for DIY difficulty. If you have worked on an engine before, this is doable but there are some do and donts and you best know which donts right up front. DON’T use a power tool for this project the first time you try it. The surface of the stock hypereutectic piston is at its thinnest section 220 thousandths. In most places its over .330” and some its .4”. The critical areas of the pistons are closest to the ring lands and it you cut through there, the piston would then (at least in my house growing up with overzealous boys with fly-cutters) become a Christmas Tree ornament. Santa would then place and order for JE forged pistons to install, which come with huge monster sized reliefs that will allow the use of any cam.
OK, so you took out your sombrero on Saturday morning and went down to the kitchen and poured yourself a glass of milk waiting for your wife (the one who you begged for permission to buy the corvette you are about to rape) and when she wakes up and comes to the kitchen, with the straightest face possible and with a milk mustache (and the sombrero on) you say, “Honey, I’m going to cut reliefs in my pistons on my new car after I take it completely apart AND… I have a stranger coming to live with us for the weekend to help me do it!” At this point she is thinking insanity but the sombrero is your escape should she call you on it but she says ok. Wow, that was easy.
To do this we first need a donor car like this cherry. Behold the 14k mile 2005 C6 with no scratches and stored in a climate controlled envirnment:

OOOH YUH! A bone stock motor sporting some LG headers and a shiny Z06 exhaust. You head out to your 6 car garage you had built as a monument to your greatness and the neighbors’ jealousy and you begin to cannibalize the car until this is what you see in the engine bay:

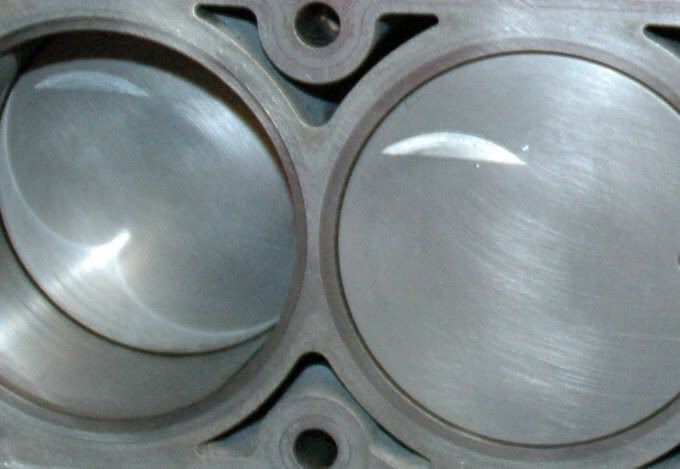
At first glance the uglies on the pistons were removed: The rear pistons were cleaned here:

You think to your self that maybe you made a mistake until the Spinmonster comes to your home in much the same fashion as the Cat in the Hat brought Thing 1 and Thing 2. Out of the truck that did 2500 rpm on the hiway all the way from NY at 70mph while boomin' the bass which sets off car alarms comes a guy that shakes you hand and in 20 minutes swaps the cam out quick like so the real work can begin.
In this first 20 minutes, head mechanic/owner of cherry, was relieved and demoted to assistant fly cut man. Chain back on and cover on, it was on to the cool stuff.
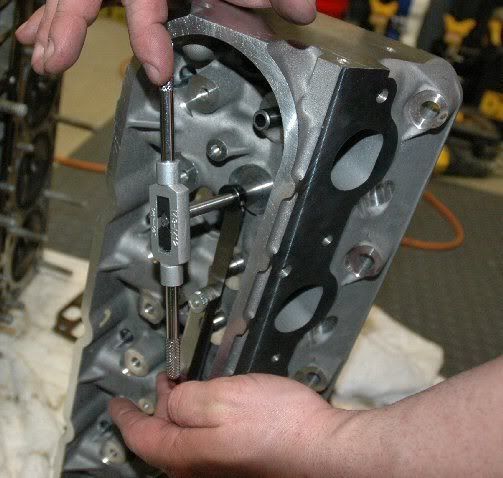
The engine is then prepped for the flycutting. To do this operation, the ISKY fly-cut tool is used. Here is the head with the seat removed and the cutter is installed in one of the 4 positions:

The tool is basically a valve stem with a cutter head where a valve head would be and it goes in a cut up (destroyed) LS3 head which had the seats removed from it. I have different heads for different fly-cut operations. A LS3 head would put the cuts where a LS3 valve would touch the piston and a LS1/LS6 head would be used for a LS1,2,6 motor. The head is then clearanced for the size cutter you need to use. The ls3/l92 valves are 2.16” and you need the next bigger sized cutter which is 2.25”. You remove the seats in the head for the intake valves and using a aluminum cutter bit, you clearance the opening the valve seat was in for the bigger ISKY fly-cutter.
The engine is prepped for the cut by covering everything with garbage bags and using masking tape on the deck surfaces and anywhere else you can get the small amount of metal shavings like this:
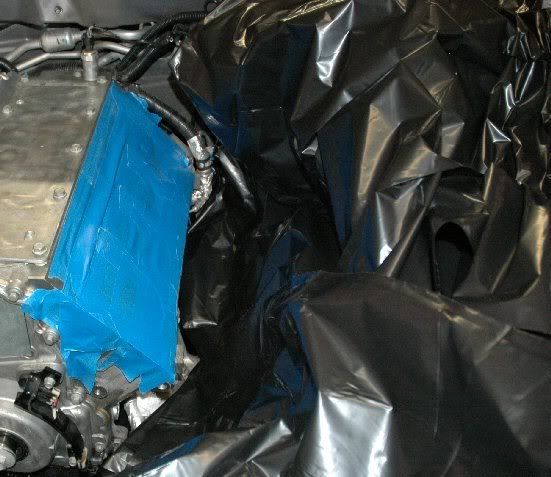
A note to the OCD guy that thinks the amount of metal shavings will be astronomical and cover your entire garage: The amount of metal that comes off is small and the shavings are contained in the combustion chamber until you remove the head after the cut. You vacume it up and NOTHING gets into the engine.
This is the cutter-head on the engine and the cutter will turned by hand with the same handle you use from a tap and dye set. DO NOT USE A POWER TOOL OR AIR TOOL.....DO IT BY HAND
Once the head is actually on the engine there are some issues you need to be aware of as to where the cutter actually makes the cut.
P/V interference is never when the piston is at top dead center. Why is this an issue? The piston is on its way down the cylinder when the intake valve is off the seat during the overlap period. The crank position for intake valve interference is after TDC until about 15 degrees past. The exhaust is in danger of hitting when the piston is approaching TDC from about 15 degrees before until TDC. Now, the fact that the piston isn’t at the top is the issue. The valve isn’t at a right angle to the top of the piston and therefore the place the valve would touch changes cam to cam depending on the height of the piston. This is a trangle formed by the valve, piston head, and an imaginary perpendicular that we drop from the valve stem to the piston. The further down the piston is the lower the valve contact would be. I made this picture to inllustrate:

The red line is if the piston was at TDC and the Blue line is where the valve may touch if the piston was some arbitrary amount of distance down the cylinder. As the piston is farther down the valve would touch further down in the direction of the black arrow. If you actually spin the crank +/- 15 degrees from TDC you will see that the distance is actually only a few thousandths of an inch different and of no concern if you use the size cutter we use here which is 2.25 minus 2.16 = .09/2 or .0045” wider than we need. There is also no gasket here so the cut will be high enough on the piston to not worry about missing the spot where the valve would touch. The wider cut does actually waste some of the precious cutter depth we need. For those that can picture it, the valve may actually touch at the spot where the cut is only .04 deep if you cut .06 at the edge.
In our case we need an added clearance of only 20 thousandths but we will cut 60 thousandths in case Phil wants to use a bigger more manly bumpstick in the future.
HOW DO YOU ADJUST THE DEPTH OF THE CUT?
The cutter stem has a bearing that is adjusted with the head on the car and the cutter is actually lowered to be in contact with the piston. The bearing is tightened down with an allen key. careful not to strip it but make it tight. If it comes loose the cut will go too deep especially for those not watching and using a power toll to spin it. It is best to bolt the head down lightly to compress the tape and get a good measurement. The bearing on the stem is loose and is moved onto the velve stem. The bearing will be spaced away from the valve stem guide using a feeler guage as in this next picture:
The feeler gauge is positioned here only to show you how it is placed for the measurement. This must be done with the head on the car and the cutter in contact with the piston. I used .06” and spaced the bearing that far from the valve stem. This bearing will not allow the cutter to go lower than that distance. Using a mirror and constantly checking that the bearing is tight and correctly placed, you turn the cutter by hand clockwise as in this picture:
The cutter being sharp, makes the cut in about 40-50 turns by hand. Take your time and check a few times. The head cant get closer to the piston because the head deck surface touches the piston. The relief is oversized so it will fit the valve a various heights in case of interference. Check frequently on your first few turns to see the progress you are making. If it takes 2 hours for all 8, fine, if it takes 2 days, fine. Its not a race. The finished cut looks like this and the head gets a cleaning with a vacuumed as does the engine block deck surface every time the cutter head is lifted off. This is what you see (note there is no way the metal can get in the cylinders):
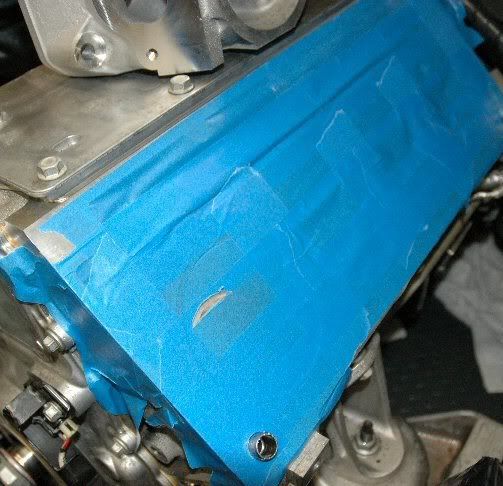
Once you complete the cut, you cover that relief and move to the next up position piston on the other side of the motor. There is no chance of metal shavings getting in the motor if you are meticulous about the clean up. Every opening is guarded as you can see in the picture.
Here is the finished product:
And this is a JE forged piston with 2cc reliefs cut in. Note the intake valve position:

The depth is verified with the feeler gauge in the relief at an angle of course. If its not deep enough put it back on and give it a few more turns.
A day later it looks like this (12 work hours):

And the monkey throws the switch….. it started right up with 42lbs oil pressure and the tune settled right into the idle. Phil was happy with the power and is awaiting 4.10’s on his Z51 to complete what is probably the fastest car he owns. He has a few.
I had a great time meeting some new friends with a love of cars (and gears). I will be back to do a N2O system on the same car after its geared and gets the r-compund tires it will need. It will be minor sized 35 and 50 shots bursts for the upper gears. This car will have 500rwhp and 4.10’s and with the Mickey Thompsons it will be a street bruiser with traction now that it was done up the right way.
Phil, thank you for the nice weekend vacation and the honor of your trust with this project.
I have a dream.....that one day it will say St Jude's Donor under everyone's name.
---------------Make a difference TODAY------------------
How to donate:
1) Personal checks, cashier checks, or money orders, made out to: St. Jude Children's Hospital and mailed to "pewter99,":
Robert Briggs
P.O. Box 17083
Clearwater Fl 33762
Please put your forum name on the memo line of the check
2) paypal: corvettes4stjude@aol.com
3) Go to:
https://waystohelp.stjude.org/sjVPor...9&programId=51
Follow promts, we get credit for this method.
OK, so in the midst of the header and gear wars, I figure its been long enough that we read the same non-sense so lets have another DIY tech thread involving real ways to make cars faster and an actual install with lots of music, grease, and torque wrenches clicking late into the night while the panzies dream about their gas mileage and low RPM’s on the hiway...a joke not a jab.
How to shove a big cam into a LS3 headed car that wont fit it with decent compression without having a piston hit a valve:
DISCLAIMER: This is not a begginer’s first project under the hood. It’s a look at what incredible tuners do to cars to make them run quick times and have awesome street manners with big cams and yet be safe running that big cam and not wreck an engine. When you go to a big name tuner, you should be aware that this type of mod takes experience, knowledge, and common sense too. If you don’t have all 3 of these things don’t try to duplicate what you see here. When you go for a 4x package at Cartek with a 3X cam, they build a high compression motor to smooth out the driveability with compression. That requires the heads to be milled, thinner gaskets and piston clearancing. Cartek does this for breakfast and its second nature and it takes time to learn to do it. Even the best of the best can mess up a measurement. Those companies back their work and what you get is a motor backed by a reputation. Louis at LG had spoken to me at length about this project and ones he is working on, and the thought and planning that goes into a package isn’t remedial nor is it based on your opinion of what he likes. Its based on absolutes and math. If you are an advanced mechanic and want to try such a project, do so with someone around that has done this before. I watched it done for years and messed up my share of practice pistons in dead engines before I was allowed to touch a good one.
PLEASE READ: I get frustrated when people ask me fitment questions about cams. This tech thread is about how you fly cut when a cam doesnt fit. It says nothing about how to check for a cam fitting. Without touching your engine and testing your actual car, no one is going to tell you what fits and what wont fit. The cam can be ground wrong, the heads could be milled if you werent the first owner....ect. Cam specs arent how you tell in a cam fits. You need to test it in person. Please dont PM me with cam specs and ask if the cam fits with xyz milling. You need to do that yourself. As a guide in the quintessential world, a 230XER intake lobe on a 114+1 with 8.7 DCR is the limit of what fits with flycutting. You can fit a bigger cam with less compression. A 234 cam and 8.3 DCR can fit. Its all a trade off. I didnt test every cam out there nor will I vouch that your cam was ground right. There is no way I want that responsibility.
Enjoy the thread and if you want input from me, its free. The piston you mess up isn’t. I post this info here to at a minimum, give people a working respect for what is involved and like a science channel show, you don’t have to be the best at something to have an interest in it. You will be amazed at what you can accomplish when pride is set aside and you are willing to ask a question. If anyone sees an error in this thread, it was typed at 2am and I welcome any opinions (rare), corrections, or comments that contribute to the topic. I actually did the work on this car and it works fine so dont argue personal values here. If you have tech info and want to share, by all means do so.
PERSONAL VALUES:
Which camp do you fall into:
1-Leave it stock, I came here to look for a new cheap wax to make my car shine.
2-Get a tiny cam so it doesn’t appear that you changed it.
3-Put the biggest cam you can get in it for a big dyno number without more compression so you dont have to fly-cut.
4-Get a small cam so you don’t have to worry about it hitting with milled heads.
5-Get the cam you want and put the dress back in the closet! Make it fit with heads milled, thinner gaskets, and I want the thing to shake with lots of low end TQ! Fly-cut mah sheeet.
6-Get a Ford.
WARNING: those who yap about warranties and can’t handle seeing a CHERRY bone stock Corvette with an EXTENDED WARRANTY get violated, better close this thread. Yes this violates the warranty.
Phil, the owner of the car is a Maryland married guy with an understanding wife that shares his values. She is happy with his hobbies and has a deep understanding of his need to tinker. He is a decent mechanic with the ability and comprehension level appropriate to this level of work. He was given a laundry list of disassembly for his car in preparation for me to install a head/cam package based on the LS3 head and a mid-sized cam which, with the static compression level needed for an 8.7 DCR requiring head milling and thinner gaskets. This made the cam not fit with the needed clearance on the intake valve side. He was in contact with me on the forum and wanted help with his project. Although I am listed as a forum tuner, I am not employed by anyone nor am I in the business of doing installs for money. I have to be a forum tuner in order to offer tuner services for auction to benefit St. Judes Hospital and save kids' lives. I was compensated for travel and expenses associated with prepping the LS3 cylinder heads with milling, port clean-up, and set-up. I traveled to his house for the install 230 miles away. I made a friend.
The H/C package will be another thread once more data is in one the finished project with the owner's input.
MAKING THE CAM FIT:
DEFINITION: FLYCUT / NOTCHING A PISTON- Cutting a space into a piston to allow for the intake valve which has a big cam lobe pushing it toward a piston to have more room without bumping into that piston.
Lets face it, the LS3 heads which are going to be on all GM creations are here to stay and they don’t have much clearance to start life out with. Getting a cam to raise the power is a dancing act between a decent compression w/small cam or a big over-cammed install lacking optimized compression. Valve drop using the stock gaskets is in the .170” territory and getting a big cam in there with both milling and thinner gaskets to get the compression up will not leave you with the required .080” intake and .100” exhaust clearance. The easy-fit line is in the 11.4:1cr range and a 224 cam. If you want a 228 to 238 intake duration cams for the 460 to 517rwhp we have seen from these heads, you will have to flycut if you want a real bootm end that these heads can extract if set-up right.
HOW TO FLYCUT
Flycutting is a simple operation when you know what you’re doing. For those that want to try this type of DIY project themselves, I will give it a 9 out of 10 for DIY difficulty. If you have worked on an engine before, this is doable but there are some do and donts and you best know which donts right up front. DON’T use a power tool for this project the first time you try it. The surface of the stock hypereutectic piston is at its thinnest section 220 thousandths. In most places its over .330” and some its .4”. The critical areas of the pistons are closest to the ring lands and it you cut through there, the piston would then (at least in my house growing up with overzealous boys with fly-cutters) become a Christmas Tree ornament. Santa would then place and order for JE forged pistons to install, which come with huge monster sized reliefs that will allow the use of any cam.
OK, so you took out your sombrero on Saturday morning and went down to the kitchen and poured yourself a glass of milk waiting for your wife (the one who you begged for permission to buy the corvette you are about to rape) and when she wakes up and comes to the kitchen, with the straightest face possible and with a milk mustache (and the sombrero on) you say, “Honey, I’m going to cut reliefs in my pistons on my new car after I take it completely apart AND… I have a stranger coming to live with us for the weekend to help me do it!” At this point she is thinking insanity but the sombrero is your escape should she call you on it but she says ok. Wow, that was easy.
To do this we first need a donor car like this cherry. Behold the 14k mile 2005 C6 with no scratches and stored in a climate controlled envirnment:
OOOH YUH! A bone stock motor sporting some LG headers and a shiny Z06 exhaust. You head out to your 6 car garage you had built as a monument to your greatness and the neighbors’ jealousy and you begin to cannibalize the car until this is what you see in the engine bay:
At first glance the uglies on the pistons were removed: The rear pistons were cleaned here:
You think to your self that maybe you made a mistake until the Spinmonster comes to your home in much the same fashion as the Cat in the Hat brought Thing 1 and Thing 2. Out of the truck that did 2500 rpm on the hiway all the way from NY at 70mph while boomin' the bass which sets off car alarms comes a guy that shakes you hand and in 20 minutes swaps the cam out quick like so the real work can begin.
In this first 20 minutes, head mechanic/owner of cherry, was relieved and demoted to assistant fly cut man. Chain back on and cover on, it was on to the cool stuff.
The engine is then prepped for the flycutting. To do this operation, the ISKY fly-cut tool is used. Here is the head with the seat removed and the cutter is installed in one of the 4 positions:
The tool is basically a valve stem with a cutter head where a valve head would be and it goes in a cut up (destroyed) LS3 head which had the seats removed from it. I have different heads for different fly-cut operations. A LS3 head would put the cuts where a LS3 valve would touch the piston and a LS1/LS6 head would be used for a LS1,2,6 motor. The head is then clearanced for the size cutter you need to use. The ls3/l92 valves are 2.16” and you need the next bigger sized cutter which is 2.25”. You remove the seats in the head for the intake valves and using a aluminum cutter bit, you clearance the opening the valve seat was in for the bigger ISKY fly-cutter.
The engine is prepped for the cut by covering everything with garbage bags and using masking tape on the deck surfaces and anywhere else you can get the small amount of metal shavings like this:
A note to the OCD guy that thinks the amount of metal shavings will be astronomical and cover your entire garage: The amount of metal that comes off is small and the shavings are contained in the combustion chamber until you remove the head after the cut. You vacume it up and NOTHING gets into the engine.
This is the cutter-head on the engine and the cutter will turned by hand with the same handle you use from a tap and dye set. DO NOT USE A POWER TOOL OR AIR TOOL.....DO IT BY HAND
Once the head is actually on the engine there are some issues you need to be aware of as to where the cutter actually makes the cut.
P/V interference is never when the piston is at top dead center. Why is this an issue? The piston is on its way down the cylinder when the intake valve is off the seat during the overlap period. The crank position for intake valve interference is after TDC until about 15 degrees past. The exhaust is in danger of hitting when the piston is approaching TDC from about 15 degrees before until TDC. Now, the fact that the piston isn’t at the top is the issue. The valve isn’t at a right angle to the top of the piston and therefore the place the valve would touch changes cam to cam depending on the height of the piston. This is a trangle formed by the valve, piston head, and an imaginary perpendicular that we drop from the valve stem to the piston. The further down the piston is the lower the valve contact would be. I made this picture to inllustrate:
The red line is if the piston was at TDC and the Blue line is where the valve may touch if the piston was some arbitrary amount of distance down the cylinder. As the piston is farther down the valve would touch further down in the direction of the black arrow. If you actually spin the crank +/- 15 degrees from TDC you will see that the distance is actually only a few thousandths of an inch different and of no concern if you use the size cutter we use here which is 2.25 minus 2.16 = .09/2 or .0045” wider than we need. There is also no gasket here so the cut will be high enough on the piston to not worry about missing the spot where the valve would touch. The wider cut does actually waste some of the precious cutter depth we need. For those that can picture it, the valve may actually touch at the spot where the cut is only .04 deep if you cut .06 at the edge.
In our case we need an added clearance of only 20 thousandths but we will cut 60 thousandths in case Phil wants to use a bigger more manly bumpstick in the future.
HOW DO YOU ADJUST THE DEPTH OF THE CUT?
The cutter stem has a bearing that is adjusted with the head on the car and the cutter is actually lowered to be in contact with the piston. The bearing is tightened down with an allen key. careful not to strip it but make it tight. If it comes loose the cut will go too deep especially for those not watching and using a power toll to spin it. It is best to bolt the head down lightly to compress the tape and get a good measurement. The bearing on the stem is loose and is moved onto the velve stem. The bearing will be spaced away from the valve stem guide using a feeler guage as in this next picture:
The feeler gauge is positioned here only to show you how it is placed for the measurement. This must be done with the head on the car and the cutter in contact with the piston. I used .06” and spaced the bearing that far from the valve stem. This bearing will not allow the cutter to go lower than that distance. Using a mirror and constantly checking that the bearing is tight and correctly placed, you turn the cutter by hand clockwise as in this picture:
The cutter being sharp, makes the cut in about 40-50 turns by hand. Take your time and check a few times. The head cant get closer to the piston because the head deck surface touches the piston. The relief is oversized so it will fit the valve a various heights in case of interference. Check frequently on your first few turns to see the progress you are making. If it takes 2 hours for all 8, fine, if it takes 2 days, fine. Its not a race. The finished cut looks like this and the head gets a cleaning with a vacuumed as does the engine block deck surface every time the cutter head is lifted off. This is what you see (note there is no way the metal can get in the cylinders):
Once you complete the cut, you cover that relief and move to the next up position piston on the other side of the motor. There is no chance of metal shavings getting in the motor if you are meticulous about the clean up. Every opening is guarded as you can see in the picture.
Here is the finished product:
And this is a JE forged piston with 2cc reliefs cut in. Note the intake valve position:
The depth is verified with the feeler gauge in the relief at an angle of course. If its not deep enough put it back on and give it a few more turns.
A day later it looks like this (12 work hours):
And the monkey throws the switch….. it started right up with 42lbs oil pressure and the tune settled right into the idle. Phil was happy with the power and is awaiting 4.10’s on his Z51 to complete what is probably the fastest car he owns. He has a few.
I had a great time meeting some new friends with a love of cars (and gears). I will be back to do a N2O system on the same car after its geared and gets the r-compund tires it will need. It will be minor sized 35 and 50 shots bursts for the upper gears. This car will have 500rwhp and 4.10’s and with the Mickey Thompsons it will be a street bruiser with traction now that it was done up the right way.
Phil, thank you for the nice weekend vacation and the honor of your trust with this project.
Last edited by SpinMonster; 10-10-2020 at 09:44 PM.
 04-14-2008, 02:42 AM
#2
Melting Slicks

Member Since: May 2005
Location: Brownsville Tx
Posts: 2,231
Likes: 0
Received 0 Likes
on
0 Posts

Wow that was an awesome project and an incredible report!!!! The introduction was a blast!!!! Guy, you DEFINITELY have a writer buried in you somewhere.
By the way, whats wrong with your car?? 2500 rpm on the highway doing 70mph is WAY TOO HIGH!! Did it explode?
By the way, whats wrong with your car?? 2500 rpm on the highway doing 70mph is WAY TOO HIGH!! Did it explode?
Last edited by jogar80; 04-14-2008 at 02:46 AM.

 04-14-2008, 03:28 AM
#5
Team Owner


 Noooo!
  The LSx motors are NOT to be run at any RPM over 1600 or else the crank will seize!
 04-14-2008, 03:36 AM
#6
Tech Contributor
Thread Starter
Ford #1: Maybe Ya'll GM guys should step up.
Last edited by SpinMonster; 04-14-2008 at 05:40 AM.
 04-14-2008, 08:12 AM
#9
Safety Car

Member Since: Jul 2006
Location: Objects in your mirror are losing , Long Island, NY
Posts: 4,647
Likes: 0
Received 1 Like
on
1 Post
St. Jude Donor '08
Great right up. Thanks for sharing Guy, Maybe "Rock N Blue 08" can provide a few tech tips in flycutting pistons..
04-14-2008, 08:27 AM
#10
Somba master


Thanks for the write-up, Guy.
When LG did my L92, L76 head and cam setup, I wasn't around the shop all the time, and wasn't aware they needed to do flycutting for the cam they used. This explains why it took longer than I thought it would.
GM
When LG did my L92, L76 head and cam setup, I wasn't around the shop all the time, and wasn't aware they needed to do flycutting for the cam they used. This explains why it took longer than I thought it would.
GM
04-14-2008, 08:36 AM
#11
Pro


Great post spin, thanks for sharing
A couple questions:
How do you check p/v clearance with the heads still on? I'm guessing you could install light "checking" springs on the valves and a dial indicator on the rocker tip and rotate motor to max valve lift and then push valve down until it hits the piston while watching indicator?
Steering rack question: Did you guys just unbolt the rack and move it out of the way in there, instead of pulling it out the drivers side wheel well.
Thanks again
04-14-2008, 08:46 AM
#12
Melting Slicks
Member Since: Feb 2006
Location: Eastern PA:ECS Paxton Novi 1500(676rwhp,585tq on stock engine),LG headers, 410's, Corsa Sports, ECS Alky Kit
Posts: 2,007
Likes: 0
Received 0 Likes
on
0 Posts
St. Jude Donor '08-'09
Awesome project, although I wont be going that route on my car (I'm finished for now) I love to read about this stuff and learn something. Thanks Spin for the education.
04-14-2008, 08:56 AM
#13
Burning Brakes

 Very nice write up Spin. Great info for some who have never seen this before or even for those of us who have, a nice refresher course. Thanks, Joe
04-14-2008, 09:02 AM
Very nice write up Spin. Great info for some who have never seen this before or even for those of us who have, a nice refresher course. Thanks, Joe
04-14-2008, 09:02 AM
#14
Tech Contributor
Thread Starter
Great post spin, thanks for sharing
A couple questions:
How do you check p/v clearance with the heads still on? I'm guessing you could install light "checking" springs on the valves and a dial indicator on the rocker tip and rotate motor to max valve lift and then push valve down until it hits the piston while watching indicator?
Steering rack question: Did you guys just unbolt the rack and move it out of the way in there, instead of pulling it out the drivers side wheel well.
Thanks again
A couple questions:
How do you check p/v clearance with the heads still on? I'm guessing you could install light "checking" springs on the valves and a dial indicator on the rocker tip and rotate motor to max valve lift and then push valve down until it hits the piston while watching indicator?
Steering rack question: Did you guys just unbolt the rack and move it out of the way in there, instead of pulling it out the drivers side wheel well.
Thanks again
the method you note wont work because the heads not comming off doesnt let you use a solid lifter to get a true measurement. Since the head comes off the clay method is easy enough. In general it has been found that a 228 xer cam with a 114lsa no advance is .050 off the seat at TDC and the valve drop for the stock head unmilled, with the stock gasket is about .170". The intake clearance is therefore .120 by this method and it fits. Milling the heads .030 is then down to .090" which still fits. If you advance the cam or tighten the LSA the distance gets too tight. A thinner gasket, milled heads, and 113LSa with 1 degree advance now reqires a flycut. If you cut then cut....
The cam size isnt as limited when choosing the cam for a notched piston. A guy that wouldnt go over a 224 cam wouldnt mind going to a 234 cam if he could run decent compression.
I am not starting wars but I bet If I checked the cams being used for near 500rwhp performance in an LS3 without removing the heads, many would fail to show a minimum clearance of .080". I know one tuner that stated they measured such a cam in one motor and it was a .034" clearance which is not safe. Since cam specs are top secret there is no way to do the math on a cam to determine a rough approximation of how bad things are unless the car is there to measure the clearance. If the heads didnt come off the car, the clearance wasnt checked since the lifters couldnt be accessed.
This is on the isky website...search is your friend.
The steering rack was moved to the passenger side just out of the way.
Last edited by SpinMonster; 04-14-2008 at 09:04 AM.
04-14-2008, 09:51 AM
#16
Safety Car

Excellent write up, Ive been getting lots of PMs about this, it should be a great learning thread for many guys.
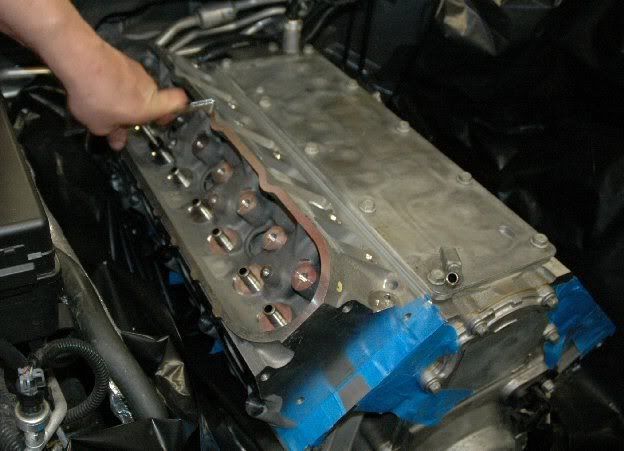
INTERESTING TO NOTE FOR EVERYONE:
For all those people that think a catch can is a waste of time, phony hype, etc - note the carbon build up on the two pistons not yet cleaned up. This is on a low mileage motor and is mostly caused by the PCV system introducing oil into the intake manifold. For all the naysayers who think if it were necessary, GM would have added one, here is physical proof that your engine is slowly losing performance, as those deposits are going to cause knock retard, pull timing, and hence lose power. This was with 14K miles, think of what it is like by 40K-50K miles!
 04-14-2008, 10:10 AM
#18
Tech Contributor
I wonder if Lou's done this? Is there enough meat in the pistons to safely cut enough to clear?
Tell Craigster to man up to the big stick!
 I believe he's next on your list anyway so you could kill 2 birds with a stone...
PS I agree with Dennis, you really should consolidate all your helpful threads into a website like Ls1howto.com (one of my favorite resources). That would be a great service, and I would happily donate $ to website upkeep.
04-14-2008, 10:23 AM
#19
Burning Brakes
Member Since: Jan 2005
Location: Baltimore MD
Posts: 1,027
Likes: 0
Received 0 Likes
on
0 Posts
St. Jude Donor '08
First, thank you for making the trip down! I can't begin to explain how fortunate I was to have you involved in this project. You are a rare mix of a mechanical genius and a genuinely great person that loves to teach. I learned so much this weekend that my head still hurts a little...but that goes away as soon as I start the C6!
Where to begin with the car? First, I'll admit I was a tiny bit nervous about tearing apart my engine and cutting on the pistons. I had visions of shavings flying all over the place. It also doesn't help when you tell people what you are planning and the usual response is:
"WHAT! Your going to flycut without pulling the engine! Are you nuts???"
As you can see from the pictures there was nothing to worry about. The process went very smoothly and by the time Guy started cutting on the second piston all of my worries were 100% gone. The assembly went great and I am really impressed by the LS engine. GM got it right this time!
Time to fire it up for the first time. Again, I was a little nervous but that quickly went away when Guy hit the button and it fired right up. It sounded incredible too! Not too outrageous but it has a very, very nice sound with the perfect amount of lope. I have the M2W system with Z06 dual mode mufflers so when the exhaust is closed it sounds almost stock. Open the flaps and it sounds very mean!
Now on to the road test and tuning. I was impressed immediately by how hard the car pulled. Guy just smiled and went to work with the laptop and it kept getting quicker and sounding better and better. The end result was amazing. The car pulls like crazy and the icing on the cake is my MPG went up.
Thank you again Guy!!
04-14-2008, 10:30 AM
#20
Safety Car
Glad it worked out, Phil....Sorry I had other commitments and couldn't make it with Guy (I'm Thing#2  )....I hear it's a stump pulling monster now...just wait until you add the 4.10s!
We do need a sound and/or video clip....so please if you get a chance, help us all drool a little more!
)....I hear it's a stump pulling monster now...just wait until you add the 4.10s!We do need a sound and/or video clip....so please if you get a chance, help us all drool a little more!