
New build - ProCharger F-1A / 365ci / LSA / E85 [*UPDATE* 915whp/815wtq]
 02-11-2013, 04:07 PM
#1
Safety Car

Thread Starter


The basics on the build are:
Gen IV 6.0L iron block
Stock crank
Eagle H-beam rods with ARP 2000 bolts
Wiseco pistons (4.005 bore, -3.2cc, ~10:1)
ARP main studs
ARP head studs
LS9 head gaskets
Lightly ported LSA heads
226/238 115+3 cam
Custom E85 fuel system (z06 in-tank pump + Magnafuel 750, Bosch 127lb injectors, -8AN feed/-6AN return)
ProCharger F-1A w/ 4.0 pulley, 8-rib direct drive w/ IW 8" crank pulley
McLeod RXT clutch
Time to get started:

Removed the exhaust and trans tunnel brace to get the trans and torque tube ready to drop, plus pulled some misc. blower parts:


Pulled the D1SC blower:


Upgrading to the F-1A

Intake manifold, fuel rail, wiring loom, ect. removed:

Shifter removed, shocks/control arms/e-brake/misc. disconnected.. pretty much ready to drop:

Disconnected the brake line that ran through the cradle and capped it:

Removed the rear cradle with diff/trans and torque tube:


Split the tranny from the rear cradle to replace the tail shaft housing seal that was leaking and install the ECS diff brace:


Engine out:

Dropped the fuel tanks to begin building the fuel system:

Pulled the fuel level sender off my original pump assembly to reuse on the new Z06 one... kind of a pain to split it out of the harness, but I guess that's how GM does it since they don't come as a package (driver side pump on the left, passenger on the right):


Replaced the pressure regulator in the passenger side fuel pump with a bypass to send fuel back to the driver side tank at all times no matter what the base fuel pressure is set at:


Replaced the pressure regulator in the driver side fuel pump with a cap to regulate at the rail:


Installed the bulkhead fittings in the driver tank:

Installing the driver side fuel pump was kind of a bitch� the string trick worked pretty well though:


Reinstalled the fuel tanks:

Built the fuel system for the rear section. Stock pump feeds the �Y� below 3psi, then above 3psi, both pumps are running. The fuel return uses the stock feed line:


Found some copper pipe foam insulation for the fuel line so it won�t rattle in the rocker:

Modified the accessory bracket for the Dallas Performance direct drive system:

New parts�
Picked up a set of Bosch 127lb/hr injectors:

McLeod RXT clutch w/ aluminum flywheel and arp hardware:

Innovators West 8� 8-rib balancer:

Tial 50mm bov with 11psi spring. The plan is to keep my original proflo bypass valve pre-intercooler to vent at part throttle, then the Tial will release the large build up of pressure on shifts:

Welded a flange to my end tank for the Tial 50mm:


Upgrading from a Z51 oil cooler to Z06 oil cooler:

Both installed:


New motor unwrapped and mounted on the engine stand:

Installed and degreed the cam and installed the rear cover:


3-bolt LS9 specs

3-bolt LS7 specs

I just went with the LS9 specs
Comp Cams 4796 degree kit:

Gauge zeroed off the lobe:

Indicator at max lift:

Indicator zeroed at max lift:

.050" on the opening side:

Degree wheel reading .050" on the opening side:

.050" on the closing side:
Degree wheel reading .050" on the closing side:

My measurements indicate the cam is retarded 1*, which should be fine

Even though I'm keeping a 3.622" stroke, the aftermarket rods and ARP bolts need extra clearance from the windage tray, so my motor was built w/ an LS7 tray. This doesn't work out of the box with the LS3 oil pick up though, so I had to cut out a window in the windage tray for the pick up bracket to fit, then modify the bracket base to fit in the pocket.

Shortblock finshed and ready for the heads:

Ported LSA heads:

Intake before/after:

Exhaust after:

LS9 gaskets on:

Had to grind this small bump on each side of the LS3 manifold to fit the LSA heads:

Installed the front steam vent from a truck on the back of my heads to vent all 4 corners:

Heads installed, intake manifold fitment tested� and blower on just because it looks cool : )

Ready to drop the motor in next. After realizing that there are a few differences on mounting points on the gen 4 iron block, I installed everything as it will be in the car to make sure it went together ok and there weren't any surprises.
First problem, the iron block doesn't have a hole that must exist on whatever car Dallas Performance used create their direct drive system.


I guess I'll just skip it... I actually needed that hole to zip tie my cam position sensor wire anyways since the metal mounting bracket/shield won't work w/ the larger balancer.
Everything put together on the stand to check for any other discrepancies

Pretty handy tool on a blower car, Gates laser alignment tool

Calibration was a little off out of the box, so I had to dial it in

Example of a 'good' pulley w/ the light hitting the 2nd ridge from the front

Example of a 'bad' pulley with the light falling in the groove before the 2nd ridge from the front

I'll need to shim the blower pulley closer to the motor to get it lined up just right
I got a larger tensioner idler as part of my f1a upgrade, but it seems to be out of wack too... probably need to call procharger and see if that's even their part and see what I should be running on the 8 rib.

Guy on LS1tech makes these little flywheel lock tools... very cheap and gets the job done

Torqued the balancer to final specs w/ some red thread lock and now it's ready to go in (hopefully I can wiggle it in w/ everything installed as is, otherwise I'll have to remove some accessories)

Gen IV 6.0L iron block
Stock crank
Eagle H-beam rods with ARP 2000 bolts
Wiseco pistons (4.005 bore, -3.2cc, ~10:1)
ARP main studs
ARP head studs
LS9 head gaskets
Lightly ported LSA heads
226/238 115+3 cam
Custom E85 fuel system (z06 in-tank pump + Magnafuel 750, Bosch 127lb injectors, -8AN feed/-6AN return)
ProCharger F-1A w/ 4.0 pulley, 8-rib direct drive w/ IW 8" crank pulley
McLeod RXT clutch
Time to get started:
Removed the exhaust and trans tunnel brace to get the trans and torque tube ready to drop, plus pulled some misc. blower parts:
Pulled the D1SC blower:
Upgrading to the F-1A
Intake manifold, fuel rail, wiring loom, ect. removed:
Shifter removed, shocks/control arms/e-brake/misc. disconnected.. pretty much ready to drop:
Disconnected the brake line that ran through the cradle and capped it:
Removed the rear cradle with diff/trans and torque tube:
Split the tranny from the rear cradle to replace the tail shaft housing seal that was leaking and install the ECS diff brace:
Engine out:
Dropped the fuel tanks to begin building the fuel system:
Pulled the fuel level sender off my original pump assembly to reuse on the new Z06 one... kind of a pain to split it out of the harness, but I guess that's how GM does it since they don't come as a package (driver side pump on the left, passenger on the right):
Replaced the pressure regulator in the passenger side fuel pump with a bypass to send fuel back to the driver side tank at all times no matter what the base fuel pressure is set at:
Replaced the pressure regulator in the driver side fuel pump with a cap to regulate at the rail:
Installed the bulkhead fittings in the driver tank:
Installing the driver side fuel pump was kind of a bitch� the string trick worked pretty well though:
Reinstalled the fuel tanks:
Built the fuel system for the rear section. Stock pump feeds the �Y� below 3psi, then above 3psi, both pumps are running. The fuel return uses the stock feed line:
Found some copper pipe foam insulation for the fuel line so it won�t rattle in the rocker:
Modified the accessory bracket for the Dallas Performance direct drive system:
New parts�
Picked up a set of Bosch 127lb/hr injectors:
McLeod RXT clutch w/ aluminum flywheel and arp hardware:
Innovators West 8� 8-rib balancer:
Tial 50mm bov with 11psi spring. The plan is to keep my original proflo bypass valve pre-intercooler to vent at part throttle, then the Tial will release the large build up of pressure on shifts:
Welded a flange to my end tank for the Tial 50mm:
Upgrading from a Z51 oil cooler to Z06 oil cooler:
Both installed:
New motor unwrapped and mounted on the engine stand:
Installed and degreed the cam and installed the rear cover:
3-bolt LS9 specs
3-bolt LS7 specs
I just went with the LS9 specs
Comp Cams 4796 degree kit:
Gauge zeroed off the lobe:
Indicator at max lift:
Indicator zeroed at max lift:
.050" on the opening side:
Degree wheel reading .050" on the opening side:
.050" on the closing side:
Degree wheel reading .050" on the closing side:
My measurements indicate the cam is retarded 1*, which should be fine
Even though I'm keeping a 3.622" stroke, the aftermarket rods and ARP bolts need extra clearance from the windage tray, so my motor was built w/ an LS7 tray. This doesn't work out of the box with the LS3 oil pick up though, so I had to cut out a window in the windage tray for the pick up bracket to fit, then modify the bracket base to fit in the pocket.
Shortblock finshed and ready for the heads:
Ported LSA heads:
Intake before/after:
Exhaust after:
LS9 gaskets on:
Had to grind this small bump on each side of the LS3 manifold to fit the LSA heads:
Installed the front steam vent from a truck on the back of my heads to vent all 4 corners:
Heads installed, intake manifold fitment tested� and blower on just because it looks cool : )
Ready to drop the motor in next. After realizing that there are a few differences on mounting points on the gen 4 iron block, I installed everything as it will be in the car to make sure it went together ok and there weren't any surprises.
First problem, the iron block doesn't have a hole that must exist on whatever car Dallas Performance used create their direct drive system.
I guess I'll just skip it... I actually needed that hole to zip tie my cam position sensor wire anyways since the metal mounting bracket/shield won't work w/ the larger balancer.
Everything put together on the stand to check for any other discrepancies
Pretty handy tool on a blower car, Gates laser alignment tool
Calibration was a little off out of the box, so I had to dial it in
Example of a 'good' pulley w/ the light hitting the 2nd ridge from the front
Example of a 'bad' pulley with the light falling in the groove before the 2nd ridge from the front
I'll need to shim the blower pulley closer to the motor to get it lined up just right
I got a larger tensioner idler as part of my f1a upgrade, but it seems to be out of wack too... probably need to call procharger and see if that's even their part and see what I should be running on the 8 rib.
Guy on LS1tech makes these little flywheel lock tools... very cheap and gets the job done
Torqued the balancer to final specs w/ some red thread lock and now it's ready to go in (hopefully I can wiggle it in w/ everything installed as is, otherwise I'll have to remove some accessories)
Last edited by turbotuner20v; 03-09-2013 at 03:11 PM.


 02-11-2013, 05:19 PM
#5
Safety Car
Thread Starter
02-11-2013, 05:38 PM
#6


Good looking build.
02-11-2013, 06:15 PM
#7

Love it so far, can't wait to see that thing rolling in tx 
Only thing I would think about doing is making sure you have enough fuel for e85 (not sure what your shooting for) seems to be good for 850 at least. Also I would highly recommend swapping to the z06 output shaft while you have it out. It seems to be the first thing that breaks on lottts of these builds.
Only thing I would think about doing is making sure you have enough fuel for e85 (not sure what your shooting for) seems to be good for 850 at least. Also I would highly recommend swapping to the z06 output shaft while you have it out. It seems to be the first thing that breaks on lottts of these builds.
02-11-2013, 06:33 PM
#8
Safety Car
Thread Starter
Love it so far, can't wait to see that thing rolling in tx
Only thing I would think about doing is making sure you have enough fuel for e85 (not sure what your shooting for) seems to be good for 850 at least. Also I would highly recommend swapping to the z06 output shaft while you have it out. It seems to be the first thing that breaks on lottts of these builds.
Only thing I would think about doing is making sure you have enough fuel for e85 (not sure what your shooting for) seems to be good for 850 at least. Also I would highly recommend swapping to the z06 output shaft while you have it out. It seems to be the first thing that breaks on lottts of these builds.
Is the output shaft breaking a c5 or a c6 thing? I know the c5's had a weird under cut that weakend them, but I hadn't heard much about the C6's. I broke an main shaft w/ 420whp na though, so who knows how long it'll last... I'm just going to roll the dice and upgrade if it gives me any problems.
 02-11-2013, 06:42 PM
#10
Safety Car
Thread Starter
 Bang for the buck is a good way to sum up the build. It's not thrown together w/ a bunch of cheap stuff, but it's not a blank check build either. I think I hit a pretty good spot w/ the parts list and it should make for a fun car to play around with.
02-11-2013, 08:38 PM
Bang for the buck is a good way to sum up the build. It's not thrown together w/ a bunch of cheap stuff, but it's not a blank check build either. I think I hit a pretty good spot w/ the parts list and it should make for a fun car to play around with.
02-11-2013, 08:38 PM
#12
Le Mans Master


Nice write up and build. You spent a lot of time taking pictures, More than I wanted to do on my build. I would of torqued the camshaft gear bolts a little more than that specs you have posted on step nine, at least you used red loctite. The engine should go in with all front accessories from the top with no problems, I just installed mine from the top last week with the blower, p/s, alt. and flip drive with no issues. It was a little tight by the abs unit. I had the bellhousing installed on the engine also. Good luck with the build, It is looking great. BTW who did you order the injectors from? I am looking at a set from Arun for mine.
 02-11-2013, 09:10 PM
#14
Safety Car
Thread Starter
Nice write up and build. You spent a lot of time taking pictures, More than I wanted to do on my build. I would of torqued the camshaft gear bolts a little more than that specs you have posted on step nine, at least you used red loctite. The engine should go in with all front accessories from the top with no problems, I just installed mine from the top last week with the blower, p/s, alt. and flip drive with no issues. It was a little tight by the abs unit. I had the bellhousing installed on the engine also. Good luck with the build, It is looking great. BTW who did you order the injectors from? I am looking at a set from Arun for mine.
 02-11-2013, 11:05 PM
#16
Drifting

Yea, it takes some extra time to snap the pics, but its fun to have a record of the build. I know the cam bolt topic is highly debated and worried about, but I think using new factory bolts with built in thread lock, new clean cam and new sprocket, plus torquing to the higher ls9 value will be fine. That's good to hear on the motor install, I just have my flywheel on, so it should be easy. I got the cam kit and injectors from Arun.
 Nice job but I don't know if my 2 cents can worth anything, I hope it do, maybe as everything is out now you can upgrade the headers to 2", only because power is an addiction and eventually you will want to get the most out of it, the 2" headers by ARH is what I used after removing my 1 3/4". I just believe its best to do it now while everything is out and while the upgrading spirit is in you and the green is spending. Always remember your used set can sell very fast to help offset the new price.
 02-11-2013, 11:06 PM
#17
Safety Car
Solid build. Can't wait to see how it all turns out. Really interested to see how you like that clutch cause I'm about ready to get rid of mine but it will have to wait until after TX2K13.
02-11-2013, 11:10 PM
#18
Le Mans Master
Bravo to you, nice write up also.
Maybe it's not too late, but you can save yourself a lot of time bolting everything together & lowering the car down on it like this.
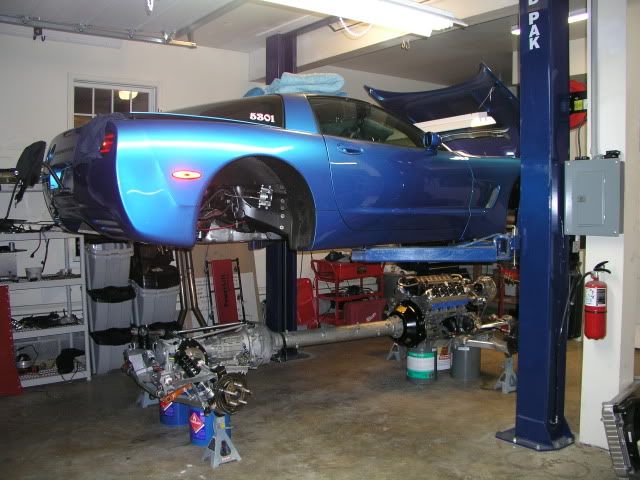
Maybe it's not too late, but you can save yourself a lot of time bolting everything together & lowering the car down on it like this.
02-11-2013, 11:19 PM
#19
Drifting
and he will also have to crawl under the car to catch up the cradle nuts.
02-11-2013, 11:23 PM
#20
Safety Car
Thread Starter
I looked at doing it like that but didn't want to jack with the brake lines and stuff up front. So far out the top hasn't been bad at all. The rear portion is pretty easy to manage on my table too.