
How to kill the Procharger heat monster...
 07-23-2006, 05:56 PM
#1
Melting Slicks

Thread Starter


Well after reading and seeing my temps in the 230's at times I decided
to kill this heat monster .Read on and see how I did this. After the modification I made and getting it all back together I took my vette out for a drive. Before I was not able to drive my vette with the A/C running and be able to keep the temps down under 230' and 219' without the A/C. Now I was able to keep the temp at 185' without the A/C and 198' with the A/C running out side temp was 98'. I pushed the vette for a hour on and off and the highest I seen it go was 198'.
Yes I have killed the Heat monster.
Step 1. Remove front bumper cover.
Tools needed- 8mm,10mm socket and a flat head screw driver.
You will have 4 screws at the top holding the top of the nose. 8mm
You will have to pull the fender plastic push in clips from each side. s/d
Remove all screws at the bottom,side air dams and brake air duct.
8mm,10mm
Disconect the fog lights and side blinkers.
Now at the front of the fender where you took the plastic push in clips out by the side markers you will need to remove 2 10mm nuts to drop the nose clip on each side.
Lay a towel down right over the vette badge. This is to keep the hood from scratching the top of the bumper.
Pull up and back at the top where you took the 4 screws out and at each corner by the lights you will have to pop it out of the clips.
Now find you a safe area to store you bumper and all other parts removed out of the way.

Step 2. Remove the styrafoam nose from the front,you will need to do this to give you room to work.
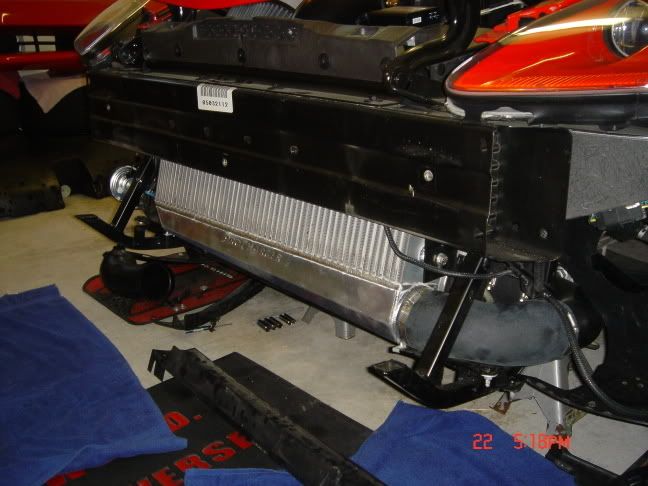
Now look at the intercooler and the air dam.
This is way our vettes run so damn hot with a blower! You have no air flow at all going to the A/C condenser or radiator.The intercooler is hogging it all up. Man Law: Intercooler must share the air.
Step 3. Remove all of the plumbing from the top of the intercooler. s/d
Step 4. Remove the plumbing from the bottom of the intercooler. s/c
Step 5. Now on each side of the intercooler you will have 2- 9/16 bolts.
Remove them and then remove the intercooler out of the way.Put it out of the way so that it will not get damaged!
Step 6. Time to cut! Don't be afraid it's just aluminum.
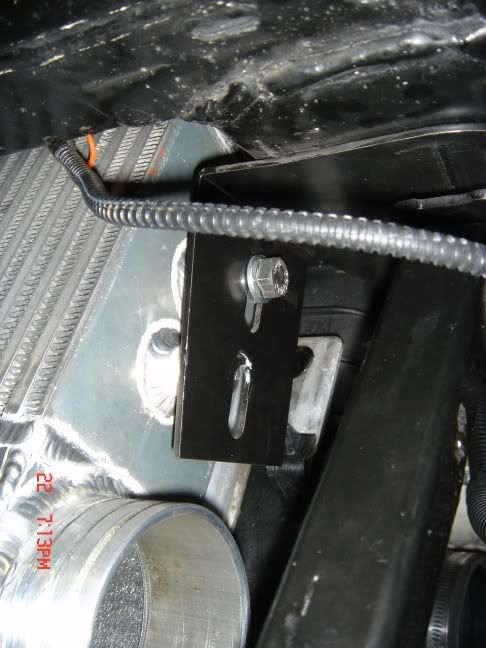
Mark 1.5 inches from the bottom up and then mark 3.5 inches up from the first mark on the skid frame bracket. Hacksaw or cutting wheel.
[IMG]http://img.photobucket.com/albums/v317/bigbollas/DSC01416.jpg
[/IMG]
As you can see in the pic when you move the intercooler forward it will intersect with the skid frame by about a half inch. This is what you will need to remove in order to make this work. Now you can cut this the way I did"the hard way" or just cut this section out completly and then go get you a 3/8 thick flat bar of aluminum at the Home Depot cut it to fit,tap some holes and bolt it back together. You will save your self alot of time by doing it this way and get the same results.
Make sure you file the edges of the cuts you made so that it does not cut in to the rubber 90. This is what it should look like when done.

Step 7. Time to put it all back together. Slip the intercooler back in to place and install 2 top bolts hand tight. Now install the rubber 90 on to the intercooler,install the upper rubber coupler to the top of the intercooler.Now you want to pull the bottom of the intercooler forward and tighten the bolts up on the intercooler.
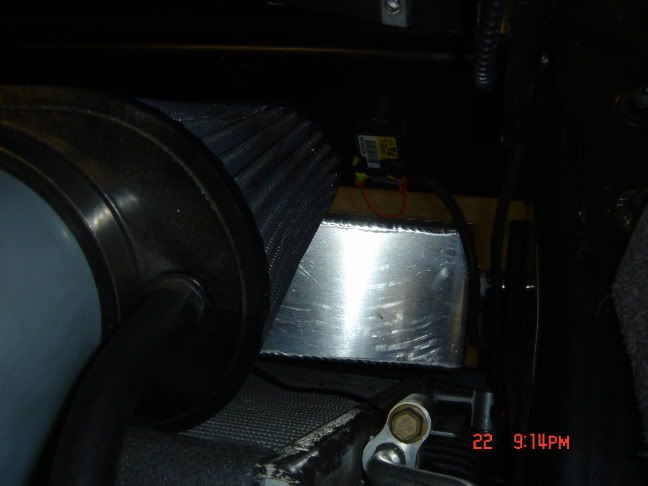
This is how it should be at the bottom.Look at that big air gap!


This is the front of the intercooler.
I will have to repost so that I can post more pics. Look for part 2.
to kill this heat monster .Read on and see how I did this. After the modification I made and getting it all back together I took my vette out for a drive. Before I was not able to drive my vette with the A/C running and be able to keep the temps down under 230' and 219' without the A/C. Now I was able to keep the temp at 185' without the A/C and 198' with the A/C running out side temp was 98'. I pushed the vette for a hour on and off and the highest I seen it go was 198'.
Yes I have killed the Heat monster.
Step 1. Remove front bumper cover.
Tools needed- 8mm,10mm socket and a flat head screw driver.
You will have 4 screws at the top holding the top of the nose. 8mm
You will have to pull the fender plastic push in clips from each side. s/d
Remove all screws at the bottom,side air dams and brake air duct.
8mm,10mm
Disconect the fog lights and side blinkers.
Now at the front of the fender where you took the plastic push in clips out by the side markers you will need to remove 2 10mm nuts to drop the nose clip on each side.
Lay a towel down right over the vette badge. This is to keep the hood from scratching the top of the bumper.
Pull up and back at the top where you took the 4 screws out and at each corner by the lights you will have to pop it out of the clips.
Now find you a safe area to store you bumper and all other parts removed out of the way.
Step 2. Remove the styrafoam nose from the front,you will need to do this to give you room to work.
Now look at the intercooler and the air dam.
This is way our vettes run so damn hot with a blower! You have no air flow at all going to the A/C condenser or radiator.The intercooler is hogging it all up. Man Law: Intercooler must share the air.
Step 3. Remove all of the plumbing from the top of the intercooler. s/d
Step 4. Remove the plumbing from the bottom of the intercooler. s/c
Step 5. Now on each side of the intercooler you will have 2- 9/16 bolts.
Remove them and then remove the intercooler out of the way.Put it out of the way so that it will not get damaged!
Step 6. Time to cut! Don't be afraid it's just aluminum.
Mark 1.5 inches from the bottom up and then mark 3.5 inches up from the first mark on the skid frame bracket. Hacksaw or cutting wheel.
[IMG]http://img.photobucket.com/albums/v317/bigbollas/DSC01416.jpg
[/IMG]
As you can see in the pic when you move the intercooler forward it will intersect with the skid frame by about a half inch. This is what you will need to remove in order to make this work. Now you can cut this the way I did"the hard way" or just cut this section out completly and then go get you a 3/8 thick flat bar of aluminum at the Home Depot cut it to fit,tap some holes and bolt it back together. You will save your self alot of time by doing it this way and get the same results.
Make sure you file the edges of the cuts you made so that it does not cut in to the rubber 90. This is what it should look like when done.
Step 7. Time to put it all back together. Slip the intercooler back in to place and install 2 top bolts hand tight. Now install the rubber 90 on to the intercooler,install the upper rubber coupler to the top of the intercooler.Now you want to pull the bottom of the intercooler forward and tighten the bolts up on the intercooler.
This is how it should be at the bottom.Look at that big air gap!
This is the front of the intercooler.
I will have to repost so that I can post more pics. Look for part 2.
Last edited by big bollas; 08-16-2006 at 10:00 PM.
 07-23-2006, 06:10 PM
#2
Heel & Toe

Member Since: Jul 2006
Location: Cave Creek AZ
Posts: 15
Likes: 0
Received 0 Likes
on
0 Posts
So how did you conqueror the Procharger heat monster. I live in Phx, AX where it is 110 plus in the summer (116 degrees yesterday). I cant imagine driving in AZ without the AC.
Are you using 160 thermo, enlarged racing ratiator, or what??
Are you using 160 thermo, enlarged racing ratiator, or what??
07-23-2006, 09:04 PM
#3
Melting Slicks
Thread Starter
Part 2.
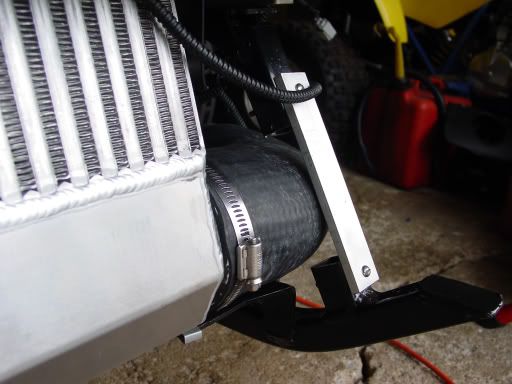
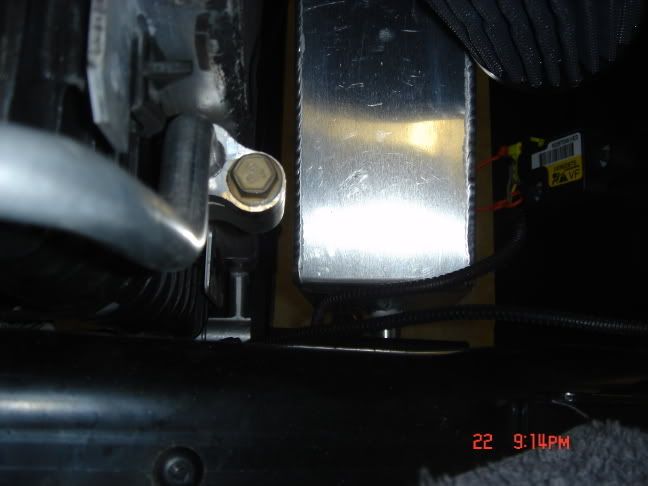
This is the back side of the intercooler. look at the gap now between the air dam and the intercooler.

Now finish bolting up the bottom plumbing to the intercooler.
This is how it should look.

This is how it should look like from the top.Look at just how much more air flow you will be getting. Air dam will kick up air for the A/C and RAD.
Intercooler will draw cool air from the front and you will now be getting fresh air to the air filter.
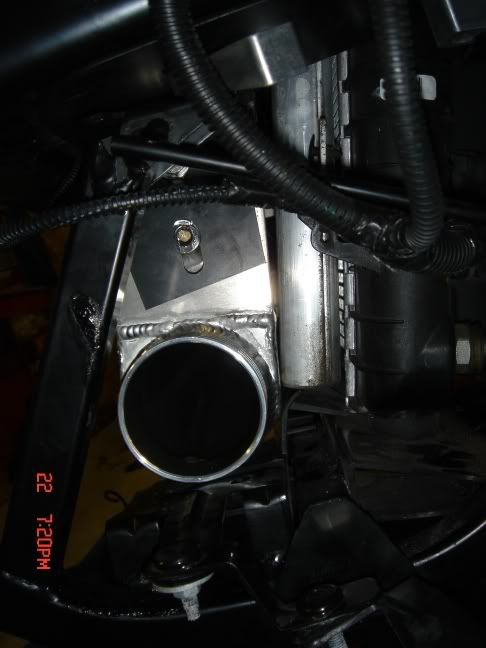
Step 8. You will now need to connect the intake pipe from the intercooler to the MAFS .
You may need to cut some off to make it fit. I had to cut about 2.5 inches off of mine.

Step 9. Install all parts removed to replace front bumper.
Step10. Enjoy and tell them all "Big Bollas" made it happen.

"Sometimes you just have to think outside the box"
This is the back side of the intercooler. look at the gap now between the air dam and the intercooler.
Now finish bolting up the bottom plumbing to the intercooler.
This is how it should look.
This is how it should look like from the top.Look at just how much more air flow you will be getting. Air dam will kick up air for the A/C and RAD.
Intercooler will draw cool air from the front and you will now be getting fresh air to the air filter.
Step 8. You will now need to connect the intake pipe from the intercooler to the MAFS .
You may need to cut some off to make it fit. I had to cut about 2.5 inches off of mine.
Step 9. Install all parts removed to replace front bumper.
Step10. Enjoy and tell them all "Big Bollas" made it happen.
"Sometimes you just have to think outside the box"
Last edited by big bollas; 08-16-2006 at 10:01 PM.
 07-23-2006, 10:59 PM
#5
Safety Car


Man have you been working since I saw you yesterday, I knew you were talking about it, but I did not expect to see it done tonight! Very creative, and it droped it 40 degrees, I try to tell people there's nothing like doing something like this for yourself and having it work, great job. When I install mine, I will do this as I put it all together, might need a little assistance.
The only part I did not follow was you said mark 1.5" on the bottom plate then up to 3.5" and cut out. Is that plastic part in front of the I/C that we were talking about, or were you refering to another part. All in all you will have saved me some time and headaches for when I install mine. I will give you a call later this week to see how she is running, have a good one.
B.J.
07-23-2006, 11:36 PM
#6
Racer
He is cutting the 45 degree angle aluminum support!!!

That has to be there for a reason and unless you replace the strength of that bumper framing I would not be comfortable with this.
Replacing a boxed seciton with a strap does not replace the strength form or funtion.
That has to be there for a reason and unless you replace the strength of that bumper framing I would not be comfortable with this.
Replacing a boxed seciton with a strap does not replace the strength form or funtion.
07-23-2006, 11:42 PM
#7
Safety Car
You could easily weld a plate on the outside for extra strenght, it simply is part of the radiator support and skid plate, not part of the main frame or anything like that.
07-24-2006, 12:43 AM
#8
Melting Slicks
Thread Starter
Originally Posted by vertC6
Man have you been working since I saw you yesterday, I knew you were talking about it, but I did not expect to see it done tonight! Very creative, and it droped it 40 degrees, I try to tell people there's nothing like doing something like this for yourself and having it work, great job. When I install mine, I will do this as I put it all together, might need a little assistance.
The only part I did not follow was you said mark 1.5" on the bottom plate then up to 3.5" and cut out. Is that plastic part in front of the I/C that we were talking about, or were you refering to another part. All in all you will have saved me some time and headaches for when I install mine. I will give you a call later this week to see how she is running, have a good one.
B.J.
The only part I did not follow was you said mark 1.5" on the bottom plate then up to 3.5" and cut out. Is that plastic part in front of the I/C that we were talking about, or were you refering to another part. All in all you will have saved me some time and headaches for when I install mine. I will give you a call later this week to see how she is running, have a good one.
B.J.
Started at about 5 and finished at 9:30pm. It took me a while just to figure things out but this can be done in 2.5 hours.
The marking is for the frame cut out on the skid bracket.
It was well worth it and free as well.
Just let me know if you need any help.
Lexicon: This is just a support brace for the A/C and Radiator and will have no effect on anything esle! It is thin wall boxed aluminum and if it was replaced with a 3/8 flat bar"NOT a strap" and bolt it in ,it would make the brace alot stronger. I put this post up so that anyone with Procharger having heat issues as I did would have a way of fixing it insted of buying water pumps,bigger radiators and fluids that are not the real problem.
No air flow to the cooling system means you will have a heat issues.
This is totaly up to the person doing it if they decide to do it.
 07-24-2006, 10:16 AM
#11
Melting Slicks
Thread Starter
B.J. yes thats how I did it but if I was to do it again I would just cut it all out and replace it with the 3/8 flat bar and bolt it up.
Now that I know that this works I will go back in and do this next chance I get.

Now that I know that this works I will go back in and do this next chance I get.
 07-24-2006, 11:55 AM
#13
Heel & Toe
Member Since: Jul 2006
Location: Cave Creek AZ
Posts: 15
Likes: 0
Received 0 Likes
on
0 Posts
Great work Big! I would recommend sending your info to ATI. Those of us living in warmer states (like Phx, AZ) could actually choose another system due to overheating problems.
Great Man Law by the way......lol
Great Man Law by the way......lol
07-24-2006, 08:07 PM
#16
Safety Car


Member Since: Dec 2004
Location: Boca Raton, FL
Posts: 4,477
Likes: 0
Received 1 Like
on
1 Post
St. Jude Donor '05-'06-'07-'08-'09-'10-'11-'12-'13-'14


Just sent this thread to my mod shop. Putting the Procharger D1SC on next week to compliment my heads, cam, headers and exhaust. Living in SE FL I don't need high temps.
Thanks for the info.
Thanks for the info.
07-24-2006, 08:13 PM
#17
Melting Slicks
Thread Starter
Originally Posted by k-line
Makes me feel better about going the nitrous route. It's been over 90 for the last 3 weeks here in so. cal.
Been there done that and would'ent go back
07-24-2006, 08:16 PM
#18
Melting Slicks
Thread Starter
Originally Posted by schilitj
Just sent this thread to my mod shop. Putting the Procharger D1SC on next week to compliment my heads, cam, headers and exhaust. Living in SE FL I don't need high temps.
Thanks for the info.
Thanks for the info.
07-24-2006, 08:22 PM
#19
Melting Slicks
Thread Starter
Originally Posted by Brabus2
Oustanding work BB!!! We ProCharger folks salute your efforts. 
07-25-2006, 07:36 AM
#20
Advanced
Member Since: Jun 2006
Posts: 76
Likes: 0
Received 0 Likes
on
0 Posts
[QUOTE=big bollas]Well after reading and seeing my temps in the 230's at times I decided
to kill this heat monster .Read on and see how I did this. After the modification I made and getting it all back together I took my vette out for a drive. Before I was not able to drive my vette with the A/C running and be able to keep the temps down under 230' and 219' without the A/C. Now I was able to keep the temp at 185' without the A/C and 198' with the A/C running out side temp was 98'. I pushed the vette for a hour on and off and the highest I seen it go was 198'.
Yes my Procharger brothers I have killed the Heat monster.
Nice build in,
How much power did it release? It must have lowered the inlet temp a lot.
DoC