
[Z06] My DIY LS7 Headswap
 09-01-2013, 03:49 PM
#101
Le Mans Master


 09-01-2013, 05:37 PM
#102
Melting Slicks

Member Since: Sep 2008
Location: Northern Virginia
Posts: 2,389
Likes: 0
Received 5 Likes
on
5 Posts
Obviously the cylinder bores and head bolt holes should be free and clear of debris. I thought the other holes on the block were coolant passages... is that not so?
What chamber and piston ring areas are you talking about? Maybe it's just the lingo that I'm not following..
What chamber and piston ring areas are you talking about? Maybe it's just the lingo that I'm not following..
09-01-2013, 09:39 PM
#103
Pro


First and foremost what a great write-up!
Secondly, never having done anything like this makes me extremely nervous! If I had knowledge and experience as many on this forum have, I'd be willing to jump right in to the project.
Limted on mechanical skill, knowledge and certainly experience........would the group say try it or give it to an expert to do?
09-01-2013, 11:41 PM
#104
Le Mans Master
Obviously the cylinder bores and head bolt holes should be free and clear of debris. I thought the other holes on the block were coolant passages... is that not so?
What chamber and piston ring areas are you talking about? Maybe it's just the lingo that I'm not following..
What chamber and piston ring areas are you talking about? Maybe it's just the lingo that I'm not following..
piston ring area--- > The piston to wall gap area (aka piston to wall clearance)
09-02-2013, 09:53 AM
#105
Melting Slicks
Member Since: Sep 2008
Location: Northern Virginia
Posts: 2,389
Likes: 0
Received 5 Likes
on
5 Posts
^ Thanks for the clarification.
If you're familiar with what everything is under the hood and where it goes, you have a nice array of tools, you can follow directions and have patience then I think this is something pretty much anyone can do if you follow the DIY.
That's just my .02 though.. I'm sure most people would say you need some additional know how but for just swapping heads I don't really think there's that much to it..
That's just my .02 though.. I'm sure most people would say you need some additional know how but for just swapping heads I don't really think there's that much to it..
09-02-2013, 09:57 AM
#106
Melting Slicks
Member Since: Sep 2008
Location: Northern Virginia
Posts: 2,389
Likes: 0
Received 5 Likes
on
5 Posts
I will be using ARP bolts. What is the torque spec for the 10mm and 15mm bolts?
Also, are there multiple 'stages' of tightening with the ARP bolts or is that for the TTY OEM bolts only? Thanks for the info.
Also, are there multiple 'stages' of tightening with the ARP bolts or is that for the TTY OEM bolts only? Thanks for the info.
09-02-2013, 02:40 PM
#107

3 stages. 75 ft lbs. and 25 ft lbs. I believe, I'd have to double check that. I used new motor oil as a thread lube, The ARP lube would be better.
09-02-2013, 03:10 PM
#109
You can type in the kit number on arp's site and get their writeup. Kit 134-3610 is what mine was. Their site says 12 point, but I called them and they said that it's really 6 point.
http://arpinstructions.com/instructions/134-3610.pdf
 09-15-2013, 01:03 PM
#113
Melting Slicks
Member Since: Sep 2008
Location: Northern Virginia
Posts: 2,389
Likes: 0
Received 5 Likes
on
5 Posts
I just finished my head swap this weekend. I took extra care in prepping the block, cylinder heads and torquing everything to spec so it took me much longer than most people say it takes them. I was also using only hand tools. Either way you slice it, it's a lot of work for one person.. but at the end of the day I saved some money and can say that I put the heads on my car myself!
I was using a friend's garage, drove it home this morning (160 miles) and the car seems just fine. Holding good operating temps, no smoking, oil and coolant look and smell fine, etc. I just need to adjust the hood bolts a bit and that's all (it's a little off on the driver's side).
This DIY is awesome. Probably the best DIY I've ever seen, so big props to the OP. It really helped me have a second frame of reference to double check connections and "check" items off as I went along.
As I previously noted, I didn't take the PS pump off the bracket and I think I could have done the job without removing the fans as well.
09-15-2013, 07:57 PM
#114
Melting Slicks

I did it without taking off pump or fans and I have ARP head studs and I took the heads off with the studs still in block and installed the heads with the studs in. This DYI was very helpful.
10-08-2013, 08:03 AM
#115
Question on step 27: The david farmer torque spec sheet says 18 lb ft on power steering pump mounting bolts. Which is correct?
27) Reinstall the Power Steering Pump Assembly
Spin the Power Steering Pump and visually locate 3 of the 4x13mm of it’s fasteners, the 4th is difficult to see but it is at the lowest point and you can feel for it with your fingers and easily locate it.
There is a PS sub-bracket that 2 of the shorter 13mm bolts attach too, there are 2 longer bolts that are at the very top and bottom of the sub-bracket that actually go through onto the generator bracket which we must remove to get access to the generator bracket.
They should be the bottom and top bolts. You will need to spin the pulley to gain access to the bolts. I used my mini-electric impact and a combination of swivels and extensions to gain access to tighten these once I had hand started all of them and turned them several threads.
Tighten 2 13mm bolts to 37ft. lbs. or 2 mini-grunts as they say ☺
11-24-2013, 10:12 PM
#117
Drifting

Well, another thanks for the DIY... Just removed my heads yesterday. If there was just great pictures and a writeup on the cam. I'll be using my AlldataDIY membership for that part. Looks pretty straight forward. Hoping to send out my heads next week!
11-30-2013, 04:03 PM
#118
Tech Contributor

Terrific write up! Wish I'd had this when I did my head swap a couple of years ago.
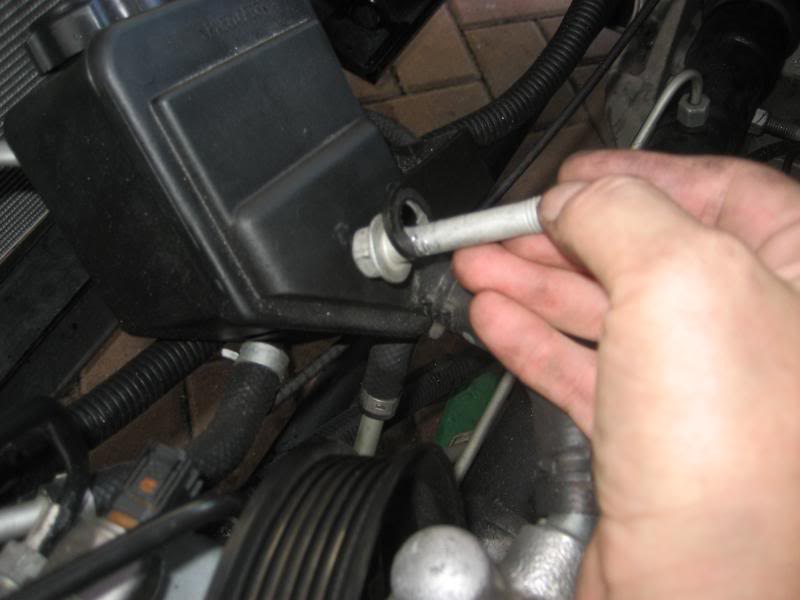
That power steering reservoir and bracket has caused many a cuss word on this earth....other than that, these cars are super easy to swap heads on.
Only thing I would add to your great write up is to notch the power steering pump bracket when you finally get it of - makes it a lot easier to reinstall, you can install the bolt through the PS bracket then just slide the reservoir down onto the bolt and tighten it up.
JayplaySS was the first one I saw post this good trick. Pic courtesy of him.
http://forums.corvetteforum.com/c6-t...s-of-pics.html
