
[Z06] My DIY LS7 Headswap


 04-22-2013, 06:03 PM
#83
Drifting

Member Since: Feb 2006
Location: Cocoa Florida
Posts: 1,890
Likes: 0
Received 0 Likes
on
0 Posts

a few stock bolts modified is better than taps because it doesn't cut threads at all. Chasers are expensive and unless you plan to do more than a few sets of heads, just modify stock bolts and use those instead.
04-23-2013, 04:33 PM
#84
Racer

Thread Starter
Just finished my head swap with forum member meanjoe. This procedure and the write up was a huge help. The service manual does NOT say to back the head bolts off one turn.
Car is dead silent now with stainless 1pc solid valves and bronze guides.
Took 6 hours to remove, 1 hour to clean prep block, 6 hours to reinstall. Working slow and triple checking.
Car is dead silent now with stainless 1pc solid valves and bronze guides.
Took 6 hours to remove, 1 hour to clean prep block, 6 hours to reinstall. Working slow and triple checking.
 06-18-2013, 02:01 PM
#85
Safety Car


I'm in the middle of doing another swap, this time with Cam Swap Added in.
At some point I will try to post the additional steps necessary for that.
So far it is:
Remove radiator shroud, radiator and swing condenser forward.
For the next step, I'm wondering why you cannot just raise the motor a bit to remove the Crank Pulley rather than removing rack or dropping cradle. Will the motor not go that high?
06-18-2013, 02:20 PM
#86
Drifting

I'm in the middle of doing another swap, this time with Cam Swap Added in.
At some point I will try to post the additional steps necessary for that.
So far it is:
Remove radiator shroud, radiator and swing condenser forward.
For the next step, I'm wondering why you cannot just raise the motor a bit to remove the Crank Pulley rather than removing rack or dropping cradle. Will the motor not go that high?
At some point I will try to post the additional steps necessary for that.
So far it is:
Remove radiator shroud, radiator and swing condenser forward.
For the next step, I'm wondering why you cannot just raise the motor a bit to remove the Crank Pulley rather than removing rack or dropping cradle. Will the motor not go that high?
I myself, was not able to get the radiator off of the condenser without removing the hardlines. I didn't want to remove the hardlines, so I swung the entire rad+con unit up to hover over the engine. See my post about my "most hoodrat way to mount a balancer".
06-18-2013, 04:01 PM
#87
Safety Car
I have the heads and intake off. Will it still hit the firewall?
I agree that the radiator condenser separation was excruciating. Feel bad for the poor shmoe that just needs a new radiator.
I agree that the radiator condenser separation was excruciating. Feel bad for the poor shmoe that just needs a new radiator.
06-18-2013, 06:37 PM
#90
Drifting
Member Since: Feb 2006
Location: Cocoa Florida
Posts: 1,890
Likes: 0
Received 0 Likes
on
0 Posts
Yeah you cant do it that way, the steering rack isn't as bad as it sounds once you realize you have to bend the little tabs on the passenger side so it fits back in the car.
I used a little bolt and some nuts and made my own little spreader and it worked fine, after I did that I had it back in the car in less than 10 minutes. The entire cam took less time then figuring out that stupid part.
I used a little bolt and some nuts and made my own little spreader and it worked fine, after I did that I had it back in the car in less than 10 minutes. The entire cam took less time then figuring out that stupid part.
06-18-2013, 06:50 PM
#91
Drifting
I dropped the cradle (had to anyway for pfadt headers and engine mounts) and I would do it that way again. I've heard they are both about an equal amount of work but you have to get an alignment the cradle way.
 08-04-2013, 01:56 PM
#94
Racer
Thread Starter
The pictures are hosted on FB and have a global security setting. You may need a FB account to see the pictures, I'm really not sure. If the forum wants to host the images an admin can download the pics and edit the links or ask me to edit the links.
I no longer own a Z06 (CTS-V now) so I'm never on this forum.
I no longer own a Z06 (CTS-V now) so I'm never on this forum.
08-14-2013, 06:27 PM
#95
Melting Slicks

Member Since: Sep 2008
Location: Northern Virginia
Posts: 2,389
Likes: 0
Received 5 Likes
on
5 Posts
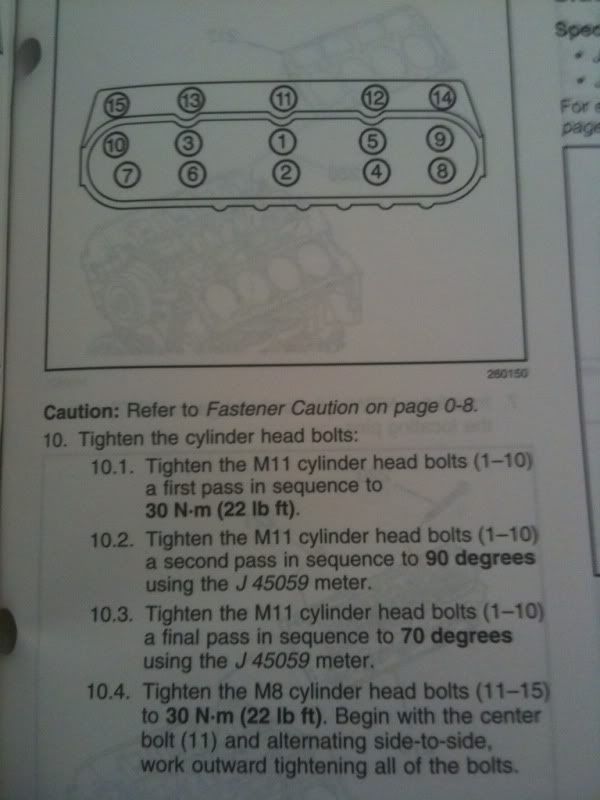
Use the below diagram to crack loose all of the 8mm bolts in reverse order counting down from 10 to 1
Does anyone have this diagram from the manual? It's the unbolting sequence for the intake manifold. Thank you!!
Does anyone have this diagram from the manual? It's the unbolting sequence for the intake manifold. Thank you!!
08-14-2013, 06:33 PM
#96
Pro

Member Since: Sep 2010
Location: San Diego CA
Posts: 501
Likes: 0
Received 0 Likes
on
0 Posts
Can anyone tell me why its so important to drain all your coolant when doing a head swap ? <- something about if you don't you could risk cracking your block ? What I don't understand is why (which isn't saying much since I'm still learning). I get that if you don't drain any and try to pull the heads you'll soak the engine bay and floor in coolant, but why drain the whole thing ?
Last edited by vvlf; 08-14-2013 at 07:47 PM.
09-01-2013, 02:28 PM
#97
Melting Slicks
Member Since: Sep 2008
Location: Northern Virginia
Posts: 2,389
Likes: 0
Received 5 Likes
on
5 Posts
I think the point is to get coolant out of the bolt holes or you could crack the block when installing the new head bolts. You definitely want to drain the coolant either because of everything you need to take off the car.
09-01-2013, 02:31 PM
#98
Melting Slicks
Member Since: Sep 2008
Location: Northern Virginia
Posts: 2,389
Likes: 0
Received 5 Likes
on
5 Posts
I uninstalled my heads this weekend. I've got them stripped down and ready to ship to WCCH. A couple of things, I unscrewed the head bolts far enough to where I could lift the head and keep coolant from soaking those bores. Place it back down then pull the head bolts, then pull the heads off is how I did it.
Also, I didn't have to do step #9. I saw someone else post that in a previous page and I was able to get the bracket off without moving the power steering pump. It took some time but it really wasn't that bad.
Great DIY. Thanks to the OP.
Also, I didn't have to do step #9. I saw someone else post that in a previous page and I was able to get the bracket off without moving the power steering pump. It took some time but it really wasn't that bad.
Great DIY. Thanks to the OP.
09-01-2013, 02:32 PM
#99
Pro
Member Since: Sep 2010
Location: San Diego CA
Posts: 501
Likes: 0
Received 0 Likes
on
0 Posts
But why ? Why would leaving coolant in cause the block to crack when you go to re-install everything