
HELP! GM Windblocker Installation
 02-12-2022, 11:14 AM
#1
Instructor

Thread Starter
My son and I are in the middle of the bracket installation for the GM Windblocker. We did a bit of research and, yes, the instructions leave much to be desired. We were moving along quite nicely until it came to the seat belt covers. We managed to detach them from the metal understructure and, even though the instructions led us to believe that they would be secured with either a Torx head screw or a plastic "Christmas tree" fastener, they were, in fact, secured with clips - one laterally to the centerline of the car and one longitudinally to the centerline. The lateral one is where the bolt that secures the top of the bracket goes through to thread into the supplied plastic anchor that is installed in the metal, after the slot is enlarged to a 3/8" hole.
It appears that we need to cut that clip completely off the backside of the seatbelt cover, in order enlarge the hole in the cover to match the installed anchor in the metal. This would be a point of no-return, so I just want to insure that we are correct in assuming that clip needs to be cut away and discarded.
One other question - it seems that when installed, the actual bracket is some distance from the tower/cover you are screwing into to secure the top of the bracket. Shouldn't there be some kind of stand-off between the tower and the bracket. Without something like that you could just tighten down that screw too much and bend the bracket out of proper alignment.
Thanks for your help. Car is in pieces in the garage and we'd like to take advantage of the 60 degree temps (in the NE) today to finish the job.
cueguy
 02-12-2022, 03:25 PM
#2
Instructor
Thread Starter
48 Views and just crickets. That's OK because my brilliant son figured it out. Given the age of the vehicle and the fact that the plexiglass wind restrictors seem to find favor over the GM iteration, it's not likely that there will be much call for this in the future. But just in case somebody else ends up struggling with this, here is how we resolved it.
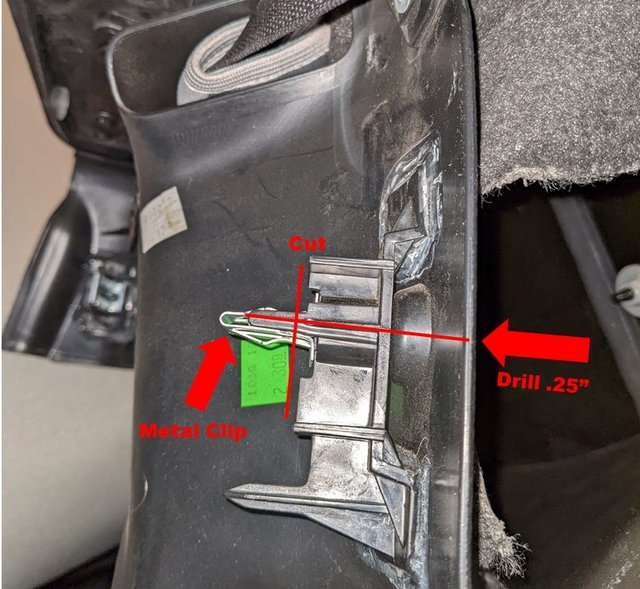
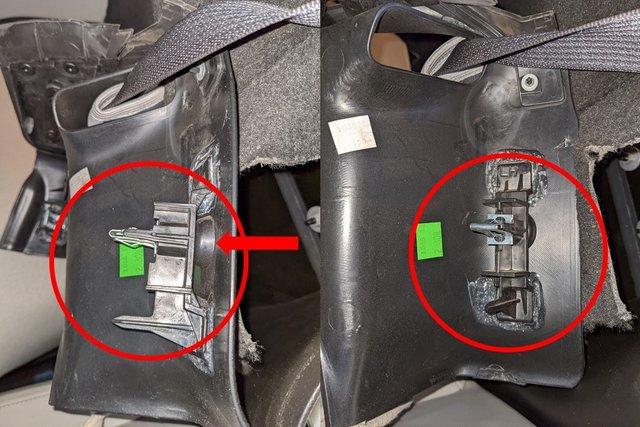
1) Remove the metal clip from its plastic protrusion
2) Cut the plastic protrusion as shown
3) From the outside of the seatbelt cover drill a .25" hole straight through where the clip was
By doing this the remainder of the base where the clip was stays intact and acts as a stand-off against the metal tower. The lower locator pin also remains and facilitates reinstallation. By having the stand-off you can tighten down the bolt that holds the bracket in place.
My estimate of time was correct. All the posts that said that now that they've done one they could do another in 45 minutes to an hour, I say that you're better men than I. Using that hour as a basis for extrapolation, I figured four hours for my son and I to do the complete job and that is exactly what it took. My mantra is, "Nothing is ever easy."
Happy, cosmetically, with the results. Didn't test the efficacy of the blocker as the car is in a semi-storage state.
After some minor dress-up items, the next project will be installation of an MGW flat-stick shifter and maybe the anti-venom mod, dependent on how the shifting feels after the MGW install. Then paint the calipers and I'm done for a while.
cueguy
02-12-2022, 04:44 PM
#3

This type of wind screen is definitely a unicorn! Glad your genius son figured it out. It's kind of a funky bracket design, as you discovered, but you'll be happy with the effectiveness of the windblocker. The plexi one doesn't block the wind as well as this screen type, and this one is easy to install for day trips. You'll probably get some experience with this one and decide later if the permanent installed plexi model is a better fit for your driving lifestyle. We had the screen type at first, then changed to the plexi style about 6 years later. So, have fun with it, get those other mods done with your genius son helping out, and enjoy your very cool ride!
Save the wave!
Save the wave!
02-12-2022, 06:22 PM
#4
Sorry for not replying earlier spent the daylight hours here running a chipper clearing land
There sis a supplement the GM put out with the change�s to mounting
Your son was spot on to say with out the help of the updated information
There sis a supplement the GM put out with the change�s to mounting
Your son was spot on to say with out the help of the updated information
02-12-2022, 07:29 PM
#5
Instructor
Thread Starter
I found the post with that bulletin number last night and searched, but couldn't find the actual publication. Yes, his solution worked great - I couldn't have done the installation without him - I'd still be in the garage cursing.
cueguy
cueguy