
How to DIY C6 Corvette headlight lense swap Base, Grand Sport, Z06...etc
 08-08-2015, 04:25 AM
#1
Instructor

Thread Starter
I hope this is posted at the right place.
If you are sick of seeing your beautiful corvette with those hazy, cracked, ugly, yellowish old lenses and you tried to polishe them, sand them etc and nothing worked, then its time to change thise suckers out. Here is how;
This is a DIY for replacing (swapping out) the headlight lenses on the C6 Corvette 2005-2013 Base, Grand Sport, Z06 ...etc. I am NOT liable for any damage you cause to your car while doing this. This DIY is for educational purposes only, do at your own risk. Some of the pictures and information i will use are mine and some are not. Some of the info belongs to RSI who is the vendor for the lenses i buy. Bare with me, it is now 3:15 am i have to go to work at 7am and i am up doing this DIY asap because a forum member sent me a pm saying he needed urgent help opening the lense and the type of glue to use, temperature to set the oven etc. If you get stuck on something or just need extra tips just send me a pm, i will reply as soon as i can. So here it goes....
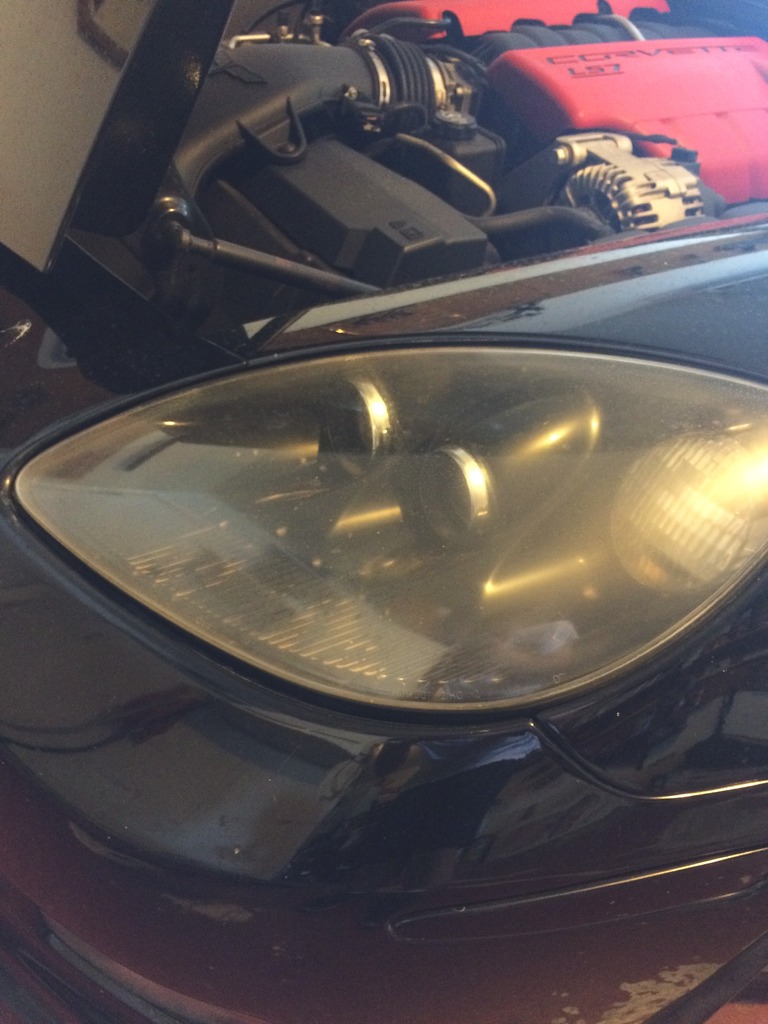
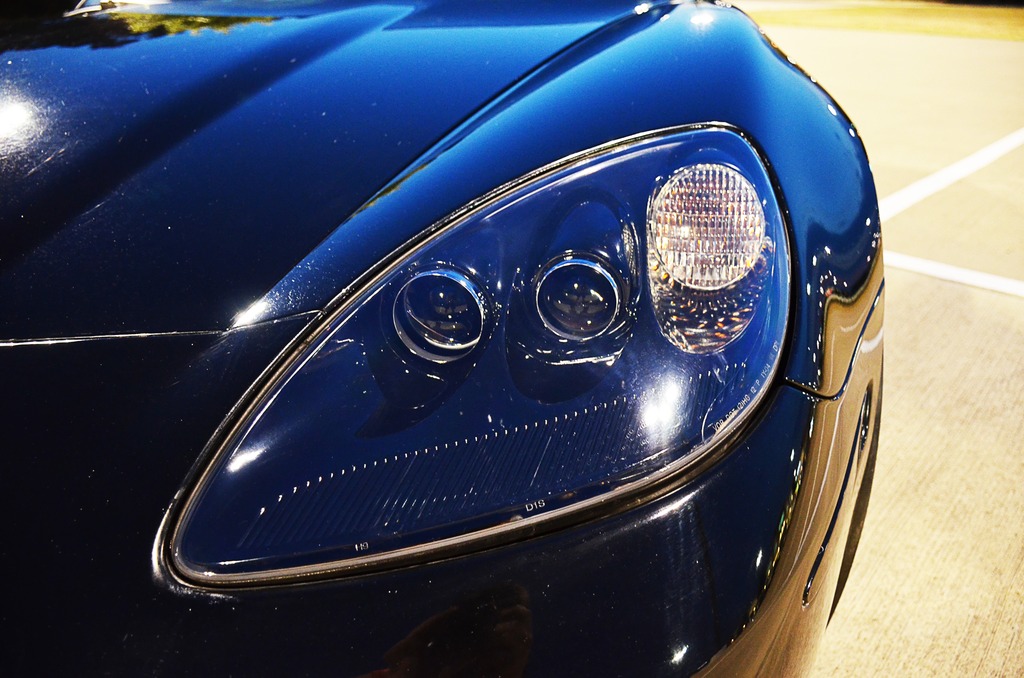
First some before and after pictures. New lense is dirty from the outside but you get the idea.
Before
After
Aside from changing the old lense now is the time to add the halos or leds inside the housing if you like that, i like to keep it looking stock so i didnt do that.
Items Nedded:
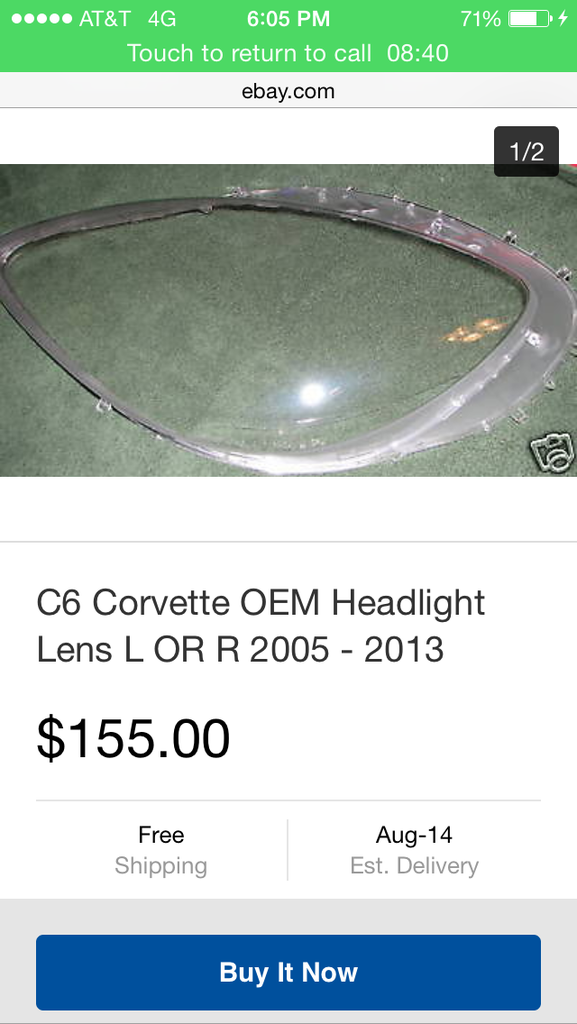
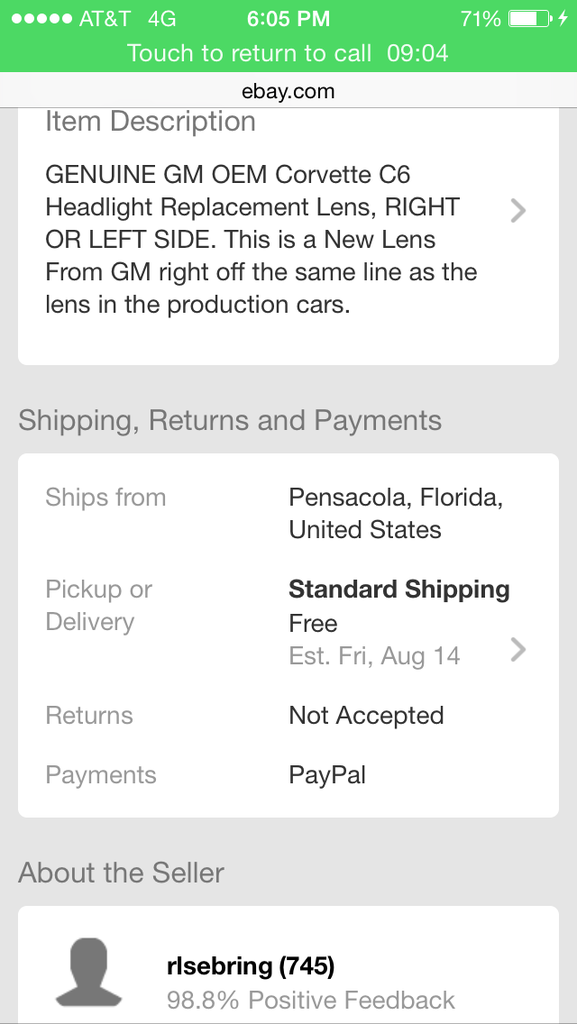
***** 2 new lenses (can be found on ebay or from other corvette stores online etc) I buy them from a guy on ebay, very good quality and quick shipping for $310
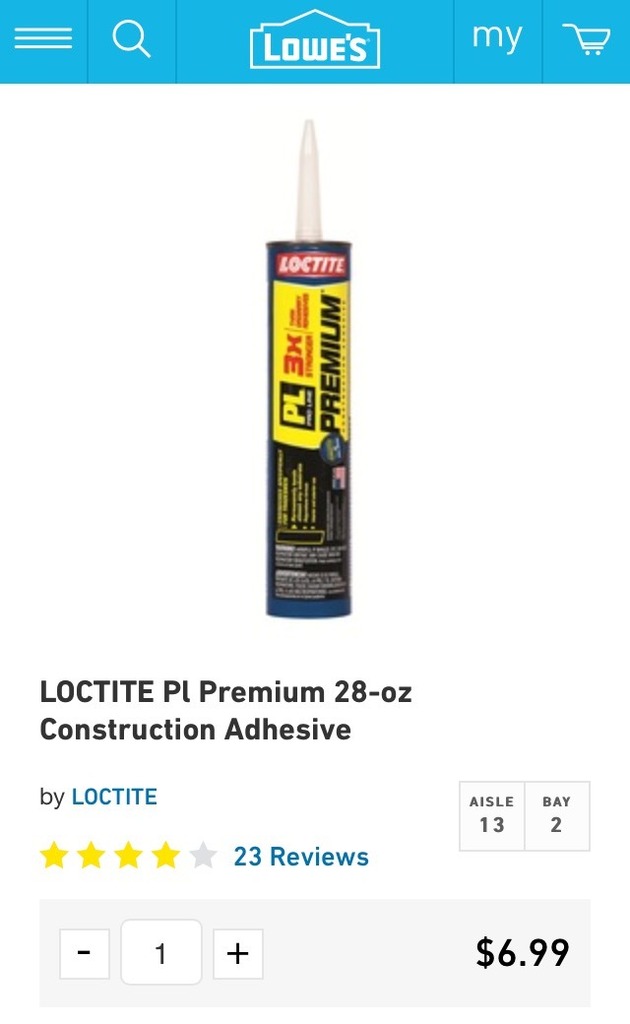
***** At least 1 can of adhesive
***** Good set of gloves to handle the HOTTTTT Headlight
***** Few flat head screwdrivers
***** Few microfiber towels
***** 10-14 small pressure clips or 8-10 clamps
***** Cleaning solution
***** Pressure air hose (If you have one) really comes in handy
***** Several household tools (torx tools, etc...)
Step #1
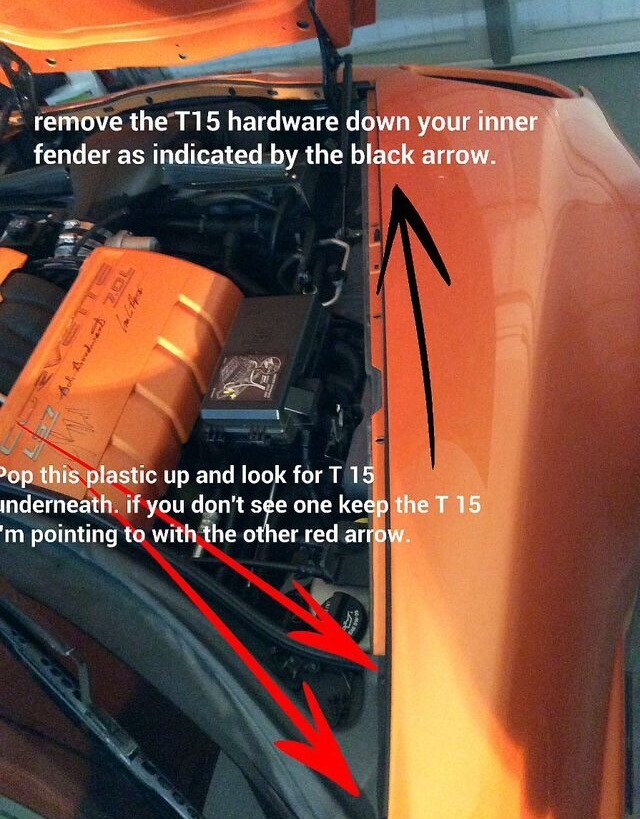
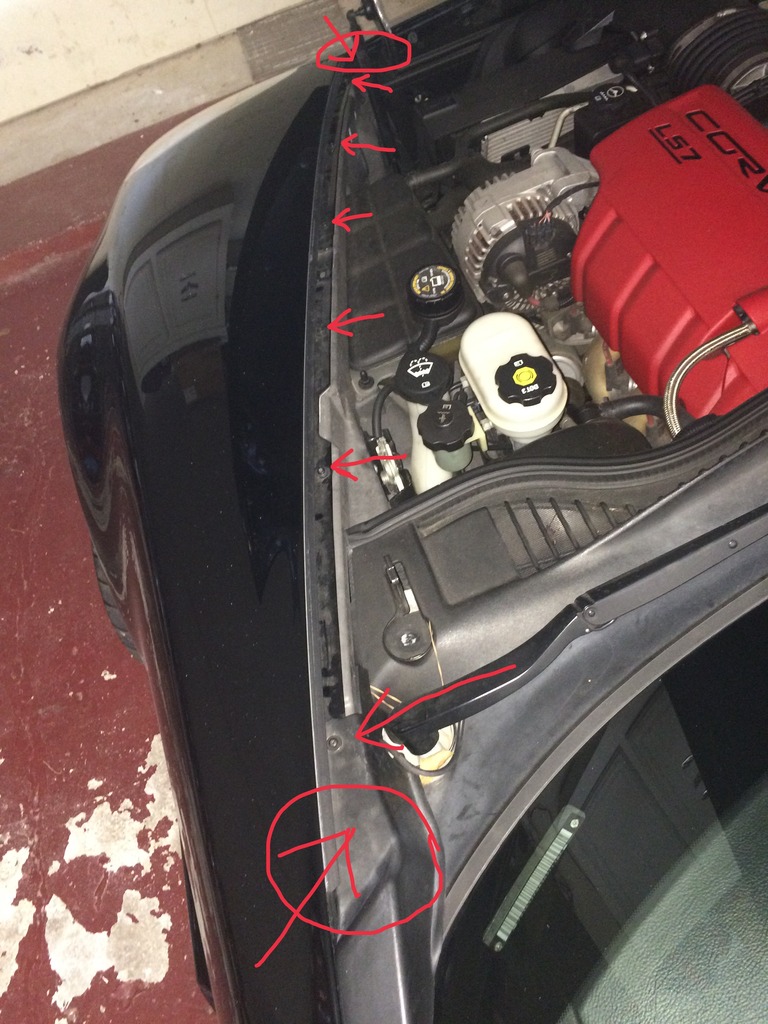
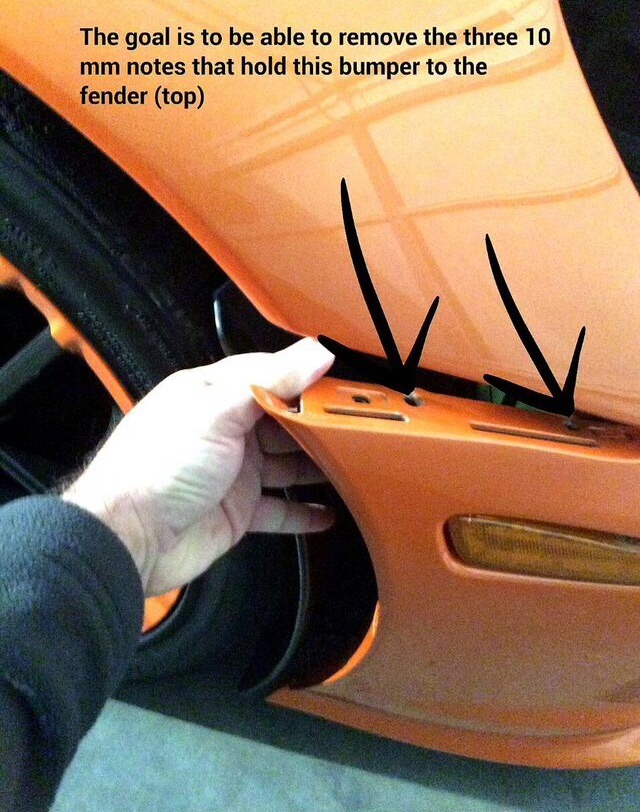
is to remove all the torx screws along the top of the fenders. There are 6 screws you can see right away, once you take those out you will have to pull the plastic where i circled in the picture closest to the windshield and remove that screw too. there is another screw towards the bottom of the fender under the plastic part of the fender by the headlight that i also circled, remove that screw too.
Step #2
Step #3
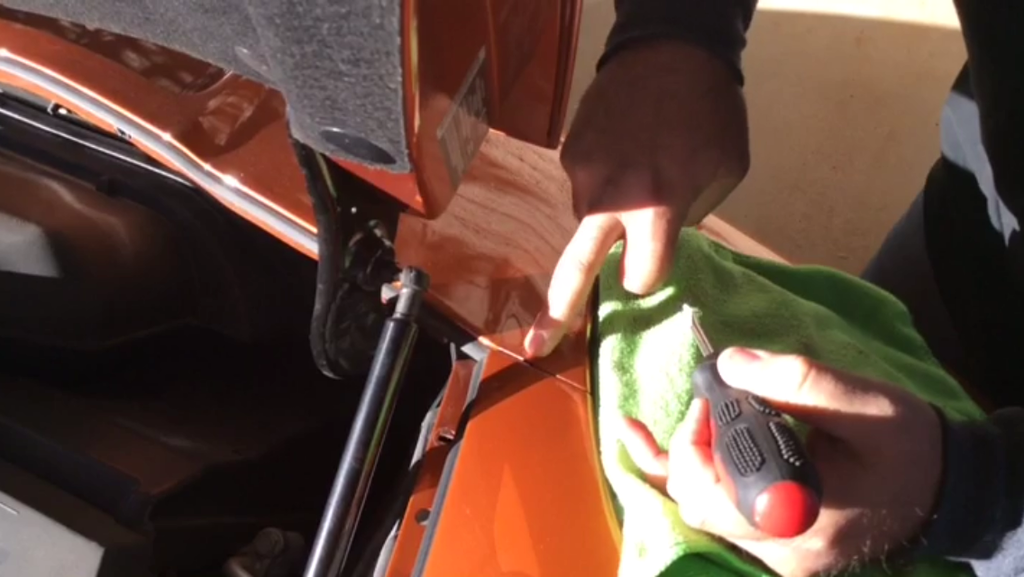
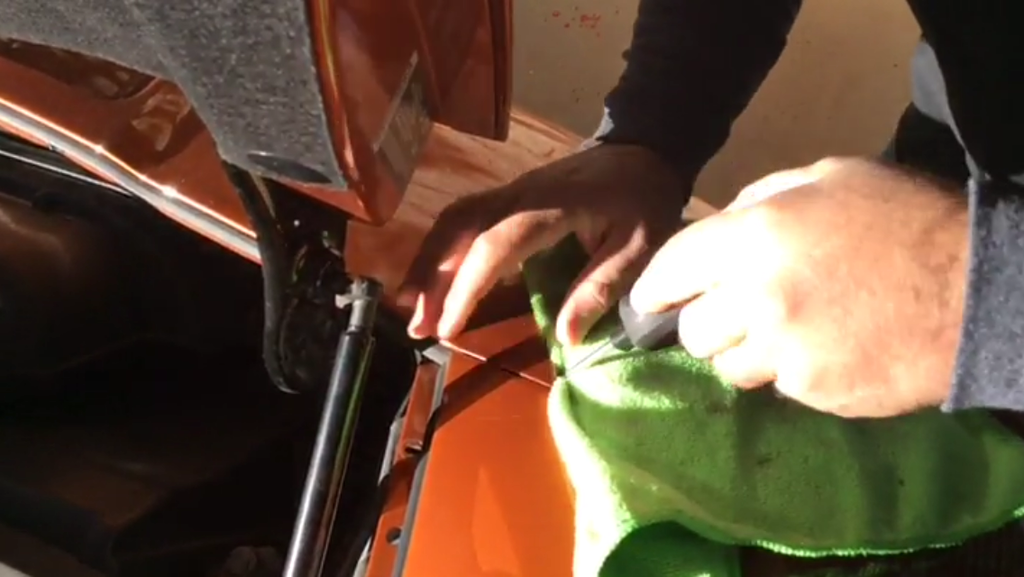
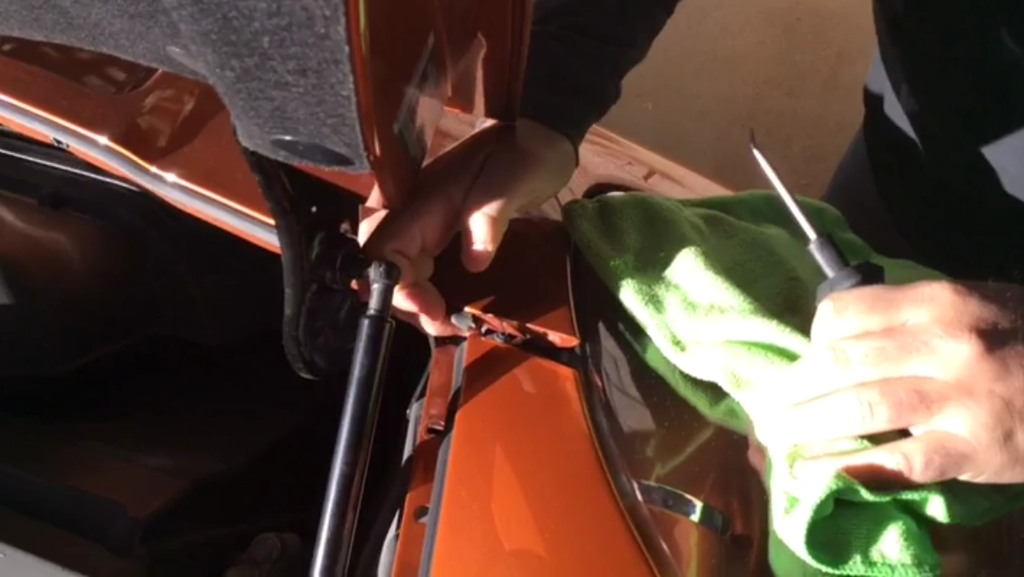
Pop the plastic corner of the bumper out by getting a microfiber cloth to protect the paint, stick a flat head screw driver between the headlight and the bumper corner and firmly apply pressure upwards. should pop right out without any damage and you should be able to just pop it back in when putting everything back togeather.
Step #4
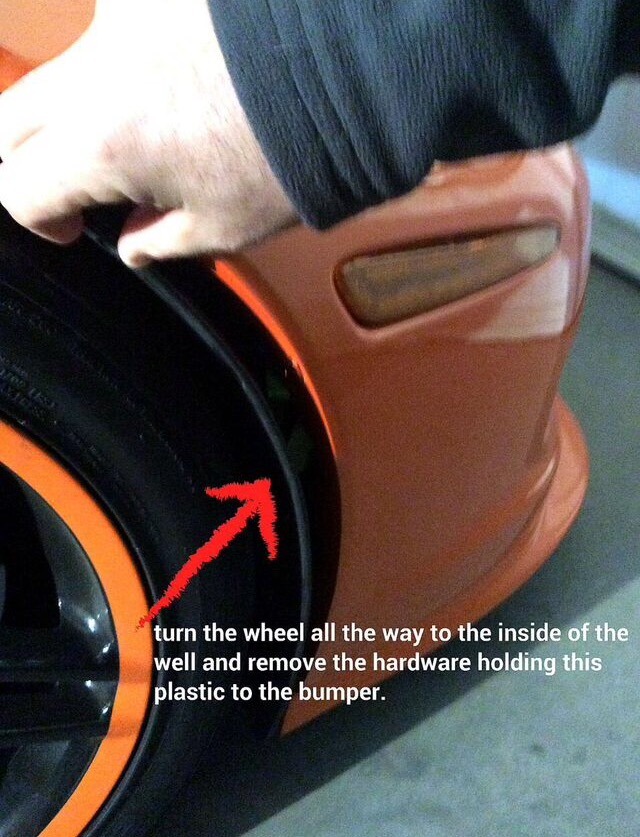
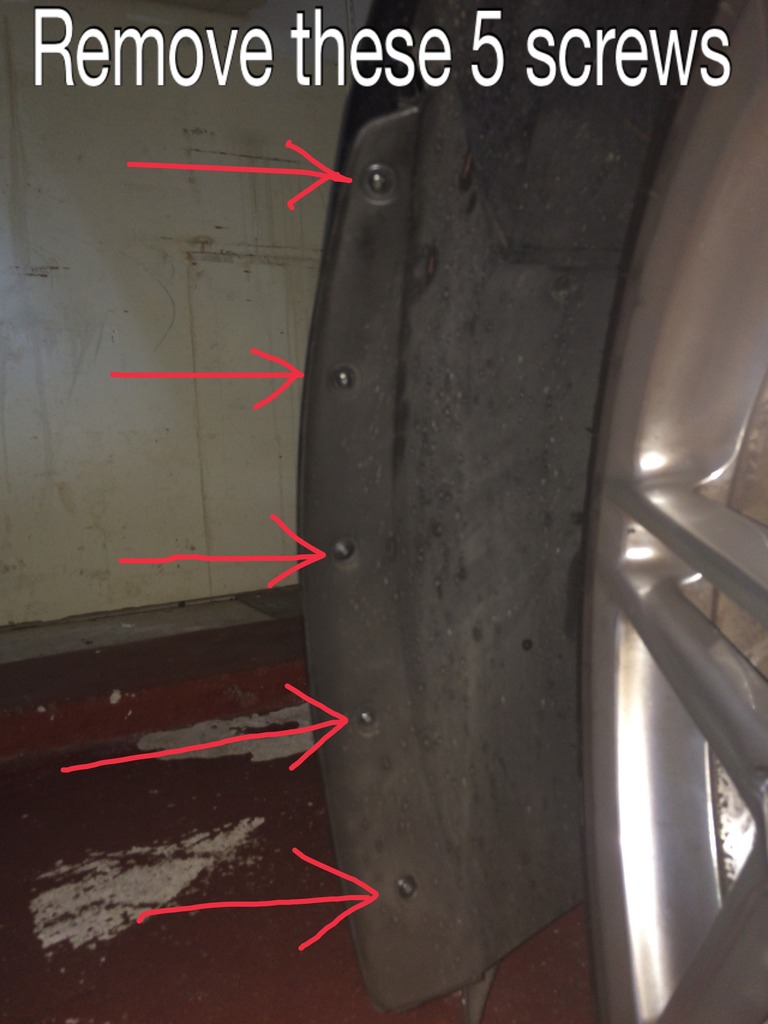
Remove the screws holding the plastic wheel well to the front bumper, i think its like 5-6 torx screws.
Step #5
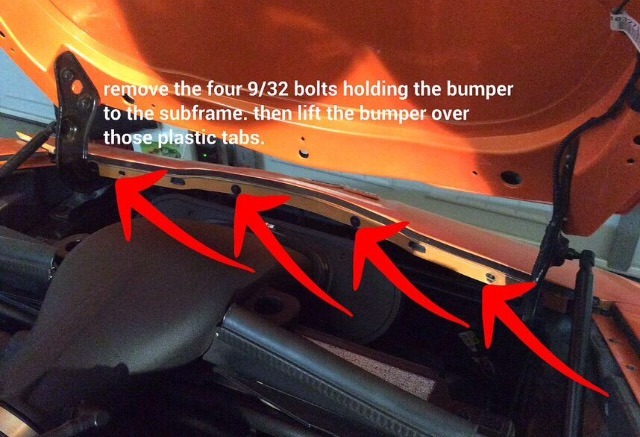
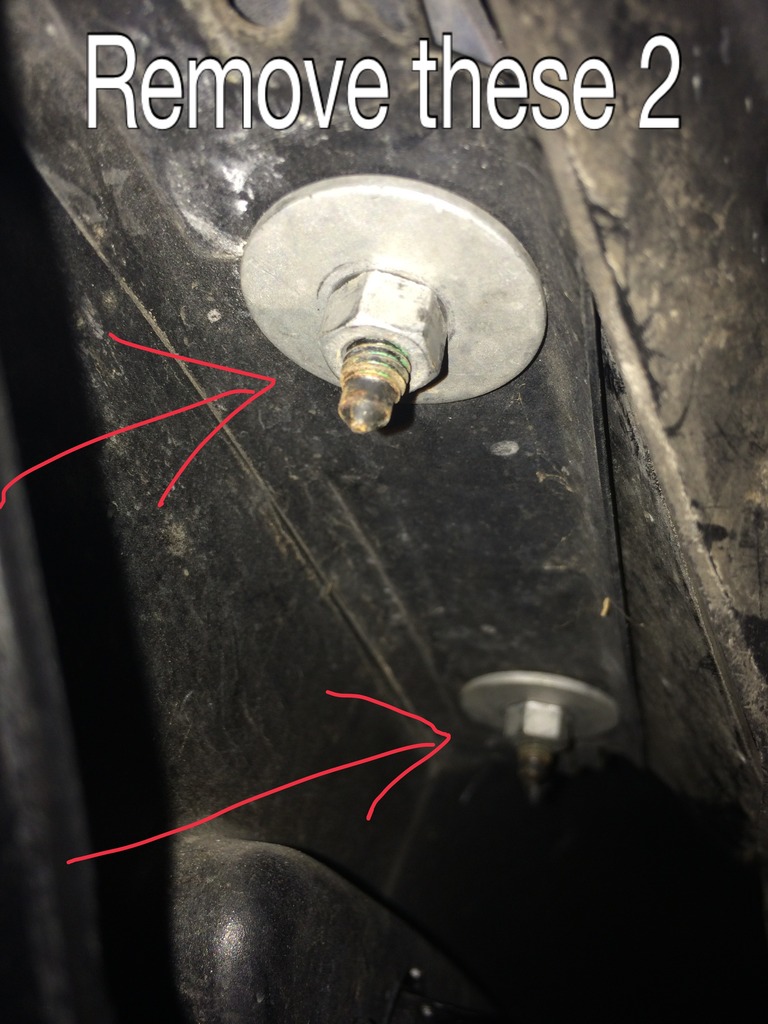
Unscrew the 2 or 3 nuts holding the bumper to the fender inside the wheel well.
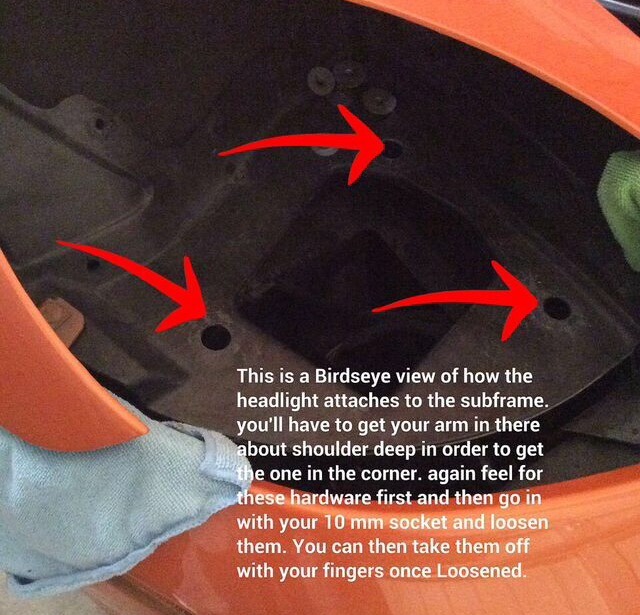
Step #6
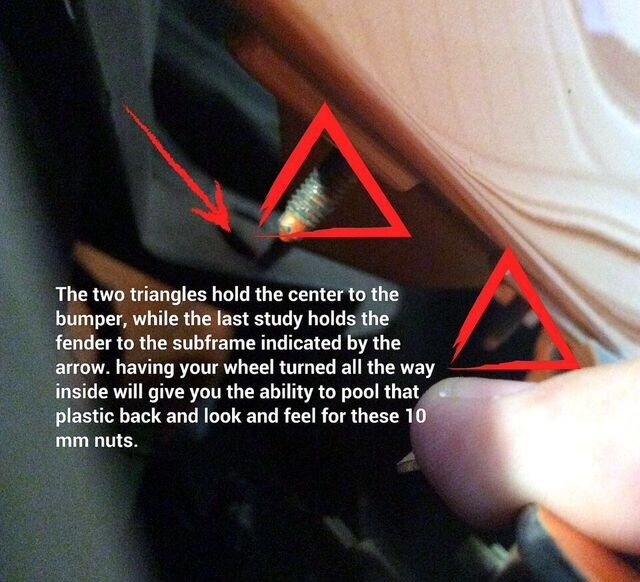
This step is a bit tricky but very doable. Having skinny/thin arms helps, long arms too. You are going to put your hand inside the wheel well between the plastic well and the front bumper and you are going to feel for the 3 nuts holding the headlight togeather. once you feel where the nuts are, losen them with one turn and they will immdiately loosed up and can be taken out by hand. Work your hands/arms between those body parts so you wont have to take anything off the car. A flashlight is useful to see exactly where those nuts are at before you go in there feeling for them.
Step #7
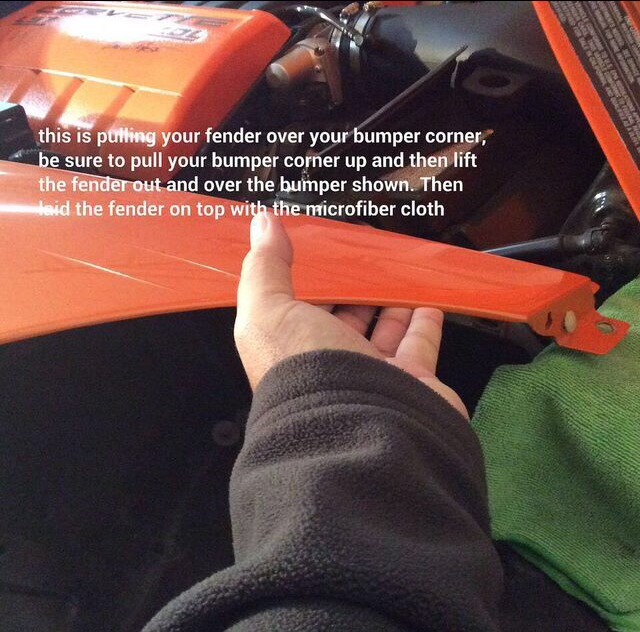
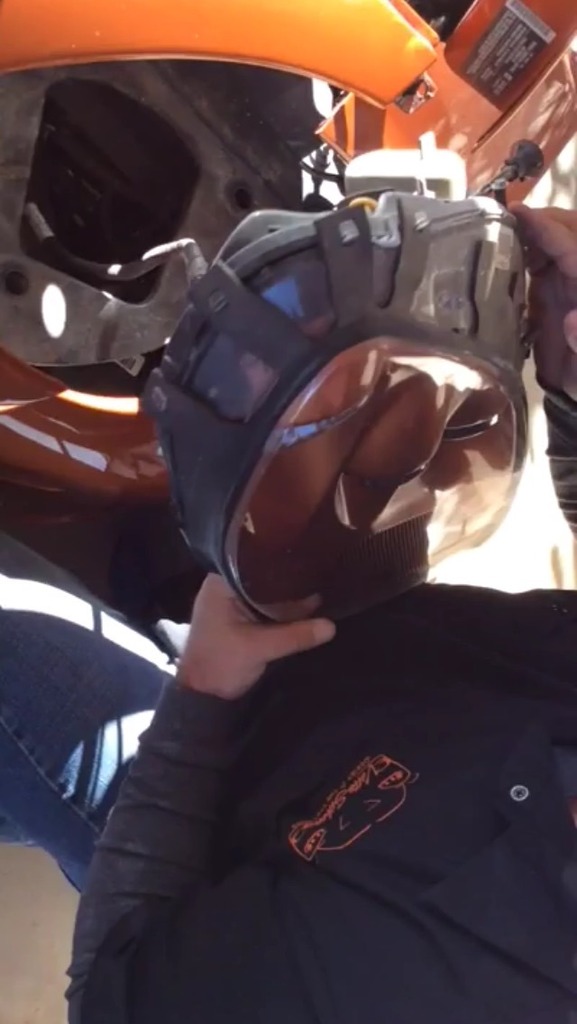
Once you take off all 3 screws from each headlight come back up to the top of the car and place a few microfiber cloths in the body panels that will be moving to avoid scratches. This step can be done alone but is MUCH better with the help of another person, one person moved the body panels away from the headlights (opens them up) and the other person grabs the headlight like in the picture and moves it around carefully in an upward position (straight up) and down towards you until the whole headlight assembly comes out.
Step #8
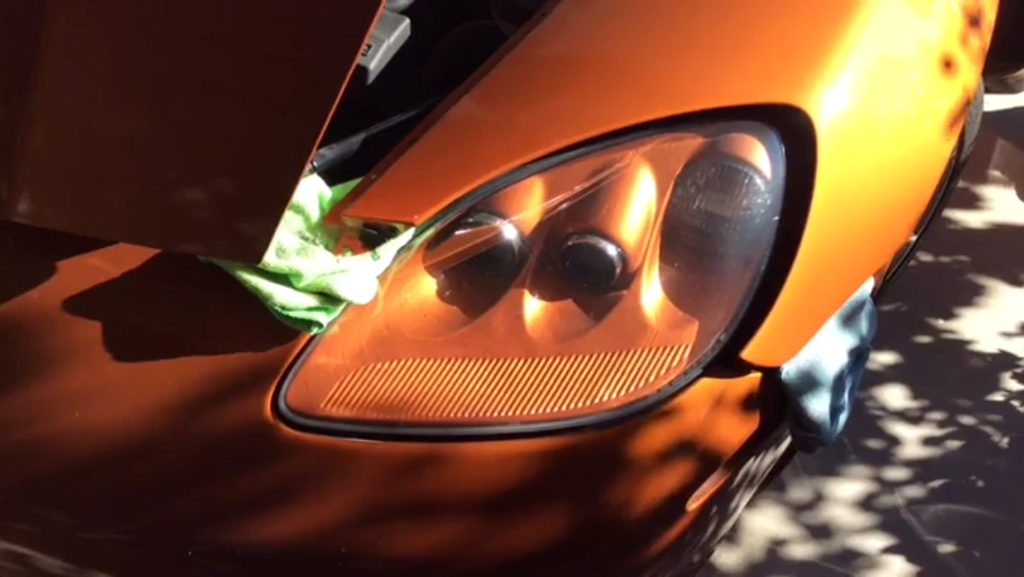
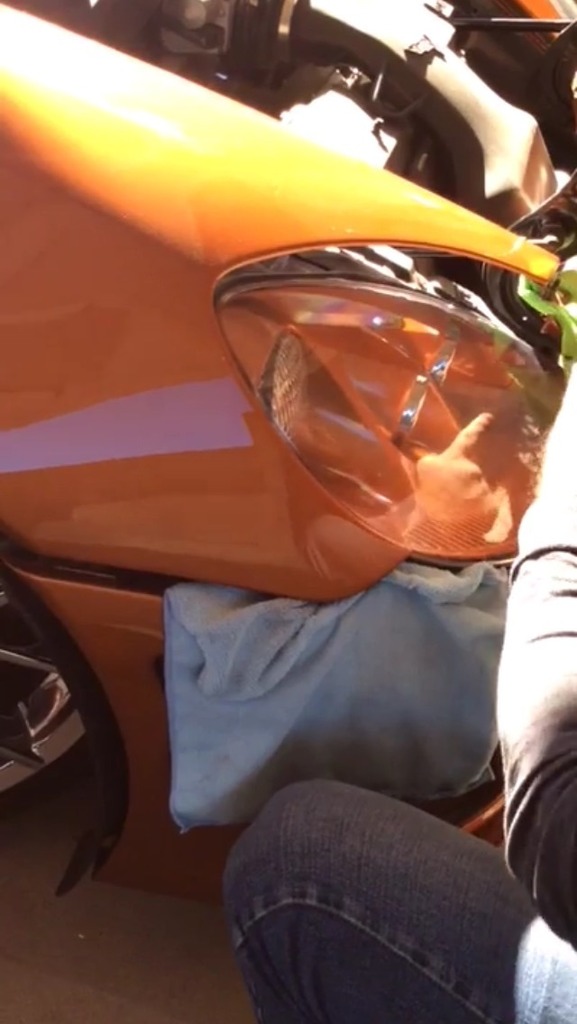
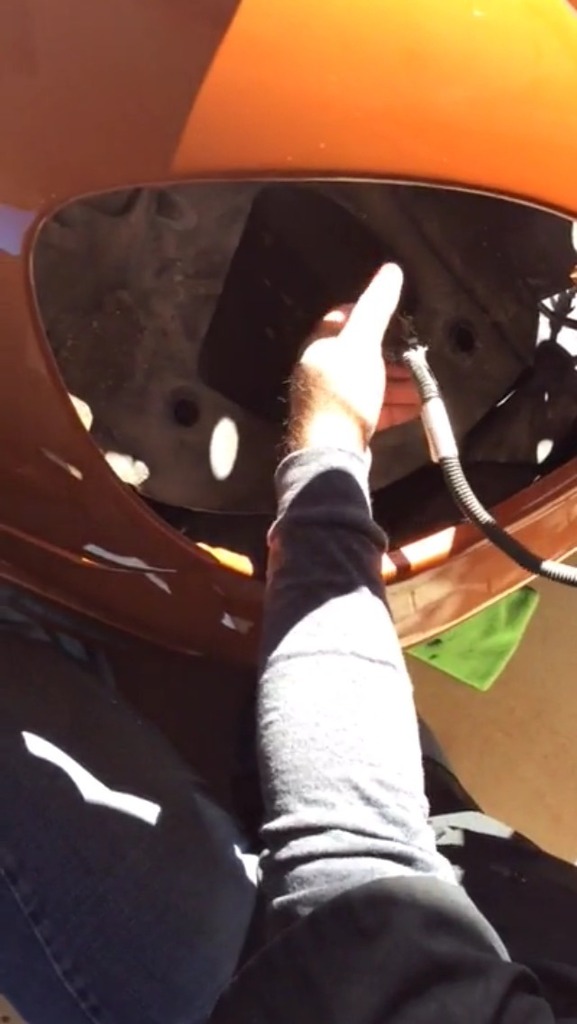
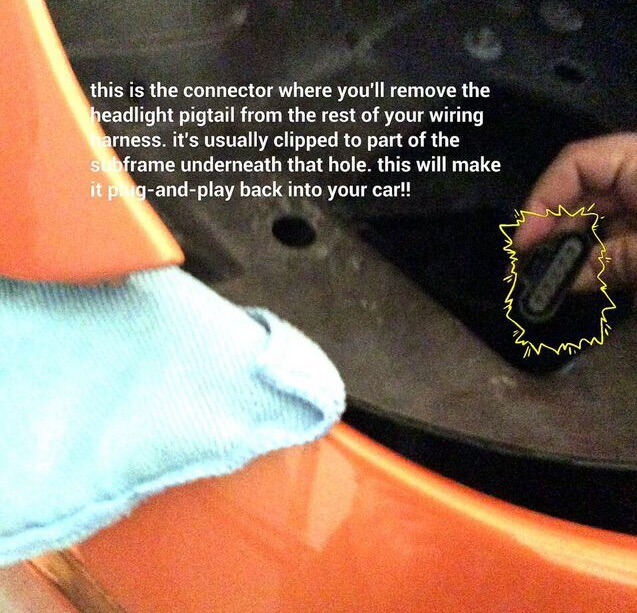
Disconnect the harness that is attached to the headlight at the connection point like the picture points out.
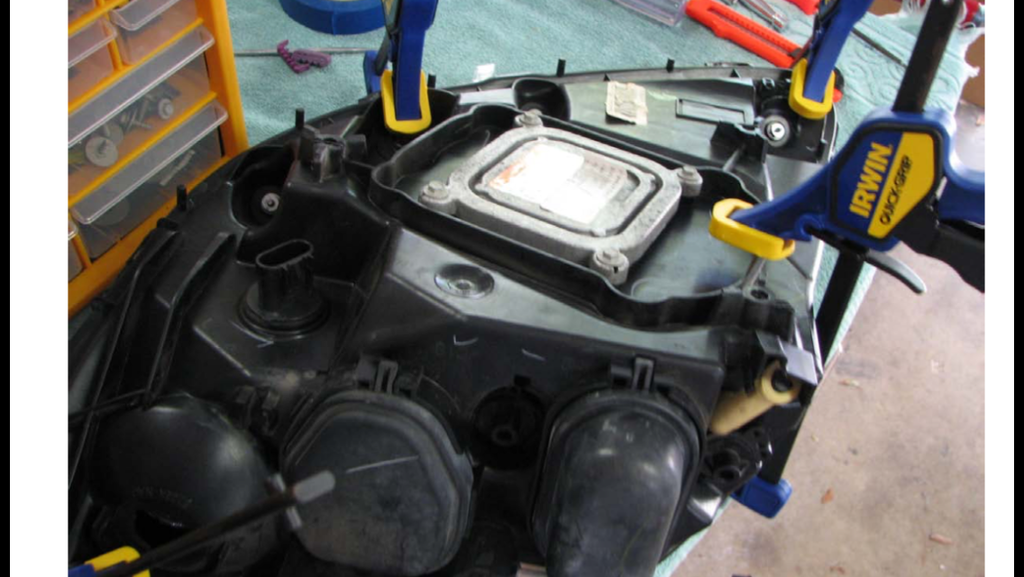
Ok now that the headlight is out off of the car we can get to the very tricky part. Be very patient with this and very careful so you wont break any tabs or anything like that. If you accidently break some tabs its ok thought i think because once you add the sealant with the clamps it will be air tight even without tabs. At least mine was because i broke 2 tabs and it didnt matter. But you still want to be careful.
Step #1 of opening the headlight (Follow the instructions on the pictures).
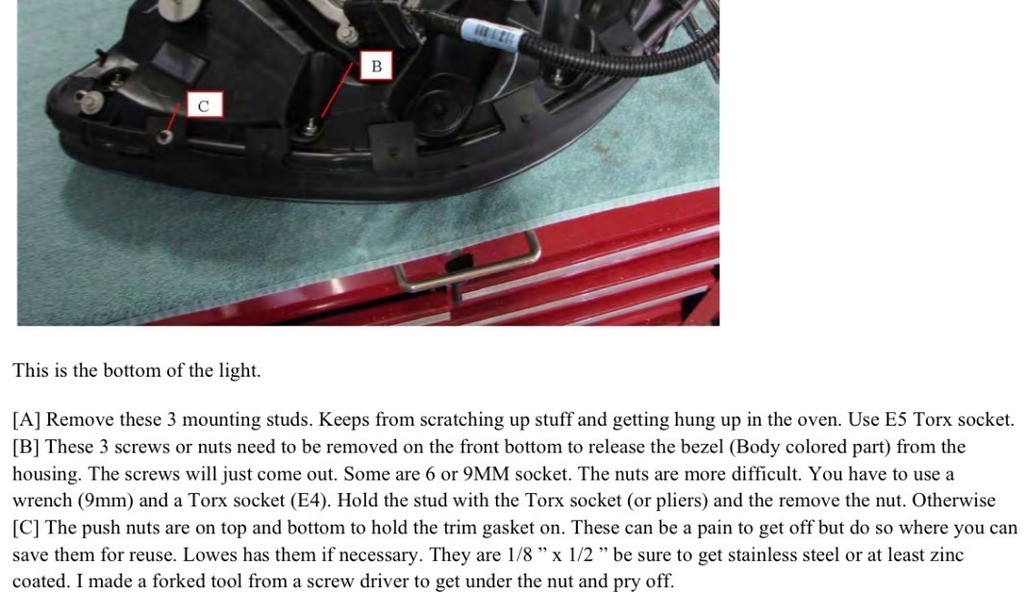
Remove the 3 screws at the bottom of the headlight. ( This step is optional, you dont have to remove the screws but it helps keep the headlight aligned and balanced while working on it and also keeps the screws from catching onto other things.)
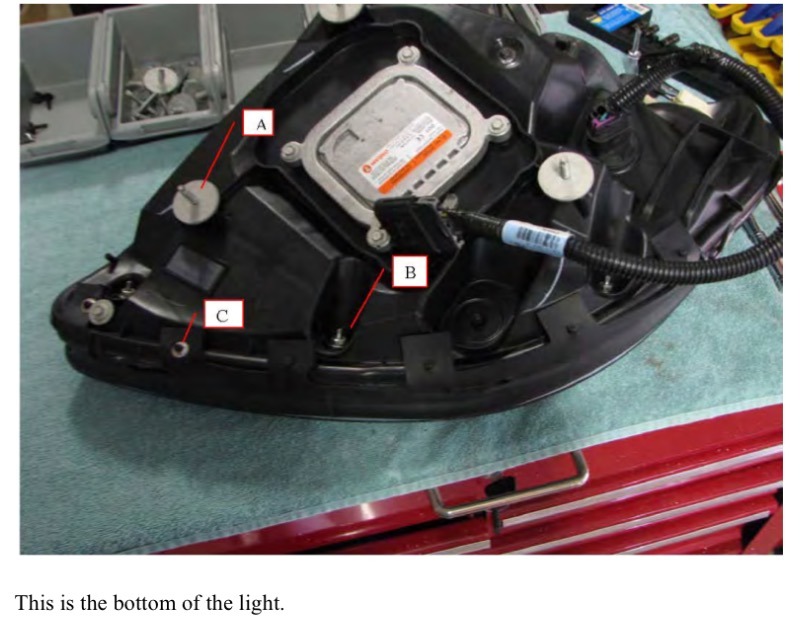
A) What holds the headlight assembly to the subframe. (Removal optional)
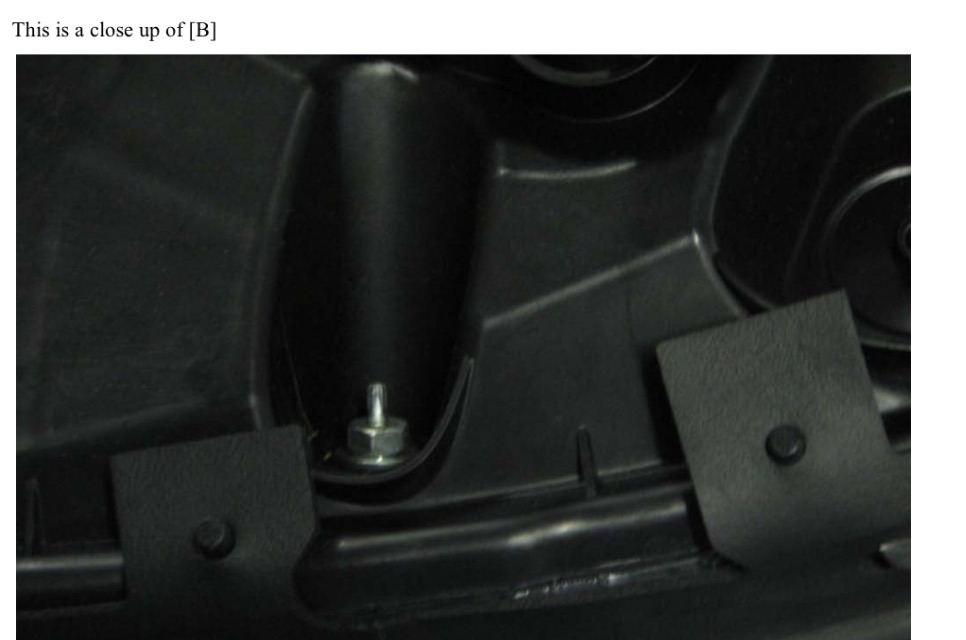
B) Holds the headlight housing to the bezel. (Since my car is an 06, my B screws were completely played out and old, there was no way to remove them so i just left them like that and while prying the headlight open they just broke off from the inside. But this didnt matter because the bezel is being held together to the lens by more torx screws and the lens will be held together to the housing with the sealant. But if you can safely remove the nuts then do so, mine were shot so they just broke off as i pryed the lens off the headlight housing.
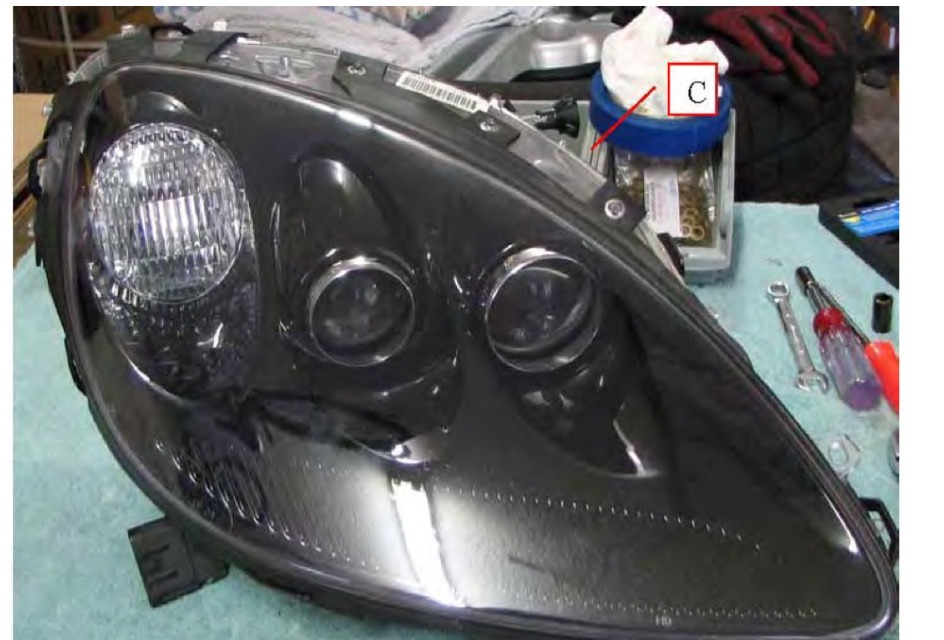
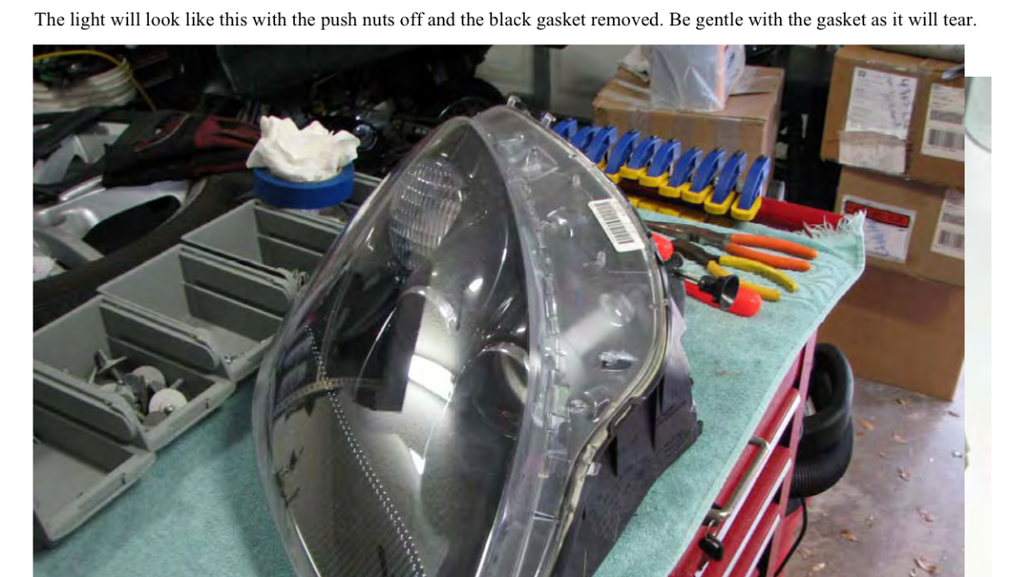
C) The push nuts hold the rubber gasket to the headlight. If you can bevery careful and try to get a pry tool to take them off and reuse them, if not its ok, lowes sells them fairly cheap. Just take an old one in and tell them you need new ones. Be very very careful when taking off the gasket because the older your car or the more its been exposed to the elements the more fragile your gasket is and the more likely it is to tear. You can always get new ones from dealer for $60 each or Ebay for $50 each. I reused my old one along with the old push nuts too.
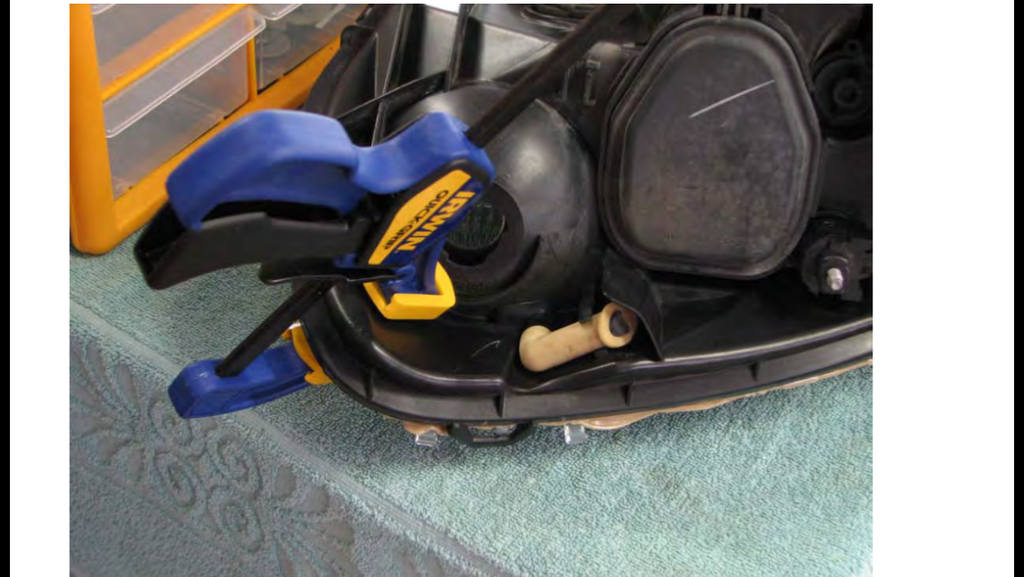
Step #2
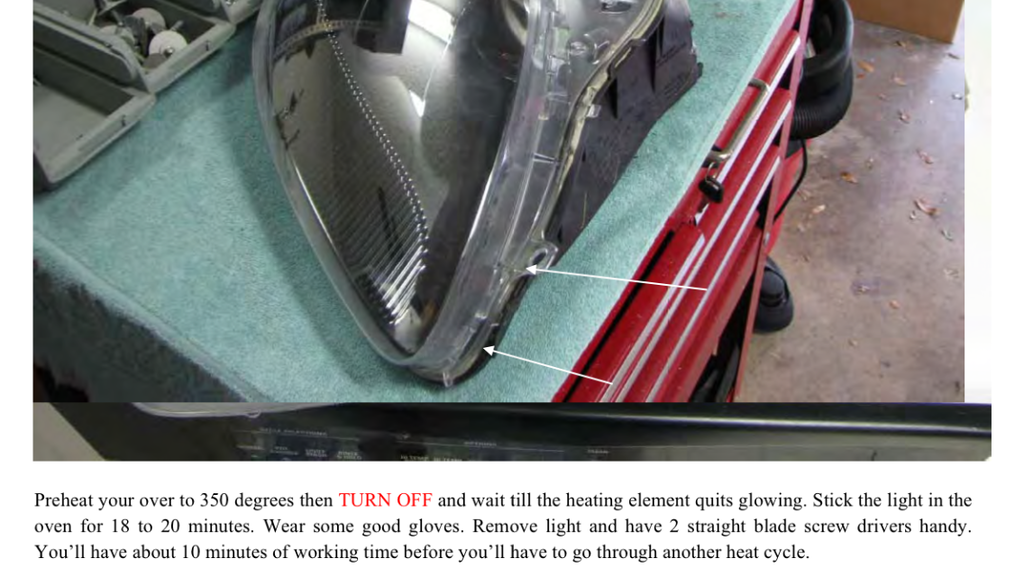
Preheat your oven to 350... as soon as it starts beeping Put the headlight assembly in there, close the oven door and then turn off the oven as soon as you close the oven door. Set up your timer for 20 minutes and wait.
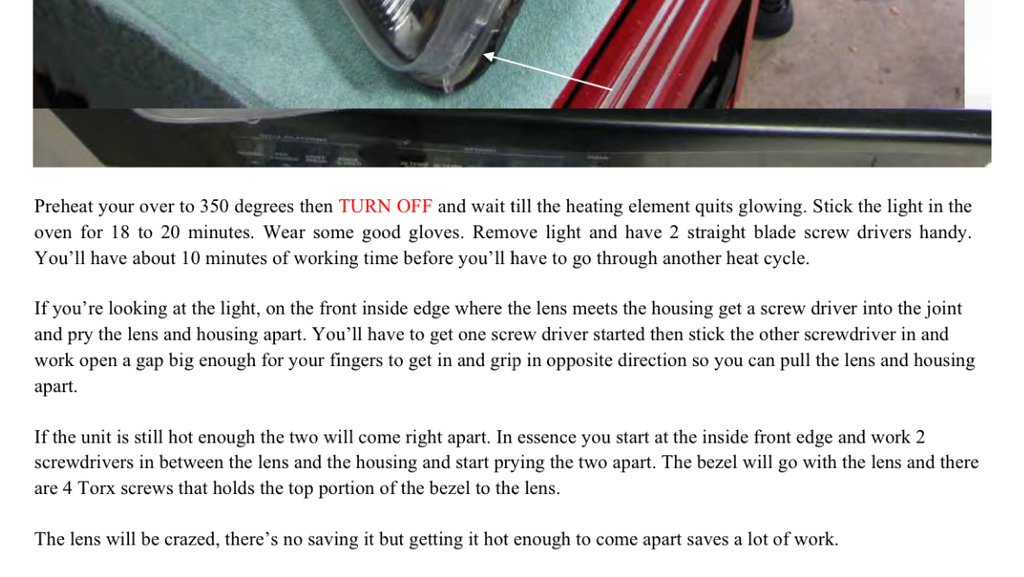
Step #3
Wear some good gloves because you will have to handle the headlight and it will be very hot. The quicker you can work the better because the heat will soften up the factory adhesive and you will be able to take the lense apart. Start at the inner bottom corber of the headlight like the picture says. Get 2-3 flat head screw drivers to pry open the inside corver first and leave the screw driver there. With another screw driver pry open another part a few inches away from the first screw driver and be careful with the tabs, pop them out as you go so you wont break them as you pry the headlight open. Start to pry between the two white arrows in the picture and work your way all the way around until you have completely separated the headlight housing from the lens.
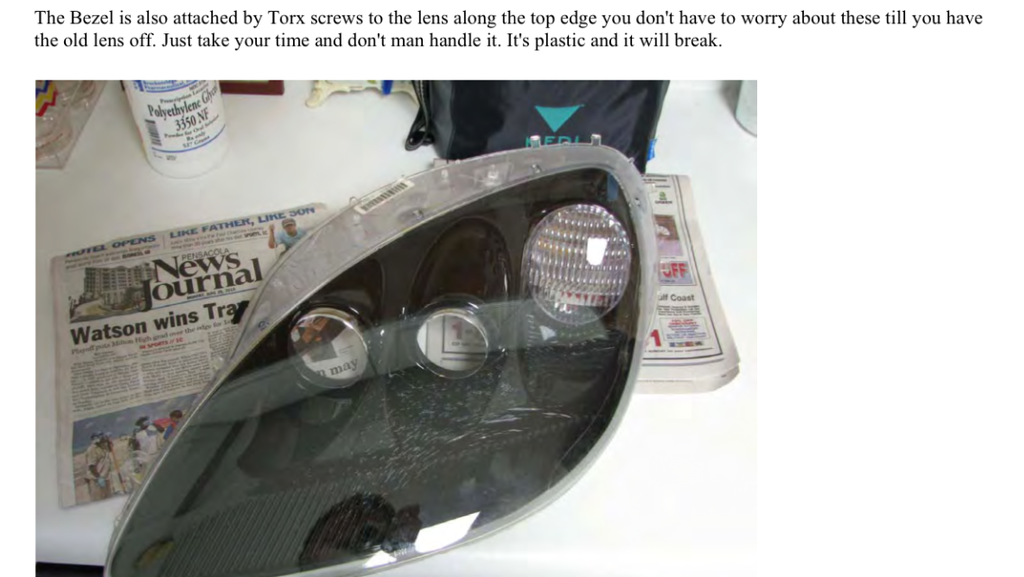
Step #4
Remove the screws that hold the bezel to the lens

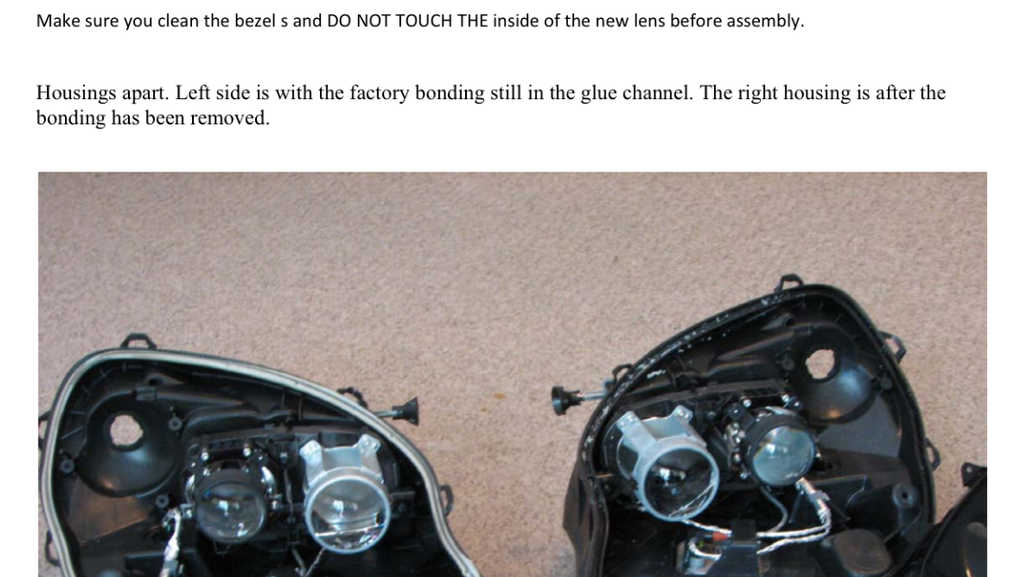
Step #5
Remove all the old sealant/adhesive from the glue channel. If the glue is still hot it will come out easier than if its cold. The quicker you work, the better. But still be very careful, you dont want to damage anything and have to buy a whole headlight assembly. if the heat wears out and the housing cools down an the glue is impossible to take off, reheat the housing for a few minutes. use your judgement on time and heat. i would say same temperature for a few minutes only.
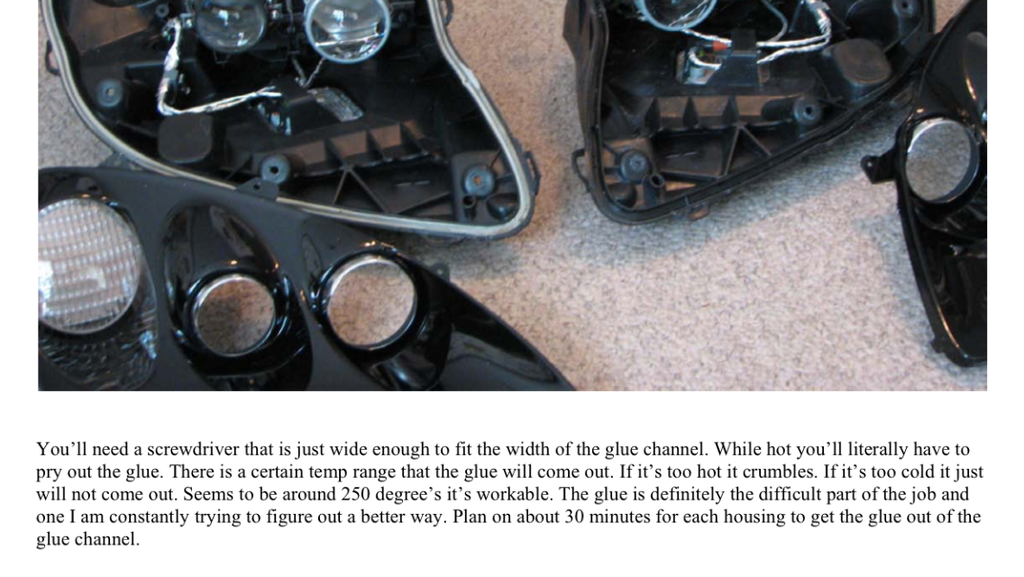
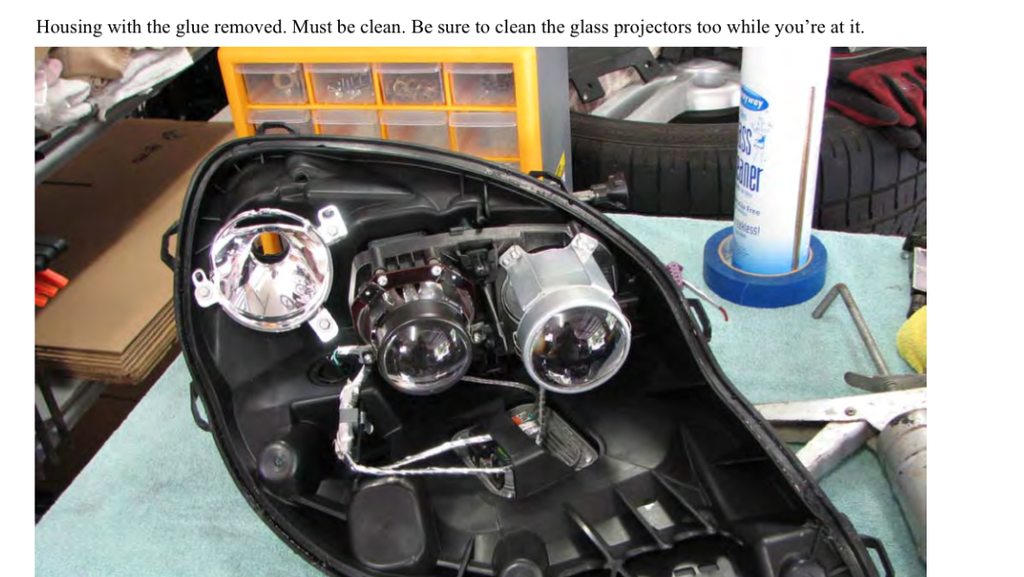
Clean the bezel very good along with the projectors and the wholw inside of the housing. I used simple household windex, worked great and cleans off any oil/grease that has build up overtime. Use a pressure air hose to blow out any and all dirt and dust particles just before putting the headlight togeather. Trust me, this is very important because if you dont and you are OCD like me, its going to kill you when you see your perfect crystal clear headlights on your car and a whole bunch of loose dust/dirt on the bezel because you forgot to blow it out.
Step #6
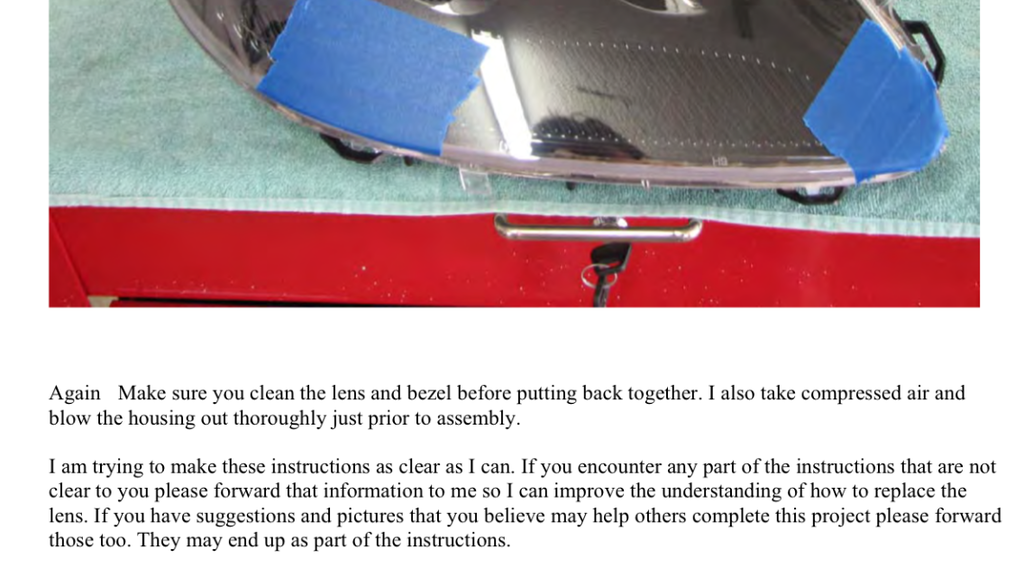
Step #7
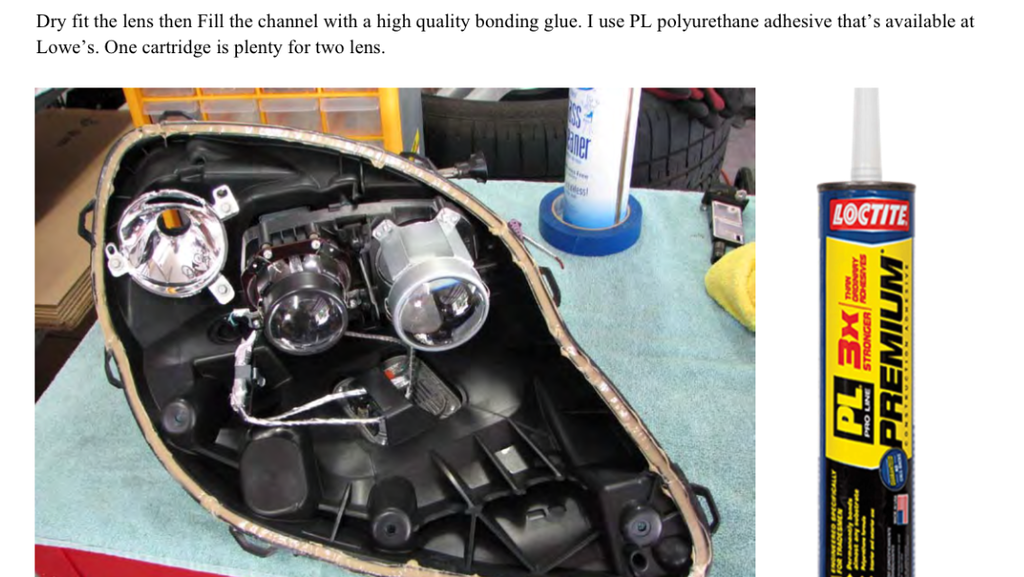
Fill that glue chanel with the new glue and fill that sucker, make sure you fill it completely to form that air tight seal... i went all out and put a ton of glue in there.
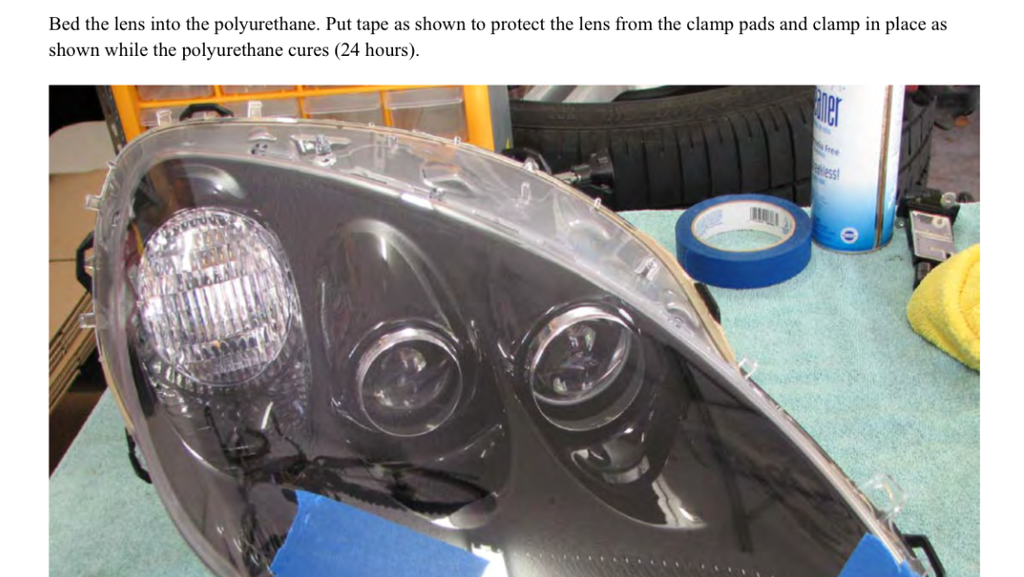
Clamp the headlight and the lenses togeather. If you use the clamps from the picture then make sure to put tape on the lense to prevent scratches. I also used different pressure clips bought at lowes for $1 each while i was getting the glue. These you dont need tape, just put them along the edges of the headlight. Try placing them in every corner. Use at least 5-6 on each headlight to make sure it creates an amazing air tight seal.
Now let the headlights sit for 24 hours before you put them back on the car (healing time). The glue might run a bit after you put the lenses togeather to the housing and add the clamps, its ok, just use your finger and run the excess glue along the side to create an even better seal, or you can whipe it off. Make sure you wipe off any sealant that is on the lense while its still wet, once it gets hard its a little difficult to take it off the lens.
These are the small clamps i used, they worked great also!
Reverse the installation process to put it all back together.
I might have forgot something or maybe some more detail, just send me a message with any questions. Thanks.
If you are sick of seeing your beautiful corvette with those hazy, cracked, ugly, yellowish old lenses and you tried to polishe them, sand them etc and nothing worked, then its time to change thise suckers out. Here is how;
This is a DIY for replacing (swapping out) the headlight lenses on the C6 Corvette 2005-2013 Base, Grand Sport, Z06 ...etc. I am NOT liable for any damage you cause to your car while doing this. This DIY is for educational purposes only, do at your own risk. Some of the pictures and information i will use are mine and some are not. Some of the info belongs to RSI who is the vendor for the lenses i buy. Bare with me, it is now 3:15 am i have to go to work at 7am and i am up doing this DIY asap because a forum member sent me a pm saying he needed urgent help opening the lense and the type of glue to use, temperature to set the oven etc. If you get stuck on something or just need extra tips just send me a pm, i will reply as soon as i can. So here it goes....
First some before and after pictures. New lense is dirty from the outside but you get the idea.
Before

After

Aside from changing the old lense now is the time to add the halos or leds inside the housing if you like that, i like to keep it looking stock so i didnt do that.
Items Nedded:
***** 2 new lenses (can be found on ebay or from other corvette stores online etc) I buy them from a guy on ebay, very good quality and quick shipping for $310


***** At least 1 can of adhesive

***** Good set of gloves to handle the HOTTTTT Headlight
***** Few flat head screwdrivers
***** Few microfiber towels
***** 10-14 small pressure clips or 8-10 clamps
***** Cleaning solution
***** Pressure air hose (If you have one) really comes in handy
***** Several household tools (torx tools, etc...)
Step #1
is to remove all the torx screws along the top of the fenders. There are 6 screws you can see right away, once you take those out you will have to pull the plastic where i circled in the picture closest to the windshield and remove that screw too. there is another screw towards the bottom of the fender under the plastic part of the fender by the headlight that i also circled, remove that screw too.


Step #2

Step #3
Pop the plastic corner of the bumper out by getting a microfiber cloth to protect the paint, stick a flat head screw driver between the headlight and the bumper corner and firmly apply pressure upwards. should pop right out without any damage and you should be able to just pop it back in when putting everything back togeather.


Step #4
Remove the screws holding the plastic wheel well to the front bumper, i think its like 5-6 torx screws.


Step #5
Unscrew the 2 or 3 nuts holding the bumper to the fender inside the wheel well.


Step #6
This step is a bit tricky but very doable. Having skinny/thin arms helps, long arms too. You are going to put your hand inside the wheel well between the plastic well and the front bumper and you are going to feel for the 3 nuts holding the headlight togeather. once you feel where the nuts are, losen them with one turn and they will immdiately loosed up and can be taken out by hand. Work your hands/arms between those body parts so you wont have to take anything off the car. A flashlight is useful to see exactly where those nuts are at before you go in there feeling for them.

Step #7
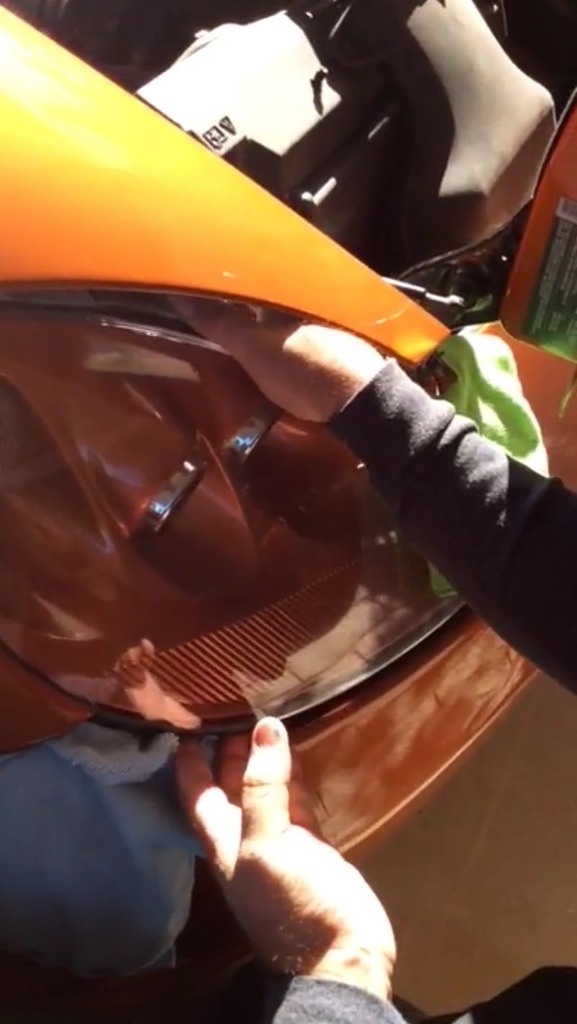
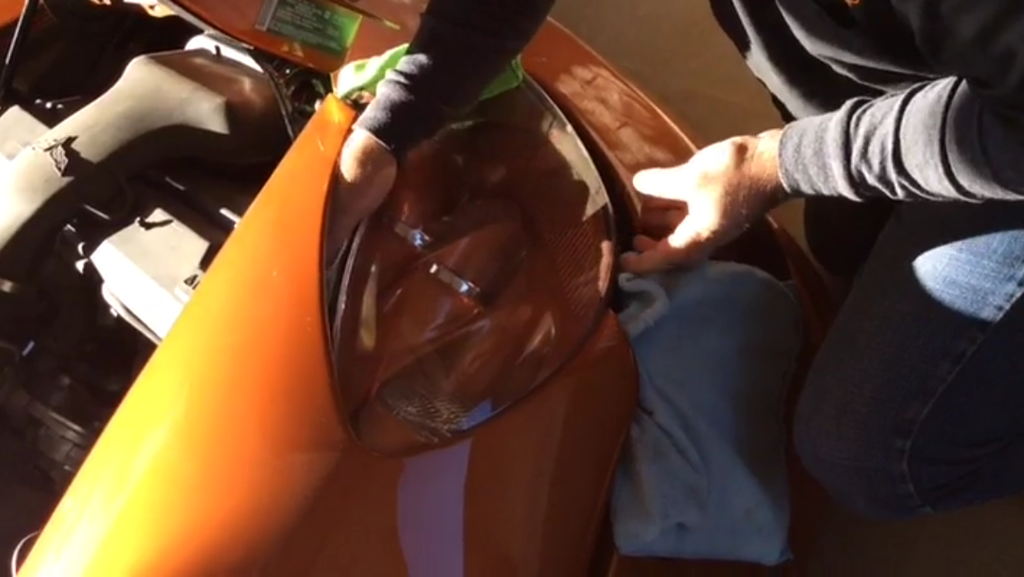
Once you take off all 3 screws from each headlight come back up to the top of the car and place a few microfiber cloths in the body panels that will be moving to avoid scratches. This step can be done alone but is MUCH better with the help of another person, one person moved the body panels away from the headlights (opens them up) and the other person grabs the headlight like in the picture and moves it around carefully in an upward position (straight up) and down towards you until the whole headlight assembly comes out.


Step #8
Disconnect the harness that is attached to the headlight at the connection point like the picture points out.


Ok now that the headlight is out off of the car we can get to the very tricky part. Be very patient with this and very careful so you wont break any tabs or anything like that. If you accidently break some tabs its ok thought i think because once you add the sealant with the clamps it will be air tight even without tabs. At least mine was because i broke 2 tabs and it didnt matter. But you still want to be careful.
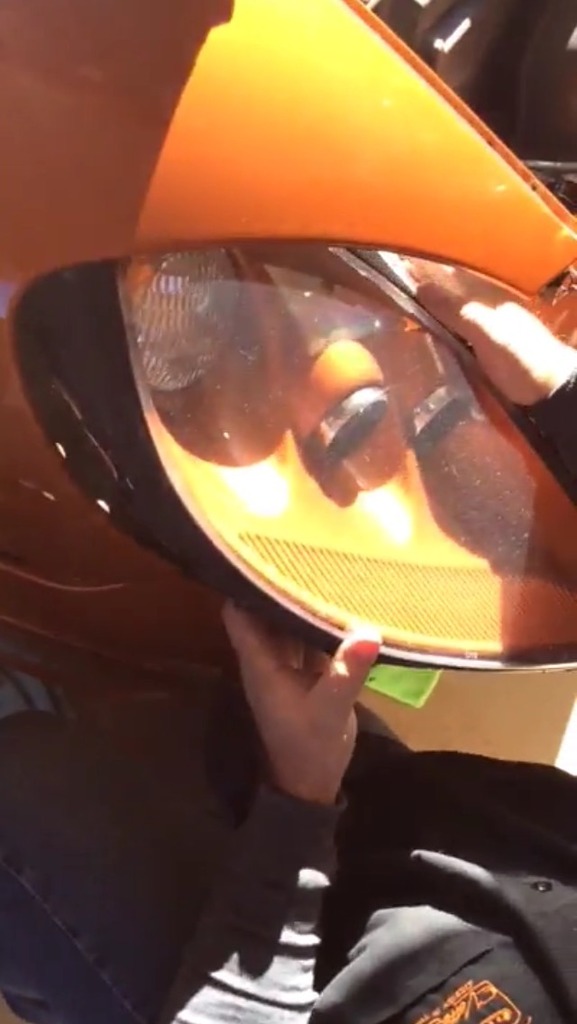
Step #1 of opening the headlight (Follow the instructions on the pictures).
Remove the 3 screws at the bottom of the headlight. ( This step is optional, you dont have to remove the screws but it helps keep the headlight aligned and balanced while working on it and also keeps the screws from catching onto other things.)

A) What holds the headlight assembly to the subframe. (Removal optional)
B) Holds the headlight housing to the bezel. (Since my car is an 06, my B screws were completely played out and old, there was no way to remove them so i just left them like that and while prying the headlight open they just broke off from the inside. But this didnt matter because the bezel is being held together to the lens by more torx screws and the lens will be held together to the housing with the sealant. But if you can safely remove the nuts then do so, mine were shot so they just broke off as i pryed the lens off the headlight housing.
C) The push nuts hold the rubber gasket to the headlight. If you can bevery careful and try to get a pry tool to take them off and reuse them, if not its ok, lowes sells them fairly cheap. Just take an old one in and tell them you need new ones. Be very very careful when taking off the gasket because the older your car or the more its been exposed to the elements the more fragile your gasket is and the more likely it is to tear. You can always get new ones from dealer for $60 each or Ebay for $50 each. I reused my old one along with the old push nuts too.


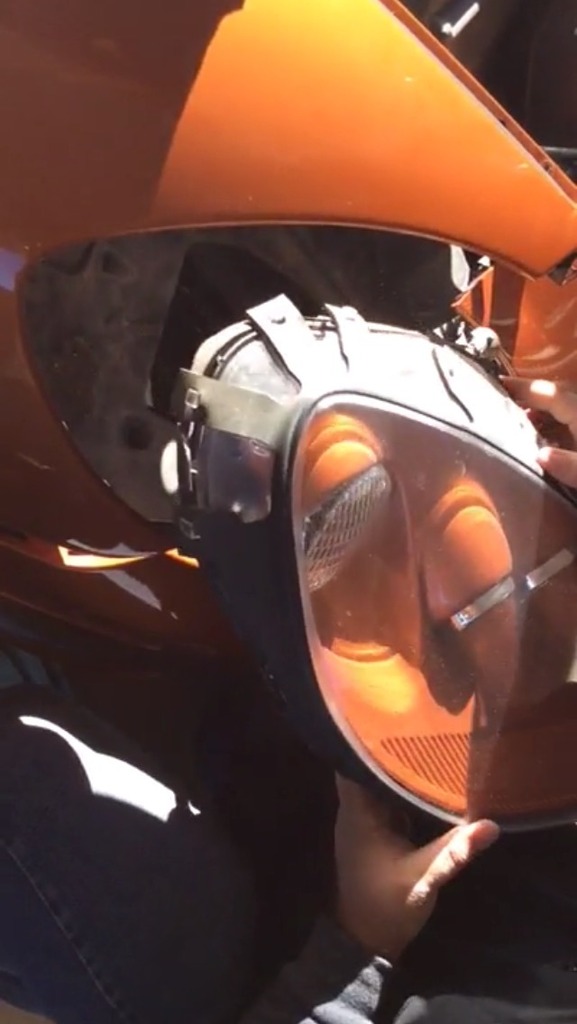
Step #2
Preheat your oven to 350... as soon as it starts beeping Put the headlight assembly in there, close the oven door and then turn off the oven as soon as you close the oven door. Set up your timer for 20 minutes and wait.

Step #3
Wear some good gloves because you will have to handle the headlight and it will be very hot. The quicker you can work the better because the heat will soften up the factory adhesive and you will be able to take the lense apart. Start at the inner bottom corber of the headlight like the picture says. Get 2-3 flat head screw drivers to pry open the inside corver first and leave the screw driver there. With another screw driver pry open another part a few inches away from the first screw driver and be careful with the tabs, pop them out as you go so you wont break them as you pry the headlight open. Start to pry between the two white arrows in the picture and work your way all the way around until you have completely separated the headlight housing from the lens.


Step #4
Remove the screws that hold the bezel to the lens


Step #5
Remove all the old sealant/adhesive from the glue channel. If the glue is still hot it will come out easier than if its cold. The quicker you work, the better. But still be very careful, you dont want to damage anything and have to buy a whole headlight assembly. if the heat wears out and the housing cools down an the glue is impossible to take off, reheat the housing for a few minutes. use your judgement on time and heat. i would say same temperature for a few minutes only.


Clean the bezel very good along with the projectors and the wholw inside of the housing. I used simple household windex, worked great and cleans off any oil/grease that has build up overtime. Use a pressure air hose to blow out any and all dirt and dust particles just before putting the headlight togeather. Trust me, this is very important because if you dont and you are OCD like me, its going to kill you when you see your perfect crystal clear headlights on your car and a whole bunch of loose dust/dirt on the bezel because you forgot to blow it out.
Step #6


Step #7
Fill that glue chanel with the new glue and fill that sucker, make sure you fill it completely to form that air tight seal... i went all out and put a ton of glue in there.
Clamp the headlight and the lenses togeather. If you use the clamps from the picture then make sure to put tape on the lense to prevent scratches. I also used different pressure clips bought at lowes for $1 each while i was getting the glue. These you dont need tape, just put them along the edges of the headlight. Try placing them in every corner. Use at least 5-6 on each headlight to make sure it creates an amazing air tight seal.


Now let the headlights sit for 24 hours before you put them back on the car (healing time). The glue might run a bit after you put the lenses togeather to the housing and add the clamps, its ok, just use your finger and run the excess glue along the side to create an even better seal, or you can whipe it off. Make sure you wipe off any sealant that is on the lense while its still wet, once it gets hard its a little difficult to take it off the lens.
These are the small clamps i used, they worked great also!

Reverse the installation process to put it all back together.
I might have forgot something or maybe some more detail, just send me a message with any questions. Thanks.
Last edited by LS3_Beast; 08-08-2015 at 12:41 PM.

The following 7 users liked this post by LS3_Beast:
corvettezman (05-20-2017),
johnusa (10-23-2015),
Kent1999 (03-18-2016),
Never-Enough (03-16-2016),
NoProxyFound (06-20-2017),
and 2 others liked this post.


 08-08-2015, 11:02 AM
#4
Team Owner


you have any issue with excess glue??
08-08-2015, 12:40 PM
#5
Instructor
Thread Starter
Thank You
Thank you
No issues at all, looks a little messy where the lens meets the housing but it's covered with the gasket and will not be seen when installed in the car. I just wanted to make sure that the seal was going to hold. But I did over do it a bit haha.
Thank you
No issues at all, looks a little messy where the lens meets the housing but it's covered with the gasket and will not be seen when installed in the car. I just wanted to make sure that the seal was going to hold. But I did over do it a bit haha.
08-08-2015, 01:31 PM
#6
Team Owner
PM me if you want to make this a "sticky" thread
08-08-2015, 10:23 PM
#8
Instructor
while the glue is curing, any that oozed out of the channel comes off easily if you just roll it off with your finger, catch it before it gets too hard and there is a good chance the glue job will be perfect
 08-09-2015, 10:33 PM
#10
Great write-up. But not sure if I'd ever attempt this.
08-10-2015, 09:31 AM
#11
Safety Car

LS3 Beast - great work! Since pictures sometimes disappear later from threads, I took your original post and created a PDF of it, here it is. If you or the mods want me to remove it, just let me know, because I don't want to offend you or take any credit for your work.
The following users liked this post:
Marconi7 (10-18-2016)

 10-29-2015, 02:53 PM
#14
Instructor
Thread Starter
Thank you!
Sorry it's been a while since I've been on here. My wife and I had twins and have been sooo busy with them! I'm glad this helped you guys out!
 10-29-2015, 04:54 PM
#17
Racer
New headlight assembly are around a grand each. I want to do this but it is rather intimidating especially when the OP says "here's the tricky part" then "here's the really tricky part" worried I might f*** something up! I will probably pull the trigger on this at some point so thank you OP for the write up
10-30-2015, 09:12 AM
#18
Racer
Member Since: Dec 2006
Location: Indiana
Posts: 369
Likes: 0
Received 0 Likes
on
0 Posts
New headlight assembly are around a grand each. I want to do this but it is rather intimidating especially when the OP says "here's the tricky part" then "here's the really tricky part" worried I might f*** something up! I will probably pull the trigger on this at some point so thank you OP for the write up
 10-30-2015, 06:28 PM
#19
Le Mans Master

Member Since: Oct 2005
Location: Left Coast, San Diego
Posts: 6,654
Received 2,093 Likes
on
1,207 Posts

Outstanding job! I will try a lot of things but the chicken in me would make an appearance when it comes to this job!!!
10-30-2015, 06:57 PM
#20
Melting Slicks

New headlight assembly are around a grand each. I want to do this but it is rather intimidating especially when the OP says "here's the tricky part" then "here's the really tricky part" worried I might f*** something up! I will probably pull the trigger on this at some point so thank you OP for the write up

At least I know never to try this..
Great write up OP!