

 03-25-2015, 02:00 PM
Last edit by: IB Advertising
See related guides and technical advice from our community experts:
Browse all: Interior How-Tos
- C6 Corvette: How to Install Backup Camera
Step by step instructions for do-it-yourselfers...
Browse all: Interior How-Tos

C6 Backup Camera Install
12-06-2013, 09:51 AM
#1
Instructor

Thread Starter

I searched the forum and could not find a detailed BU camera install so I thought I would document mine.
Any camera install assumes that you have an aftermarket double din radio with a back up video input and reverse wire.
I installed a Kenwood DNX570HD unit last spring because the stock Bose unit is a piece of junk. I can only advise on the Kenwood units but I would assume the most of the other aftermarket radio manufactures supply a BU input. Since you have gotten this far you must have already installed your new radio so I am going to assume you know how to remove the dash bezel and the radio again.
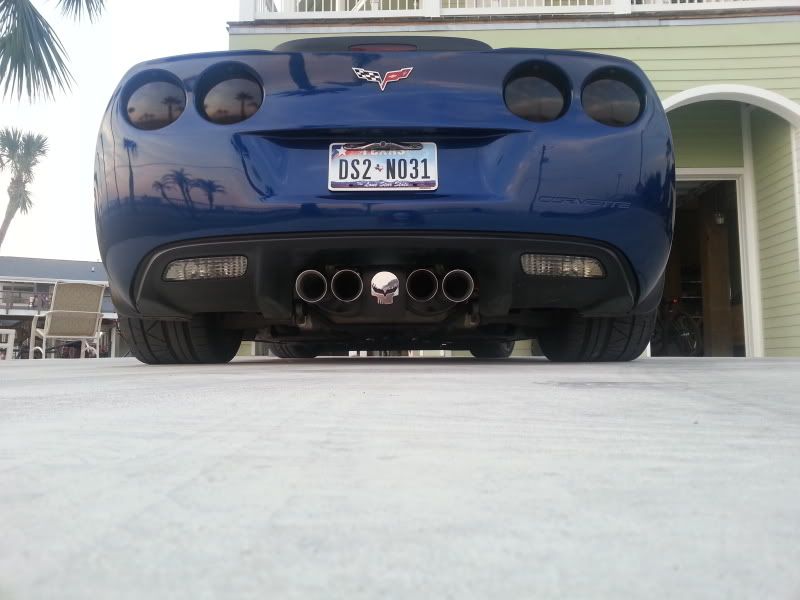
I purchased Pyle PLCM18SC License Plate Mount Rearview Backup Color Camera with Distance Scale Line (Zinc Metal Chrome) from Amazon for less than $30. Install was very simple because it uses the liscece plate bolts and the wiring just tucks up behind the lights. Make sure you install the camera with the adjusting screws facing down. That way you can rotate the camera while it is installed and the video will not be upside down. (I put it on wrong side up the first time.)
Now you need to remove both passenger side tail lights to get access to the wiring.
Also remove the trunk trim panel that covers the lock. There are two screws on each side and two push in plugs near the latch hole.
The camera came with a long RCA cable so plug one end into the BU port in the radio and find the reverse wire. These two wires need to be run down the center console and under the carper to the back wall where the trunk latch is. You will need to remove the center arm rest panel (two bolts under oval covers at rear and slide to the rear) so that you can run the wires under it and under the carpet that goes over the waterfall panel. From the front I lifted the trunk carpet and pushed the wires as far to the rear as I could then went to the back and reached under the rear of the trunk carpet and pulled the wires through.
Now comes the nasty part. You have to drill a 1/2" hole in the inner rear panel to get the RCA plug back to the camera Then I used some leftover Hush Mat to seal the hole on both sides of the inner bulkhead.
Next plug the RCA video cables together and locate the harness that goes to the RH backup light. It is clipped behind the RH outer tail light.
Strip back the tape and find the green and black wires. I used 3M connectors so I did not cut any wires. Connect the reverse wire from the radio and the red wire from the camera to the green wire and then the black from the camera to the black back up light wire. Next make sure the radio is set correctly. See photo. Other radios might have different setting.
Now test the camera before putting everything back together.
Start the car and put in reverse.

Now put everything back together and go test drive. I forgot to mention that my main reason for installed the camera was I was tired of backing into parking spots and being 5 feet from the curb with the nose of the car sticking out in the traffic lane.
Here are the final pictures. After some trial and error I figured that if I backed in with the red line to the back of the curb then I would be about 2 feet from the curb.
Any camera install assumes that you have an aftermarket double din radio with a back up video input and reverse wire.
I installed a Kenwood DNX570HD unit last spring because the stock Bose unit is a piece of junk. I can only advise on the Kenwood units but I would assume the most of the other aftermarket radio manufactures supply a BU input. Since you have gotten this far you must have already installed your new radio so I am going to assume you know how to remove the dash bezel and the radio again.
I purchased Pyle PLCM18SC License Plate Mount Rearview Backup Color Camera with Distance Scale Line (Zinc Metal Chrome) from Amazon for less than $30. Install was very simple because it uses the liscece plate bolts and the wiring just tucks up behind the lights.
Make sure you install the camera with the adjusting screws facing down. That way you can rotate the camera while it is installed and the video will not be upside down. (I put it on wrong side up the first time.)Now you need to remove both passenger side tail lights to get access to the wiring.
Also remove the trunk trim panel that covers the lock. There are two screws on each side and two push in plugs near the latch hole.
The camera came with a long RCA cable so plug one end into the BU port in the radio and find the reverse wire. These two wires need to be run down the center console and under the carper to the back wall where the trunk latch is. You will need to remove the center arm rest panel (two bolts under oval covers at rear and slide to the rear) so that you can run the wires under it and under the carpet that goes over the waterfall panel. From the front I lifted the trunk carpet and pushed the wires as far to the rear as I could then went to the back and reached under the rear of the trunk carpet and pulled the wires through.
Now comes the nasty part. You have to drill a 1/2" hole in the inner rear panel to get the RCA plug back to the camera
Then I used some leftover Hush Mat to seal the hole on both sides of the inner bulkhead.Next plug the RCA video cables together and locate the harness that goes to the RH backup light. It is clipped behind the RH outer tail light.
Strip back the tape and find the green and black wires. I used 3M connectors so I did not cut any wires. Connect the reverse wire from the radio and the red wire from the camera to the green wire and then the black from the camera to the black back up light wire. Next make sure the radio is set correctly. See photo. Other radios might have different setting.
Now test the camera before putting everything back together.
Start the car and put in reverse.
Now put everything back together and go test drive. I forgot to mention that my main reason for installed the camera was I was tired of backing into parking spots and being 5 feet from the curb with the nose of the car sticking out in the traffic lane.
Here are the final pictures. After some trial and error I figured that if I backed in with the red line to the back of the curb
then I would be about 2 feet from the curb.
Last edited by Crisis; 12-06-2013 at 09:57 AM.

The following users liked this post:
wz882j (07-04-2017)


 12-06-2013, 09:59 AM
#3
Melting Slicks

Have the same camera. I am jealous your headunit has the distance on there. I have a DDX719 which is prob an older model Kenwood. All in all I love the backup camera. Works well. Thinking about upgrading to one of the newer units where it has both a front and reverse camera input.
12-06-2013, 10:02 AM
#5
Instructor
Thread Starter
Have the same camera. I am jealous your headunit has the distance on there. I have a DDX719 which is prob an older model Kenwood. All in all I love the backup camera. Works well. Thinking about upgrading to one of the newer units where it has both a front and reverse camera input.
12-06-2013, 10:05 AM
#6
Instructor
Thread Starter
The radio was around $900 from DoubleDMods. When I was looking for cameras I found some that came with a screen so you could go that way or there are aftermarket rear view mirrors with built in screens.
12-06-2013, 10:07 AM
#7
Melting Slicks
 12-06-2013, 10:09 AM
#8
Instructor
Member Since: May 2013
Location: Prescott AZ
Posts: 164
Likes: 0
Received 0 Likes
on
0 Posts

I'm running a JVC DVD head unit w/o NAV that cost less than $400, and sounds great, so there are lots of options for less $$ if you don't care about NAV. I haven't installed my backup camera yet, so this thread will be helpful... thanks!
12-06-2013, 10:16 AM
#10
Melting Slicks
12-06-2013, 10:25 AM
#11
Instructor
Member Since: May 2013
Location: Prescott AZ
Posts: 164
Likes: 0
Received 0 Likes
on
0 Posts
This is similar to the one I ended up with:
http://www.crutchfield.com/p_105ADV6....html?tp=20217
Bluetooth, Sirius, DVD, and works w/ backup camera... $369...
http://www.crutchfield.com/p_105ADV6....html?tp=20217
Bluetooth, Sirius, DVD, and works w/ backup camera... $369...
12-06-2013, 12:25 PM
#12
Pro

Is that camera compatible with the factory Nav, like plug & play?
12-06-2013, 12:45 PM
#13
Team Owner

This is similar to the one I ended up with:
http://www.crutchfield.com/p_105ADV6....html?tp=20217
Bluetooth, Sirius, DVD, and works w/ backup camera... $369...
http://www.crutchfield.com/p_105ADV6....html?tp=20217
Bluetooth, Sirius, DVD, and works w/ backup camera... $369...
Or something from Amazon.com?
12-06-2013, 02:03 PM
#14
Drifting

You might get pulled over in some states for obscurring the plate.
Have a simple $5 solution at a local auto parts store... added to your plate.
Raises the location to make the LEO happy.
(Mounted to a Chevy Avalanche - clearance may be an issue with the C6.)


Have a simple $5 solution at a local auto parts store... added to your plate.
Raises the location to make the LEO happy.
(Mounted to a Chevy Avalanche - clearance may be an issue with the C6.)
Last edited by Bandit's C4; 12-06-2013 at 04:51 PM.
12-06-2013, 02:26 PM
#15
Instructor
Thread Starter