
Replaced DRLs with SilverStar Lamps
 12-30-2006, 11:53 PM
#1
Instructor

Thread Starter
There have been a couple of threads about doing this, but I thought I could provide a few tips in a new thread.
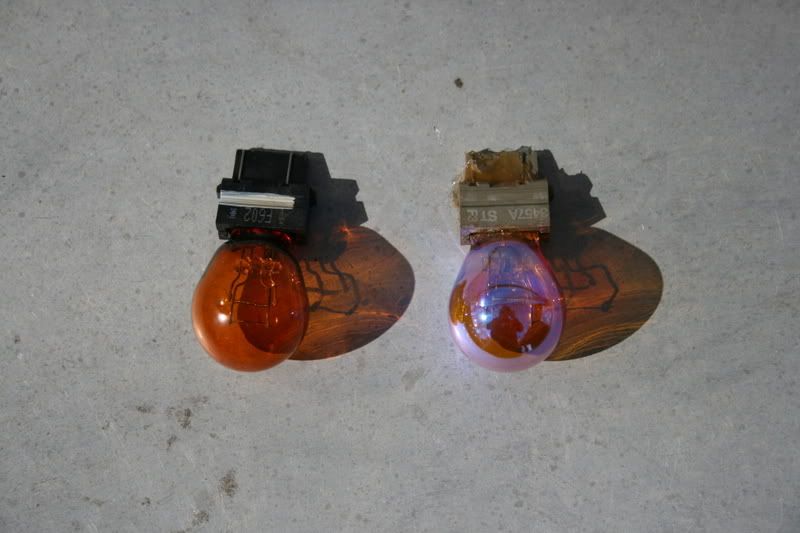
You can get a pack with two bulbs for $9.95 at Pep Boys. The Sylvania number is 3457AST. Here is a pic of the stock and SilverStar bulbs side by side. It looks like the difference is a dichroic coating on the SilverStar bulb.
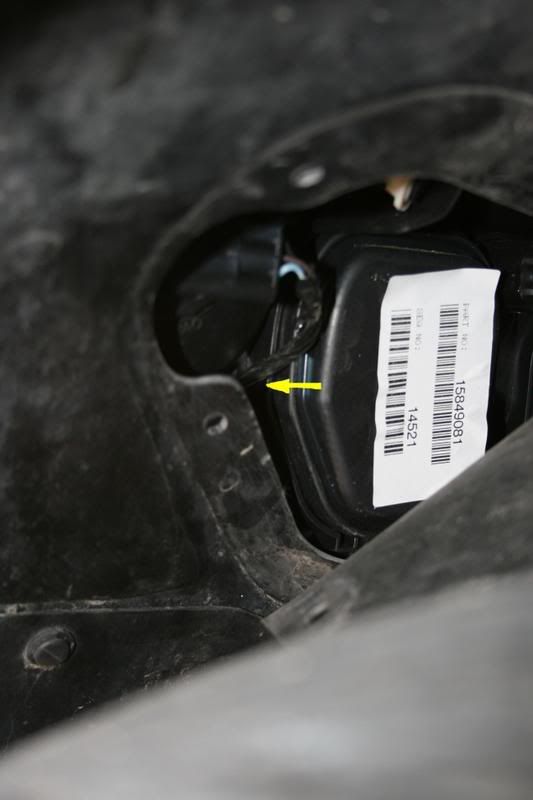
The manual for my 2007 has pretty sparse directions on page 373 for changing out the bulbs, but it got me to the right access area inside the wheel well forward of the tire. The back side of the headlamp assembly is hidden by a rubber flap that's fastened to the fender liner with two-piece push-on plastic pins. I turned the wheels to the right to get at the passenger side, to the left for the driver's side, as you can see in this pic of that area with the flap in place.

Another forum member noted that jacking the car to raise the wheel well relative to the wheel provides more room to work. I have small hands and was able to complete the job without using a jack.
You only need to remove the outer three plastic pins that are marked in the photo above to be able to fold the flap out of the way and see the back of the headlight assemby and the DRL wiring and socket. This pic was taken at the best angle I could find, but it is still hard to see the socket - shown by the arrow:
I used a pair of diagonal cutters to pull out the center pin of the fasteners to release them, taking care not to cut the pins.
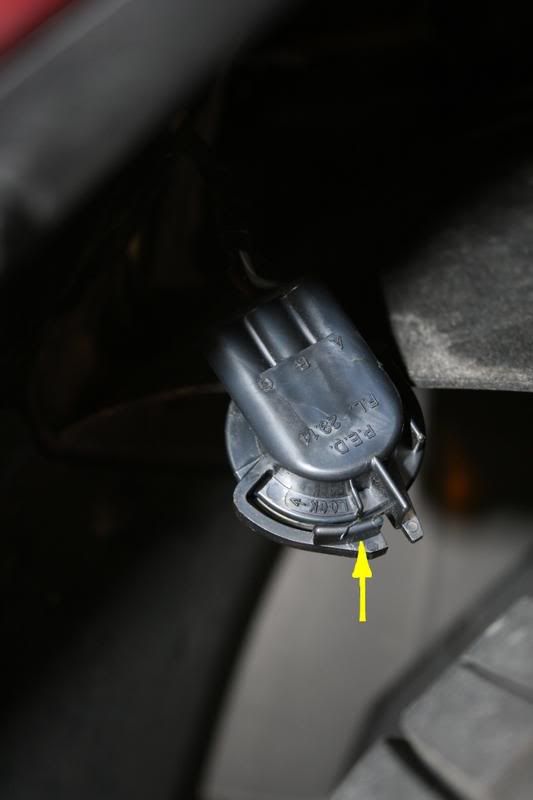
The socket must be turned about 30 degrees counter-clockwise to release it from the assembly. When released the socket can be pulled straight back out of the assembly. This pic shows the socket released and turned so you can see the rear of the socket; a release tab, discussed below, is marked with an arrow.
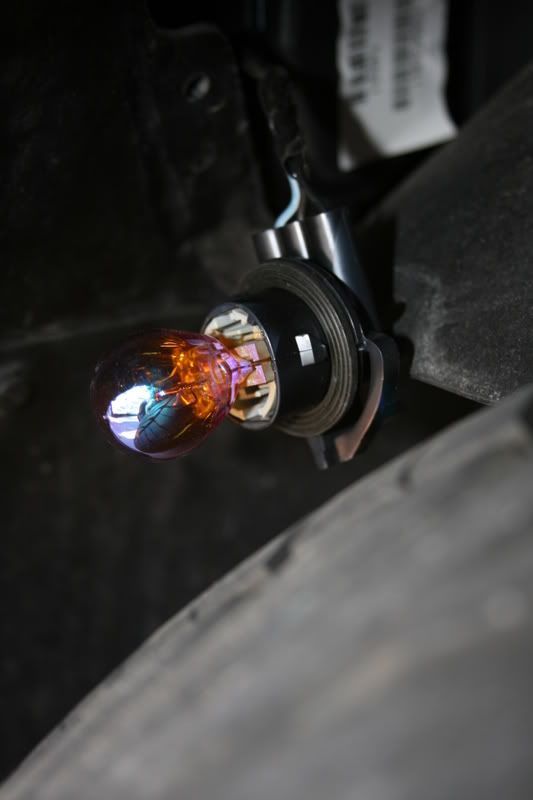
The bulb has a bayonet type connection and is removed by pulling it straight out of the socket - it will snap loose. Here is a pic of the socket and new bulb.
There are two keys to getting to the bulbs.
1. The wiring harness to the bulb socket is too tight on the driver's side to allow the socket to be rotated counter-clockwise. The wiring is clamped to the car just a few inches away from the socket. I was able to firmly, but carefully, tug on the wiring and pull enough slack from the clamp to allow the socket to turn.
2. The sockets must be unlocked before they can be rotated in the lamp assembly. This is done by squeezing a tab on the socket toward the center of the socket while you are turning. The tab is on the side of the socket and is difficult to reach, especially on the passenger side. On that side I used a small flat blade screwdriver in one hand to pry the tab while turning the socket with my other hand.
I think it's a good practice to use some silicone grease on the socket and bulb connection when installing new bulbs. The grease helps transfer heat away from the connection and reduces corrosion.
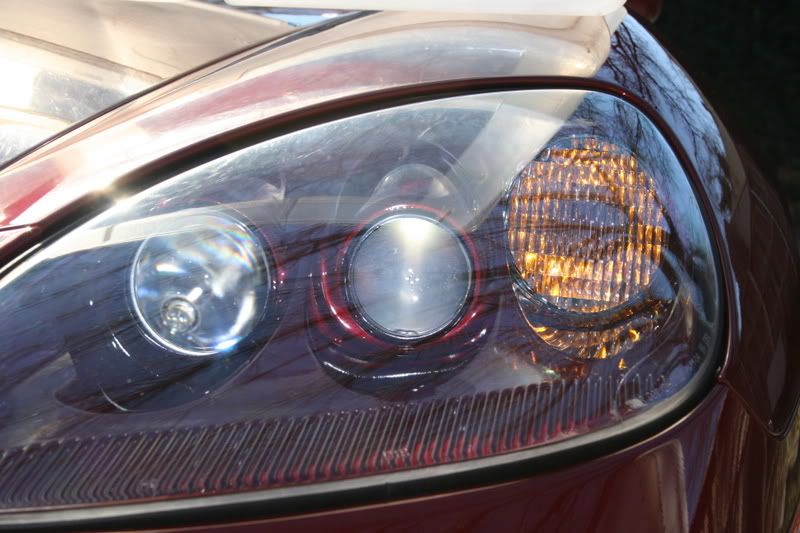
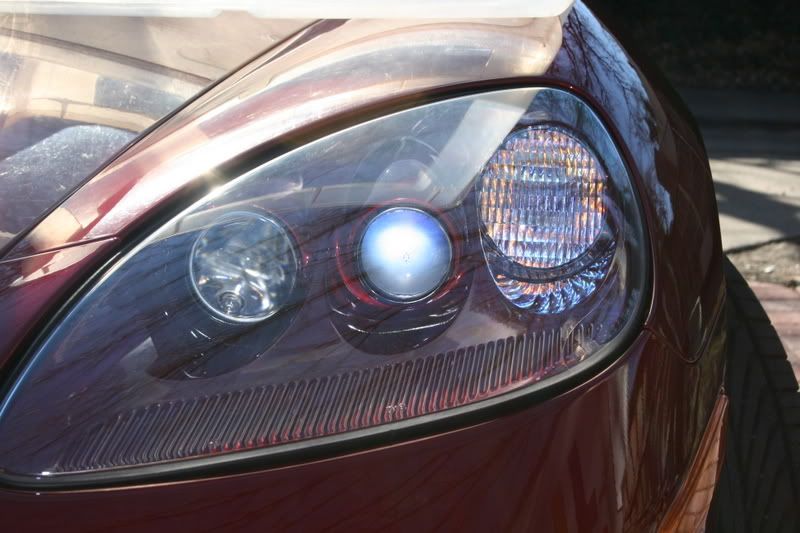
The final result is subtle but looks nice when the lights are off. If you look closely you see either faint blue or faint amber in the center of the DRL - depending on the angle - instead of the strong amber dot caused by the stock bulb. When the lights are on they look exactly the same as stock; I checked after I installed the first bulb and could compare the new and old bulbs. Here are before and after pics:
All in all, this was a little more difficult than I expected, but it's inexpensive and the result is a less busy, more sophisticated appearance for the front of the car when the DRLs are off.
Wayne
You can get a pack with two bulbs for $9.95 at Pep Boys. The Sylvania number is 3457AST. Here is a pic of the stock and SilverStar bulbs side by side. It looks like the difference is a dichroic coating on the SilverStar bulb.
The manual for my 2007 has pretty sparse directions on page 373 for changing out the bulbs, but it got me to the right access area inside the wheel well forward of the tire. The back side of the headlamp assembly is hidden by a rubber flap that's fastened to the fender liner with two-piece push-on plastic pins. I turned the wheels to the right to get at the passenger side, to the left for the driver's side, as you can see in this pic of that area with the flap in place.
Another forum member noted that jacking the car to raise the wheel well relative to the wheel provides more room to work. I have small hands and was able to complete the job without using a jack.
You only need to remove the outer three plastic pins that are marked in the photo above to be able to fold the flap out of the way and see the back of the headlight assemby and the DRL wiring and socket. This pic was taken at the best angle I could find, but it is still hard to see the socket - shown by the arrow:
I used a pair of diagonal cutters to pull out the center pin of the fasteners to release them, taking care not to cut the pins.
The socket must be turned about 30 degrees counter-clockwise to release it from the assembly. When released the socket can be pulled straight back out of the assembly. This pic shows the socket released and turned so you can see the rear of the socket; a release tab, discussed below, is marked with an arrow.
The bulb has a bayonet type connection and is removed by pulling it straight out of the socket - it will snap loose. Here is a pic of the socket and new bulb.
There are two keys to getting to the bulbs.
1. The wiring harness to the bulb socket is too tight on the driver's side to allow the socket to be rotated counter-clockwise. The wiring is clamped to the car just a few inches away from the socket. I was able to firmly, but carefully, tug on the wiring and pull enough slack from the clamp to allow the socket to turn.
2. The sockets must be unlocked before they can be rotated in the lamp assembly. This is done by squeezing a tab on the socket toward the center of the socket while you are turning. The tab is on the side of the socket and is difficult to reach, especially on the passenger side. On that side I used a small flat blade screwdriver in one hand to pry the tab while turning the socket with my other hand.
I think it's a good practice to use some silicone grease on the socket and bulb connection when installing new bulbs. The grease helps transfer heat away from the connection and reduces corrosion.
The final result is subtle but looks nice when the lights are off. If you look closely you see either faint blue or faint amber in the center of the DRL - depending on the angle - instead of the strong amber dot caused by the stock bulb. When the lights are on they look exactly the same as stock; I checked after I installed the first bulb and could compare the new and old bulbs. Here are before and after pics:
All in all, this was a little more difficult than I expected, but it's inexpensive and the result is a less busy, more sophisticated appearance for the front of the car when the DRLs are off.
Wayne
Last edited by rtibbit; 01-01-2007 at 04:13 PM. Reason: Added Photos


 12-31-2006, 08:10 AM
#4
Team Owner


I did this as well, but was a little disappointed. I was hoping to get rid of the egg yolk look.
 12-31-2006, 09:06 AM
#6
MONARTOR
 12-31-2006, 12:04 PM
#7
Instructor
Thread Starter
I think "worthless" is a little harsh, but I understand the point.
Since I did the swap without taking off the front wheel or jacking up the car, there was very little space to get the good views and angles I'd like see (I had to work mostly by feel). However, I'll go back and shoot it as best as I can. It would be useful to show the final look. I'll add the pics to the original post.
Wayne
12-31-2006, 12:10 PM
#8
Team Owner


Member Since: Sep 2005
Location: Big Bend Country, TX
Posts: 29,114
Received 2,186 Likes
on
1,337 Posts
St. Jude Donor '06-'07-'08-'09-'10-'11-'12-'13-'14-'15- '16-'17-�18-�19-'20-'21
NCM Lifetime Member


Heck, he just needs to close his eyes and use his imagination.  Btw, I replaced mine too with the Silverstar bulbs. A definite improvement over stock.
Btw, I replaced mine too with the Silverstar bulbs. A definite improvement over stock.
 12-31-2006, 01:45 PM
#11
Team Owner
Member Since: Sep 2005
Location: Big Bend Country, TX
Posts: 29,114
Received 2,186 Likes
on
1,337 Posts
St. Jude Donor '06-'07-'08-'09-'10-'11-'12-'13-'14-'15- '16-'17-�18-�19-'20-'21
NCM Lifetime Member
 12-31-2006, 02:24 PM
#12
Safety Car


I also did this swap... it is pretty subtle. If you aren't looking for it I doubt anyone would ever notice.
The blue color, has a tendency to blend a bit with the LMB, so it eliminates the infamous egg yolk look, but again I would bet 99% of the people walking by the car would never notice.
The blue color, has a tendency to blend a bit with the LMB, so it eliminates the infamous egg yolk look, but again I would bet 99% of the people walking by the car would never notice.
12-31-2006, 04:02 PM
#14
I'm not sure I get it....what's the difference btw this and stock? What instead of yellow or something?
Fwiw, I love seeing another Vette coming towards me with the DRL's; very distinctive look. Can someone post a before and after?
Fwiw, I love seeing another Vette coming towards me with the DRL's; very distinctive look. Can someone post a before and after?
12-31-2006, 06:26 PM
#15
Pro

Member Since: Oct 2004
Location: Henderson Nevada
Posts: 570
Likes: 0
Received 0 Likes
on
0 Posts
I'm use to the stock look, at a good distance comin atcha you know the low slung, aggressive look, yellow drl's are on a CORVETTE only. So I'll stay stock. Happy New Year's members....
12-31-2006, 06:36 PM
#16
Moderator

They are still "yellow" when they are on. They just don't look yellow when they are off. Not sure if these are the same bulbs as OP, but this gives you a side-by-side comparison (graphic from GS Creations web site):


Last edited by Zymurgy; 12-31-2006 at 06:40 PM.
12-31-2006, 07:31 PM
#17
Team Owner
Member Since: Sep 2005
Location: Big Bend Country, TX
Posts: 29,114
Received 2,186 Likes
on
1,337 Posts
St. Jude Donor '06-'07-'08-'09-'10-'11-'12-'13-'14-'15- '16-'17-�18-�19-'20-'21
NCM Lifetime Member
Zymurgy, excellent post ! 
12-31-2006, 09:43 PM
#19
Team Owner
Member Since: Sep 2005
Location: Big Bend Country, TX
Posts: 29,114
Received 2,186 Likes
on
1,337 Posts
St. Jude Donor '06-'07-'08-'09-'10-'11-'12-'13-'14-'15- '16-'17-�18-�19-'20-'21
NCM Lifetime Member
 12-31-2006, 10:00 PM
#20
Drifting


 we need a vette specefic color for sure