
Opinions on Dead Pedal Exhaust Switch
 08-01-2012, 10:25 PM
#21
Instructor


Man, I like the sound of this. Exactly what did you do to make this work??

 08-01-2012, 10:42 PM
#22
Melting Slicks


I used Sunset Orange which was expensive and it uses one of my garage door opener buttons and took 5 minutes to install. But to answer your question you go into the fuse block behind the passengers side footwell. Remove the NPP 10 Amp fuse that controls the valves on the exhaust. Install an add a fuse adapter and put the fuse in series with a foot switch or any other type of on off switch. This will make and break the power which will open or close the NPP. Pretty simple but I like my setup.
08-01-2012, 10:48 PM
#23
Drifting

Dead Pedal switch  4 years, 16,000 miles, and $10 later.
No fumbling for a remote. My buddy in his Z06 went M2W, now he is asking me how I like the dead pedal switch.
However, either way, the sound rocks.
M...
4 years, 16,000 miles, and $10 later.No fumbling for a remote. My buddy in his Z06 went M2W, now he is asking me how I like the dead pedal switch.
However, either way, the sound rocks.
M...
08-01-2012, 11:04 PM
#24
Drifting

I installed a mild-to-wild switch at month six of owning my first Corvette. Four weeks later, I just left it on full time. I became addicted to the sound. Compared to the loud Harley motorcycles roaring around my neighborhood, the full exhaust note of our Corvette is tame. With my next Corvette, I'll just pull the fuse and call it a day.
08-02-2012, 07:09 PM
#25
Instructor
I understand your description but am not familiar with a fuse adaptor. Assume that would go where the NPP fuse normally is with a wire under the console to the on/off switch (where do I get one like in the pics) to be located on the dead pedal. How is the fuse wired into this new circuit? I don't want to jury rig this but can follow directions very well...;o))
08-02-2012, 09:49 PM
#26
Melting Slicks
Here is what it looks like

And here is a better description. Remove the heated seat fuse as you would with the remote unit sold by vendors. Using this fuse makes it so when the car is off there is not voltage running thru the circuit. Add this devise in the place where you removed the heated seat fuse. Now plug back in the seat heat fuse into the slot that doesn't have the red wire. Remove the NPP fuse and plug it in to the "add a circuit" slot that has the red wire. Run the red wire to the switch and then from the switch back to the empty NPP fuse slot on the left hand side (you will need a spade lug).
Hope that draws you a better picture. Can't tell you where to get a switch but I am sure you would find something that suits you at Home Depot or Lowes in the electrical dep't.
Last edited by MKenM; 08-02-2012 at 10:01 PM.
08-03-2012, 03:54 AM
#27
No need to mess with the heated seat fuse. You can wire it only using the NPP fuse slot  . The left location of the 'added' fuse should be empty, but you cannot see it on the pic. The right connection is a 'C' terminal with one end cut off. Here's mine:

. The left location of the 'added' fuse should be empty, but you cannot see it on the pic. The right connection is a 'C' terminal with one end cut off. Here's mine:
Last edited by JCtx; 08-03-2012 at 03:58 AM.
08-03-2012, 06:26 AM
#28

I didn't want to rip out the interior of my car and drill a hole in it so I went with the M2W. I don't know what your time is worth, but the $85 I spent on the M2W with the two remotes was well worth it to me(and I'm retired and work very cheap). I have no problem reaching into the cup holder and pushing the button on the remote with my hand, vs pushing a switch on the dead panel with my foot.
 08-04-2012, 12:48 PM
#31
Melting Slicks

Can you explain that a little better, please? The terms "left" and "right" don't seem to jibe with the Add-A-Circuit fuse holder vs. your picture. And what is meant by a "C" terminal. I have tons of experience in this sort of thing, but I just can't quite understand what needs to be done. Maybe you could take another picture with the fuse holder removed and that would make it more clear what you're talking about. Or...is there a DIY thread on this here, somewhere? I searched NPP and Old School...no luck.
08-04-2012, 06:16 PM
#32
Melting Slicks

I have had both and I prefer the dead pedal....it is much easier to use....IMO...plus you can use the home link for just that.....
08-05-2012, 07:35 PM
#33
Melting Slicks
Now lets try and make this even easier. There is a fuse in the space that controls the NPP. Remove it. You now have two slots on the fuse block. One side is positive the other side is negative. If you were to take a short piece of wire and connect the + to the - you would complete the circuit and the wire would sort of be in the shape of a "C". Now if you cut that wire and put one side of the fuse you just removed on the wire you cut and the other side of the wire on one side of the switch you will have two wires left those two get spliced together. You now have a series circuit somehat like the diagram below. Forgetting the symbols R1 is the fuse and R2 is the switch (in either order). The thick and thin vertical line represent the plus and minus of the fuse circuit.
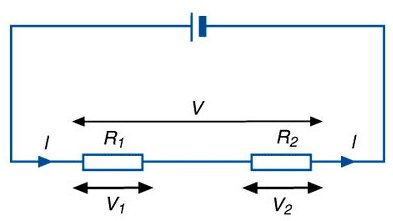
With the switch in series with the circuit you can turn the NPP system on and off. If you take a spade lug similar in size to the spades on the fuse it is nothing more than crimping the wire to the spade, and plugging it in. Just make sure the two don't touch or the circuit won't work. Does that help any?
With the switch in series with the circuit you can turn the NPP system on and off. If you take a spade lug similar in size to the spades on the fuse it is nothing more than crimping the wire to the spade, and plugging it in. Just make sure the two don't touch or the circuit won't work. Does that help any?
08-07-2012, 12:02 PM
#34
Melting Slicks
If you were to take a short piece of wire and connect the + to the - you would complete the circuit and the wire would sort of be in the shape of a "C". Now if you cut that wire and put one side of the fuse you just removed on the wire you cut and the other side of the wire on one side of the switch you will have two wires left those two get spliced together. You now have a series circuit somehat like the diagram below.
With the switch in series with the circuit you can turn the NPP system on and off. If you take a spade lug similar in size to the spades on the fuse it is nothing more than crimping the wire to the spade, and plugging it in. Just make sure the two don't touch or the circuit won't work. Does that help any?
With the switch in series with the circuit you can turn the NPP system on and off. If you take a spade lug similar in size to the spades on the fuse it is nothing more than crimping the wire to the spade, and plugging it in. Just make sure the two don't touch or the circuit won't work. Does that help any?
Actually, no. As per your description, all you have done is added a switch in series with the fuse, which will do nothing to independently activate the NPP with the switch ON, and will only serve to totally deactivate the system when the switch is moved to OFF. That is the circuit you have with R1 being a fuse, R2 being a switch, and the battery symbol being the two fuse terminals.
As I understand it, using the Seat Heat power method with dual fuses (Add-A-Circuit) retains the needed fuse for the Seat Heat; adds a power circuit for the NPP that is routed to the left side NPP fuse terminal; and a switch is added in-line to turn that power on and off to the NPP independently of the 3500 rpm signal from the ECU. Does anyone know if this is correct?
In the OEM configuration, the NPP fuse never sees current flow unless the 3500/ECU signal is given to whatever relay sends power through the NPP circuit, and THAT is why I don't understand how ELP_JC's method works. Where is the power coming from that triggers NPP when the switch is ON? It's certainly not coming from either terminal of the NPP fuse unless the engine is at 3500, etc.
So, forgetting Seat Heat and everything else except the left side NPP fuse terminal, as I see it, a fella could get 12 volts from anywhere (preferably with the car running, meaning "switched power") and if he touched that 12V wire to the left side NPP terminal, it will open the exhaust, period. And he then puts a switch in that wire, he can turn NPP on and off when the key is on, plain and simple. Am I right about this?
Last edited by Tracy; 08-07-2012 at 01:50 PM.
08-07-2012, 07:24 PM
#35
Melting Slicks
OK so if you look through some of the threads you will see that some people say they just pull the fuse and the NPP is disabled. What does that mean. It means that the butterfly valves are are OPEN ALL THE TIME. When you start your car with the fuse in you will hear a louder exhaust for a moment and if you watch you will see the valves close. So by making and breaking the circuit you will enable or disable the ECU. When power is flowing through the circuit the NPP works as it should opening the valves at about 3500 RPM's. When the circuit is broken there is no NPP and you hear "sweet music"
Whether you use M2W, Exhaust Commander or a Dead Man's switch they all perform the same function. Some just less expensive than others.
Whether you use M2W, Exhaust Commander or a Dead Man's switch they all perform the same function. Some just less expensive than others.
 08-07-2012, 08:29 PM
#37
Melting Slicks
08-08-2012, 08:27 AM
#38
Melting Slicks
Ohhhhh...that explains everything, thanks! Obviously, I was thinking the exact opposite, that the butterflys were Normally Closed and that they were activated open by current through that circuit. I'm surprised that Chevy did it this way, but maybe they want the valves to always be cycling so they don't get stuck in one position or the other due to carbon buildup or whatever. I recall that similar crappy "cutout" systems (usually aftermarket) on old musclecars failed pretty quickly in the carbon-y, corrosive exhaust of yesteryear's motors.
Last edited by Tracy; 08-08-2012 at 11:20 AM.
08-08-2012, 05:57 PM
#39
Melting Slicks
Sorry that I didn't explain it better the first time around. Hope you enjoy the sounds whichever way you decide to get it.