
TKO Paint Protection Film
 01-25-2012, 05:08 PM
#1
Drifting

Thread Starter
Ed at TKO picked me to be one of the product testers for the paint protection film, as mentioned in this thread:
http://forums.corvetteforum.com/c6-c...ction-kit.html
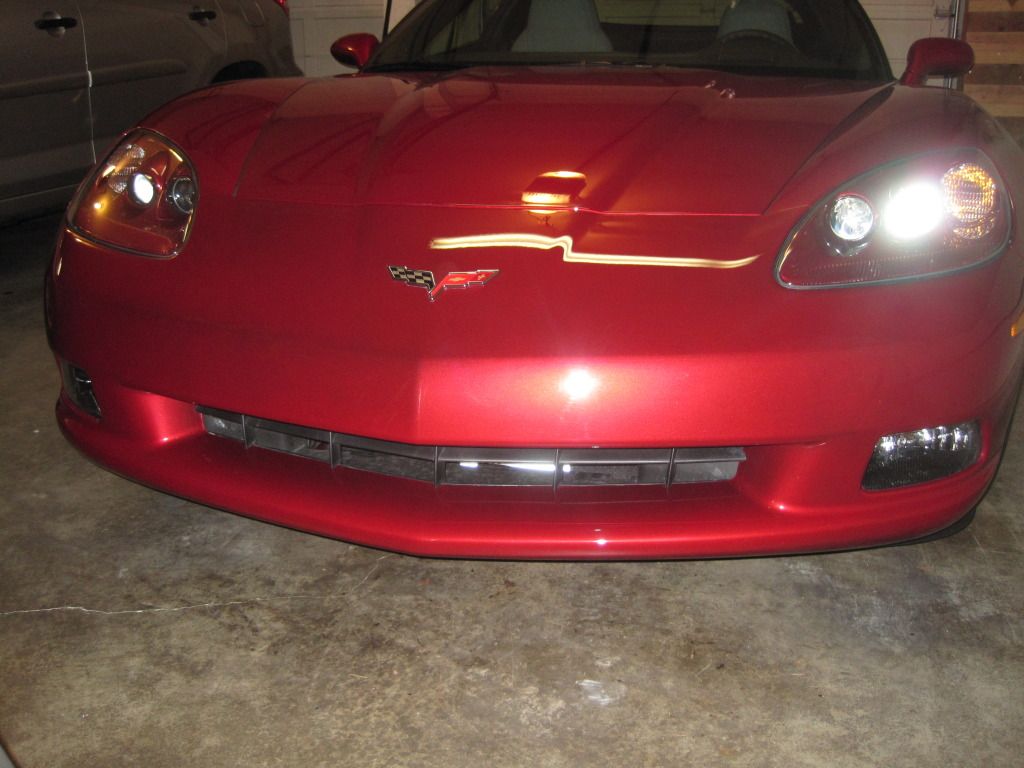
Ed explained that this is a Clear-tastic product and is one of their higher end products. I have no prior experience applying protection films other than doing the headlights of several vehicles I own with the WeatherTech LampGard films, which are several orders thicker. This product is designed to protect the horizontal surfaces on the front of the nose only, and is designed to be an easy do-it-yourself product.
In this first product, it is designed to fit a base C6 coupe. Mines is a 2011 that I took delivery of on March 2nd. It now has 9400 miles and has had no paint protection, other than Rejex sealant.
Ed sent the film to me, and it arrived on a big backing sheet. There are three pieces.
One piece covers the nose above the grille opening, from approximately 3/4" inside the corner marker lights all the way across the more horizontal part of the nose. There are two flaps of material that hang down and cover the part of the paint that is to the inside of the foglight and curves towards the engine to meet the recessed grill. The top part of this piece ends just below the crease in the nose, and the bottom ends just above the grille opening.
The two other pieces butt together in the middle of the bottom splitter-type piece and protect that lower horizontal piece all the way to the wheelwell. It wraps not only that horizontal surface but also nearly an inch above and below the crease where the horizontal surface transitions towards the back of the car. The top end of the piece fits into the rounded crease under the foglight, then follows that line out to the wheelwell. Underneath, it covers a significant amount of the forward facing surface.
I started by fully cleaning and using a clay bar on the nose surface. This gave me a good opportunity to fix and note where the rock dings were, and probably 80-90% of those are on the horizontal surface that this kit would cover. I put the front of the car up on ramps to make it easier. Here's how it looked at that point:

The reflection from the flash is right in the middle of the upper piece on the nose. The film doesn't create any orange peel appearance and is very smooth. I found it beads up water like my Rejex-coated paint.
Ed said the kit would adhere better in warmer temps. Unfortunately, there were several inches of snow outside when I was installing this, so the conditions were cooler than Ed would have wanted them to be. Like most other kits, you're supposed to use a wetting solution to allow you to move the film around, then squeegee out the air and liquid, and allow it to dry. Ed suggested three drops of Dawn dishwashing liquid per 32 ounces. To compensate for the cold temps, I used hot water from an Insta-hot to mix up the spray. That kept the film warm and pliable, and probably helped with evaporation as well.
I won't go into a lot of details on how I installed the pieces, but they went on easily and were cut accurately. Part of what Ed wanted was some testers to install the film and then describe to him the method we used, and I've done that, so Ed will combine the best methods and produce the installation instructions.
The Cleartastic product itself is of high quality. It is approximately as thick as other films I've seen, and is very shiny and optically clear. The film edge is no more visible than any other professionally installed film I've seen, and I've seen a fair number. Here's a picture taken pretty soon after the install was done. I used a 4 megapixel camera with the flash on, which would highlight reflection differences between the bare paint and the film, and you just can't see where the film is:
Like any other film, there's a cloudiness from the moisture that goes away after a couple of days, and even though it's been cold, any haziness has disappeared. The most difficult place for the film to adhere would be the bottom outer corners of the nose, where it makes about a 60 degree bend towards the wheelwells. With the help from a hair dryer, the film smoothed out and adhered perfectly in this area.
Three days after installation, I drove the car to work in the rain, with still a lot of the storm dirt and debris on the road. When I got there, I noticed that I had taken a rock right on the film, since it was dimpled and hazy right at the point of impact. When I returned to the car after work, the haziness had mostly disappeared and the surface was much more even. Today, a couple of days later, it's almost impossible to see where the hit had occurred. This film seems to have some self-healing properties.
I definitely don't want to misrepresent this film. When you look at the pieces, it doesn't seem like it covers much, but the area it does cover contains probably 80-90% of the rock dings I have on my car. The installation took a couple of hours, and that included some head scratching and trying to figure things out as I am a total neophyte at film installs. With Ed's improved instructions, this is probably a 60-90 minute install. I think this would be the perfect film for someone who isn't interested in doing a full film installation but is a daily driver or occasional HPDE and/or autocross participant.
Thanks again to Ed for chosing me as a tester, and for already saving me from one rock ding!
http://forums.corvetteforum.com/c6-c...ction-kit.html
Ed explained that this is a Clear-tastic product and is one of their higher end products. I have no prior experience applying protection films other than doing the headlights of several vehicles I own with the WeatherTech LampGard films, which are several orders thicker. This product is designed to protect the horizontal surfaces on the front of the nose only, and is designed to be an easy do-it-yourself product.
In this first product, it is designed to fit a base C6 coupe. Mines is a 2011 that I took delivery of on March 2nd. It now has 9400 miles and has had no paint protection, other than Rejex sealant.
Ed sent the film to me, and it arrived on a big backing sheet. There are three pieces.
One piece covers the nose above the grille opening, from approximately 3/4" inside the corner marker lights all the way across the more horizontal part of the nose. There are two flaps of material that hang down and cover the part of the paint that is to the inside of the foglight and curves towards the engine to meet the recessed grill. The top part of this piece ends just below the crease in the nose, and the bottom ends just above the grille opening.
The two other pieces butt together in the middle of the bottom splitter-type piece and protect that lower horizontal piece all the way to the wheelwell. It wraps not only that horizontal surface but also nearly an inch above and below the crease where the horizontal surface transitions towards the back of the car. The top end of the piece fits into the rounded crease under the foglight, then follows that line out to the wheelwell. Underneath, it covers a significant amount of the forward facing surface.
I started by fully cleaning and using a clay bar on the nose surface. This gave me a good opportunity to fix and note where the rock dings were, and probably 80-90% of those are on the horizontal surface that this kit would cover. I put the front of the car up on ramps to make it easier. Here's how it looked at that point:
The reflection from the flash is right in the middle of the upper piece on the nose. The film doesn't create any orange peel appearance and is very smooth. I found it beads up water like my Rejex-coated paint.
Ed said the kit would adhere better in warmer temps. Unfortunately, there were several inches of snow outside when I was installing this, so the conditions were cooler than Ed would have wanted them to be. Like most other kits, you're supposed to use a wetting solution to allow you to move the film around, then squeegee out the air and liquid, and allow it to dry. Ed suggested three drops of Dawn dishwashing liquid per 32 ounces. To compensate for the cold temps, I used hot water from an Insta-hot to mix up the spray. That kept the film warm and pliable, and probably helped with evaporation as well.
I won't go into a lot of details on how I installed the pieces, but they went on easily and were cut accurately. Part of what Ed wanted was some testers to install the film and then describe to him the method we used, and I've done that, so Ed will combine the best methods and produce the installation instructions.
The Cleartastic product itself is of high quality. It is approximately as thick as other films I've seen, and is very shiny and optically clear. The film edge is no more visible than any other professionally installed film I've seen, and I've seen a fair number. Here's a picture taken pretty soon after the install was done. I used a 4 megapixel camera with the flash on, which would highlight reflection differences between the bare paint and the film, and you just can't see where the film is:
Like any other film, there's a cloudiness from the moisture that goes away after a couple of days, and even though it's been cold, any haziness has disappeared. The most difficult place for the film to adhere would be the bottom outer corners of the nose, where it makes about a 60 degree bend towards the wheelwells. With the help from a hair dryer, the film smoothed out and adhered perfectly in this area.
Three days after installation, I drove the car to work in the rain, with still a lot of the storm dirt and debris on the road. When I got there, I noticed that I had taken a rock right on the film, since it was dimpled and hazy right at the point of impact. When I returned to the car after work, the haziness had mostly disappeared and the surface was much more even. Today, a couple of days later, it's almost impossible to see where the hit had occurred. This film seems to have some self-healing properties.
I definitely don't want to misrepresent this film. When you look at the pieces, it doesn't seem like it covers much, but the area it does cover contains probably 80-90% of the rock dings I have on my car. The installation took a couple of hours, and that included some head scratching and trying to figure things out as I am a total neophyte at film installs. With Ed's improved instructions, this is probably a 60-90 minute install. I think this would be the perfect film for someone who isn't interested in doing a full film installation but is a daily driver or occasional HPDE and/or autocross participant.
Thanks again to Ed for chosing me as a tester, and for already saving me from one rock ding!
Last edited by MisterMidlifeCrisis; 01-25-2012 at 05:13 PM.


 01-25-2012, 08:29 PM
#5
Burning Brakes

I use the cleartastic on the front fenders, rocker panels, and on the front top of the rear fenders. I'm a believer. It has saved me many chips. The new stuff is much better than the cleartastic stuff I got years ago for my c5.
Unfortunately I tried to be one of his guinea pigs for the front application, but didn't make the cut.
Unfortunately I tried to be one of his guinea pigs for the front application, but didn't make the cut.
01-26-2012, 10:59 PM
#8
Former Vendor
 01-27-2012, 12:27 PM
#9
Drifting
Thread Starter
An update. Yesterday was a sunny day after several rainy days and it was the first chance to sit the car in the sun to help it dry any moisture still left under the films. I had several tiny air bubbles and these have disappeared. The film has dried totally clear, and it stayed cleaner than the rest of the car that got really dirty from the muck left over from our snowstorm.
The area that took the rock ding has disappeared. There is no lifting of the film at the edges, corners, or where it bends around the nose.
Highly recommended!
The area that took the rock ding has disappeared. There is no lifting of the film at the edges, corners, or where it bends around the nose.
Highly recommended!
01-31-2012, 10:32 AM
#11
Premium Supporting Vendor
Member Since: Aug 2004
Location: ★ Performance Parts & Accessories ★ 1800 778 9898
Posts: 17,142
Received 279 Likes
on
222 Posts
St. Jude Donor '07-'08-'11-'12-'13-'14-'15-'16-'17

Wayne(MisterMidlifeCrisis),
Thank you for testing the kit, the feed back and for taking the time to post a well written description of the product here on the forum!
For those who don't know, what we did was we created a paint protection kit for the front/nose of the C6 that that can be easily installed. A real do-it-yourself kit. Typically these film kits are pretty expensive and need to be installed by a professional installer which takes more time and costs even more money.
This kit (Cleartastic Plus) is specifically designed so you can easily apply it yourself. But to make sure, we sent a kit to a forum member who we have no affiliation with to get some real raw feedback.
We have done this with many of the Cleartastic kits since 1995.
We feel there is no better way to create a better product then to invite other enthusiasts into the picture.
I think we nailed it here. I also like the fact that MisterMidlifeCrisis noticed how clear the film is before and after it was applied. Some films tend to have an "orange peel” look once applied. The Cleartastic Plus has more of a smooth as glass appearance. It really is "The clear choice in paint protection!
I noticed you mentioned it sort of "self healed". I too have seen that but I need to test more on that. BUT we do know it won't stain!
The kit will be released by mid month. If anyone has any questions, give us a shout! 631 940 9494
Thank you again Wayne for your time and help. We really appreciate it!

Big thanks Rich! Always a pleasure taking care of all of your Corvette needs.
Ed
Thank you for testing the kit, the feed back and for taking the time to post a well written description of the product here on the forum!
For those who don't know, what we did was we created a paint protection kit for the front/nose of the C6 that that can be easily installed. A real do-it-yourself kit. Typically these film kits are pretty expensive and need to be installed by a professional installer which takes more time and costs even more money.
This kit (Cleartastic Plus) is specifically designed so you can easily apply it yourself. But to make sure, we sent a kit to a forum member who we have no affiliation with to get some real raw feedback.
We have done this with many of the Cleartastic kits since 1995.
We feel there is no better way to create a better product then to invite other enthusiasts into the picture.
I think we nailed it here. I also like the fact that MisterMidlifeCrisis noticed how clear the film is before and after it was applied. Some films tend to have an "orange peel” look once applied. The Cleartastic Plus has more of a smooth as glass appearance. It really is "The clear choice in paint protection!
I noticed you mentioned it sort of "self healed". I too have seen that but I need to test more on that. BUT we do know it won't stain!
The kit will be released by mid month. If anyone has any questions, give us a shout! 631 940 9494
Thank you again Wayne for your time and help. We really appreciate it!
Ed
__________________

Serving The Corvette Forum For 23 Years!!
Allow us to add you to the list of extremely satisfied customers.
Order Securely Online 24/7: http://tkoperformance.com/index.html
Feel Free To Contact Us By Phone: 1800 -778- 9898 Monday- Friday 9:00am to 4:30pm
Click Here: http://www.facebook.com/pages/TKO-Pe...e/367433626633
01-31-2012, 08:19 PM
#12
Drifting
Thread Starter
I've put some more miles on and have had the car out in the sun, and have gotten the car really dirty and have cleaned it afterwards. The film material is very optically clear and the seams are only visible if you look for them and know they are there, just like any other film. Otherwise, they blend in and the film reflects light very similarly to bare paint. Any hazing or bubbles that were under the film have disappeared. The corners have stayed stuck tight. It is a very well done kit that can be applied in an hour or so by a rank amateur, and will really protect the areas that will take the full force of a rock impact.
Thanks again, Ed, for letting me be a product tester. This is a really nice product!
Thanks again, Ed, for letting me be a product tester. This is a really nice product!
02-10-2012, 01:38 PM
#13
Racer

Member Since: Dec 2010
Location: Myrtle Beach SC
Posts: 349
Likes: 0
Received 0 Likes
on
0 Posts
So, this film kit does NOT curve up over into the sloped emblem/hood area of the front end?
If not..thats disappointing. I was hoping it basically covered the WHOLE front end.
If not..thats disappointing. I was hoping it basically covered the WHOLE front end.
02-10-2012, 07:36 PM
#14
Drifting
Thread Starter
No, it doesn't. It covers the more horizontal surface to the crease leading to the sloped area with the emblem.
I had around 9500 miles on my Corvette when I installed the kit. My car is a daily driver and I drive it just like any car, which includes riding pretty close to the person in front. I had only one rock ding in that area, whereas I had probably a dozen in just the horizontal area. So, it covers the area where I get the vast majority of rock dings.
I had around 9500 miles on my Corvette when I installed the kit. My car is a daily driver and I drive it just like any car, which includes riding pretty close to the person in front. I had only one rock ding in that area, whereas I had probably a dozen in just the horizontal area. So, it covers the area where I get the vast majority of rock dings.