
Burning MP3 Disc for C6 Nav unit.
 12-03-2011, 03:18 AM
#1
Safety Car


Thread Starter
Member Since: Mar 2009
Location: Northeast MA & Mad Beach FL
Posts: 4,101
Received 716 Likes
on
436 Posts

If you have a newer C6 with the USB port or external music port, I know a lot of people use I-Pods -I-Tunes and such with these ports for their C6 players.
Or without these ports, some use a PAL setup etc.
But if you have a NAV unit without these external ports, it's great to burn 100-200 MP3 songs onto a disc and then control everything with the stock NAV head unit.
I started a couple years ago burning MP3 Discs for my C6 Nav with help from Forum members.
But when I don't burned a disc for a while it takes time to remember the correct settings and steps to correctly burn a disc so the player reads the disc showing all the albums in separate folders and songs in each folder.
Once in a while someone on the Forum asks why their MP3 disc won't work, and it's difficult to answer fully and actually help someone.
So, thought I'd make this tutorial to help others ... and myself to remember, how to do it without a lot of trial and error.
In my case, I use Media Monkey Gold. I downloaded and learned with the free trial version and seeing it was a nice setup, ordered the Gold version for something like $24.99.
Well worth it IMO and now use it as my main music player and to make Discs.
One thing to mention..
I-Phones etc are great but if you're like me and have a bunch of CD's with all your favorite music and have them on your Computer, you don't want to go and buy more songs that only work on I-Phones etc or I-Tunes or whatever.
I personally prefer MP3 files and already had tons of Music on my Computer.
Media Monkey can Convert the music on your Computer into MP3 files and, .. also Rip a new CD to your Computer Converting the songs directly to the Computer as MP3 files, so you don't need to do it afterwards.
Now to start:
Once you have the songs you want on your Computer, create a folder on your desk top or wherever you want.
I usually just name it the numeral 1 for convenience.
Next, create separate sub Folders in the 1 Folder, and name each Sub Folder for each Album you are going to burn.
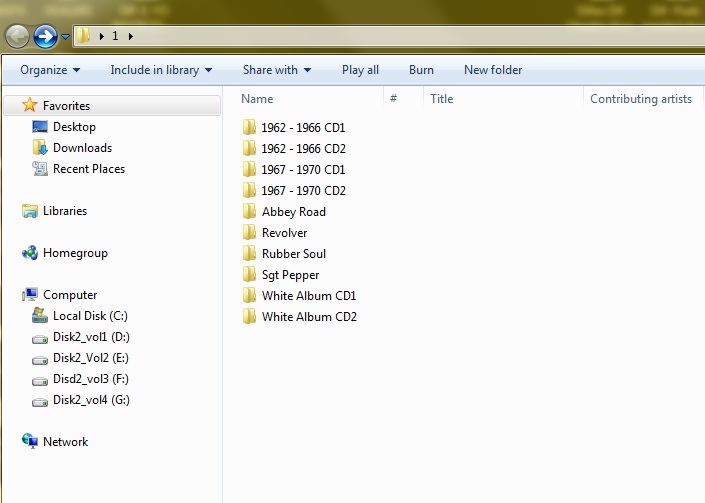
Now Copy/transfer the songs for each matching Album and place them into the corresponding named Album folder.
Open the Media Monkey Player.
Then, simply drag each individual Album Folder one at a time into the Now Playing column of the Media Monkey Player.
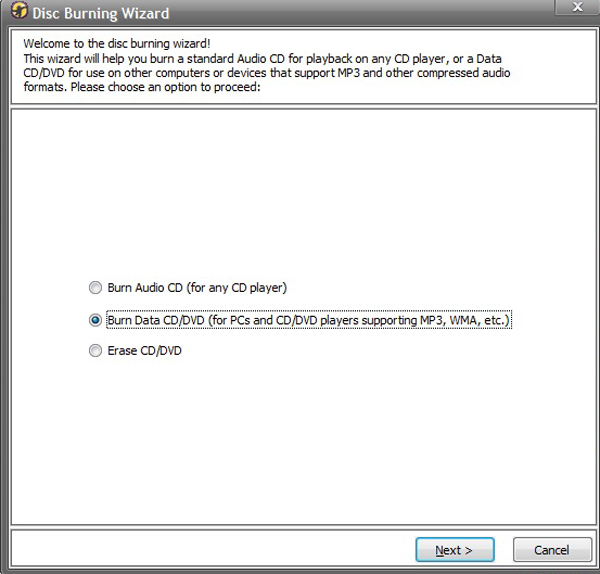
Highlight all the songs and click the Burn icon.
In this window check the burn data box and then click Next.
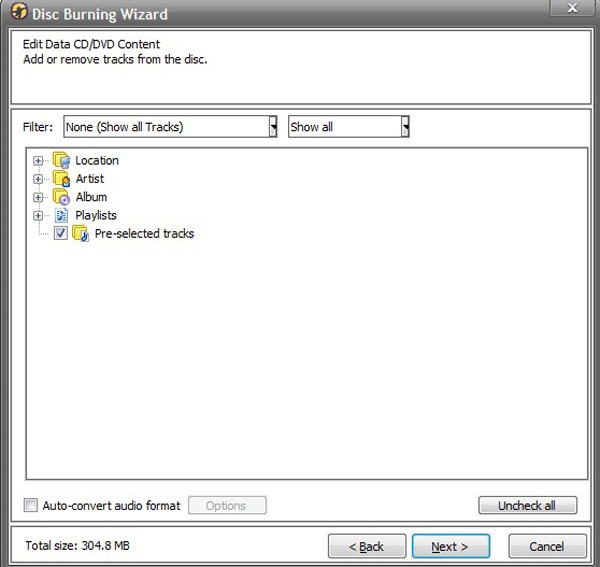
You should see the box for Pre-selected tracks is checked, so click Next again.
This next window is where you'll setup the Disc Format so the player can read the songs and Folders/Albums correctly once burned to the disc.
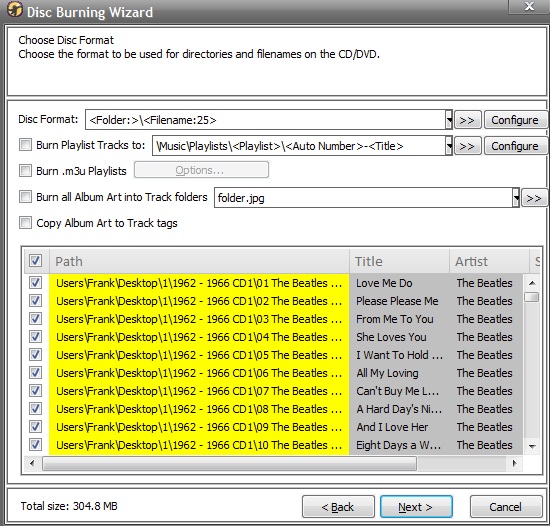

Type this into the Format Disc window to Format the disc .. <Folder:>\<Filename:25>
I've inserted two pictures to show how the song Path looks, depending on the number put after the colon following the word Folder ... <Folder:?>
Notice in the pictures, the higher the number, the less Path information is attached to the beginning of the songs.
The number 4 .. in this case .. eliminates everything before the song itself so the player can read and sort each according song in their separate Folder/Album on the disc.
The number 25 placed after the <Filename:25> sets the song title to maximum of 25 characters + MP3.
If,.. there is more than 25 characters in the song title, the player will have trouble reading the song name, or not read it at all and will not play that song.
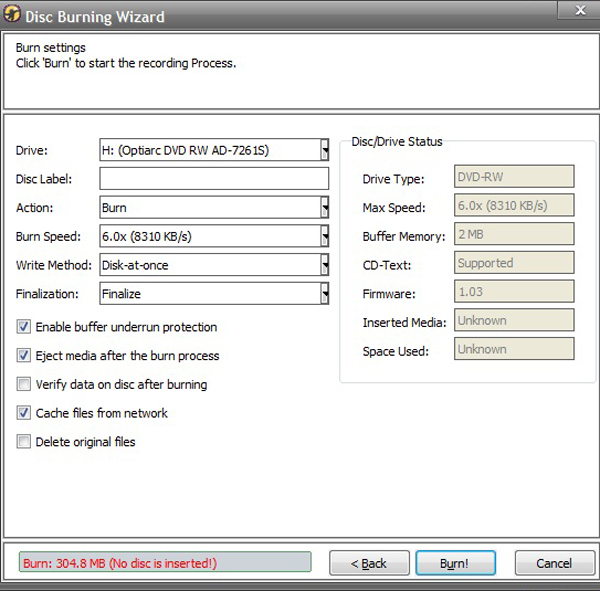
So, after you set the Format Disc info to .. <Folder:4>\<Filename:25> .. click next and in the new window click Burn.
That's basically it and trial and error is inevitable at first, but this is a good start to eliminate some of the trial and error.
Hope this helps someone
Or without these ports, some use a PAL setup etc.
But if you have a NAV unit without these external ports, it's great to burn 100-200 MP3 songs onto a disc and then control everything with the stock NAV head unit.
I started a couple years ago burning MP3 Discs for my C6 Nav with help from Forum members.
But when I don't burned a disc for a while it takes time to remember the correct settings and steps to correctly burn a disc so the player reads the disc showing all the albums in separate folders and songs in each folder.
Once in a while someone on the Forum asks why their MP3 disc won't work, and it's difficult to answer fully and actually help someone.
So, thought I'd make this tutorial to help others ... and myself to remember, how to do it without a lot of trial and error.
In my case, I use Media Monkey Gold. I downloaded and learned with the free trial version and seeing it was a nice setup, ordered the Gold version for something like $24.99.
Well worth it IMO and now use it as my main music player and to make Discs.
One thing to mention..
I-Phones etc are great but if you're like me and have a bunch of CD's with all your favorite music and have them on your Computer, you don't want to go and buy more songs that only work on I-Phones etc or I-Tunes or whatever.
I personally prefer MP3 files and already had tons of Music on my Computer.
Media Monkey can Convert the music on your Computer into MP3 files and, .. also Rip a new CD to your Computer Converting the songs directly to the Computer as MP3 files, so you don't need to do it afterwards.
Now to start:
Once you have the songs you want on your Computer, create a folder on your desk top or wherever you want.
I usually just name it the numeral 1 for convenience.
Next, create separate sub Folders in the 1 Folder, and name each Sub Folder for each Album you are going to burn.
Now Copy/transfer the songs for each matching Album and place them into the corresponding named Album folder.
Open the Media Monkey Player.
Then, simply drag each individual Album Folder one at a time into the Now Playing column of the Media Monkey Player.
Highlight all the songs and click the Burn icon.
In this window check the burn data box and then click Next.
You should see the box for Pre-selected tracks is checked, so click Next again.
This next window is where you'll setup the Disc Format so the player can read the songs and Folders/Albums correctly once burned to the disc.
Type this into the Format Disc window to Format the disc .. <Folder:>\<Filename:25>
I've inserted two pictures to show how the song Path looks, depending on the number put after the colon following the word Folder ... <Folder:?>
Notice in the pictures, the higher the number, the less Path information is attached to the beginning of the songs.
The number 4 .. in this case .. eliminates everything before the song itself so the player can read and sort each according song in their separate Folder/Album on the disc.
The number 25 placed after the <Filename:25> sets the song title to maximum of 25 characters + MP3.
If,.. there is more than 25 characters in the song title, the player will have trouble reading the song name, or not read it at all and will not play that song.
So, after you set the Format Disc info to .. <Folder:4>\<Filename:25> .. click next and in the new window click Burn.
That's basically it and trial and error is inevitable at first, but this is a good start to eliminate some of the trial and error.
Hope this helps someone
Last edited by Dif; 12-03-2011 at 03:27 AM.

The following users liked this post:
Herbertjan (10-06-2019)
 Where was this at a year ago
12-03-2011, 05:05 AM
Where was this at a year ago
12-03-2011, 05:05 AM
#5

Nice write up, I'm sure this will help people 
However it's certainly not necessary to spend $24.99 on Media Monkey, or any other 3rd party software. Windows 7 does all that very simply. So did XP and Vista for that matter.
I teach music and have a recording studio. I record in wav or au, convert to MP3 and burn to disk all day long for my students - completely on Windows.
12-03-2011, 07:27 AM
#6
Team Owner


thanks.
12-03-2011, 07:37 AM
#7
Race Car Tech
I've used Roxio (free download) with success.
 12-03-2011, 07:53 AM
#8
Melting Slicks


 12-16-2011, 03:42 AM
#9
Safety Car
Thread Starter
Member Since: Mar 2009
Location: Northeast MA & Mad Beach FL
Posts: 4,101
Received 716 Likes
on
436 Posts
Nice write up, I'm sure this will help people
However it's certainly not necessary to spend $24.99 on Media Monkey, or any other 3rd party software. Windows 7 does all that very simply. So did XP and Vista for that matter.
I teach music and have a recording studio. I record in wav or au, convert to MP3 and burn to disk all day long for my students - completely on Windows.
 Yes you can burn the MP3's onto discs with Windows and they work in many different players.
I was wondering if you have tried any of your burned CD's in a C6 Nav player?
It's the Nav unit that requires a certain method arranging the MP3 Song info before burning them onto a Disc in order for it to work.
The 6 CD changer player does not have these problems.
Myself and many others originally used Windows to burn the MP3 songs onto a disc, but had no luck getting the CD's to work in the C6 Nav unit.
Originally, the Windows Disc's I burned worked in some players and even in my Truck Nav unit, but not my C6 Nav unit

In Windows, without being able to automatically configure it to eliminate the song file path, and shorten the artist and song name correctly,the Nav unit will not read the CD correctly.
The Folders and Songs did not form correctly in order for the Nav to read them.
When the CD was viewed in Windows Player, all the songs would show up on the Disc.
But in the C6 Nav player, some Folders and Songs that were actually on the Disc, could not be read/recognized.
They don't even show up on the Nav unit and do not play.
That's why I got Media Monkey.
Others used a different 3rd party software and it worked also, but none of us had any luck burning a Disc with Windows.
I've since gone back and tried using Windows thinking I missed something.
Not knocking Windows, but what I find is, Windows is fine for simple burning and ripping etc, but does not have the advanced capabilities of Media Monkey and other software of it's kind
12-20-2011, 05:54 PM
#10
I created an account just to say thank you for this write up! The time it took to register and say thanks is nothing compared to the time I wasted burning cd's that would not play in my 06. This write up worked nearly flawlessly. I am finding some folders still being unrecognized if they have special characters or have long folder names, but with this write up and renaming some folders, I'll finally have playable MP3 CD's in my vette.
Of course with my LockPick 360 on order and an iPhone, I'll probably never need an MP3 CD again, but thanks anyway for taking the time to make a complete tutorial for others to follow.
Mikey
Of course with my LockPick 360 on order and an iPhone, I'll probably never need an MP3 CD again, but thanks anyway for taking the time to make a complete tutorial for others to follow.
Mikey
12-20-2011, 10:02 PM
#11
Safety Car
Thread Starter
Member Since: Mar 2009
Location: Northeast MA & Mad Beach FL
Posts: 4,101
Received 716 Likes
on
436 Posts
I created an account just to say thank you for this write up! The time it took to register and say thanks is nothing compared to the time I wasted burning cd's that would not play in my 06. This write up worked nearly flawlessly. I am finding some folders still being unrecognized if they have special characters or have long folder names, but with this write up and renaming some folders, I'll finally have playable MP3 CD's in my vette.
Of course with my LockPick 360 on order and an iPhone, I'll probably never need an MP3 CD again, but thanks anyway for taking the time to make a complete tutorial for others to follow.
Mikey
Of course with my LockPick 360 on order and an iPhone, I'll probably never need an MP3 CD again, but thanks anyway for taking the time to make a complete tutorial for others to follow.
Mikey

Glad to see this helped.
I also had a few albums with long Folder names that gave me trouble at first.
Mostly albums with multiple artists and the album name listed all of them.
Or albums with a main and sub name such as : Derek and the Dominos \ Layla and other assorted Love Songs :
It was like a double album name so it had 5 things to eliminate while most albums only had 4

I found the problem went away if I tagged and burned the songs from the Music playlist instead of the music Library.
Reason being, the Playlist didn't list/show the secondary album name
Best Wishes for the Holidays
10-06-2019, 11:54 AM
#12
Heel & Toe

If you have a newer C6 with the USB port or external music port, I know a lot of people use I-Pods -I-Tunes and such with these ports for their C6 players.
Or without these ports, some use a PAL setup etc.
But if you have a NAV unit without these external ports, it's great to burn 100-200 MP3 songs onto a disc and then control everything with the stock NAV head unit.
I started a couple years ago burning MP3 Discs for my C6 Nav with help from Forum members.
But when I don't burned a disc for a while it takes time to remember the correct settings and steps to correctly burn a disc so the player reads the disc showing all the albums in separate folders and songs in each folder.
Once in a while someone on the Forum asks why their MP3 disc won't work, and it's difficult to answer fully and actually help someone.
So, thought I'd make this tutorial to help others ... and myself to remember, how to do it without a lot of trial and error.
In my case, I use Media Monkey Gold. I downloaded and learned with the free trial version and seeing it was a nice setup, ordered the Gold version for something like $24.99.
Well worth it IMO and now use it as my main music player and to make Discs.
One thing to mention..
I-Phones etc are great but if you're like me and have a bunch of CD's with all your favorite music and have them on your Computer, you don't want to go and buy more songs that only work on I-Phones etc or I-Tunes or whatever.
I personally prefer MP3 files and already had tons of Music on my Computer.
Media Monkey can Convert the music on your Computer into MP3 files and, .. also Rip a new CD to your Computer Converting the songs directly to the Computer as MP3 files, so you don't need to do it afterwards.
Now to start:
Once you have the songs you want on your Computer, create a folder on your desk top or wherever you want.
I usually just name it the numeral 1 for convenience.
Next, create separate sub Folders in the 1 Folder, and name each Sub Folder for each Album you are going to burn.
Attachment 47685772
Now Copy/transfer the songs for each matching Album and place them into the corresponding named Album folder.
Open the Media Monkey Player.
Then, simply drag each individual Album Folder one at a time into the Now Playing column of the Media Monkey Player.
Highlight all the songs and click the Burn icon.
In this window check the burn data box and then click Next.
Attachment 47685767
You should see the box for Pre-selected tracks is checked, so click Next again.
Attachment 47685768
This next window is where you'll setup the Disc Format so the player can read the songs and Folders/Albums correctly once burned to the disc.
Attachment 47685769
Attachment 47685770
Type this into the Format Disc window to Format the disc .. <Folder:>\<Filename:25>
I've inserted two pictures to show how the song Path looks, depending on the number put after the colon following the word Folder ... <Folder:?>
Notice in the pictures, the higher the number, the less Path information is attached to the beginning of the songs.
The number 4 .. in this case .. eliminates everything before the song itself so the player can read and sort each according song in their separate Folder/Album on the disc.
The number 25 placed after the <Filename:25> sets the song title to maximum of 25 characters + MP3.
If,.. there is more than 25 characters in the song title, the player will have trouble reading the song name, or not read it at all and will not play that song.
So, after you set the Format Disc info to .. <Folder:4>\<Filename:25> .. click next and in the new window click Burn.
Attachment 47685771
That's basically it and trial and error is inevitable at first, but this is a good start to eliminate some of the trial and error.
Hope this helps someone