
DIY - Steering Column Lock 2005
 09-23-2011, 01:56 PM
#1
Pro

Thread Starter

Here is a DIY for those that have the no start issue due to the worn out solenoid in the column lock. If you have an 05 and your car wont start (gauges sweep but nothing) and you have to pull the negative cable repeatedly to get the car to start, then you need to replace your SCL. If your column lock is going out you will hear a difference in the noises your column makes while unlocking the wheel. Instead of a fast zip, it may labor, be extra noisy, or barely sound at all.
I pulled together a couple of threads and then added pics to complete this DIY. The steering wheel photos were borrowed from cencalC6's steering wheel removal thread.
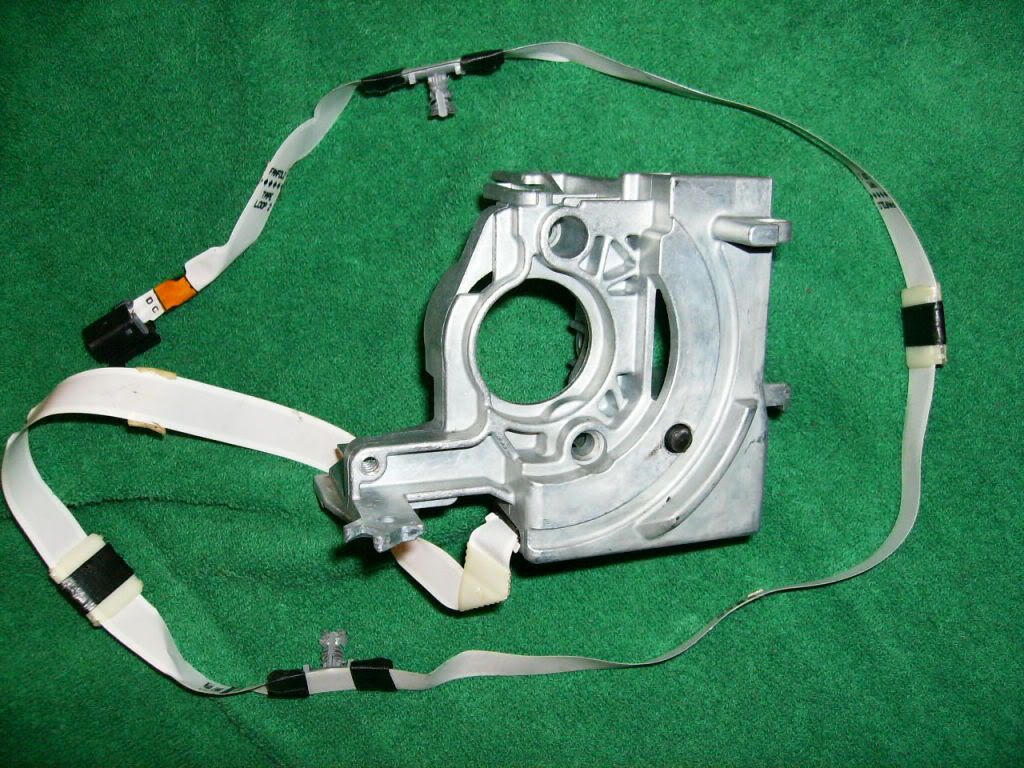
Here is the part you will be replacing. I picked it up from Kevin at PartsTaxi for $370.00 Kevin is the best guy with the best prices on the forum. I have bought from the others but Kevin will have all my future business.
VERY IMPORTANT BEFORE YOU START....DISCONNECT THE BATTERY and let it sit for about 5 minutes.
First, remove the airbag
On each side of the steering wheel there is a little tiny hole.Use a small allen wrench or screwdriver and push and feel for a tab that has some type of spring feel to it.At the same time pull on the airbag gently on the side your are pushing in......Now shove a wrench or some type of a smooth object, between the airbag and the wheel.... so it will not attach itself back in place.Repeat the same step on the other side of the wheel.
NOTE: On the 05 there are four holes (two on each side) because we have the dough boy wheel
The below image is from an 06 and up wheel.


With a flat head screwdriver gently pry out the little plastic locking tabs.then you squeez the connectors and remove them.


Unplug this Black connector

With a 21mm socket remove the nut on the steering wheel

Notice that the wheel and shaft have alignment markes, make sure that they are aligned when removed and installed. VERY IMPORTANT

Gently pull on steering wheel left to right and it will free itself loose

This next step is on how to remove the clock spring
Revove the bottom panel underneath your Steering wheel,there 2 torx screws that need to be removed after that then gently pop out the panel there are 2 plastic tabs that will snap out.

Remove this stainless bracket out the way, (4) 7mm bolts that need to be removed.


Remove Steering Column Cover...Firmly Remove 1" Rubber Strap towards the front of the car


You will need to use a C clip tool to remove the clock spring. Sear sells a nice two-way action one with differnet sized pins for multiple jobs.


Once the C clip is removed, remove the clock spring and set it to the side (I didnt unhook it, I just moved it out of my way)
Next, you need to remove another retaining clip. There is a large spring on the reverse side of this plate that must be compressed to remove the retaining clip. I could not push the spring by hand, so I had to buy a steering wheel lock plate removal tool. It was $17 at Advanced Auto - Autocraft Part #AC579.

Tool in use. The tool has a wing nut on it but the spring pressure was too tight so I had to clamp some good ole red neck vice grips on there. I will probably replace the wing nut with a regular nut, but not today.

Clip removed

Remove the wiper and turn signal. Torx screws and clips

There's the little bugger that left me outside one too many stores with my hood up while I kept unhooking the negative battery cable! Nothing like a teenage kid walking by saying nice car while he drives off in his civic -

Remove the steering column lock. Two torx screws on the front and one torx screw on the right side where the wiper controller was mounted.

The white ribbon cable is heading up behind the gauge cluster - great....
Remove bezel from around gauge cluster. There are four snap clips. Pull gently and it will pop out. Disconnect the wires needed to get it out of your way.
The dash cluster is held in by four 7mm nuts

Cluster is removed and there is the end of our ribbon cable

Unplug the cable from the little black box and reroute your new ribbon cable in with the same routing. There are some securing clips along the path that are part of the cable itself
Ummm, I sure hope I remember how all this goes back together

Put everyting back in the reverse order that you removed it.
Here is my beautiful wife putting the clip back in on the reassembly. She has a lot more patience than me and is actually a good mechanic. She should be, she has a mechanical engineering degree. Yes, I know, the car needs washed. It rained the other day.

Hope this helps someone in the future. The job isnt that bad but the various clips and such can be a real pain in the rear. Car fires right up and the SCL is making a nice zip instead of the moan and groan it used to.
I pulled together a couple of threads and then added pics to complete this DIY. The steering wheel photos were borrowed from cencalC6's steering wheel removal thread.
Here is the part you will be replacing. I picked it up from Kevin at PartsTaxi for $370.00 Kevin is the best guy with the best prices on the forum. I have bought from the others but Kevin will have all my future business.
VERY IMPORTANT BEFORE YOU START....DISCONNECT THE BATTERY and let it sit for about 5 minutes.
First, remove the airbag
On each side of the steering wheel there is a little tiny hole.Use a small allen wrench or screwdriver and push and feel for a tab that has some type of spring feel to it.At the same time pull on the airbag gently on the side your are pushing in......Now shove a wrench or some type of a smooth object, between the airbag and the wheel.... so it will not attach itself back in place.Repeat the same step on the other side of the wheel.
NOTE: On the 05 there are four holes (two on each side) because we have the dough boy wheel
The below image is from an 06 and up wheel.
With a flat head screwdriver gently pry out the little plastic locking tabs.then you squeez the connectors and remove them.
Unplug this Black connector
With a 21mm socket remove the nut on the steering wheel
Notice that the wheel and shaft have alignment markes, make sure that they are aligned when removed and installed. VERY IMPORTANT
Gently pull on steering wheel left to right and it will free itself loose
This next step is on how to remove the clock spring
Revove the bottom panel underneath your Steering wheel,there 2 torx screws that need to be removed after that then gently pop out the panel there are 2 plastic tabs that will snap out.
Remove this stainless bracket out the way, (4) 7mm bolts that need to be removed.
Remove Steering Column Cover...Firmly Remove 1" Rubber Strap towards the front of the car
You will need to use a C clip tool to remove the clock spring. Sear sells a nice two-way action one with differnet sized pins for multiple jobs.
Once the C clip is removed, remove the clock spring and set it to the side (I didnt unhook it, I just moved it out of my way)
Next, you need to remove another retaining clip. There is a large spring on the reverse side of this plate that must be compressed to remove the retaining clip. I could not push the spring by hand, so I had to buy a steering wheel lock plate removal tool. It was $17 at Advanced Auto - Autocraft Part #AC579.
Tool in use. The tool has a wing nut on it but the spring pressure was too tight so I had to clamp some good ole red neck vice grips on there. I will probably replace the wing nut with a regular nut, but not today.
Clip removed
Remove the wiper and turn signal. Torx screws and clips
There's the little bugger that left me outside one too many stores with my hood up while I kept unhooking the negative battery cable! Nothing like a teenage kid walking by saying nice car while he drives off in his civic -
Remove the steering column lock. Two torx screws on the front and one torx screw on the right side where the wiper controller was mounted.
The white ribbon cable is heading up behind the gauge cluster - great....
Remove bezel from around gauge cluster. There are four snap clips. Pull gently and it will pop out. Disconnect the wires needed to get it out of your way.
The dash cluster is held in by four 7mm nuts
Cluster is removed and there is the end of our ribbon cable
Unplug the cable from the little black box and reroute your new ribbon cable in with the same routing. There are some securing clips along the path that are part of the cable itself
Ummm, I sure hope I remember how all this goes back together
Put everyting back in the reverse order that you removed it.
Here is my beautiful wife putting the clip back in on the reassembly. She has a lot more patience than me and is actually a good mechanic. She should be, she has a mechanical engineering degree. Yes, I know, the car needs washed. It rained the other day.
Hope this helps someone in the future. The job isnt that bad but the various clips and such can be a real pain in the rear. Car fires right up and the SCL is making a nice zip instead of the moan and groan it used to.
Last edited by csnow; 09-23-2011 at 04:48 PM.


 09-23-2011, 03:50 PM
#6
Pro
Thread Starter
 It seems every one of them is different on how they come apart. I also screwed around with that second clip for awhile with all my redneck ingenuity before I called a friend that works at Chevy and he told me I had to use a specialty tool to compress the spring. Then, I had to drive to Advanced Auto to get the removal tool. If I had to do it again it would take about an 1.5 hours for the whole job.
 How is GM going to do it for free? 05's are out of warranty, and if you dont have an 05 M6 then you dont have a SCL. If you go to the dealer, you will fork out over $1000. I dont pay another person to do something I can do or figure out myself. These cars arent rocket science. Just bolts, nuts, and screws.
Last edited by csnow; 09-23-2011 at 04:34 PM.
09-23-2011, 03:52 PM
#7
Team Owner

 09-23-2011, 04:29 PM
#9
Pro
Thread Starter
Yeah, it was active handling that got the recall. I think Chevy should do a recall on this because more and more are failing now. They ditched this design in 06, so they "figured" something out. I just got this car about six months ago and it wouldnt start a week after buying it. That is probably the reason the other owner got rid of it...lol. I just lived with it but it left me at Starbucks for about 20 minutes last week, so I said enough is enough. If I have to replace it every five years, no biggie. The new SCL has a different style ribbon cable so maybe they have improved from the original part.
Last edited by csnow; 09-23-2011 at 05:45 PM.
09-23-2011, 04:58 PM
#10
Race Director

Yeah, it was active handling. I think Chevy should do a recall on this because more and more are failing now. They ditched this design in 06, so they "figured" something out. I just got this car about six months ago and it wouldnt start a week after buying it. That is probably the reason the other owner got rid of it...lol. I just lived with it but it left me at Starbucks for about 20 minutes last week, so I said enough is enough. If I have to replace it every five years, no biggie. The new SCL has a different style ribbon cable so maybe they have improved from the original part.
09-23-2011, 05:05 PM
#11
Team Owner
This has nothing to do with the service active handling recall. This is the column lock mechanism, there is no recall and it is not covered under factory or GMPP.
This column lock mechanism is similar to what was on the C5 up through 2004. The 2005 C6 is the only car that has it. It was engineered out in 2006 and unfortunately there is nothing that can be done to the 2005's to eliminate it. We have it until it fails and then have to replace it.
Last edited by talon90; 09-23-2011 at 05:08 PM.
09-23-2011, 05:17 PM
#12
Race Director
The active handling recall has to do with the steering wheel position sensor and placing a clip at the connector.
This has nothing to do with the service active handling recall. This is the column lock mechanism, there is no recall and it is not covered under factory or GMPP.
This column lock mechanism is similar to what was on the C5 up through 2004. The 2005 C6 is the only car that has it. It was engineered out in 2006 and unfortunately there is nothing that can be done to the 2005's to eliminate it. We have it until it fails and then have to replace it.
Last edited by saplumr; 09-23-2011 at 05:20 PM.
 09-23-2011, 05:40 PM
#15
Pro
Thread Starter
Chris
Last edited by csnow; 09-23-2011 at 05:45 PM.
09-23-2011, 06:03 PM
#16
Race Director
09-23-2011, 06:27 PM
#17
Team Owner
Nice writeup!!! Thanks for sharing. 
For anyone interested, here's a recent thread about a Column Lock Bypass. I have no idea how difficult or effective it is......I got cross eyed trying to read the pdf document.
http://forums.corvetteforum.com/c6-t...ft-design.html
For anyone interested, here's a recent thread about a Column Lock Bypass. I have no idea how difficult or effective it is......I got cross eyed trying to read the pdf document.
http://forums.corvetteforum.com/c6-t...ft-design.html
12-19-2011, 11:15 PM
#18
Tech Contributor

What a great thread CSnow. Thanks for taking the time to post up with pictures.
I wonder if you could cut off that pin that fits into the lock plate to lessen the force on it to ease the life of the locking mechanism. I doubt it, but I wonder. Did you take apart your old unit to see if there are limit switches in it to report if it's fully extended and retracted? I bet there are.
I always park my car with no strain on the wheel, hoping to never have to replace that darn column lock. So far so good, but thanks again for the write up.
12-19-2011, 11:55 PM
#19
Team Owner
Nice write up and quality pics. Your attitude is what I liked also. Don't pay someone a bunch of money for something that you can figure out and do yourself...unfortunately, there are fewer and fewer people who think like that nowadays. I know some yuppie types who have to call a handyman to change lightbulbs in the house...sad!
