
Alternate Location for NPP Retrofit Box
 05-13-2011, 11:23 AM
#1
Melting Slicks

Thread Starter
I just installed NPP mufflers and an NPP "retrofit" kit on my car. These kits require you to run a vacuum line from the engine and hook it up to a small control box in the rear of the car to control the vacuum to the muffler valves.
The popular kits generally instruct you to install the control box in one of two locations:
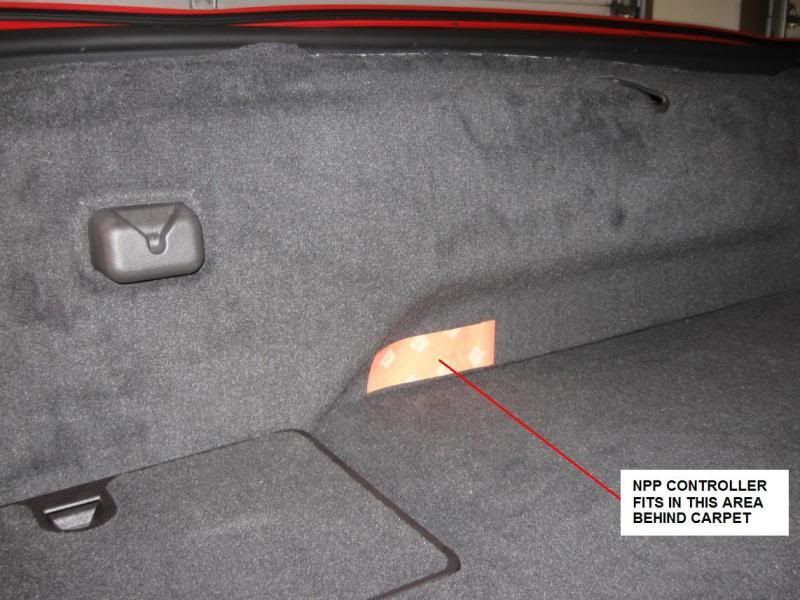
The carpet covering the rear of the hatch area bulges out quite a bit...so I decided to see what was behind there. I removed a few fasteners holding this carpet in place and pulled it away from the rear of the car. As it turns out, there's plenty of room in this area to place an NPP control box...and it works like a champ! The supplied wiring harness and vacuum tubing with my NPP-in-a-Box worked without any additional modifications!
Here's where I'm talking about...
Here's how to do it...
There are 6 fasteners holding the carpet in place against the rear of the hatch area. You'll need to remove all 6 fasteners.
Start by removing the two round push-in “christmas-tree” connectors near the latch mechanism...

You can pry these out quickly with the proper trim tool (I purchased this set of trim tools for $7), or you can use your fingers to get them started (not easy!) and then grab them with needle-nose plyers and pull them out the rest of the way.
At each corner of the rear hatch carpet (near each interior light) you will see a round, flat head push-in connector head and an anchor for the cargo net. Again, use a trim tool (or fingers) to pull the flat-head connector off. The cargo net anchors unscrew easily...don't try to pull them off!
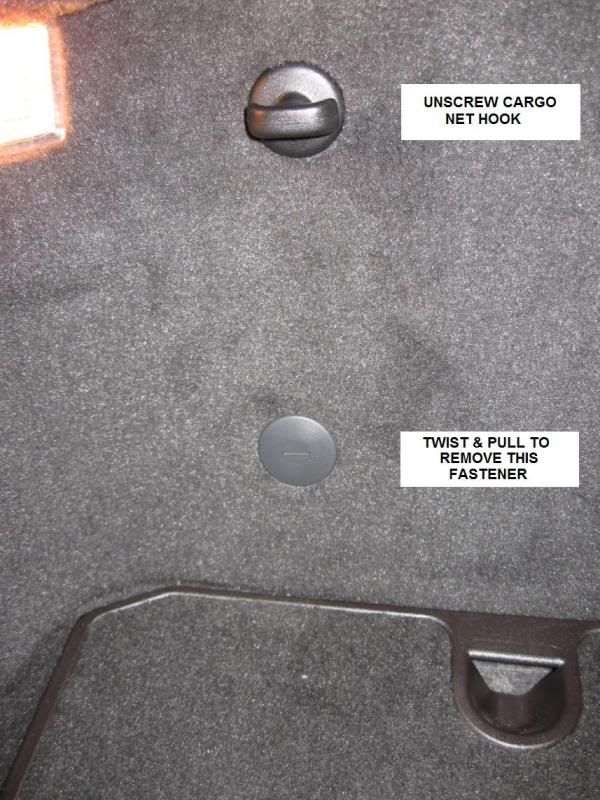
Note: You will need to remove these connectors from both sides of the car...not just the passenger side.
With all of the above connectors removed, you can now pull the carpet away from the rear of the hatch. You may want to set something heavy on the carpet it to hold it down out of your way while you work. Otherwise it will keep springing back into place. Here's what you'll be looking at...

As you can see from the photo above there's plenty of room to fit the control box in behind the carpet next to the rear latch towards the passenger side of the car. It is nicely wedged in place so there's no way it will move around. No need to attach it to anything. It's a perfect fit and it's not going anywhere in this location!
So how do you get the vacuum lines to the control box? Well, you will have to drill a couple of holes. Generally I wouldn't like that, but these holes will be completely out of sight...even from underneath the car. If you remove the system, noone will ever know holes were there!
Set your control box in place with the vacuum outlets pointing toward the passenger side of the car. Mark two spots on the rear of the hatch area where the vacuum lines will need to run to the outside of the car. Here's what you will be seeing at this point...
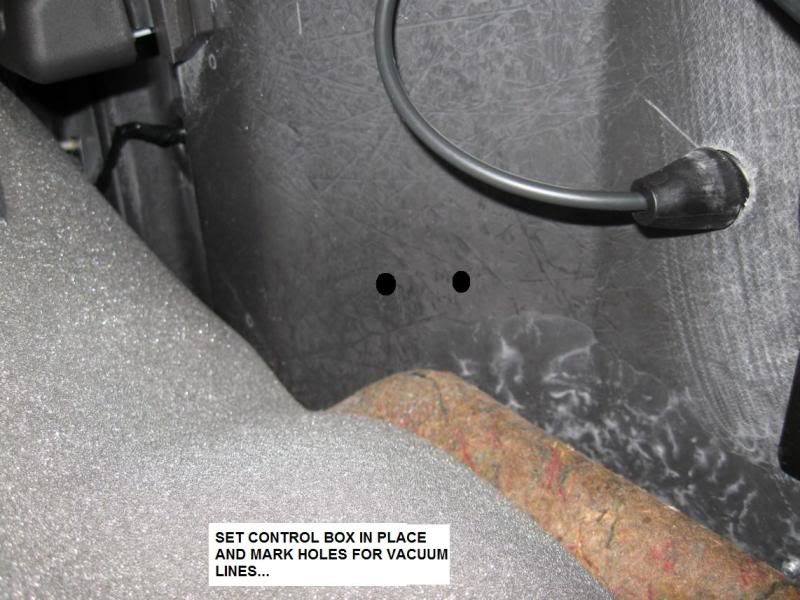
Before you drill out the holes, use a T15 torx bit and remove the single screw that is holding in the inner passenger-side tail-light. Pull the tail-light out of the bumper, unplug it from the wiring harness and set it aside. Take a moment to look in the hole where the taillight was. This is where the holes will go to route your vacuum control lines between the control box, engine and mufflers...
Note: In the picture above, those two vacuum lines are the ones going to the NPP control box. You won't see these at this point. I'm just showing you where your lines will be after you drill the holes.
OK...now grab your drill and drill out the 2 holes you marked. Be careful because the panel you're drilling through is extremely THIN and it's made of fiberglass. The material may splinter a little bit when you drill it. Be careful cleaning up the holes with your fingers or you will be walking around with glass fibers stuck in your skin annoying you for the next 2 days. Ask me how I know!

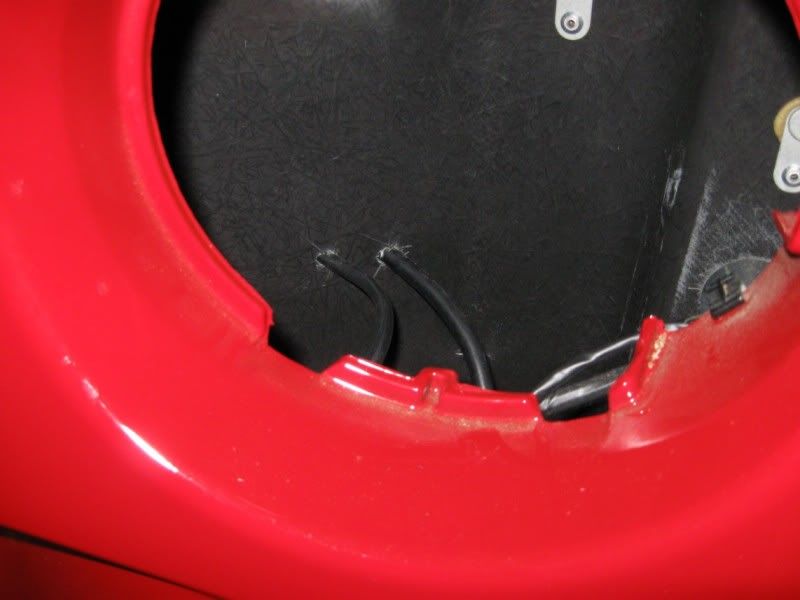
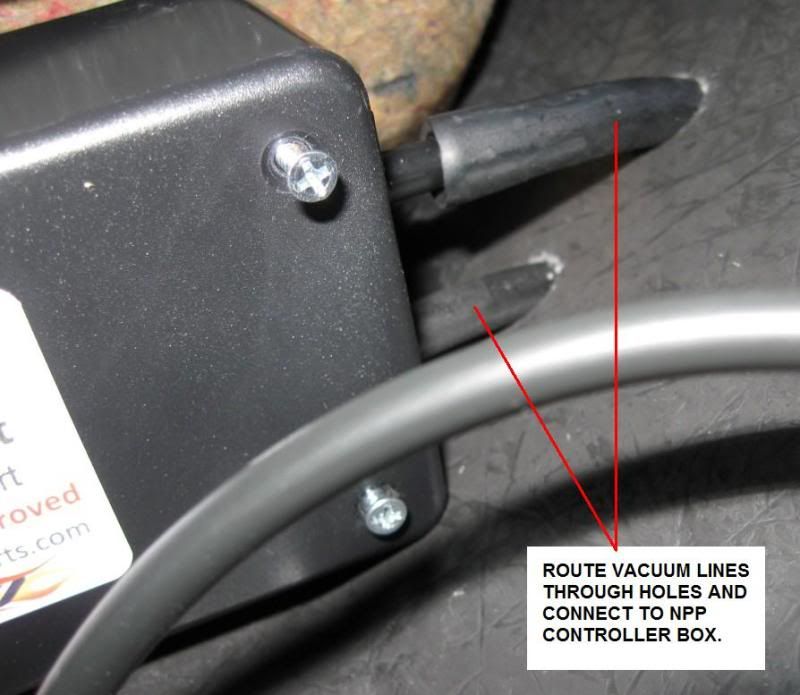
Once the holes are drilled, set the NPP control box back in place and route the vacuum lines through the holes. It will look like this...

OK...you're probably wondering at this point how I got the engine vacuum line routed to behind the back bumper. Here's how...
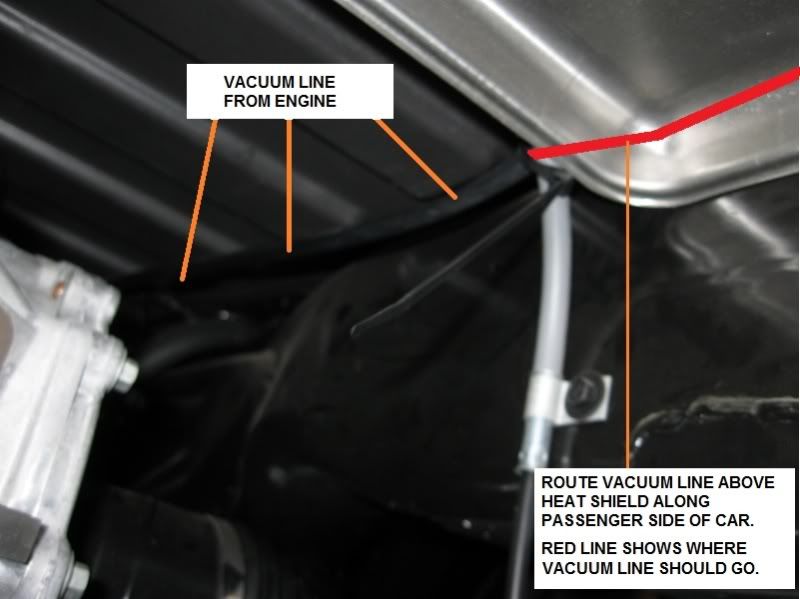
When the mufflers are removed, you can see a large metal heat shield pan that protects the floor of the hatch area. The top edges of the shield are rounded off. If you look along the passenger side edge of this pan where it meets the floor of the hatch, you can see that there's enough room to run a vacuum line on top of the shield along the edge. If you snake a hose in along the passenger side top edge of the pan, the line will come out behind the back bumper...within inches of the 2 holes you just drilled for your NPP control box! Looking towards the front of the car, here's where the vacuum line will enter along the passenger side top of the heat shield...
I found it easier to just unbolt the shield and lower it down...then I routed the vacuum line up behind the back bumper...then raised the shield back up into place. This will require removing a few bolts, but it will save you some frustration.
Note: This heat shield is a few inches away from the mufflers. I don't think it gets hot enough to compromise the vacuum tubing behind the shield. I have driven with this setup for a few hundred miles so far without any issues.
Once you have the vacuum line from the engine routed above the heat shield, you will be able to look through the tail-light hole to see where it comes out behind the bumper. Take the smaller diameter vacuum line from the NPP box (the one going to the mufflers) and route it through the same spot where engine vacuum line comes out. This line can then be routed down to the mufflers from underneath the car, like this...

Completed installation from underneath car before installation of mufflers...

Once you install your mufflers, nobody will be able to tell where their vacuum source is coming from (no lines running in/out of bottom of storage bin or control box underneath the car). Everything is hidden, and you retain full use of your passenger side storage bin. This installation method may add an extra 30 minutes to your install time, but it's easy and it's a little more stealthy! 
EDIT: Be sure to scroll down to Post #14 in this thread for another mounting option with NO DRILLING REQUIRED.
The popular kits generally instruct you to install the control box in one of two locations:
1. Inside the car in the passenger side storage bin
2. Outside the car glued to something underneath
I wasn't sure I wanted either one of these solutions...so I started looking around for another option and got an idea... 2. Outside the car glued to something underneath
The carpet covering the rear of the hatch area bulges out quite a bit...so I decided to see what was behind there. I removed a few fasteners holding this carpet in place and pulled it away from the rear of the car. As it turns out, there's plenty of room in this area to place an NPP control box...and it works like a champ! The supplied wiring harness and vacuum tubing with my NPP-in-a-Box worked without any additional modifications!
Here's where I'm talking about...
Here's how to do it...
There are 6 fasteners holding the carpet in place against the rear of the hatch area. You'll need to remove all 6 fasteners.
Start by removing the two round push-in “christmas-tree” connectors near the latch mechanism...
You can pry these out quickly with the proper trim tool (I purchased this set of trim tools for $7), or you can use your fingers to get them started (not easy!) and then grab them with needle-nose plyers and pull them out the rest of the way.
At each corner of the rear hatch carpet (near each interior light) you will see a round, flat head push-in connector head and an anchor for the cargo net. Again, use a trim tool (or fingers) to pull the flat-head connector off. The cargo net anchors unscrew easily...don't try to pull them off!
Note: You will need to remove these connectors from both sides of the car...not just the passenger side.
With all of the above connectors removed, you can now pull the carpet away from the rear of the hatch. You may want to set something heavy on the carpet it to hold it down out of your way while you work. Otherwise it will keep springing back into place. Here's what you'll be looking at...
As you can see from the photo above there's plenty of room to fit the control box in behind the carpet next to the rear latch towards the passenger side of the car. It is nicely wedged in place so there's no way it will move around. No need to attach it to anything. It's a perfect fit and it's not going anywhere in this location!
So how do you get the vacuum lines to the control box? Well, you will have to drill a couple of holes. Generally I wouldn't like that, but these holes will be completely out of sight...even from underneath the car. If you remove the system, noone will ever know holes were there!
Set your control box in place with the vacuum outlets pointing toward the passenger side of the car. Mark two spots on the rear of the hatch area where the vacuum lines will need to run to the outside of the car. Here's what you will be seeing at this point...
Before you drill out the holes, use a T15 torx bit and remove the single screw that is holding in the inner passenger-side tail-light. Pull the tail-light out of the bumper, unplug it from the wiring harness and set it aside. Take a moment to look in the hole where the taillight was. This is where the holes will go to route your vacuum control lines between the control box, engine and mufflers...
Note: In the picture above, those two vacuum lines are the ones going to the NPP control box. You won't see these at this point. I'm just showing you where your lines will be after you drill the holes.
OK...now grab your drill and drill out the 2 holes you marked. Be careful because the panel you're drilling through is extremely THIN and it's made of fiberglass. The material may splinter a little bit when you drill it. Be careful cleaning up the holes with your fingers or you will be walking around with glass fibers stuck in your skin annoying you for the next 2 days. Ask me how I know!
Once the holes are drilled, set the NPP control box back in place and route the vacuum lines through the holes. It will look like this...
OK...you're probably wondering at this point how I got the engine vacuum line routed to behind the back bumper. Here's how...
When the mufflers are removed, you can see a large metal heat shield pan that protects the floor of the hatch area. The top edges of the shield are rounded off. If you look along the passenger side edge of this pan where it meets the floor of the hatch, you can see that there's enough room to run a vacuum line on top of the shield along the edge. If you snake a hose in along the passenger side top edge of the pan, the line will come out behind the back bumper...within inches of the 2 holes you just drilled for your NPP control box! Looking towards the front of the car, here's where the vacuum line will enter along the passenger side top of the heat shield...
I found it easier to just unbolt the shield and lower it down...then I routed the vacuum line up behind the back bumper...then raised the shield back up into place. This will require removing a few bolts, but it will save you some frustration.
Note: This heat shield is a few inches away from the mufflers. I don't think it gets hot enough to compromise the vacuum tubing behind the shield. I have driven with this setup for a few hundred miles so far without any issues.
Once you have the vacuum line from the engine routed above the heat shield, you will be able to look through the tail-light hole to see where it comes out behind the bumper. Take the smaller diameter vacuum line from the NPP box (the one going to the mufflers) and route it through the same spot where engine vacuum line comes out. This line can then be routed down to the mufflers from underneath the car, like this...
Completed installation from underneath car before installation of mufflers...
Once you install your mufflers, nobody will be able to tell where their vacuum source is coming from (no lines running in/out of bottom of storage bin or control box underneath the car). Everything is hidden, and you retain full use of your passenger side storage bin. This installation method may add an extra 30 minutes to your install time, but it's easy and it's a little more stealthy!
EDIT: Be sure to scroll down to Post #14 in this thread for another mounting option with NO DRILLING REQUIRED.
ONE LAST INSTALLATION TIP...
BEFORE you put the carpet back in place with all the fasteners, make sure you like the functionality of your NPP controller. Do you want it to start quiet, loud or remember your last setting? You may have to make an adjustment inside the control box to change this! Refer to the manufacturer's instructions for details.
BEFORE you put the carpet back in place with all the fasteners, make sure you like the functionality of your NPP controller. Do you want it to start quiet, loud or remember your last setting? You may have to make an adjustment inside the control box to change this! Refer to the manufacturer's instructions for details.
* * DISCLAIMER * *
I have no affiliation with NPP-in-a-Box or Exhaust Commander. This installation method has not been approved by any manufacturer. Follow these instructions at your own risk. As always, follow common sense guidelines when working on your car.
I have no affiliation with NPP-in-a-Box or Exhaust Commander. This installation method has not been approved by any manufacturer. Follow these instructions at your own risk. As always, follow common sense guidelines when working on your car.
Last edited by Top_Fuel; 02-28-2012 at 01:31 PM.

The following 3 users liked this post by Top_Fuel:
05-13-2011, 12:37 PM
#2
Melting Slicks


Great post, nice picts. I will consider this to free up the cubby. Thanks for posting.
05-13-2011, 01:04 PM
#4


Well guess where my controller is going!?! Thanks for the post and great pics. I installed my NPPs this AM along with R&R'd the intake that suffered from my attempt to remove the much maligned manifold vacuum source. New manifold was installed sans "T", opened up the port a bit...with a bit....and capped with a vacuum cap lubricated for easy removal. When I get the controller later today ( hope) along with my heat sheathing...its back under the car to run the vacuum from the engine to the controller.
I am using the other guys controller and will have both control functionallity from the fob as well as the "Reset" button at the instrument panel...we will report back as soon as we have lift off.
I am using the other guys controller and will have both control functionallity from the fob as well as the "Reset" button at the instrument panel...we will report back as soon as we have lift off.
05-13-2011, 01:56 PM
#5
Melting Slicks
Thread Starter

Keep us posted on your install. I have no idea how big your controller box is compared to NPP-n-a-Box. But there's a lot of room behind that carpet, so you should be good to go!
05-13-2011, 02:14 PM
#6
Melting Slicks

Member Since: Dec 2006
Location: Exhaust Commander Wireless Bi-Mode Exhaust Controllers, Innovative and advanced technology! --- Check out our website @ www.sunsetorangecreations.com
Posts: 2,887
Likes: 0
Received 2 Likes
on
2 Posts
St. Jude Donor '13
Well guess where my controller is going!?! Thanks for the post and great pics. I installed my NPPs this AM along with R&R'd the intake that suffered from my attempt to remove the much maligned manifold vacuum source. New manifold was installed sans "T", opened up the port a bit...with a bit....and capped with a vacuum cap lubricated for easy removal. When I get the controller later today ( hope) along with my heat sheathing...its back under the car to run the vacuum from the engine to the controller.
I am using the other guys controller and will have both control functionallity from the fob as well as the "Reset" button at the instrument panel...we will report back as soon as we have lift off.
I am using the other guys controller and will have both control functionallity from the fob as well as the "Reset" button at the instrument panel...we will report back as soon as we have lift off.
Just a note.
You DO NOT need to drill any holes to install the Exhaust Commander NPP retrofit kit.
The vacuum solenoid box can be mounted externally underneath the car and the wiring to it routed through the grommet for the tail light wiring.
Why drill holes if you dont need to?
The install instructions are available at:
http://sunsetorangecreations.com/upl...structions.pdf
Go to page 13 to see the external mounting option.

Last edited by SunsetOrangeCreations; 05-13-2011 at 02:17 PM.
05-13-2011, 02:31 PM
#7
So maybe it wasn't my imagination that when you remove that little "T" cap, the hole it opens up is actually pretty small? After I popped the cap off of my intake, I couldn't get a small trim nail inside that hole. I had to connect a vacuum line to it to convince myself it was actually open to the intake.
Keep us posted on your install. I have no idea how big your controller box is compared to NPP-n-a-Box. But there's a lot of room behind that carpet, so you should be good to go!
Keep us posted on your install. I have no idea how big your controller box is compared to NPP-n-a-Box. But there's a lot of room behind that carpet, so you should be good to go!
05-13-2011, 02:39 PM
#8
Melting Slicks
Thread Starter
I didn't think there was even a hole there when that cap came off.
...done...maybe 45 minutes start to finish. No bloody arms and a clean port to attach the vacuum line to the NPP controller.
So I would have saved myself 2+ hours of frustration if I had just pulled the intake off in the first place?  Son of a ....
05-14-2011, 08:58 PM
Son of a ....
05-14-2011, 08:58 PM
#9
Hi Sam,
Just a note.
You DO NOT need to drill any holes to install the Exhaust Commander NPP retrofit kit.
The vacuum solenoid box can be mounted externally underneath the car and the wiring to it routed through the grommet for the tail light wiring.
Why drill holes if you dont need to?
The install instructions are available at:
http://sunsetorangecreations.com/upl...structions.pdf
Go to page 13 to see the external mounting option.
Last edited by sampaschal; 05-14-2011 at 09:00 PM. Reason: sp. correction
05-14-2011, 09:26 PM
#10
Melting Slicks
Thread Starter
Whatever happens, between your silicone hose and heat shield, your installation should be pretty bullet-proof.
05-14-2011, 10:22 PM
#11
I had a spot where the vacuum line ran for several inches near the passenger side exhaust pipe without any support...there was just nothing in the area to take advantage of a zip-tie or other anchor system. Once I got my mufflers installed it made me nervous so I ended up using a couple of self-adhesive cable clips stuck to the bottom of the car in this area. I used something like these.
Whatever happens, between your silicone hose and heat shield, your installation should be pretty bullet-proof.
Whatever happens, between your silicone hose and heat shield, your installation should be pretty bullet-proof.
think a like I suppose...I had already purchased adhesive backed clips nearly identical to the ones you used. Peel and stick...also I have some 3M double sided automotive trim tape that may see some service...by marking where you want to run the vacuum line along the body...peel the tape off one side and stick to the body panel....peel the face off and stick the vacuum line to the trim tape at intervals of say several inches..then use sticky backed clip....then several more inches of double faced 3M....you get the picture...I think the vacuum line will stay where its put...I hope.. I have rubber insulated metal straps where I can find a screw...like at the shields......zip ties....chewing gum and some bailing wire ...I am ready to get this done
  .....then LG Motorsports is just about 1 hour from my house...are long tube headers in the mix.....LGs long tube street headers...with install and tune....around a buck fifty....
Last edited by sampaschal; 05-14-2011 at 10:29 PM. Reason: capitalization error

 07-06-2011, 03:50 PM
#14
Melting Slicks
Thread Starter
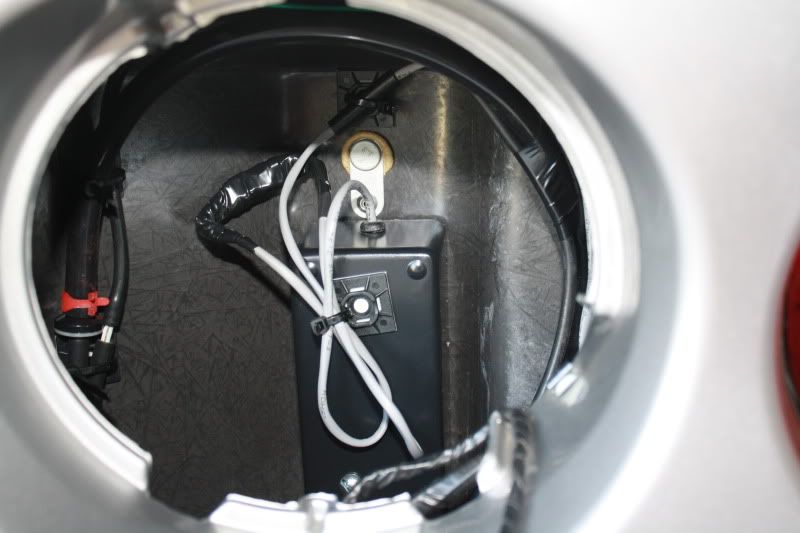
Forum member sampaschal came up with yet another location to mount the NPP box.
His method requires NO DRILLING...so you may want to consider this location as a possibility.
He used a quality 2-sided tape and attached his NPP box behind the tail-light. Here's a picture...
Again...I would advise you not to seal everything up until you have tested the system out and verified that you like the "start-up mode" of the unit. My NPP-in-a-Box came set up to automatically go into "quiet" mode as soon as the car starts. In order to change this to open in "loud" mode, you have to remove the 4 screws on the NPP-in-a-Box module and swap a couple of wires.
I've had to open my NPP control box 3 times because I can't make up my mind if I like the car to start quiet or loud. I think my neighbor would prefer the quiet mode.
 07-06-2011, 07:59 PM
#16
Hi Sam,
Just a note.
You DO NOT need to drill any holes to install the Exhaust Commander NPP retrofit kit.
The vacuum solenoid box can be mounted externally underneath the car and the wiring to it routed through the grommet for the tail light wiring.
Why drill holes if you dont need to?
The install instructions are available at:
http://sunsetorangecreations.com/upl...structions.pdf
Go to page 13 to see the external mounting option.
Just a note.
You DO NOT need to drill any holes to install the Exhaust Commander NPP retrofit kit.
The vacuum solenoid box can be mounted externally underneath the car and the wiring to it routed through the grommet for the tail light wiring.
Why drill holes if you dont need to?
The install instructions are available at:
http://sunsetorangecreations.com/upl...structions.pdf
Go to page 13 to see the external mounting option.
Jeff
04-06-2013, 11:16 PM
#19
Melting Slicks


UPDATE: I had my tuner (Quality Motorsports) pull the manifold and install the vacuum line for me today. Sound is awesome!
Thank you Greg, GREAT idea!
Last edited by BarneyZ; 04-29-2013 at 03:01 PM.
