
Garage/Shop on a budget!
 01-23-2011, 07:02 PM
#1
Le Mans Master

Thread Starter
Member Since: Dec 2005
Location: North Western Connecticut
Posts: 7,597
Received 91 Likes
on
54 Posts

I've seen some fantastic unbelievable very expensive "man cave" projects being posted lately. Actually some look more expensive than the inside of my home.  ... In any event let's call this write up/pictorial the Poor Man's garage/shop project. Much of what you see was DIY stuff including the actual garage construction. No, I'm not a contractor but have learned a few things over the years. There were a lot of choices to make but because of $$ considerations I kept it simple. Didn't have an unlimited budget like many here so I had to get creative with what I could afford to do. That meant no fancy tables, chairs, plasma TV's, bars, custom floors, illuminated signs, chrome do-dads and finished off with 10 grand of "Snap On" tool chests. That wasn't going to happen because budget constraints and needing more of a working garage!
I started with about 1400 sq ft of a pretty well constructed garage that was fully insulated. I added a gas overhead heating system last year which works fantastic. There is almost 1400 sq ft of storage over head too but only have a 10 ft ceiling on. I couldn't afford to be heating a bunch of air space so it was a factor in the ceiling height. Cost was the major factor in almost all my decisions on this project.
I've been working on and off as time and money permit for about 4 years and finally have it almost finished. I decided to partition when I built it between GARAGE and SHOP because of my many project that create dust and dirt. Now I can just close the door between the 2 areas and I'm good to go for cutting, sanding, grinding drilling etc. Didn't want all that crap floating on the car(s)....
Since I do a fair amount of mechanical work on my vette, truck and friends cars so it had to be practical. You will not see fancy counters that SCREAM ouch the first time a wrench is dropped on them. Nothing that can't take a beating from grease, oil etc was used. This had to be a WORKING shop/garage and not a show place which would be great but couldn't afford anyway. Mine is just a simple neat, clean and warm place to actually work on things like cars... etc.
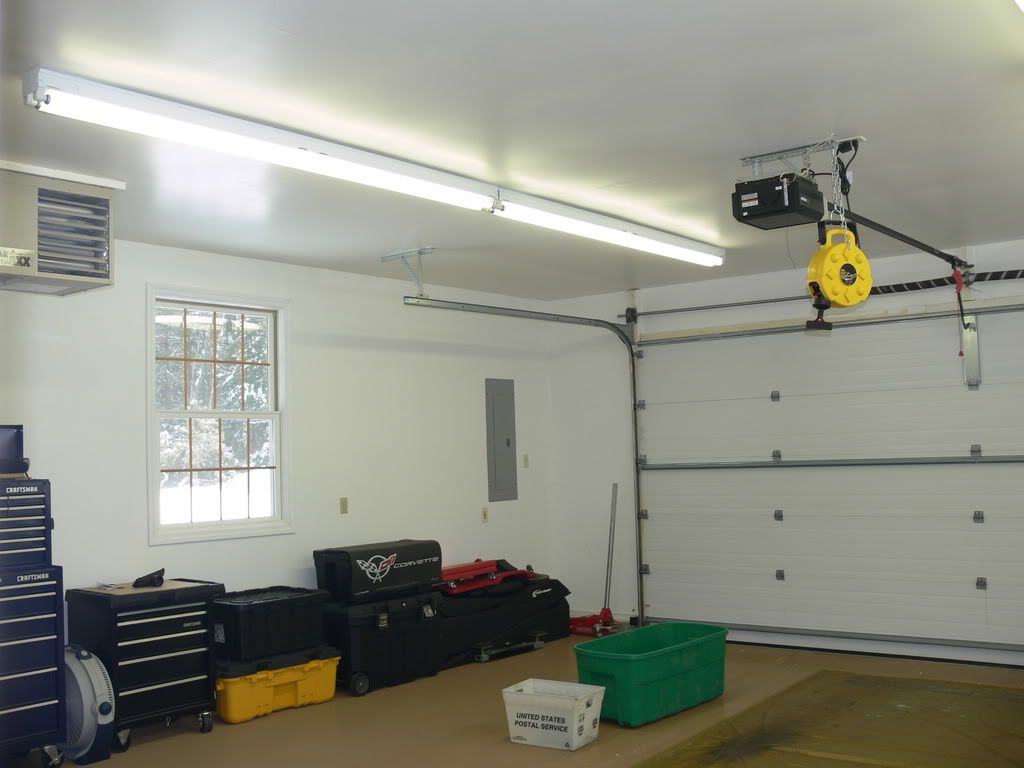
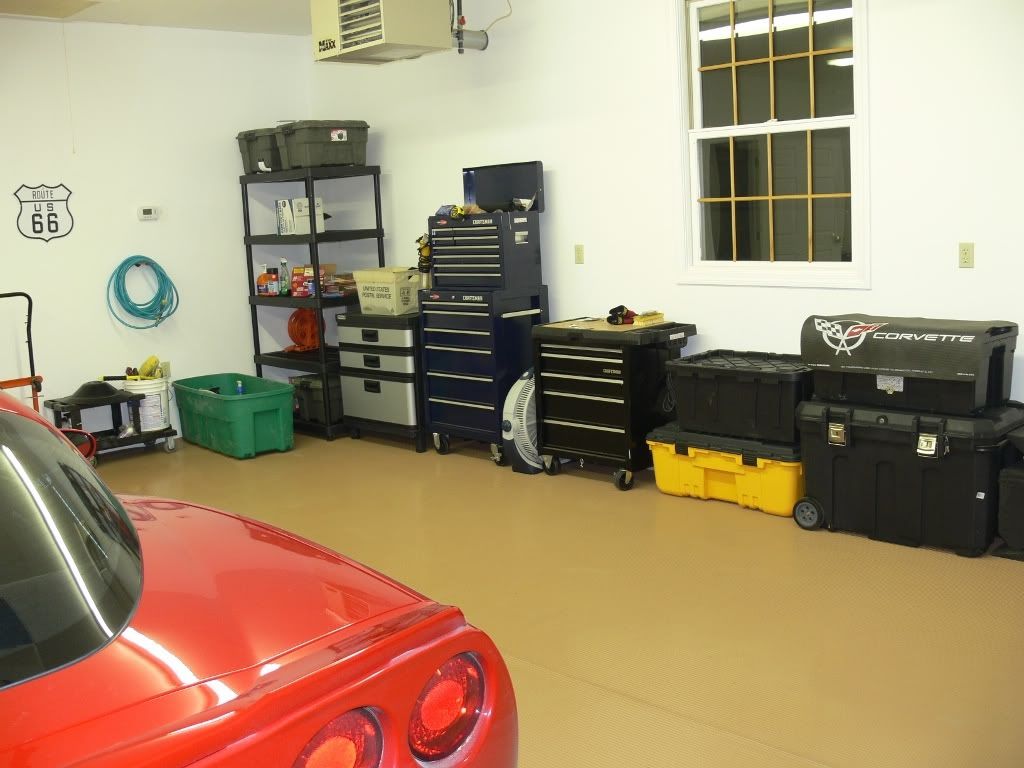
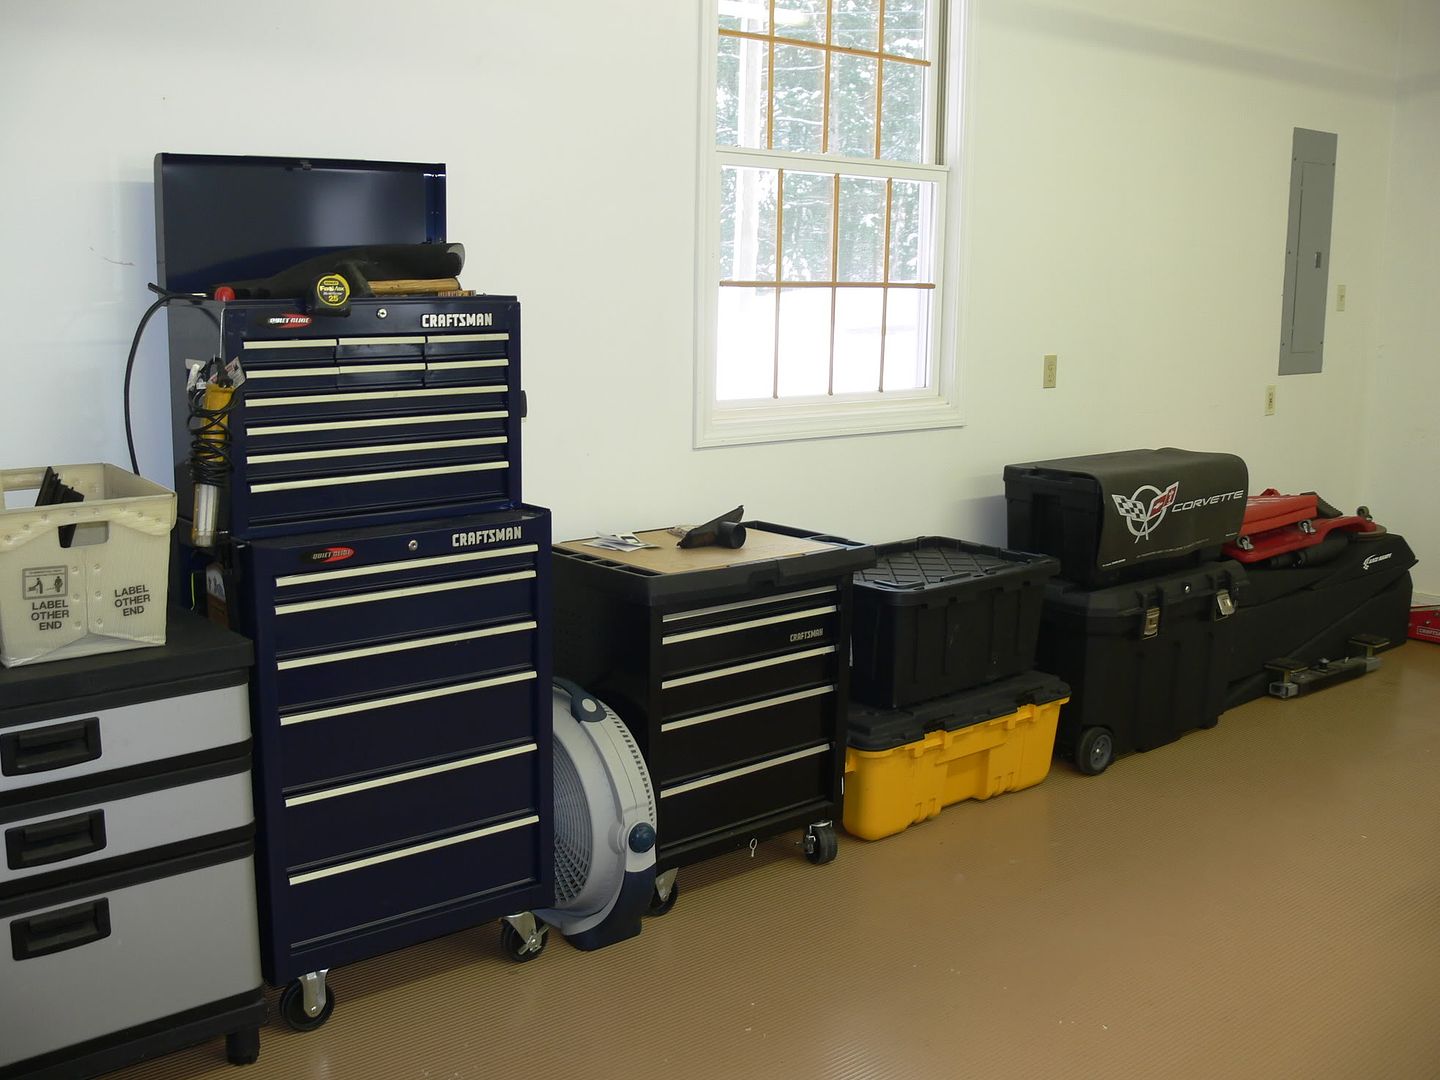
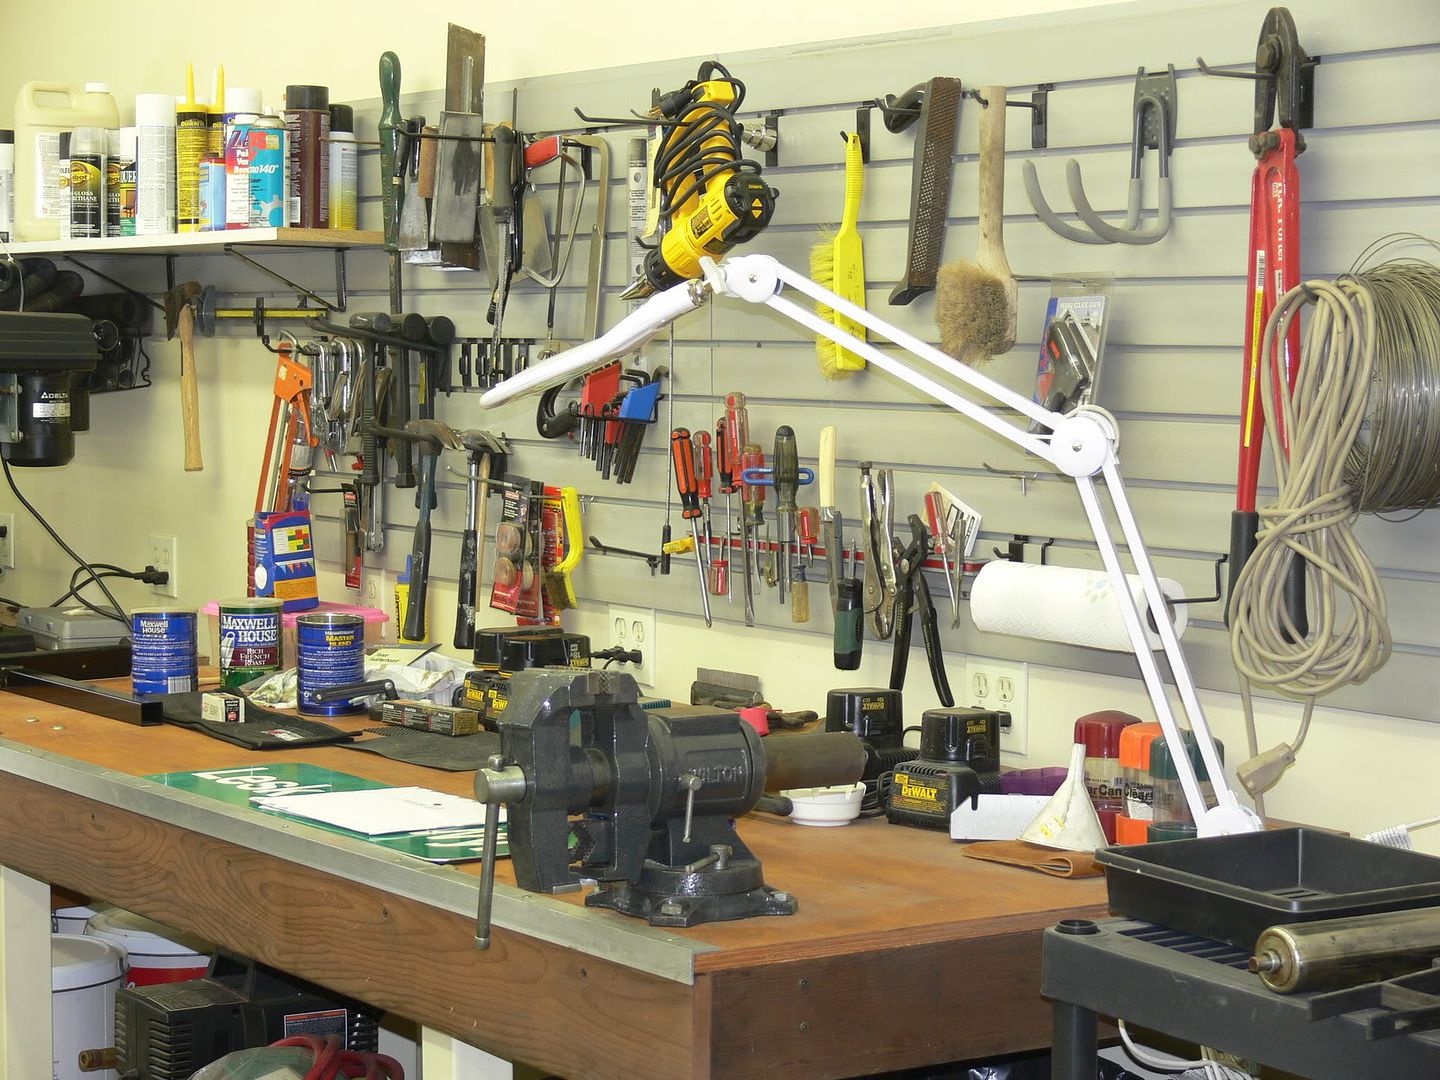
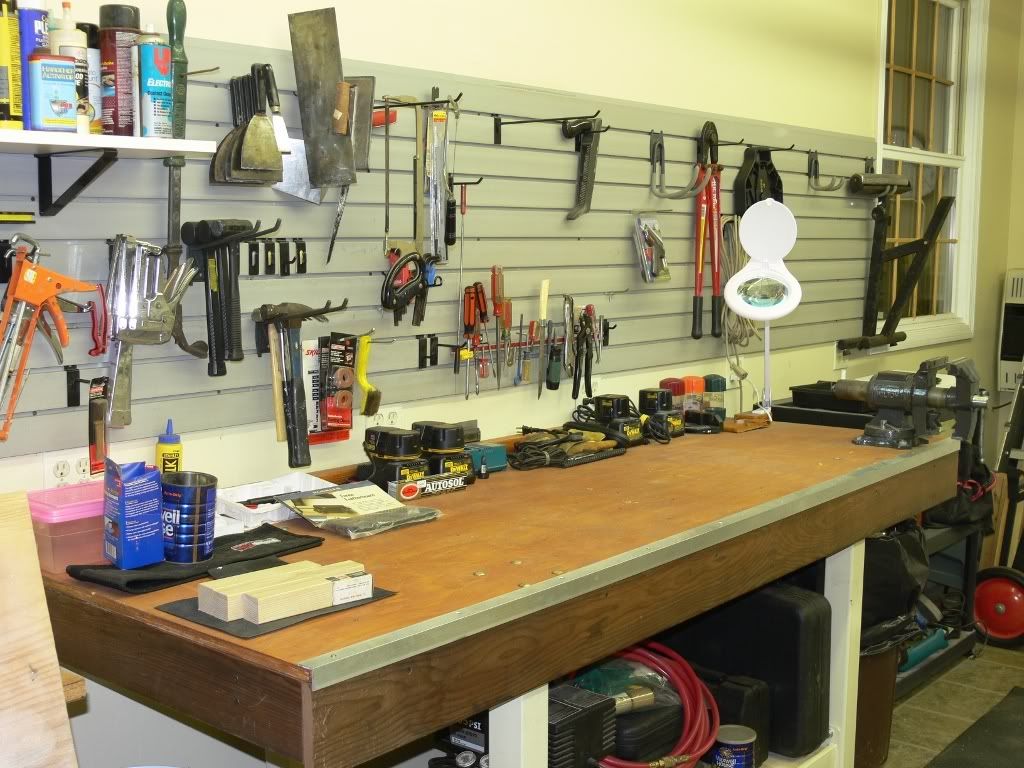
The shop area is mostly used for wood working and home projects. Anything that needs fixing or building is done there. I installed a decent sized Ingersoll Rand compressor (220 volt) because I have lots of air tools. I also ran air line hooks ups to the garage side and outside. Also many outside plugs for working there in the warmer months. I hope to add a welder and with a separate 200 amp service I can run most anything. I did splurge on the shop cabinets because I wanted something that looked nice and professional. Still got a great deal and only paid around 800 bucks. The work bench I bought the super heavy duty legs/frame from Grizzly and built my own top with 2 x 4's turned sideways, glued and screwed together then sandwiched between 3/4 plywood. It's SUPER strong and SUPER heavy... oh man this thing is so heavy!! I like a very sturdy work bench and this was a good cost effective method imo.
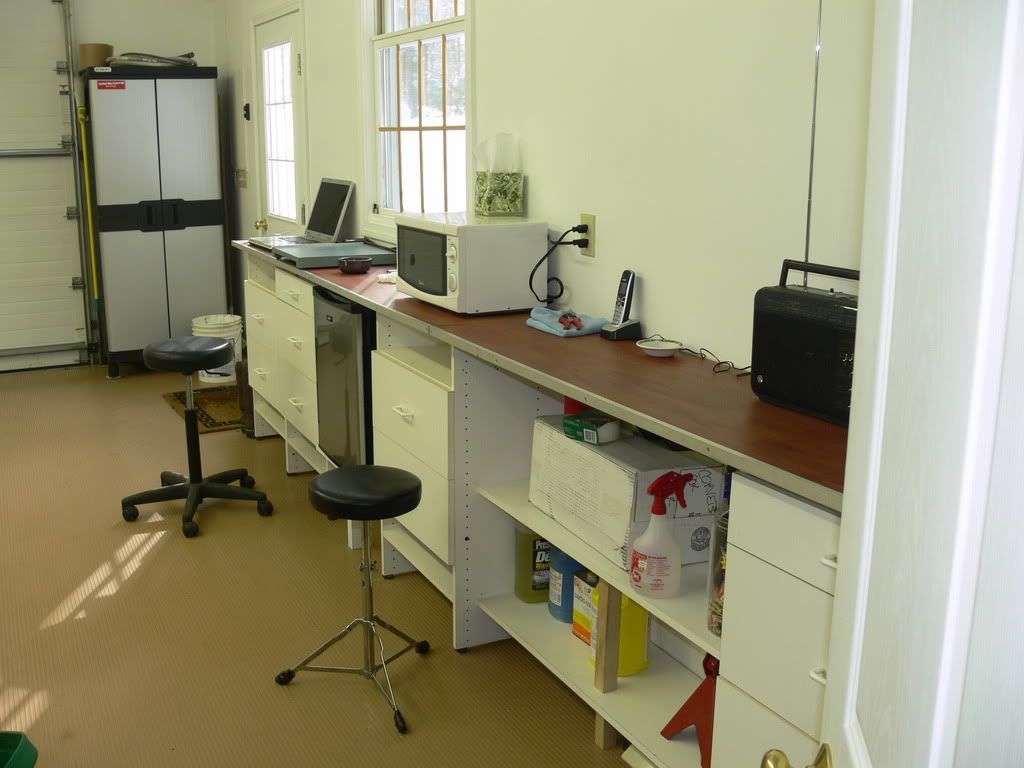
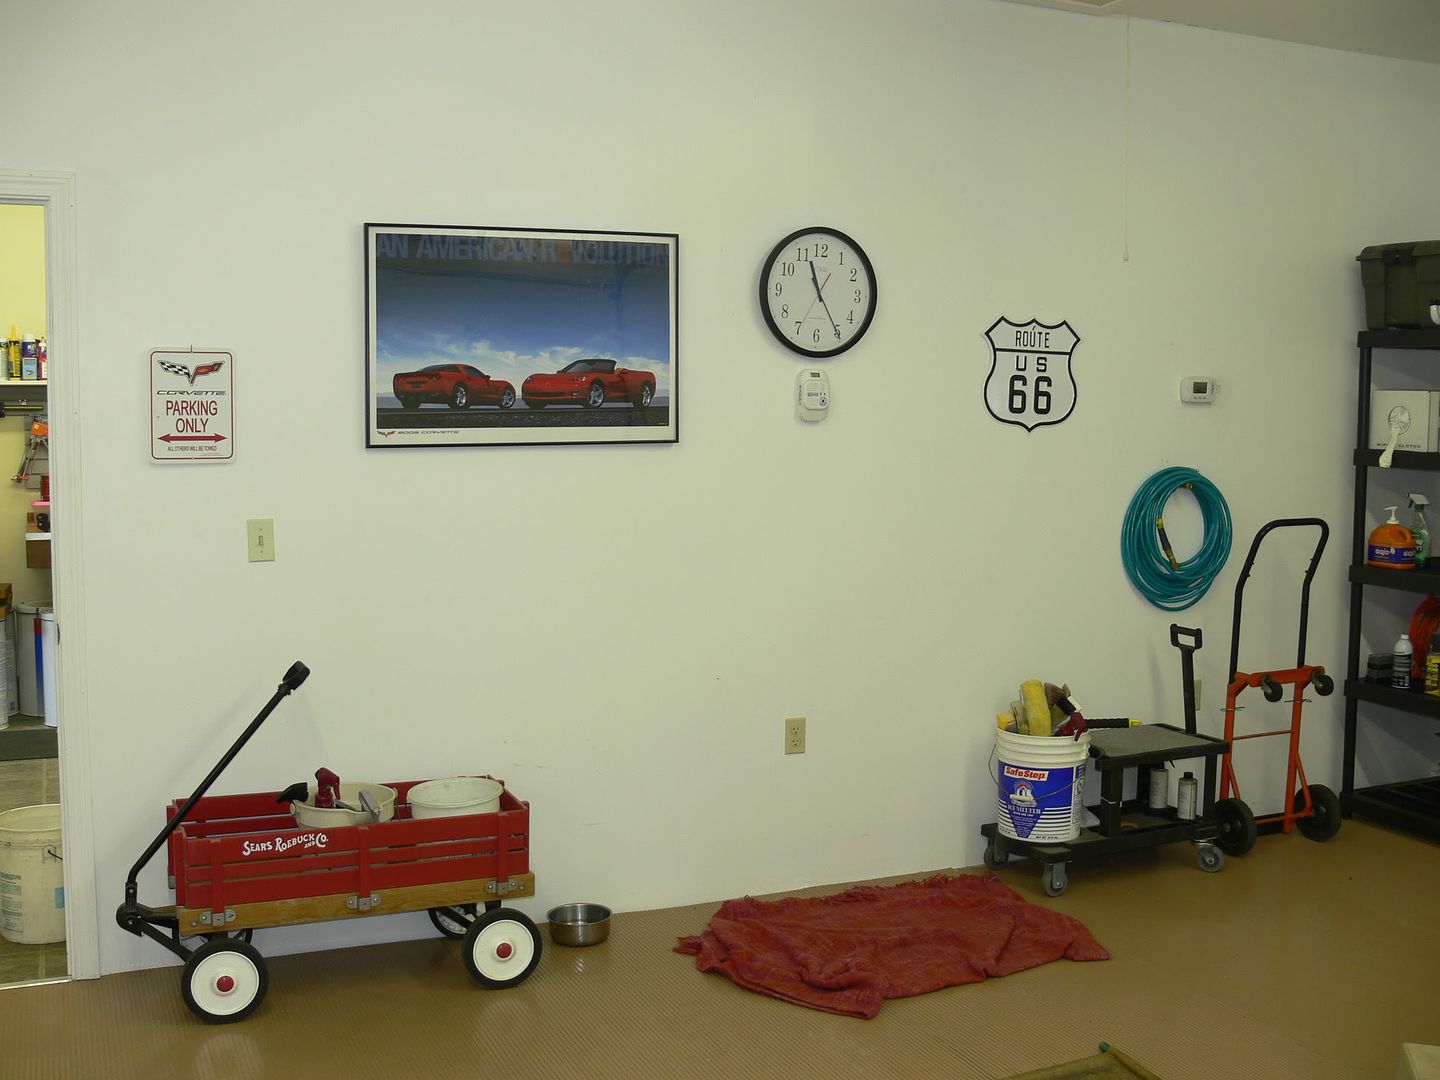
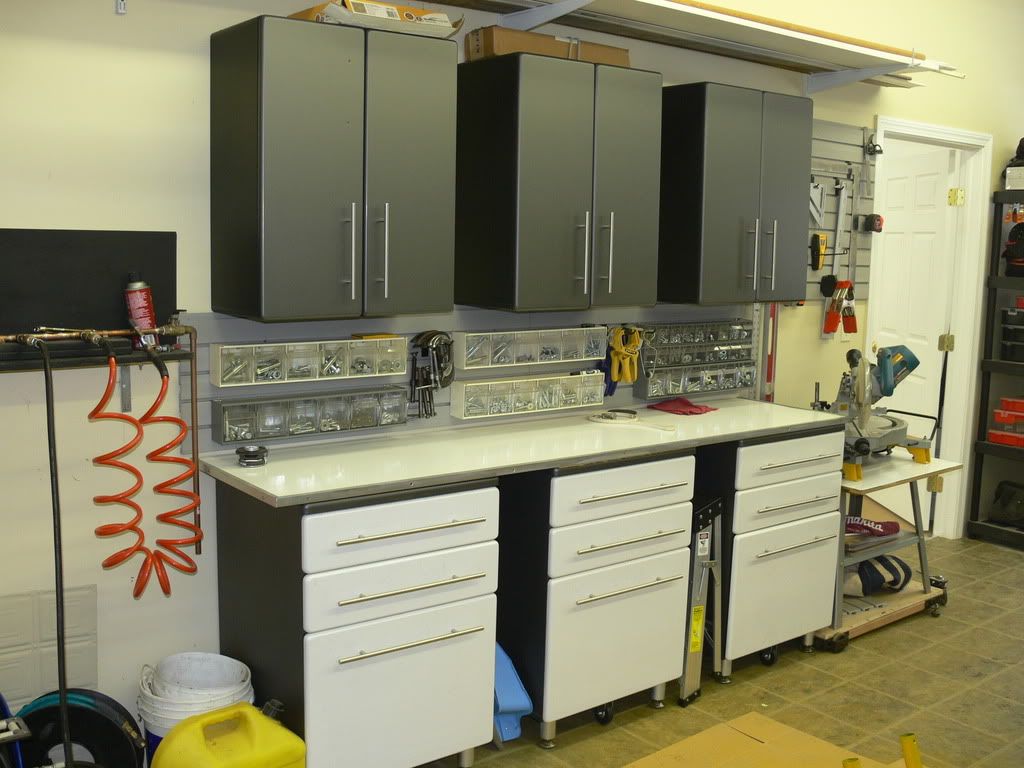
The garage side cabinets I lucked into because someone was ripping them out and going to toss them. They seemed OK to me but then again I'm cheap. I rehabbed them and they turned out fine considering the price was.. FREEI I used 3/4" oak plywood for counter top and stained it with some great stuff from Home Cheapo. It was then fastened it down with stainless wood screws and edged with plain 3/4" aluminum channel from Home Cheapo. The stain btw is great stuff because it's water and chemical resistant and stands up well. If it gets beat simply apply another coat of stain/sealer and you're good to good. Nothing fancy but I think it looks decent for being 3/4 inch plywood.
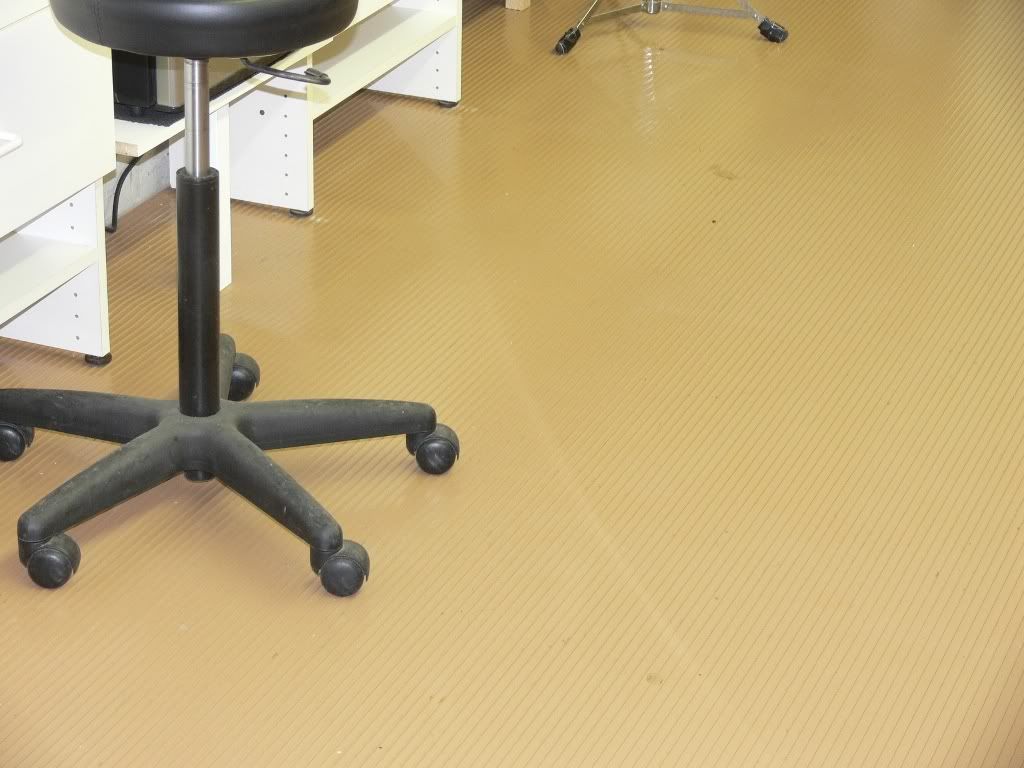
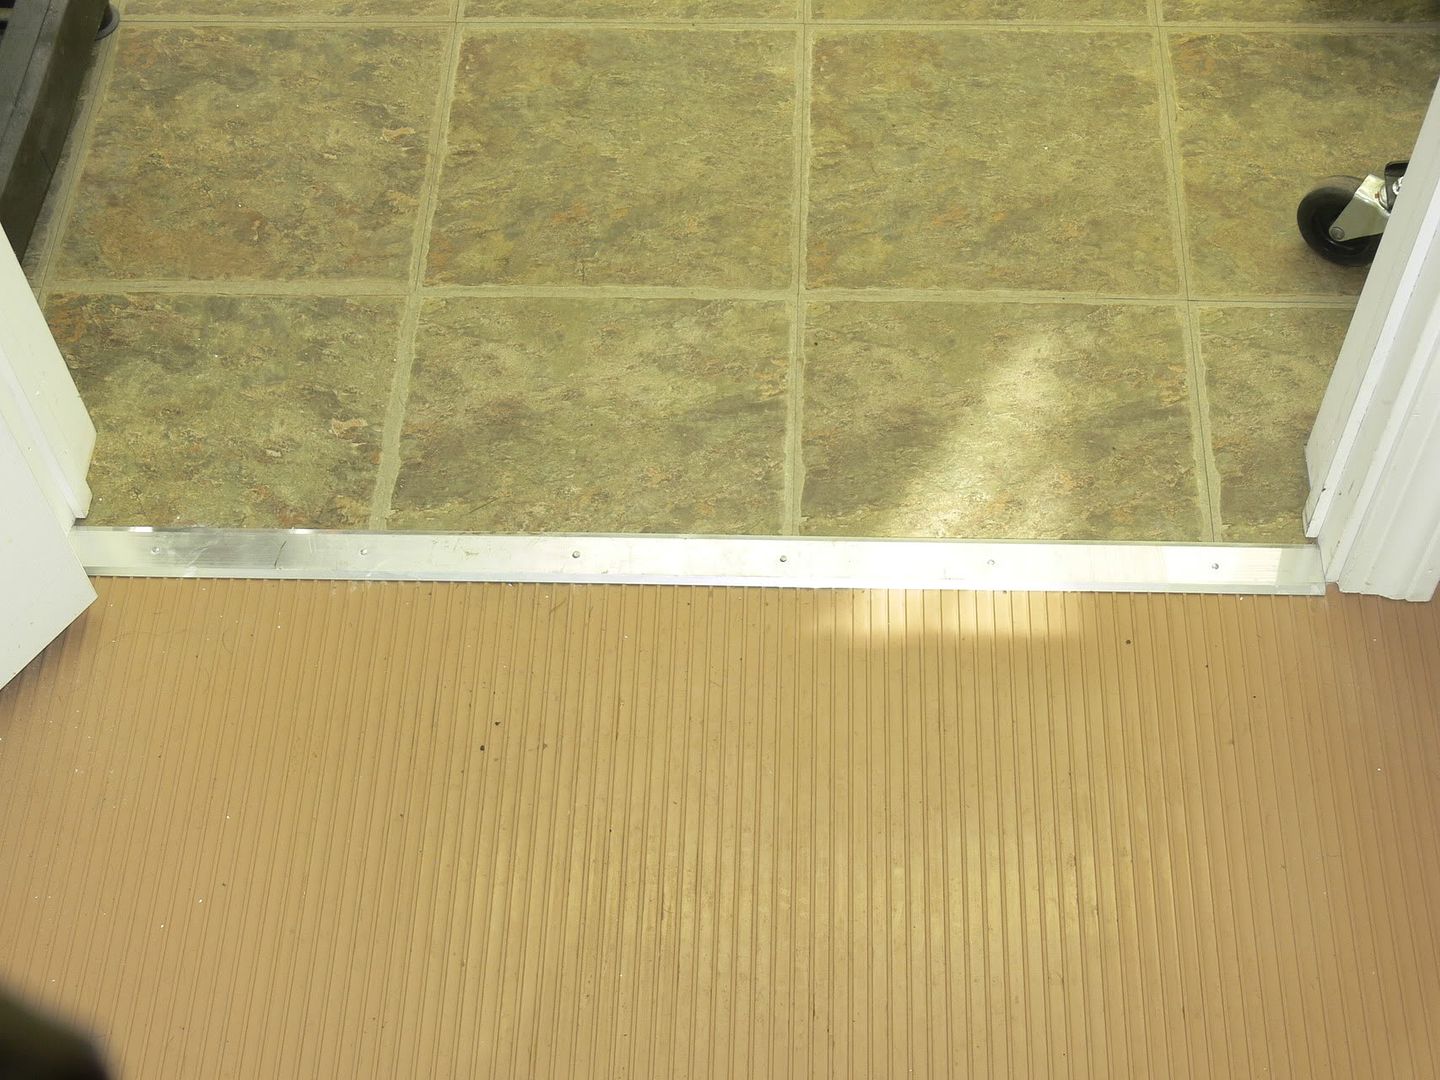
I really struggled deciding on picking floor material for the garage side. The shop side had commercial grade stick down tiles early on. They have been down over 3 years and have stood the test of time very well. Just make sure your concrete is super clean and treated before sticking them down. No problem with except they tend to get a little slippery when wet. For that reason I ruled them out for the garage side. I did not want epoxy finishes either because I've seen to many crack, discolor, chip and peel in a few years. Even high expensive epoxy systems can do it from hot car tires. I don't care for plastic floor tiles because they tend to be slippery and heavy items like floor jacks are not good on them. They are also pretty expensive!
I decided to go with this rubberized type flooring material (on rolls) which is supposed to be extremely durable. It's not cheap but it is about half the cost of those special plastic floor tiles systems. I covered well over 500 sq ft for under a grand. It's also easy to clean (pressure washer or mop) and nice on your legs and back. Nothing worse than working for hours on concrete or tile floors. This stuff looks decent and comes in several colors. It required 3 rolls which can be seamed together by the user. If it gets damaged I can replace only the damaged section. Application is very easy as you simply unroll and let it flatten itself in a few days. You can trim to size with a razor knife pretty easy. I decided to put down aluminum flooring strips (not necessary) to make sure it stays tight at the garage opening and present a more professional look. It was over kill but was cheap and easy to do. The flooring can be moved outside the garage in 10 mins by unfastening the strips and dragging it out.... I'm thinking cleanup should be a snap with my pressure washer. .
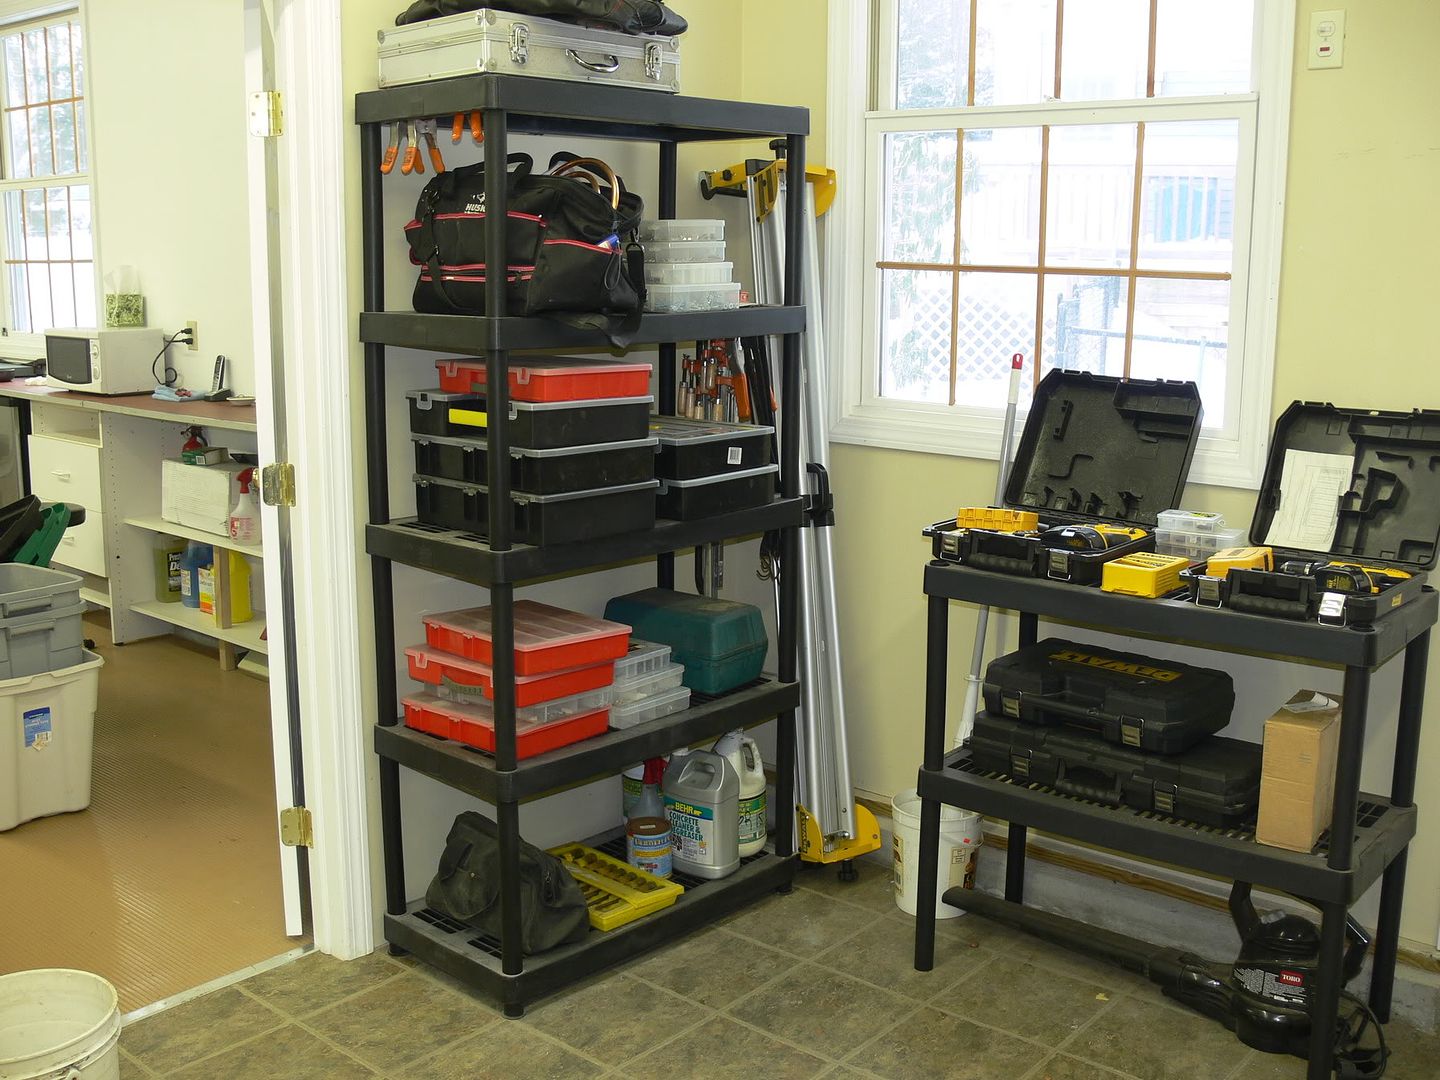
I shopped around for storage racks etc that wouldn't break the piggy bank. Home Cheapo and Lowes had some decent stuff. Not expensive (plastic) but it gets the job and doesn't look hideous. I installed overhead a power cords in both shops which is very handy. I have many wall circuits but always seem to use the overhead one. When you need an extension cord for something it's great to have it right there.
I want to emphasize the garage/shop is a "real" working area that sees lots of dirt and water because of snow blowers etc... lol... Nothing is in there that when it gets whacked will cause to wring my hands! lol. I know with working on lots of cars and trucks it's going to happen.
The upstairs storage area can be accessed from either inside or outside the building. It's full stand up height and is great for storing my used vette parts, tires, wheels.. etc. We used a 7/12 pitch because of snow loads in my area and do not expect to have any snow load problems.
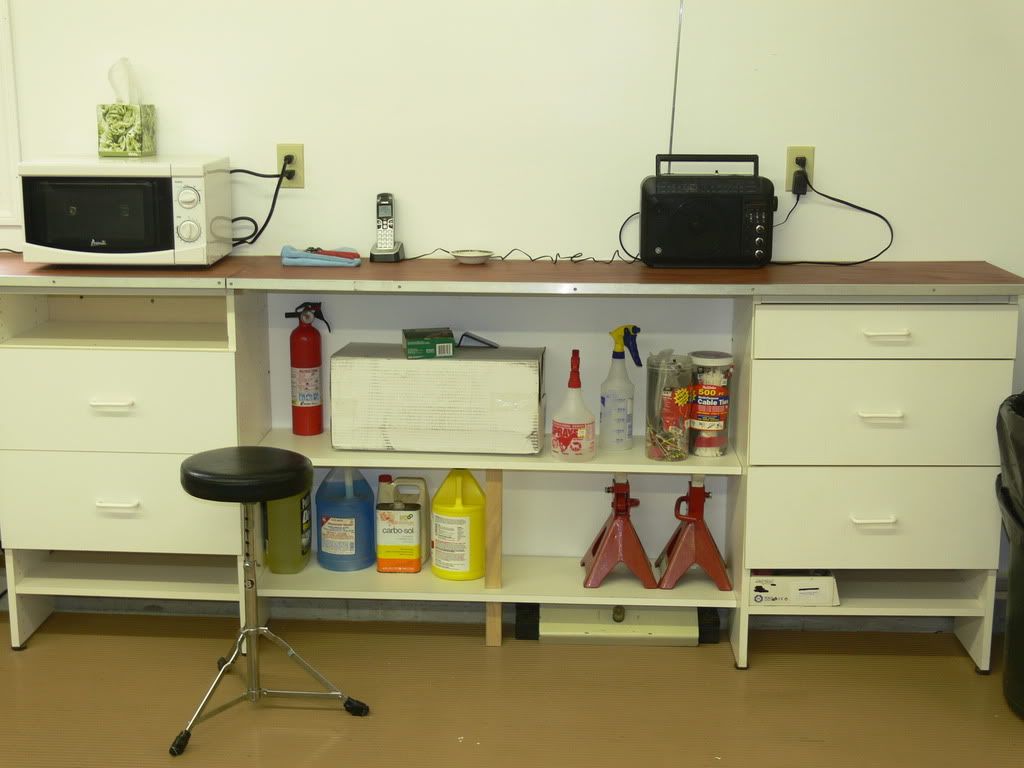
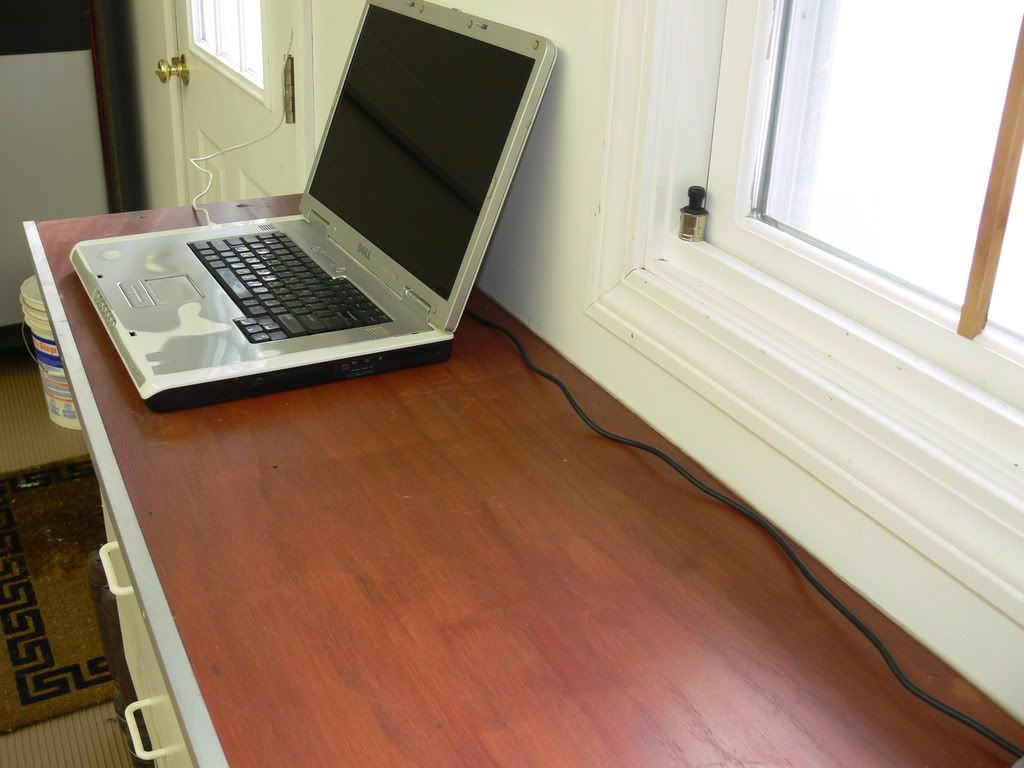
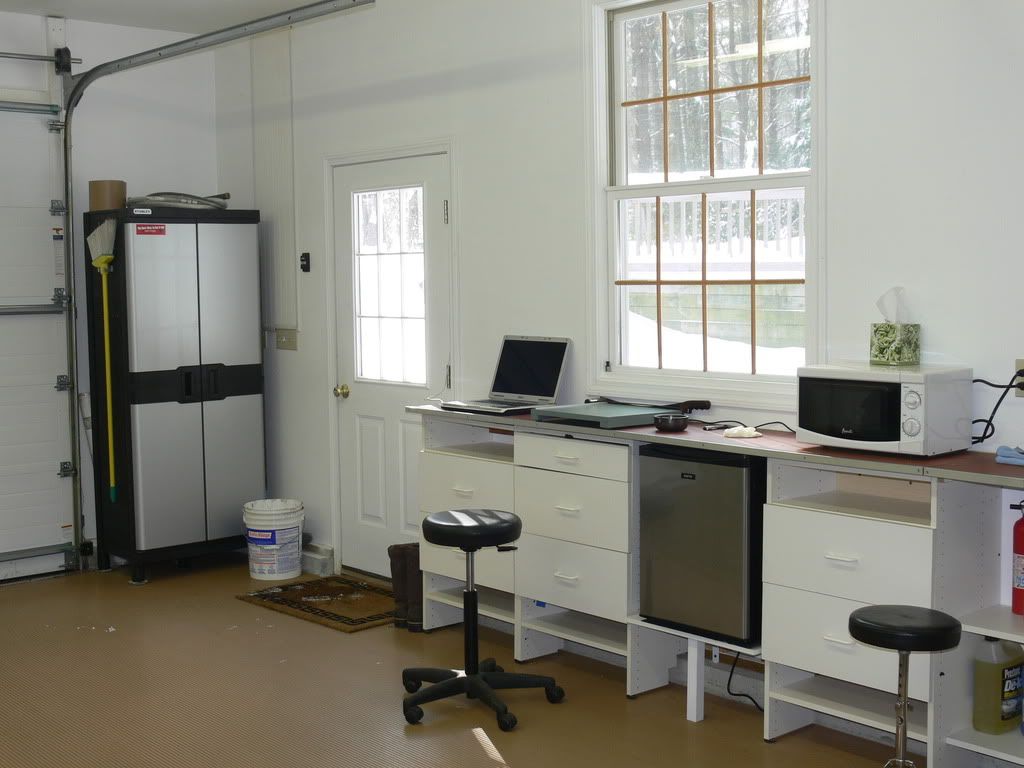
I also splurged for a mini fridge (works great) and micro. They both get used a lot reheating coffee and grabbing cold drinks. It's just nice to have them in the shop area. A a decent radio and also installed an outside antenna for my Wifi. It works great and I now keep an older lap top there. I use it all the time when doing projects and think it's well worth the effort to have internet access there. BTW.... I'm almost 100 ft from the house so without the external antenna I had ZERO internet but get a "GOOD" signal with it.
Garage doors!
There is single large for the garage and smaller one for the shop area. They are economy/insulated from Overhead Door but still much better quality then almost any of the Sears or home improvement stuff imo. Have Overhead on my house garage for over 20 years and have never replaced a single part.
I tried to build enough space but not to much. It's a fine line when everyone was telling me to build it bigger, yea.... bigger.. yea well HELLO.... it's got to be heated in the winter and there were building costs to consider. Easy to say bigger when you're not paying for it..... At 1400 sq ft it's large enough but no it's not an airplane hanger. I can park 3 vehicles easy. I still have 2 more garage bays attached to the house. Since I don't have a car collection nor plans for a fleet I'm sure it's enough inside parking for now.
My total cost was approximately 6 grand for all the inside fixtures, flooring etc. That of course excludes equipment and actual construction costs. I do have water with a .... oh no no... FLOOR DRAIN! No bathroom but could be put in with some work. All the labor was done by myself and a friend who I compensated for his time. He's also a licensed electrician and did my wiring.... which was a HUGE cost saver. That was mostly in the construction stage of the project.
No it's not glamor or a show place like many of these "man caves" (not even close) but I wanted to show guys of lesser means (like me) you can have a decent setup if you shop around. Do as much as you can yourself above all be creative. I found garage stuff seems to carry a premium price tag which was annoying!. Mine is a real working garage/shop, warts and all. It's going to get dirty, greasy and grimey but it can also be cleaned easy. That was a very important goal because I refuse to spend hours cleaning. I wanted neat and clean but nothing that could get damaged easy! I'm sure over time I might add a lift (maybe) and a few other things. Mostly however what will be added is tools, etc that can help me work more efficiently. Nothing like having the right tool for the right job!
Bottom line I'm satisfied with what's been accomplished for a reasonable price. I didn't have 20 or 30 grand (or more) to toss at finishing the inside to make it into palatial estate. lol.. I believe you can have a nice garage/shop while not breaking the bank if you use proper planning and some sweat equity. Shop around and find those good deals.. they're out there. Do it in stages if money is an issue. At least get started and make your improvements over time like I did. It's sweet when it all comes together....
I guess it's time to get back out there and actually do some work......


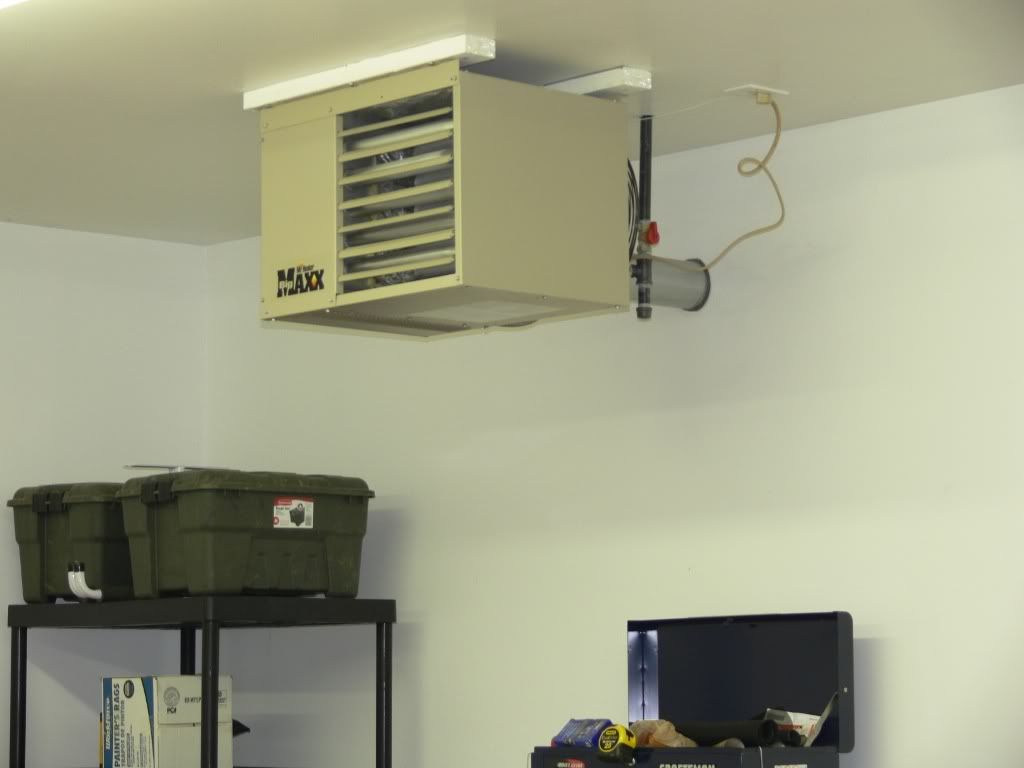
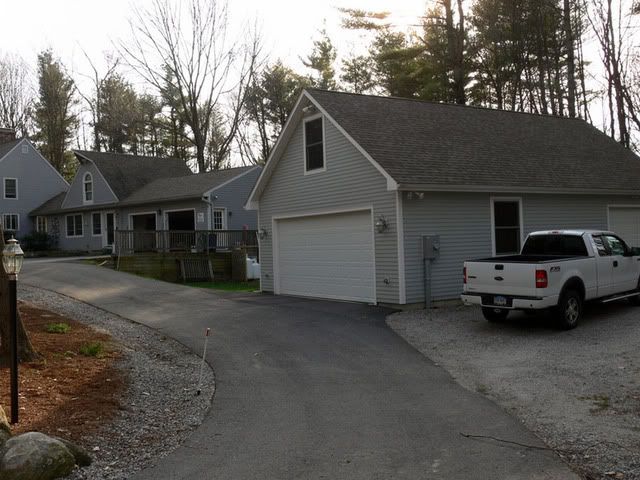
... In any event let's call this write up/pictorial the Poor Man's garage/shop project. Much of what you see was DIY stuff including the actual garage construction. No, I'm not a contractor but have learned a few things over the years. There were a lot of choices to make but because of $$ considerations I kept it simple. Didn't have an unlimited budget like many here so I had to get creative with what I could afford to do. That meant no fancy tables, chairs, plasma TV's, bars, custom floors, illuminated signs, chrome do-dads and finished off with 10 grand of "Snap On" tool chests. That wasn't going to happen because budget constraints and needing more of a working garage! I started with about 1400 sq ft of a pretty well constructed garage that was fully insulated. I added a gas overhead heating system last year which works fantastic. There is almost 1400 sq ft of storage over head too but only have a 10 ft ceiling on. I couldn't afford to be heating a bunch of air space so it was a factor in the ceiling height. Cost was the major factor in almost all my decisions on this project.
I've been working on and off as time and money permit for about 4 years and finally have it almost finished. I decided to partition when I built it between GARAGE and SHOP because of my many project that create dust and dirt. Now I can just close the door between the 2 areas and I'm good to go for cutting, sanding, grinding drilling etc. Didn't want all that crap floating on the car(s)....
Since I do a fair amount of mechanical work on my vette, truck and friends cars so it had to be practical. You will not see fancy counters that SCREAM ouch the first time a wrench is dropped on them. Nothing that can't take a beating from grease, oil etc was used. This had to be a WORKING shop/garage and not a show place which would be great but couldn't afford anyway. Mine is just a simple neat, clean and warm place to actually work on things like cars... etc.
The shop area is mostly used for wood working and home projects. Anything that needs fixing or building is done there. I installed a decent sized Ingersoll Rand compressor (220 volt) because I have lots of air tools. I also ran air line hooks ups to the garage side and outside. Also many outside plugs for working there in the warmer months. I hope to add a welder and with a separate 200 amp service I can run most anything. I did splurge on the shop cabinets because I wanted something that looked nice and professional. Still got a great deal and only paid around 800 bucks. The work bench I bought the super heavy duty legs/frame from Grizzly and built my own top with 2 x 4's turned sideways, glued and screwed together then sandwiched between 3/4 plywood. It's SUPER strong and SUPER heavy... oh man this thing is so heavy!! I like a very sturdy work bench and this was a good cost effective method imo.
The garage side cabinets I lucked into because someone was ripping them out and going to toss them. They seemed OK to me but then again I'm cheap.
I rehabbed them and they turned out fine considering the price was.. FREEI I used 3/4" oak plywood for counter top and stained it with some great stuff from Home Cheapo. It was then fastened it down with stainless wood screws and edged with plain 3/4" aluminum channel from Home Cheapo. The stain btw is great stuff because it's water and chemical resistant and stands up well. If it gets beat simply apply another coat of stain/sealer and you're good to good. Nothing fancy but I think it looks decent for being 3/4 inch plywood.I really struggled deciding on picking floor material for the garage side. The shop side had commercial grade stick down tiles early on. They have been down over 3 years and have stood the test of time very well. Just make sure your concrete is super clean and treated before sticking them down. No problem with except they tend to get a little slippery when wet. For that reason I ruled them out for the garage side. I did not want epoxy finishes either because I've seen to many crack, discolor, chip and peel in a few years. Even high expensive epoxy systems can do it from hot car tires. I don't care for plastic floor tiles because they tend to be slippery and heavy items like floor jacks are not good on them. They are also pretty expensive!
I decided to go with this rubberized type flooring material (on rolls) which is supposed to be extremely durable. It's not cheap but it is about half the cost of those special plastic floor tiles systems. I covered well over 500 sq ft for under a grand. It's also easy to clean (pressure washer or mop) and nice on your legs and back. Nothing worse than working for hours on concrete or tile floors. This stuff looks decent and comes in several colors. It required 3 rolls which can be seamed together by the user. If it gets damaged I can replace only the damaged section. Application is very easy as you simply unroll and let it flatten itself in a few days. You can trim to size with a razor knife pretty easy. I decided to put down aluminum flooring strips (not necessary) to make sure it stays tight at the garage opening and present a more professional look. It was over kill but was cheap and easy to do. The flooring can be moved outside the garage in 10 mins by unfastening the strips and dragging it out.... I'm thinking cleanup should be a snap with my pressure washer. .
I shopped around for storage racks etc that wouldn't break the piggy bank. Home Cheapo and Lowes had some decent stuff. Not expensive (plastic) but it gets the job and doesn't look hideous. I installed overhead a power cords in both shops which is very handy. I have many wall circuits but always seem to use the overhead one. When you need an extension cord for something it's great to have it right there.
I want to emphasize the garage/shop is a "real" working area that sees lots of dirt and water because of snow blowers etc... lol... Nothing is in there that when it gets whacked will cause to wring my hands! lol. I know with working on lots of cars and trucks it's going to happen.
The upstairs storage area can be accessed from either inside or outside the building. It's full stand up height and is great for storing my used vette parts, tires, wheels.. etc. We used a 7/12 pitch because of snow loads in my area and do not expect to have any snow load problems.
I also splurged for a mini fridge (works great) and micro. They both get used a lot reheating coffee and grabbing cold drinks. It's just nice to have them in the shop area. A a decent radio and also installed an outside antenna for my Wifi. It works great and I now keep an older lap top there. I use it all the time when doing projects and think it's well worth the effort to have internet access there. BTW.... I'm almost 100 ft from the house so without the external antenna I had ZERO internet but get a "GOOD" signal with it.
Garage doors!
There is single large for the garage and smaller one for the shop area. They are economy/insulated from Overhead Door but still much better quality then almost any of the Sears or home improvement stuff imo. Have Overhead on my house garage for over 20 years and have never replaced a single part.
I tried to build enough space but not to much. It's a fine line when everyone was telling me to build it bigger, yea.... bigger.. yea well HELLO.... it's got to be heated in the winter and there were building costs to consider. Easy to say bigger when you're not paying for it...
.. At 1400 sq ft it's large enough but no it's not an airplane hanger. I can park 3 vehicles easy. I still have 2 more garage bays attached to the house. Since I don't have a car collection nor plans for a fleet I'm sure it's enough inside parking for now.My total cost was approximately 6 grand for all the inside fixtures, flooring etc. That of course excludes equipment and actual construction costs. I do have water with a .... oh no no... FLOOR DRAIN! No bathroom but could be put in with some work. All the labor was done by myself and a friend who I compensated for his time. He's also a licensed electrician and did my wiring.... which was a HUGE cost saver. That was mostly in the construction stage of the project.
No it's not glamor or a show place like many of these "man caves" (not even close) but I wanted to show guys of lesser means (like me) you can have a decent setup if you shop around. Do as much as you can yourself above all be creative. I found garage stuff seems to carry a premium price tag which was annoying!. Mine is a real working garage/shop, warts and all. It's going to get dirty, greasy and grimey but it can also be cleaned easy. That was a very important goal because I refuse to spend hours cleaning. I wanted neat and clean but nothing that could get damaged easy! I'm sure over time I might add a lift (maybe) and a few other things. Mostly however what will be added is tools, etc that can help me work more efficiently. Nothing like having the right tool for the right job!
Bottom line I'm satisfied with what's been accomplished for a reasonable price. I didn't have 20 or 30 grand (or more) to toss at finishing the inside to make it into palatial estate. lol.. I believe you can have a nice garage/shop while not breaking the bank if you use proper planning and some sweat equity. Shop around and find those good deals.. they're out there. Do it in stages if money is an issue. At least get started and make your improvements over time like I did. It's sweet when it all comes together....
I guess it's time to get back out there and actually do some work......
 01-23-2011, 07:08 PM
#2
Team Owner

Member Since: Jun 2005
Location: Northern, VA
Posts: 46,111
Received 2,485 Likes
on
1,947 Posts
St. Jude Donor '15
"In honor of jpee"
Yah, that actually looks kinda like a normal garage, Craig. Not that I don't like the others. Good going! 
 em are some nice Caves
 01-23-2011, 07:41 PM
#6
Melting Slicks

nice... I was looking for flooring as my garage floor is shot and I don't want to replace it. Who did you get the flooring from? Is is slippery when wet also.. I'd hate to drive my vette in and come out the other side..
thanks,
/jc
thanks,
/jc
01-23-2011, 07:50 PM
#7
Le Mans Master
Thread Starter
Member Since: Dec 2005
Location: North Western Connecticut
Posts: 7,597
Received 91 Likes
on
54 Posts
They also have different designs instead of ribbed but I wanted it to channel any water..... http://www.allmats.com/site/439205/page/108132

 01-23-2011, 08:10 PM
#10
Lifetime NCM Member #2482

Member Since: Jul 2008
Location: West of Houston Texas
Posts: 2,996
Likes: 0
Received 1 Like
on
1 Post
St. Jude Donor '11

Can you come organize my husband's barn? 

This looks great! And you have a place for everything. It has to serve your purpose and it does. Well done!!
This looks great! And you have a place for everything. It has to serve your purpose and it does. Well done!!
01-23-2011, 08:51 PM
#13
Melting Slicks
Looks great, I like that you put a lot of effort into repurposing, and working within a budget. That is reality for most of us. Good job!
01-23-2011, 09:17 PM
#14
Race Director

Looks great!
I need to work on mine, waiting to finish my son's MGB project. Right now it's about 35 degrees in the garage and I refuse to work in there. With the price of propane I'm not about to put a heater in there.
I need to work on mine, waiting to finish my son's MGB project. Right now it's about 35 degrees in the garage and I refuse to work in there. With the price of propane I'm not about to put a heater in there.


 nice setup.now you need one of these.not the car but a 7k benwel 2 post lift.
