

 03-03-2015, 12:54 PM
Last edit by: IB Advertising
See related guides and technical advice from our community experts:
Browse all: Cleaning and Detailing
- How to restore your headlights
Step by step instructions for do-it-yourselfers.
Browse all: Cleaning and Detailing

No Low Beam Headlights
01-12-2013, 01:11 PM
#81
6th Gear


Member Since: Dec 2012
Posts: 6
Likes: 0
Received 0 Likes
on
0 Posts
I have been pretty much been avoiding night time driving, as I have not had time to go out and get a new fuse box installed.
Has anyone contacted General Motors directly? This is definitely a hazard and should be on their recall list, at least the should have a TSB...
My car only has 45K miles on it, sadly even at this low mileage I have the infamous low beam problem.
Has anyone contacted General Motors directly? This is definitely a hazard and should be on their recall list, at least the should have a TSB...
My car only has 45K miles on it, sadly even at this low mileage I have the infamous low beam problem.
 01-13-2013, 11:13 PM
#82
Instructor
I'm in the same boat...no low beams.
Dealership said everything in the fuse box was fine and they would have to remove the front bumper and fenders to get the headlights out to try those. Worst case scenario, replace both ballasts...Parts and Labor to the tune of $1065.
I'll hand it back over to them tomorrow to take apart. I'll keep this thread posted. I almost wish it was as simple as a fuse box for me.
01-28-2013, 10:55 PM
#83
Heel & Toe

Hi everyone!
I have had a low beam problem on my car since I bought it. Dealer tried to fix it before shipping it to me (by replacing a relay) and that did of course not work. After much back and forth arguing who's paying for what I decided to fix it myself.
First, a huuuuuge thank you to racerxr (Tom) here on the forum. Thanks for locating the problem and figuring out how to fix it as well as providing excellent descriptions and pictures via email! The wire was broken in EXACTLY the spot that you pointed out!
Yesterday me and my awesome girlfriend set out to fix the fuse box! We ended up following Tom's instructions for the most part with a few modifications. I have written a short step-by-step guide for how we fixed the problem. This is to further clarify how this CAN be done (this is by NO means the perfect solution) to those who are still wondering to fix it yourself or not. It was a pretty straight forward job, and absolutely well worth 1000 $
Take the fuse box out of the car. Very simple:
1. Disconnect the battery and the power cable that connects to the fuse box
2. Press the plastic clips that attaches the main part of the fuse box and pop it out
3. Unscrew the four metal bolts and knock on them so that each of the four blocks fall out
4. You're DONE
Disassemble the fuse box
1. Pull out all fuses and relays
2. Use a needle nose plier and un-swedge the metal sleeves that hold the two layers together.
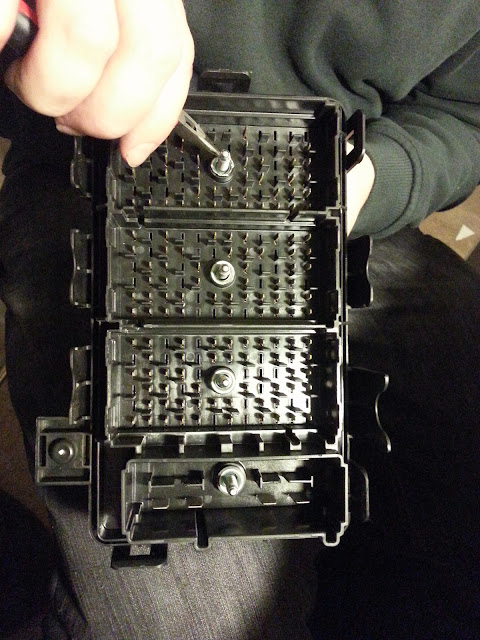

3. When un-swedged enoug, knock the bolts through the box so that it can be disassembled. I messed up the bolts so badly (bad needle nose pliers) during the un-swedging that I decided to cut the metal sleeves surrounding the bolts (see picture) so that they don't interfere. The sleeves are not needed as their only purpose is to keep you from opening the fusebox. When the box is in the car, it is held in place by the four bolts and the four block modules.

Replacing the broken wire
1. Get some 20 gauge copper wire. I bought some at Homedepot for 7 $

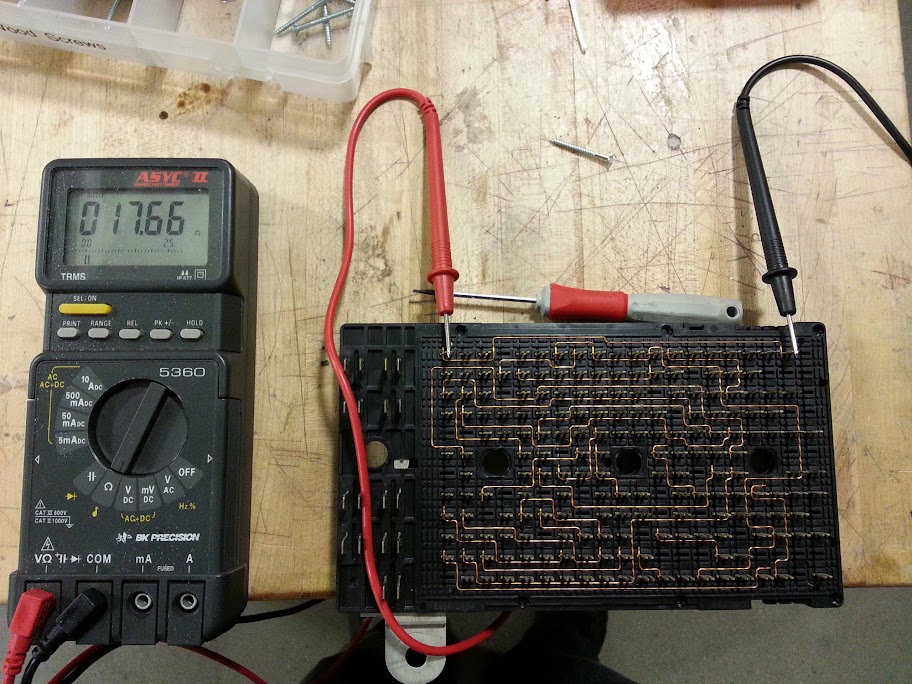
2. Find the broken broken wire and remove it. When you manage to open the fusebox, the broken wire is on the other side.

Very bad conductivity.
3. Replace the wire. As Tom suggested, I added a backup wire on the other side as well. So in case the wire breaks again there is a backup on the other side. I also removed some of the plastic guiding with a razor so that the copper wire can have nicer bends.

Backup wire on the back side

Put everything back together and drive after dark!
When putting the fusebox back together, simply align the four block modules and place the box on top of them (without the bolts in place). Then see through the bolt holes so that you make sure that they are sentered. Enter the bolts and screw in place each of the modules till each bolt is tightened. Check visually afterwards if all the blocks are in place.

edit: Link to the picasa album: https://picasaweb.google.com/1062290...FixCorvetteC6#
Thanks Tom!
I have had a low beam problem on my car since I bought it. Dealer tried to fix it before shipping it to me (by replacing a relay) and that did of course not work. After much back and forth arguing who's paying for what I decided to fix it myself.
First, a huuuuuge thank you to racerxr (Tom) here on the forum. Thanks for locating the problem and figuring out how to fix it as well as providing excellent descriptions and pictures via email! The wire was broken in EXACTLY the spot that you pointed out!
Yesterday me and my awesome girlfriend set out to fix the fuse box! We ended up following Tom's instructions for the most part with a few modifications. I have written a short step-by-step guide for how we fixed the problem. This is to further clarify how this CAN be done (this is by NO means the perfect solution) to those who are still wondering to fix it yourself or not. It was a pretty straight forward job, and absolutely well worth 1000 $
Take the fuse box out of the car. Very simple:
1. Disconnect the battery and the power cable that connects to the fuse box
2. Press the plastic clips that attaches the main part of the fuse box and pop it out
3. Unscrew the four metal bolts and knock on them so that each of the four blocks fall out
4. You're DONE
Disassemble the fuse box
1. Pull out all fuses and relays
2. Use a needle nose plier and un-swedge the metal sleeves that hold the two layers together.
3. When un-swedged enoug, knock the bolts through the box so that it can be disassembled. I messed up the bolts so badly (bad needle nose pliers) during the un-swedging that I decided to cut the metal sleeves surrounding the bolts (see picture) so that they don't interfere. The sleeves are not needed as their only purpose is to keep you from opening the fusebox. When the box is in the car, it is held in place by the four bolts and the four block modules.
Replacing the broken wire
1. Get some 20 gauge copper wire. I bought some at Homedepot for 7 $
2. Find the broken broken wire and remove it. When you manage to open the fusebox, the broken wire is on the other side.
Very bad conductivity.
3. Replace the wire. As Tom suggested, I added a backup wire on the other side as well. So in case the wire breaks again there is a backup on the other side. I also removed some of the plastic guiding with a razor so that the copper wire can have nicer bends.
Backup wire on the back side
Put everything back together and drive after dark!
When putting the fusebox back together, simply align the four block modules and place the box on top of them (without the bolts in place). Then see through the bolt holes so that you make sure that they are sentered. Enter the bolts and screw in place each of the modules till each bolt is tightened. Check visually afterwards if all the blocks are in place.
edit: Link to the picasa album: https://picasaweb.google.com/1062290...FixCorvetteC6#
Thanks Tom!
Last edited by SenseofTouch; 01-29-2013 at 12:49 AM.
The following 6 users liked this post by SenseofTouch:
C5forFun (10-29-2016),
C6LS3 (10-28-2016),
fred_S (06-09-2022),
LatinHeat33 (04-08-2022),
ReVetter (12-07-2017),
and 1 others liked this post.
01-29-2013, 03:31 AM
#84
6th Gear
Member Since: Dec 2012
Posts: 6
Likes: 0
Received 0 Likes
on
0 Posts
This is what I'm talking about!
Thank you for putting up this simple write-up and fix, and most definitely thank you to Tom for being the Grand Daddy of this fix!
This makes life easier!
If you ever get a problem with your oil sending unit, please make sure to do the same kind of write up!
Thank you for putting up this simple write-up and fix, and most definitely thank you to Tom for being the Grand Daddy of this fix!
This makes life easier!
If you ever get a problem with your oil sending unit, please make sure to do the same kind of write up!
01-29-2013, 07:08 PM
#85
Heel & Toe
No problem
I feel that I have been wanting this kind of write-up myself, so the least I could do was to make one when I was fixing the problem.
I think it's especially important to have good guides on problems like this. More or less all Corvettes will eventually encounter this problem (mine has only 54k miles on it) and I think it is a shame that people might end up paying 1000 $ + to fix (and that's a temporary fix!) the problem at a workshop.
I went to the workshop to hear how much it would cost. 165 $ for diagnostic (which I have to have them run), 510 $ for a fuse box + work. That will be around 1000 $ IF they find the problem on the first attempt...
02-01-2013, 12:17 AM
#86
Instructor
A BIG thank you to all the contributors!
I was just about to order new bulbs when I thought I should check CF. Sure enough I'm not alone! Both lights just started to go yesterday. Tonight they worked, so I know it's just a matter of time.
I've got an '05 with 69K miles.
Questions:
Should I quit running my headlights during the day (after this fix)?
Also, what does "un-swedge" mean, or is that self-explanatory once I get a look at the bolts?
Last edited by JonnyJett; 02-01-2013 at 12:23 AM.
02-01-2013, 02:25 AM
#87
Heel & Toe
Not sure why you would not run the headlights during the day after the fix. After the fix everything works like it should. I have them on auto all the time 
About the un-swedging, I really don't know what it means either, since I'm not a native English speaker I just re-used the word that was used on earlier occasions
You'll see when you open the fuse box. There's a metal sleeve that runs through the box that keeps it from opening. The bolt is inside this metal sleeve. To get the bolts (and the sleeve) out you need to take a plier and bend the metal edge/fold (on the side of the box where the threads for the bolt are) so that you are able to knock the sleeve and the bolt through the plastic hole. Kind of hard to explain but everything makes sense when you have the box in front of you
02-01-2013, 03:03 AM
#88
Team Owner


I have close to 48,000 miles now on 2005 Corvette ordered from factory. I have not experienced this problem. When I am in my own garage which is pitch black I make sure headlights do not come on because as soon as I pull out into the street the lights will turn off so I stopped the low beams from going on and off on a regular basis. I don't know if this helps or prevents a problem like this. Maybe less usage = longer life less problems?
02-01-2013, 07:00 AM
#90
Melting Slicks

Mine is doing the same thing. Untill I can acquire a new fuse block, I just ran a jumper wire from the ground on the parking light relay to the ground on the low beam relay.
The lights come on with the parking lights now.
Once I get a doner fuse block I will disect it and see if I can correct the ground wire going the the low beam relay.
The lights come on with the parking lights now.
Once I get a doner fuse block I will disect it and see if I can correct the ground wire going the the low beam relay.
02-02-2013, 07:24 PM
#91
Instructor
2. Press the plastic clips that attaches the main part of the fuse box and pop it out
I'm not sure what this means. I did step #1: battery disconnected. I pulled on the 4 clips and unseated it from housing, and now I don't know what to do next. I don't know how to "pop out" the base of the fuse box that has the pink grey and black sections.
I'm not sure what this means. I did step #1: battery disconnected. I pulled on the 4 clips and unseated it from housing, and now I don't know what to do next. I don't know how to "pop out" the base of the fuse box that has the pink grey and black sections.
02-02-2013, 07:39 PM
#92
Instructor
2. Press the plastic clips that attaches the main part of the fuse box and pop it out
I'm not sure what this means. I did step #1: battery disconnected. I pulled on the 4 clips and unseated it from housing, and now I don't know what to do next. I don't know how to "pop out" the base of the fuse box that has the pink grey and black sections.
I'm not sure what this means. I did step #1: battery disconnected. I pulled on the 4 clips and unseated it from housing, and now I don't know what to do next. I don't know how to "pop out" the base of the fuse box that has the pink grey and black sections.
02-02-2013, 10:51 PM
#93
Instructor
So THIS stuff worked. I got 25 feet of it for $4 from Frys.
Took me 3 hours total. The de-swedging was easy. All I did was crimp up the lip. It was laying down the wiring that took the most time. And I did lay a back-up down. Once that was done, it only took about 15min to put it back together.
Again, thanks for all the instructions and advice!
So 3 weeks ago it was a leaky brake line. Last weekend it was a cracked radiator. What's up for next weekend?! Hopefully the Vette will give me a break
02-03-2013, 02:10 PM
#95
Team Owner

 02-03-2013, 04:20 PM
#96
Melting Slicks
Sure that is true, But if you are diving deep into this problem, you must do it with a multi-meter.
Testing each related fuse should be at the top of the troubleshooting list.
My first goal when troubleshooting this was to get headlights working.
Once I have a fix which would allow me to drive in the dark, then I needed to find what was bad.
From testing the circuits, I found that the ground on my headlight relay was bad.
I pulled the block off, but I didn't see and easy/quick fix.
SenseofTouch did an excellent job of descibing the problem and fix.
So now I personally am more comfortable pulling my fuse block apart to fix it.
My 20 guage wire is on order as we speak.
I wish GM would have made the block a bit easier to come apart.
02-10-2013, 03:50 PM
#97

Well senseoftouch you beat me to it. Thats a good thing though I have a lot on my plate right now. Is anyone a Family Law Attorney? If I could clarify one thing, this is a situation where G.M. just didn't get it right, but everytime I stand on the gas on a nice cool day I forgive them. This is an easy and permament repair and with the installation of the second back up wire on the other side and removing the tiny plastic guides so there is no longer a 90 degree bend, you will never experience it again. Thanks for showing the roll of Bell wire at Home Depot. Many of the questions I recieved were "What is Bell wire?" Its just what they call SOLID copper wire of that size. I think it came from the fact that its the type of wire that they would run from the Door "Bell" Button on your front porch to the Door "Bells" somewhere in a closet in your house. They also use it for garage door openers but you need to make sure it is 20 gauge or .030-.031 in diameter. They also sell 22 gauge that is not what you want it will be around .025. Like senseoftouch said everything becomes very clear once you get into it. I also want to point out that NOTHING falls out on the floor when you turn it over and you cannot put the relays in wrong they will not fit any other way than the right way and the fuse size and location is on the cover and in your owners manual or you could just take a picture. Be well my friends and make sure you keep an eye on your bank records if your wife is doing your banking. Tom
02-10-2013, 04:07 PM
#98
Instructor
You're right Racerxr. Bell wire is copper wire that isn't tinned. Usually you don't need to solder wire to a door bell. I believe you just wrap it around a screw. And you'll notice the color of the wire is copper. They also sell tinned copper wire, and the color is silver. Tinned copper wire is for soldering as the tinning makes it easier to solder. Either one will work. Tinned copper wire tends to be cheaper and easier to find. I'm using tinned copper wire and there's no degradation in conductivity or performance.
And yeah, I hear you Racerxr, I got lucky...we had separate bank accounts and hadn't gotten around to merging them. Good luck and remember, from here on out "it's just business".
And yeah, I hear you Racerxr, I got lucky...we had separate bank accounts and hadn't gotten around to merging them. Good luck and remember, from here on out "it's just business".
Last edited by JonnyJett; 02-10-2013 at 04:17 PM.
02-11-2013, 10:58 AM
#100
Melting Slicks
I just knocked mine out in about and hour and a half.
It looked like I had some moisture in there.
I ended up replacing several wires, just because they looked like they were going next.
Everything is all pretty and sparkly clean now.
It looked like I had some moisture in there.
I ended up replacing several wires, just because they looked like they were going next.
Everything is all pretty and sparkly clean now.